


-
13
-
Model No.: VCR-S407
Version: 1.0
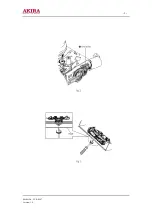
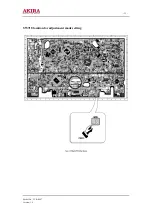
ACE Head Position (X-Point) Adjustment
(See the ACE Head Position (X-Point) Adjustment on the Mechanical Manual)
1 Playback the alignment tape (Color bar).
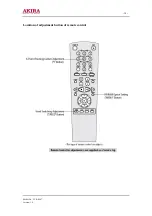
2 Press the “TEST” button on Main PCB to set the adjustment mode. (See Fig. 2-2)
3 Press the “5” button of remote control then adjustment is operated automatically. (See Fig. 2-1)
4 Connect the CH-1 probe to TP301 (Envelope) the CH-2 probe to TP602 (H’D switching pulse) and
then trigger to CH-1.
5 Insert the (-) driver into the X-Point adjustment hole and adjust it so that envelope waveform is
maximum.
6
Turn the Power off.
Head Switching Point Adjustment
1. Playback the alignment tape.
2. Press the “TEST” button on Main PCB to set the adjustment mode. (See Fig. 2-2)
3. Press the “SPEED” button of remote control then adjustment is operated automatically. (See Fig.
2-1)
4. Turn the Power off.
NVRAM Option Setting
1. NVRAM Option is a adjusted in the factory.
2.
In case Micom (IC601) and NVRAM (IC605 ; EEPROM) are replaced, be sure to set the
corresponding option number of the repaired model. (If the option is not set, the unit will not
operate.)
1. Press the “TEST” button on Main PCB to set the adjustment mode. (See Fig. 2-2)
2. Press the “MENU” button on the remote control about 5 seconds then option setting display is
appeared. (See Fig. 2-4)
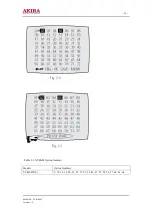
3. Select the option number (See Table 2-1) of corresponding model with “CURSOR” button on the
remote control.
4. After selecting the option number is completed, press the “OK” button of remote control.
(If “OK” button is pressed, the selected number is changes color; See Fig. 2-4)
5. Press the “MENU” button of remote control again to store the option number.
(“PLEASE WAIT” is displayed for a second as shown Fig. 2-5 and this setting is completed.)
6. Turn the Power off.
Содержание VCR-S407
Страница 1: ...Video Cassette Recorder Service Manual...
Страница 2: ...2 Model No VCR S407 Version 1 0 MODEL VCR S407...
Страница 5: ...5 Model No VCR S407 Version 1 0...
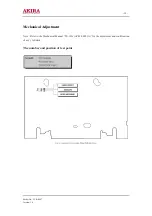
Страница 10: ...10 Model No VCR S407 Version 1 0 Location of adjustment button of remote control...
Страница 11: ...11 Model No VCR S407 Version 1 0 SW718 location for adjustment mode setting...
Страница 15: ...15 Model No VCR S407 Version 1 0 CABINET ASSEMBLY...
Страница 17: ...17 Model No VCR S407 Version 1 0...
Страница 35: ...35 Model No VCR S407 Version 1 0...
Страница 36: ...36 Model No VCR S407 Version 1 0 S M P S...
Страница 37: ...37 Model No VCR S407 Version 1 0 POWER DRIVE...
Страница 39: ...39 Model No VCR S407 Version 1 0 AUDIO VIDEO...
Страница 40: ...40 Model No VCR S407 Version 1 0 HI FI OPTION...
Страница 41: ...41 Model No VCR S407 Version 1 0 TM...
Страница 42: ...42 Model No VCR S407 Version 1 0 INPUT OUTPUT...
Страница 43: ...43 Model No VCR S407 Version 1 0 SUB...
Страница 44: ......


