5
PARTS NAME
Model No.: AC-S13CEGVI.doc Version: 1.0
Все каталоги и инструкции здесь:
http
:
//splitoff.ru/tehn-doc.html
Страница 1: ...Air Conditioner Service Manual Большая библиотека технической документации http splitoff ru tehn doc html каталоги инструкции сервисные мануалы схемы ...
Страница 2: ...2 MODEL AC S13CEGV1 Model No AC S13CEGVI doc Version 1 0 Все каталоги и инструкции здесь http splitoff ru tehn doc html ...
Страница 3: ... UNIT 6 DISASSEMBLY PROCEDURES OF OUTDOOR UNIT 11 FAILURE AND ANALYSIS 15 EXPLODED VIEW OF INDOOR UNIT 18 PART LIST 19 EXPLODED VIEW OF OUTDOOR UNIT 20 PART LIST 21 CIRCUIT DIAGRAM 22 Model No AC S13CEGVI doc Version 1 0 Все каталоги и инструкции здесь http splitoff ru tehn doc html ...
Страница 4: ... 830X285X189 Package dimensions W D H mm 875X378X266 Indoor side Net weight Gross weight kg 11 14 Rated power A 1020 Rated current A 4 73 Throttling method Capillary Compressor type Rotary Starting method Capacitor starting Working temperature T1 18 43 C Condenser Love water film aluminum film Pipe diameter Φ9 52 Row No fin distance mm 2 1 4 Working area m2 0 33 Fan motor power W speed rpm 48 900 ...
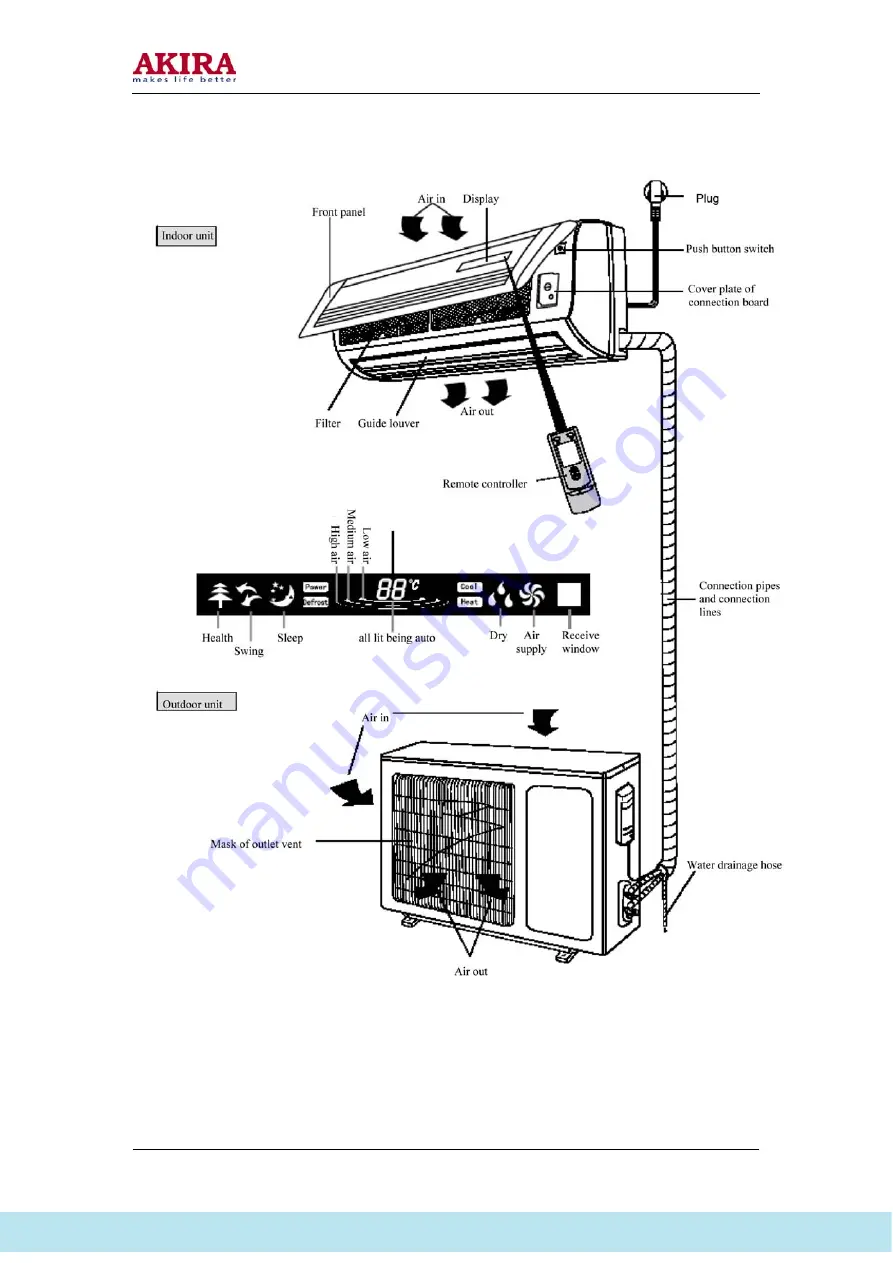
Страница 5: ...5 PARTS NAME Model No AC S13CEGVI doc Version 1 0 Все каталоги и инструкции здесь http splitoff ru tehn doc html ...
Страница 6: ...ong the groove fixing the panel of the panel body to remove the as shown in Fig A isassemble filter d and then upward to remove the filter as shown in Fig A 1 isassemble the guide louver ovable lock of guide louver is released to remove the guide louver as Fig A D Push the filter inwar Fig A 1 D Bend the guide louver so that the m shown in Fig A 2 Fig A 2 Model No AC S13CEGVI doc Version 1 0 Все к...
Страница 7: ...ter tray Screw off the fixing screws fixing the water tray with a screwdriver and pull out the terminal board of the step motor Pull upwards the water tray Remove the water tray as shown in Fig A 4 Fig A 4 Disassemble electric box Open three movable latches with hand and then pull them upward to remove the cover of electric box as shown in Fig A 5 Fig A 5 Model No AC S13CEGVI doc Version 1 0 Все к...
Страница 8: ...tor The lower rear clamp plate can be removed by just screwing off one screw with a screwdriver Screw off two screws at both left right sides of the evaporator and take out the evaporator with hand so that the sideboard catch of the evaporator is disengaged from the groove Remove the evaporator carefully and take care to protect the connection pipe as shown in Fig A 7 A 8 A 9 Fig A 7 Fig A 8 Fig A...
Страница 9: ...plate with a screwdriver and remove the pressure plate Screw off the three fixing screws at the axle sleeve and remove the motor as shown in Fig A 10 A 11 Fig A 11 Fig A 10 Model No AC S13CEGVI doc Version 1 0 Все каталоги и инструкции здесь http splitoff ru tehn doc html ...
Страница 10: ...s case the cross flow fan can be removed as shown in Fig A 12 uxiliary electric heater heating units heater with a screwdriver as shown in Fig A 13 Fig A 12 A Note only existing in cooling Screw off 2 screws fixing the auxiliary electric Fig A 13 Model No AC S13CEGVI doc Version 1 0 Все каталоги и инструкции здесь http splitoff ru tehn doc html ...
Страница 11: ...n Fig B Fig B Remove the net cover Screw off 4 taping screws at the rear sideboard and the valve frame bottom plate and condenser sideboard Remove the net cover as shown in Fig B 1 Fig B 1 Disassemble panel assembly Screw off 5 screws at the rear sideboard and the valve frame bottom plate and the condenser sideboard Remove the front panel assemble as shown in Fig B 2 Fig B 2 Model No AC S13CEGVI d...
Страница 12: ...oard as shown in Fig B 3 isassemble right side plate assembly te to remove the right side plate assembly as shown in Fig B 4 isassemble right side plate assembly ate to remove the right side plate assembly as shown in Fig B 5 Fig B 3 D Screw off the 5 screws at the rear side pla Fig B 4 D Screw off the 5 screws at the rear side pl Fig B 5 Model No AC S13CEGVI doc Version 1 0 Все каталоги и инструк...
Страница 13: ...r off the 4 soldering points of 4 way valve remove the 4 way valve It is recommended to solder as quickly as possible and the cotton gauze should always be wet Make sure not to burn the leads of compressor as shown in Fig B 7 Remarks prior to disassembling any pipe component or compressor it should be sure that no cooling refrigerant left inside any more Fig B 7 Disassemble liquid divider assembly...
Страница 14: ...ewed bolts fixing the small valve and solder off the soldering point connecting the small valve and the cross type pipe Remove the small valve as shown in Fig B 9 Disasse Screw Remarks requiring drainage of cooling refrig scharging pipes for the compressor and rem on Fig B 10 mble the compressor off the 3 washer nuts at the bottom legs of the comp erant first Solder off all the soldering points of...
Страница 15: ...15 FAILURE AND ANALYSIS Model No AC S13CEGVI doc Version 1 0 Все каталоги и инструкции здесь http splitoff ru tehn doc html ...
Страница 16: ...16 Model No AC S13CEGVI doc Version 1 0 Все каталоги и инструкции здесь http splitoff ru tehn doc html ...
Страница 17: ...17 Model No AC S13CEGVI doc Version 1 0 Все каталоги и инструкции здесь http splitoff ru tehn doc html ...
Страница 18: ...18 Model No AC S13CEGVI doc Version 1 0 EXPLODED VIEW OF INDOOR UNIT Все каталоги и инструкции здесь http splitoff ru tehn doc html ...
Страница 19: ... Filter 111224442 2 19 Front Case 20002301 1 20 Little Front Panel 1 20002305 1 21 Remote Control Y512SB 30515037 1 22 Display Board 5253F 305452081 1 23 Guide Louver up 10512050 1 24 Guide Louver down 10512052 1 25 Stepping Motor MP24GA 15212102 1 26 Drain Pan Ass y Stuff 76712005 1 27 Electric Heater 600W 28 Right Motor Clamp 26112429 1 29 Motor Bearing Holder 26152423 1 30 Motor FN8H 15012051 1...
Страница 20: ...20 EXPLODED VIEW OF OUTDOOR UNIT Model No AC S13CEGVI doc Version 1 0 Все каталоги и инструкции здесь http splitoff ru tehn doc html ...
Страница 21: ...010027 1 13 Terminal Board 3M T386A 42011241 1 14 Rear Grill 01473030 1 15 Top Cover Plate 01253443 1 16 Condenser Ass y 01133063 1 17 Motor Support 01703391 1 18 Motor FW48G 15013066 1 19 Self threading Screw ST4 8x13 70140259 4 20 Axial Flow Fan 10333413 1 21 Washer 6 70410252 1 22 Nut with Washer M6 70310131 1 23 Front Plate 015330121 1 24 Front Grill 22413431 1 25 Base Plate 01213429 1 26 Clap...
Страница 22: ...22 C C CI I IR R RC C CU U UI I IT T T 22 Model No AC S13CEGVI doc Version 1 0 DIAGRAM Model No AC S13CEGVI doc Version 1 0 Все каталоги и инструкции здесь http splitoff ru tehn doc html ...
Страница 23: ...Большая библиотека технической документации http splitoff ru tehn doc html каталоги инструкции сервисные мануалы схемы ...