background image

AKG Technology, Inc. (

http://www.akgtech.com

)


Tele:

(909)967-5572; 

Fax:

 (909) 580-8228; 

Email:

 [email protected]   

Mailing Address: 1225 Benito Avenue, #M, Alhambra, CA 91803, U. S. A.


4 - 11                                                                                LCD Open frame SAW Touch Monitor 


spaced at 75mm and 100mm standard. 

NOTE: Do not penetrate the M4 screw into the monitor more than 5mm. 


2.4 Attaching the L-Brackets 


To attach the L-brackets: 
1    Lay the monitor face down. 
2    Place the long end of the L-bracket against the side of touch monitor. Line up the two 
holes of the L-bracket with the two holes of the touch monitor.     
3    Place two M4 screws in the holes and with the screwdriver; screw them in to secure the 
bracket.  
4    Repeat steps 2 and 3 to attach the other L-bracket to the other side of the touch monitor. 

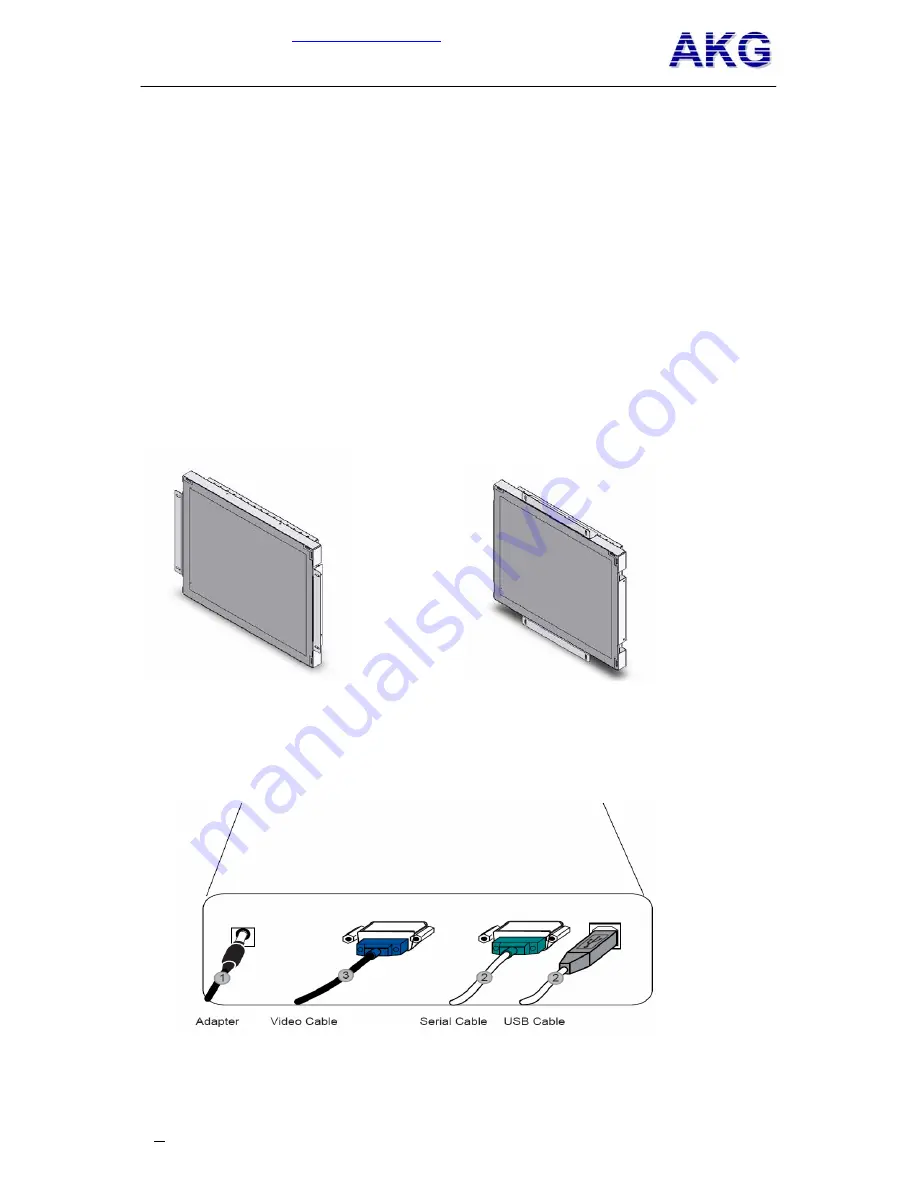
NOTE: The way to attach the L-brackets has two options, See the illustration below: 


Option 1                                                               Option 2 


L-brackets to the left and right sides                            L-brackets to the up and down sides


2.5 Interface Connection 

Note: Before connecting the cables to your touch monitor and PC, be sure that the 
computer and touch monitor are turned off. 


1.    Connect one end of either the 

serial (RS232) cabl

e or the 

USB cable

 (but not both) to the 

rear side of the computer and the other end to the LCD monitor. Tighten by turning the two 
thumb screws clockwise to ensure proper grounding (USB cable does not have thumb 
screws). 

Содержание KOT-0190US-SA4B

Страница 1: ...nd Setup 2 2 1 Unpacking Your Touch monitor 2 2 Product Overview 2 3 VESA Mounting Interface 2 4 Attaching the L bracket 2 5 Interface Connection 2 6 Installing the Driver Software and Calibration 2 6 1 Installing the Driver Software 2 6 2 Calibration Chapter 3 Operation 7 3 1 About Touch monitor Adjustments 3 1 1 Rear Panel Controls 3 2 Controls and Adjustment 3 2 1 On Screen Display OSD Menu Fun...

Страница 2: ... frame touch monitor is a 19 SXGA TFT color display with the following features Long lasting product cycle enclosure controlled by KeeTouch specifications Future generation panels phased in without external changes High quality panel with high brightness high contrast ratio and broad viewing angle Multiple mounting options including VESA mount horizontal or vertical bracket mount KeeTouch s SAW te...

Страница 3: ...e or One USB cable One Power cable US Canada 2 2 Product Overview Mechanical Dimensions unit in mm 2 3 VESA Mounting Interface Your touch monitor conforms to the VESA Flat Panel Monitor Physical Mounting Interface FPMPMITM Standard which defines a physical mounting interface for flat panel monitors and corresponding standards for flat panel monitor mounting devices such as wall and table arms Your...

Страница 4: ...ws in the holes and with the screwdriver screw them in to secure the bracket 4 Repeat steps 2 and 3 to attach the other L bracket to the other side of the touch monitor NOTE The way to attach the L brackets has two options See the illustration below Option 1 Option 2 L brackets to the left and right sides L brackets to the up and down sides 2 5 Interface Connection Note Before connecting the cable...

Страница 5: ... downloaded from KeeTouch Driver CD developed by Touch base Windows 2000 for both home version professional version Windows XP for both home version professional version Windows Vista for both home version professional version 2 6 2 Drivers Supply from Technical Support email developed by KeeTouch Windows XP embedded Linux Your KeeTouch touch monitor is Plug and Play compliant Information on the v...

Страница 6: ...ment Variations in video output and application may require adjustments to your touch monitor to optimize the quality of the display For best performance your touch monitor should be operating in native resolution that is 1280 1024 at 80k 75 Hz Use the Display control panel in Windows to choose 1280 1024 resolution Operating in other resolutions will degrade video performance For further informati...

Страница 7: ...splay OSD Menu Functions To Display and Select the OSD Functions 1 Press the Menu key to activate the OSD menu 2 Use or to move through the menu Press the Menu key the parameter will be highlighted when selected 3 To quit the OSD screen at any time during the operation press the AUTO key NOTE If no keys are pressed for a short time period the OSD automatically disappears 3 2 2 Power Management Sys...

Страница 8: ...the monitor off then turn it on again Out of Range display Check to see if the resolution of your computer is higher than that of the LCD display Reconfigure the resolution of your computer to make it is less than or equal to 1024 768 See Appendix A for more information on resolution Touch doesn t work Make sure the touch cable is securely attached at both ends Chapter 5 5 NATIVE RESOLUTION The na...

Страница 9: ... your new touch monitor read through this manual especially Chapter 2 Installation and Chapter 3 Operation 1 To reduce the risk of electric shock follow all safety notices and never open the touch monitor case 2 Turn off the product before cleaning 3 The socket outlet shall be installed near the equipment and shall be easily accessible 4 The slots located on the sides and top of the touch monitor ...

Страница 10: ... up down 75 60 Contrast Ratio Typical 700 1 Video Input Analog RGB Signal Input H V Separate Sync TTL Video Signal Input Connector Mini D Sub 15 pin VGA Frequency H V 30 80KHz 60 75Hz Power Supply Type External brick Input line voltage 100 240 VAC 50 60 Hz Output voltage current 12 volts at 4 amps max Operating Temp 0 50 C Storage Temp 20 60 C Operating RH 20 80 Environment Storage RH 10 90 MTBF 5...

Страница 11: ...mbra CA 91803 U S A 11 11 LCD Open frame SAW Touch Monitor Touch Response time 9ms Agency Approval ETL FCC CE RoHS Regular Warranty 5 years for SAW Sensor 3 years for controller 1 year for LCD NOTE Our current LCD panel is made by one of the largest Chinese LCD panel manufacture BOE www boe com cn and SVA NEC www sva nec com english index html ...

Отзывы: