background image

3

General Safety Instructions (Cont.)

Installation

•  Install the washing machine on a flat surface to avoid overturning during use.
•  If the machine must be placed on carpet, make sure the ventilation openings in the 

base are not obstructed. 

•  Connect the washing machine to the water mains using new hose sets. Do not 

reuse old hose sets.

•  Make sure that all water and electrical connections are made by qualified personnel 

only, observing the manufacturer’s instructions (see “Getting Started: Installation” on 
pages 10 to 13) and local safety regulations.

•  Improper installation may result in the risk of fire, electric shock and/or injury.
•  We assume no liability for any eventual damages caused by improper or faulty use. 

Usage conditions and restrictions

•  The appliance is designed for home use only. 
•  Do not operate the appliance outdoors.
•  This appliance is not intended for use by persons (including children) with reduced 

physical, sensory or mental capabilities, or lack of experience and knowledge, 
unless they have been given supervision or instruction concerning use of the 
appliance by a person responsible for their safety. 

•  Young children should be supervised to ensure they do not play with the appliance.
•  Before loading the washing machine, always ensure no pet or young child has 

climbed into it.

•  Make sure all pockets of clothing to be washed are empty. Hard, sharp objects 

such as coins, safety pins, bra wires, nails, screws or stones can cause extensive 
damage to the appliance and block the pump.

•  Any damage or malfunction resulting from foreign objects is not covered by your 

warranty and may lead to expensive repairs.

•  We assume no liability for any eventual damages caused by improper or faulty use.

Cleaning and maintenance

•  Before cleaning or carrying out maintenance, always unplug the appliance from the  

power supply.

•  Except for the filters that require regular cleaning, the unit has no user-serviceable 

parts contained within. Do not attempt to repair, disassemble or modify it. Repairs 
made by inexperienced or unqualified persons may cause injury and/or make more 
serious repairs to the appliance necessary.

•  CAUTION:  

After each wash, check and clean the lint filter inside the drum. Also 
check and clean the lint filter at the back of the machine next to the 
drain hose outlet on a regular basis.

•   This appliance should only be serviced by an authorised service centre, and only 

genuine spare parts should be used. Contact the after sales support line for advice.

Содержание XQB100-Y1066S

Страница 1: ...XQB100 Y1066S N13275 9kg Top Load Washing Machine Instruction Manual AFTER SALES SUPPORT NZ 0800 836 761 ...

Страница 2: ... precautions and accident prevention measures when using an electrical appliance including the following Electrical safety Before connecting and turning on the washing machine ensure the electrical voltage and circuit frequency correspond to those indicated on the appliance Only connect the washing machine to a grounded earthed electrical outlet Do not insert any objects into the appliance Do not ...

Страница 3: ...n should be supervised to ensure they do not play with the appliance Before loading the washing machine always ensure no pet or young child has climbed into it Make sure all pockets of clothing to be washed are empty Hard sharp objects such as coins safety pins bra wires nails screws or stones can cause extensive damage to the appliance and block the pump Any damage or malfunction resulting from f...

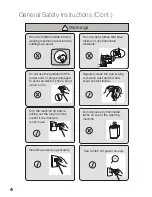
Страница 4: ...appliance if the power cord or plug is damaged to avoid an electric shock short circuit or fire Regularly clean the power plug to remove dust and dirt and avoid contact failure Turn the machine off before pulling out the plug from the socket if the machine is not in use Do not place any flammable items on top of the washing machine Insert the power plug securely Warnings Use a 240V AC power source...

Страница 5: ...lug Do not wash jackets raincoats fishing coats and similar clothes in the washing machine Do not allow children to lay or sit on top of the washing machine The water temperature should not exceed 60 C when washing with warm water Cautions Do not pull out or insert the plug with wet hands to avoid electric shock No wet hands To avoid electric shock fire and malfunction do not install this machine ...

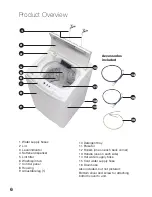
Страница 6: ...tub 7 Control panel 8 Housing 9 Adjustable leg 1 2 1 7 5 6 4 8 9 12 11 10 16 15 14 10 Detergent tray 11 Pulsator 12 Rollers one on each back corner 13 Handle one on each side 14 Hot water supply hose 15 Cold water supply hose 16 Drain hose Also included but not pictured Bottom cover and screw for attaching bottom cover to unit 3 13 ...

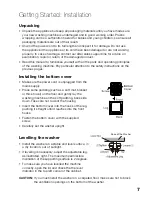
Страница 7: ...ling the washer Install the washer on a stable and level surface in a dry location out of sunlight If levelling is necessary adjust the adjustable leg as illustrated right The maximum permissible inclination of the supporting surface is 2 degrees To make sure you have levelled the machine correctly open the lid and check the the level indicator in the top left corner of the cabinet CAUTION If you ...

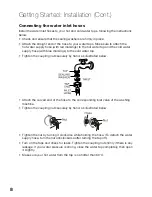
Страница 8: ...e cold water tap Tighten the coupling nuts securely by hand as illustrated below Attach the curved end of the hose to the corresponding inlet valve of the washing machine Tighten the coupling nuts securely by hand as illustrated below Tighten the nut by turning it clockwise while holding the hose To detach the water supply hose turn the nut anticlockwise after turning the tap off Turn on the taps ...

Страница 9: ...e evenly and do not twist the water inlet valve CAUTION Use only the new supplied hoses with your new appliance Do not use a hose from an existing machine or one that has been used previously CAUTION In the event that the hoses are too short for your set up please seek advice from your local washing machine store to purchase a longer hose ...

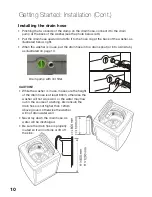
Страница 10: ...ay down the drain hose as water will be discharged Be sure the drain hose is properly routed so it will not kink or lift off the sink Pinching the two bands of the clamp on the drain hose connect it to the drain pump at the back of the washer see the photo below left Pull the drain hose upward and affix it to the hose clip at the back of the washer as illustrated below right When the washer is in ...

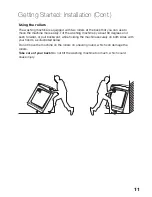
Страница 11: ...e more easily Tilt the washing machine by about 30 degrees and push forward or pull backward while holding the machine securely on both sides with your hands as illustrated below Do not move the machine on the rollers on uneven ground which can damage the rollers Take care of your back Do not tilt the washing machine too much which could cause injury ...

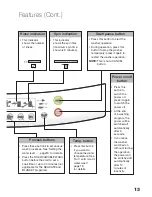
Страница 12: ...time during washing Press this button to preset the finish time of the washing not applicable for the DELICATE program To select or cancel the ULTRA SONIC function press and hold the button until the ULTRASONIC light is on or off This indicator shows during presetting when the washing will be finished When abnormal conditions occur an error warning will appear here When setting soak and wash proce...

Страница 13: ...ess this button to start the washer operation During operation press this button to stop the washer temporarily press it again to restart the washer operation NOTE This is not a CANCEL button This indicator shows the number of rinses Press this button if you want to choose the water temperature See Hot cold warm water wash page 19 for details This indicator shows the spin time maximum spin time sh...

Страница 14: ...f clothes and turn pockets inside out 2 Sort your washing into appropriate loads whites coloureds cottons delicates heavily soiled etc Place delicate items into a wash bag for protection On the back Install the drain hose at a height of 80 120cm to prevent water drain age and overflowing problems A B D C E 3 Put your washing in the machine loading items uniformly in the tub 4 Add washing detergent...

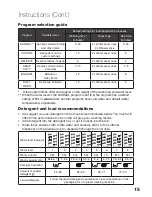
Страница 15: ... set to 8 the program has a default setting of 90L of warm water all other programs have cold water as a default water temperature is adjustable Detergent and load recommendations We suggest you use detergent in the amounts recommended below Too much will affect rinse performance and too little will give poor washing results Add detergent into the detergent tray or put it directly into the tub Dil...

Страница 16: ... when the option is selected 4 Press the WATER LEVEL button and choose an appropriate water level 5 Close the lid and press the START PAUSE button for the washing program to start 6 At the end of the washing program a buzzer will sound to alert you that the program has finished before the power is shut off automatically Close the water taps and unplug the power plug from the wall outlet 7 If you w...

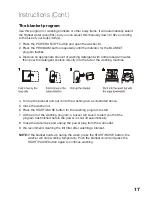
Страница 17: ...rgent solution directly into the tub of the washing machine 4 Fold up the blanket and put it into the washing tub as illustrated above 5 Close the washer lid 6 Press the START PAUSE button for the washing program to start 7 At the end of the washing program a buzzer will sound to alert you that the program has finished before the power is shut off automatically 8 Close the water taps and unplug th...

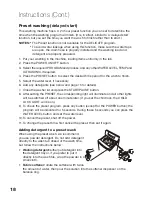
Страница 18: ...ee below and page 15 for details 7 Close the washer lid and press the START PAUSE button 8 After setting the PRESET the corresponding light will illuminate and all other lights will be switched off about one minute later If you set the child lock the CHILD LOCK LIGHT will be on 9 To check the preset program press any button except for the POWER button the program will be indicated for 5 seconds Du...

Страница 19: ...ater power level from H1 H2 H3 to the strongest H4 Press the SOAK VARIABLE WASH button again repeatedly to decrease the water power level from L1 L2 L3 to the weakest L4 Setting the water level and other processes You can set the water level for wash and rinse processes For example if you are sensitive to detergent residues in your washing you may want to select a higher water level for rinsing To...

Страница 20: ...hine is running When the power is back on again the washing machine will automatically start again and complete the remaining process Memory function When the NORMAL CUSTOM or HEAVY DUTY program is selected 20 seconds after starting the machine will remember this program except for the preset time and water level setting and start the same program the next time it is selected NOTE This function is...

Страница 21: ...clean under running water taking care not the damage any parts Reinstall the filter making sure it fits securely behind the cover clasp and latches and locks securely into place Cleaning the water inlet valve suggested interval every 6 months To avoid blockage of the mesh filter at the water inlet after long time use detach the water inlet hose making sure you have turned off the water supply at t...

Страница 22: ...power source 2 If necessary wait until the water has cooled down 3 Place a container underneath the pump opening to collect any spillage see below left 4 Turn the filter cap anticlockwise to take it out gently see below right 5 Remove any objects from the filter by flushing it see below left Always keep a rag nearby to dry up spillage of water when removing the pump filter 6 Put the cap back and p...

Страница 23: ...ddenly and taking in water again If the washing is piled up at one side of the tub during the spin cycle the washing machine automatically takes in more water to redistribute the load Once the load is balanced again the spin cycle will continue 5 Why is there a sound like water flowing after spinning This is the sound of the balancing liquid in the balance ring This helps reduce vibration during s...

Страница 24: ...w Check the height of the drain hose is above 80cm Water does not drain out Check and make sure the drain hose is properly connected and installed Check the drain hose for kinks or obstructions Check whether the drain hose is clogged Check and ensure that the drain hose is between 80cm and 120cm off the ground Check whether the filter of the drain pump is clogged Check the lint filter bag inside t...

Страница 25: ...ust be plugged into an appropriate outlet that is installed and earthed in accordance with all local standards and requirements IMPORTANT The wires in the appliance power supply cord are coloured in accordance with the following code Green and Yellow Earth Blue Neutral Brown Live If the colours of the wires in the mains lead of this appliance do not correspond with the coloured markings identifyin...

Страница 26: ...26 Notes ...

Страница 27: ...27 Notes Cont ...

Страница 28: ...h packed with features and completely reliable We are so confident in our products we back them up with a full 2 year warranty Now you too can relax knowing that you are covered Customer Helpline NZ 0800 836 761 This Product is covered by 2 year warranty when accompanied by proof of purchase ...

Отзывы: