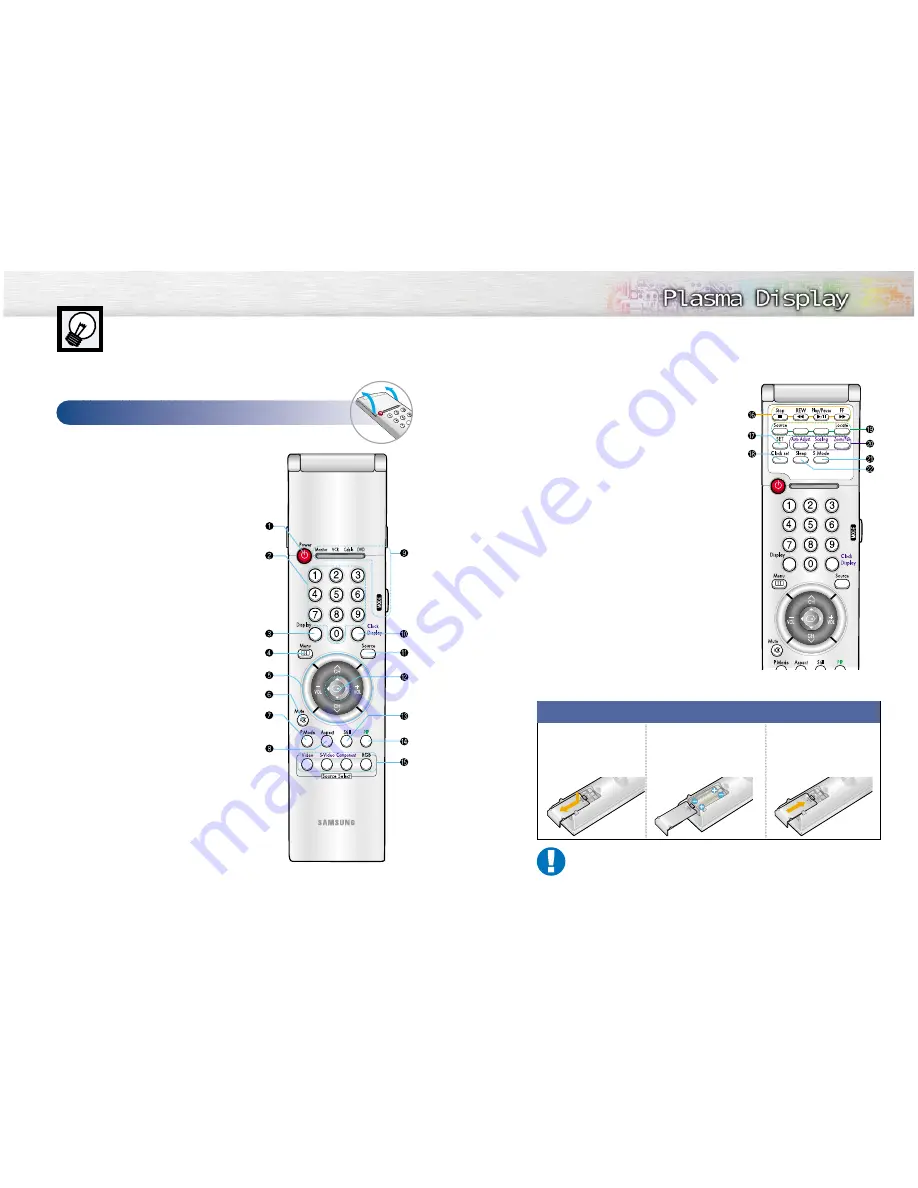
Akai PDP5090 Скачать руководство пользователя страница 7

ı

VCR control buttons

Controls VCR tape functions: Stop, Rewind,
Play/Pause, Fast Forward.

˜

SET button

Use during setting up of this remote control, so that it
will work compatibly with other devices (VCR, cable
box, DVD, etc.)

¯

Clock set button

Press to clock setting.

˘

PIP control buttons

Source : Press to select one of the available signal

sources for the PIP window.

S.Sel :

Press to select the Audio (PIP or Main).

Locate : Press to move the PIP window to any of the

screen.

¿

PC control buttons

Auto Adjust
Scaling
Zoom/Pan

¸

S.Mode button

Adjust the PDP sound by selecting one of the preset
factory settings (or select your personal, customized
sound settings.)

˛

Sleep button

Press to select a preset time interval for automatic 
shutoff.

S.Sel

13

Remote Control Buttons

Œ

Power button

Turns the PDP on and off.

´

Number buttons

ˇ

Display button

Press to display information on the PDP screen.

¨

Menu button

Displays the main on-screen menu.

ˆ

CH (Channel) and VOL (Volume) buttons

Channel and Volume buttons are used for selecting
menu item in menu mode.

Ø

Mute button

Press to mute the PDP sound.

P.Mode button

Adjust the PDP picture by selecting on of the preset fac-
tory settings (or select your personal, customized pic-
ture settings.)

Aspect button

Press to change the screen size.

Mode button

Selects a target device to be controlled by the AKAI
remote control (ie., VCR, Cable, or DVD players).

˝

Clock Display button

Press to display clock on the PDP screen.

Ô

Source button

Press to display all of the available video sources 
(ie., Video, S-Video, Component1, Component2, 
PC ).

Joystick button

Use to highlight on-screen menu items and change
menu values.

Ò

Still button

Press to pause the current screen.

Ú

PIP button

Activates picture in picture.

Æ

Source selection buttons

Press to directly select Video, S-Video, Component1,
Component2 or PC. 

12

Remote Control

Flip the cover open

in the arrow direction.

Installing the Batteries in Your Remote Control

1

Slide the back cover

to open the battery
compartment of the
remote control

3

Slide the cover back into

place.

2

Install two AAA size batter-

ies. Make sure to match the
“+” and “-” ends of the bat-
teries with the diagram
inside the compartment.

Remote Control Operation Range.

You can use your remote control within a distance of 7~10m and an angle of 30 degrees
from the left and right sides of the remote control receiver of the monitor.

Содержание PDP5090

Страница 1: ...BN68 00480A 00 Owner s Instructions PDP5090...

Страница 2: ...hat there is adequate ventilation and that you ve followed the manufacturer s instructions for mounting Operate your Monitor only from the type of power source indicated on the marking label If you ar...

Страница 3: ...C issued by the Commission of the European Community Compliance with these directives implies conformity to the following Euro pean Norms EN55022 1998 Class B EN55024 1998 EN61000 3 2 1995 EN61000 3 3...

Страница 4: ...nd programming should be limited to no more than 5 of the total television viewing per week Additionally viewing other stationary images and text such as stock market reports video game displays stati...

Страница 5: ...P L A S M A D I S P L A Y P A N E L Setup Your New Plasma Display Panel 10 Remote Control Buttons 12 Wall Installation Instructions 14 Turning the PDP On and Off 18...

Страница 6: ...al speakers RGB Input 1 jack 15pin Connect to the video output jack on your PC RGB Input 2 Component Video Input jacks H V R G B Y Pb Pr RGB input2 Component video input jacks are BNC connectors Video...

Страница 7: ...Mode button Adjust the PDP picture by selecting on of the preset fac tory settings or select your personal customized pic ture settings Aspect button Press to change the screen size Mode button Select...

Страница 8: ...ot install the PDP on any place other than vertical walls 2 To protect the performance of the PDP and prevent troubles avoid the following Do not install next to smoke and fire detectors Do not instal...

Страница 9: ...rs and insulation holder into the six screw holes as shown in the following figure Bolt Insulation holder 6 Hang the protruding plastic part on the rear of the PDP up the groove on the top of the wall...

Страница 10: ...le easy to use menu system that appears on the PDP screen This system makes it con venient and fast to use features on the PDP Your PDP also lets you display the status of many of your PDP s features...

Страница 11: ...P L A S M A D I S P L A Y P A N E L Connection Connecting Speakers Receiver Connecting Speakers 22 Connecting a VCR Cable Box 23 Connecting a DVD Set Top Box 24...

Страница 12: ...utput jack on the VCR Cable box and the Video Input jack on the PDP For better video you can use a S Video cable You can attach the Ferrite Cores supplied to the both jacks of the Video cable Simply s...

Страница 13: ...e PDP You can attach the Ferrite Cores supplied to the both jacks of the Video cable Simply set the Ferrite Cores right under the jacks Connect an Audio cable between the Audio Output jack on the DVD...

Страница 14: ...Exit 26 1 Press the Menu button then press the joystick to enter 2 Move the joystick left or right to select the Custom You will also see the items Contrast Brightness Sharpness Color and Tint 3 Move...

Страница 15: ...ut jacks 4 Press the Menu button to exit PIP Select On Locate Source Move Adjust Exit PIP Select On Locate Source Move Adjust Exit PIP VIDEO S VIDEO COMPONENT 1 Move Exit 28 Selecting the PIP Screen 1...

Страница 16: ...Zoom2 Stretch 4 3 When you press the Aspect button on the remote control the PDP s screen mode should appear in sequence The screen displays in this order Wide Panorama Zoom1 Zoom2 Stretch 4 3 Note If...

Страница 17: ...the Still button on the remote control to freeze a mov ing picture into a still one Press again to cancel P L A S M A D I S P L A Y P A N E L Sound Control Customizing the Sound 34 Using Automatic Sou...

Страница 18: ...Press the Menu button Move the joystick up or down to select the AUDIO then press the joystick to enter 2 Move the joystick left or right to select the Custom You will also see the items Treble Bass B...

Страница 19: ...p or down to select the AUDIO then press the joystick to enter 2 Move the joystick up or down to select the Surround then move the joystick left or right to select the Concert Hall or Stadium 3 Press...

Страница 20: ...ff 1 Press the Menu button Move the joystick up or down to select the TIME then press the joystick to enter 2 Move the joystick left or right to select hour then move the joystick up or down to select...

Страница 21: ...ve the joystick up or down to select the TIME then press the joystick to enter 2 Move the joystick up or down to select the On time then move the joystick left or right 3 Move the joystick left or rig...

Страница 22: ...eration Connecting to a PC 44 Adjusting the PC Screen 48 Changing the Position of the Image 49 Changing the Size of the Image 50 Enlarge of the Image Zoom 51 Move Expanded Picture 52 Picture Quality A...

Страница 23: ...nfigure itself to use the flat panel display Connecting to a PC This PDP set is not compatible with Macintosh PC 45 44 Connect a PC 15pin or BNC cable between the Video Output jack on the PC and the R...

Страница 24: ...e type of PC monitor and its resolution The table below shows all of the display modes that are supported N Negative P Positive The PDP might operate abnormally if a non standard video format is selec...

Страница 25: ...g the R G B Preset Press the RGB button to select the PC mode 1 Press the Menu button then press the joystick to enter 2 Move the joystick up or down to select the Color Control then move the joystick...

Страница 26: ...Miscellaneous Move Adjust Exit Zoom 5 Panning Move Adjust Exit 50 Preset Press the RGB button to select the PC mode 1 Press the Menu button Move the joystick up or down to select the SETUP then press...

Страница 27: ...t Exit 52 Preset Press the RGB button to select the PC mode 1 Press the Menu button Move the joystick up or down to select the SETUP then press the joystick to enter 2 Move the joystick up or down to...

Страница 28: ...us Move Adjust Exit Auto Adjustment Frequency 0 Phase 0 Move Adjust Exit Phase 50 54 Frequency Adjustment Preset Press the RGB button to select the PC mode 1 Press the Menu button Move the joystick up...

Страница 29: ...er management system saves energy by switching your monitor into a low power mode when it has not been used for a certain amount of time This power management system operates with a VESA DPMS complian...

Страница 30: ...Selecting a Menu Language 60 Setting the Multi Control 61 Using the Key Lock 62 Setting up Your Remote Control 63 P L A S M A D I S P L A Y P A N E L Function Description...

Страница 31: ...oystick or channel up down buttons 4 Move the joystick up or down to select the ID Input The ID Input operates by using only the numeric buttons 5 Enter ID Input and the screen with the set ID number...

Страница 32: ...mote control Your VCR or Cable box DVD players should turn on if your remote is set up correctly If your VCR or Cable box DVD players does not turn on after set up repeat steps 2 3 and 4 but try one o...

Страница 33: ...P L A S M A D I S P L A Y P A N E L Appendix Troubleshooting 66 Care and Maintenance 67 Specifications 68 64 Remote Control Codes VCR Codes Cable Box Codes DVD Codes...

Страница 34: ...ed on Adjust the Brightness or Contrast settings Adjust the Size settings The PDP is overheated Power off the PDP and cool it for a while The cooling fan of the PDP may have a problem Contact an autho...

Страница 35: ...DP5090 1208 5 W X 89 D X 724 H mm 47 58 W X 3 50 D X 28 50 H inches 54 W X 31 5 D X 220 H mm 2 13 W X 1 24 D X 8 66 H inches 42kg 92 59lbs 150g including batteries 0 33lbs 120V 60 Hz 540 Watts 1106 5...

Страница 36: ...Memo 71 70 Memo...

Отзывы: