background image


77 

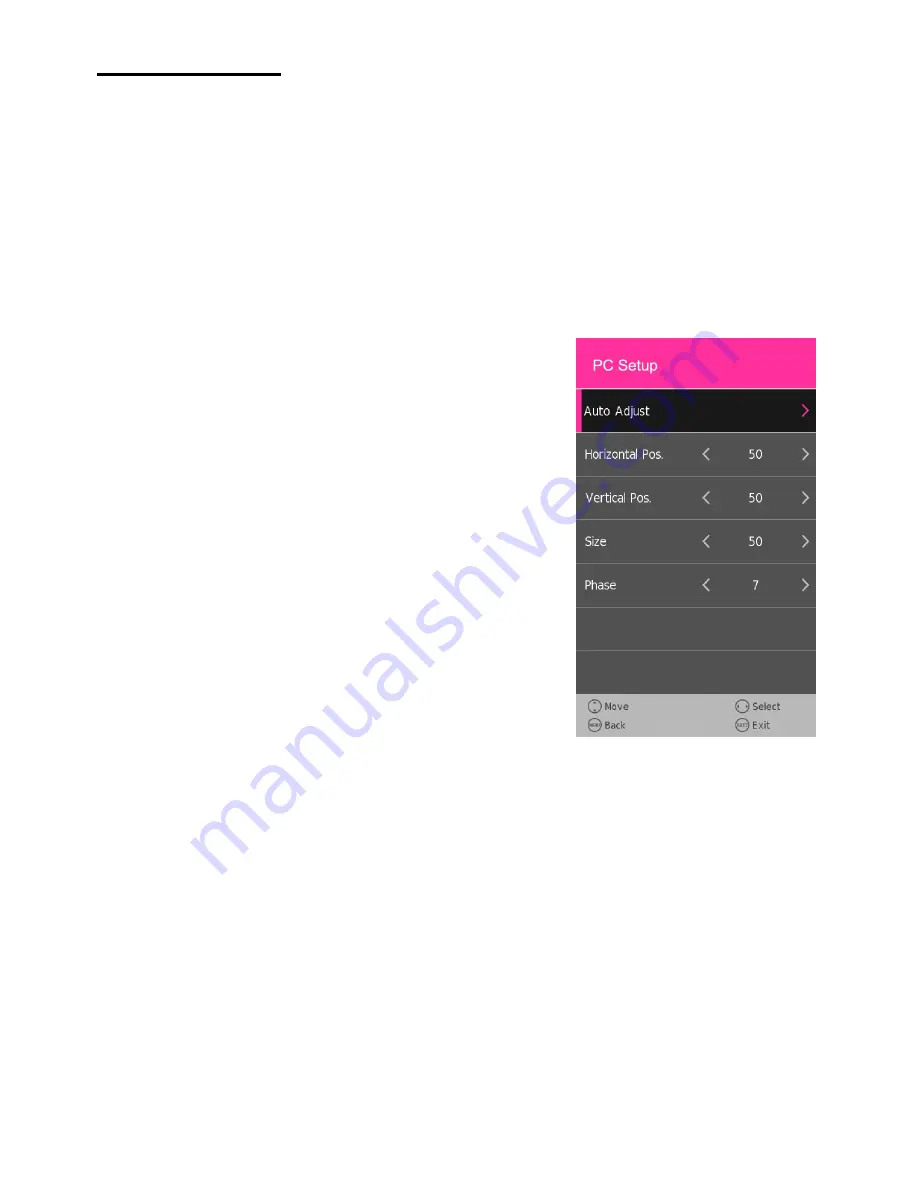
PC/VGA MODE 

- Connect a personal computer to this unit. 
- Power on your computer and this unit. 
- Press SOURCE button on the unit or remote control to select PC-RGB (VGA) input source. 
- Press MENU button to display the main menu and select Picture using LEFT/RIGHT 
navigation button.   
- Use UP/DOWN navigation button to highlight “PC Setup” and press OK or RIGHT 
navigation button to enter it. 
 
- Press UP/DOWN navigation button to select preferred item. 
- Press OK or RIGHT navigation button to enter submenu. Press LEFT/RIGHT navigation 
button to adjust the value. 
 

1. Auto Adjust 

This item is used to adjust the PC screen automatically. 
 

2. Horizontal Pos. 

This item is used to adjust the value of horizontal position. 
 

3. Vertical Pos. 

This item is used to adjust the value of vertical position. 
 

4. Size 

This item is used to adjust the signals transfer speed. 

 
5. Phase 

This item is used to adjust the picture apply to the TV. 


NOTE:

 For other menu operations in PC-RGB (VGA) mode, please refer to the menu 

operations of DTV mode. 


Содержание ATE-55D1044K

Страница 1: ...MANUEL D UTILISATION USER MANUAL ATE 55D1044K Lire attentivement la notice avant d utiliser l appareil Before operating this product please read user manual completely ...

Страница 2: ...S NE PAS ENLEVER LE COUVERCLE A L ARRIERE AUCUNE PIECE A L INTERIEUR NE DOIT ETRE REPARE PAR L UTILISATEUR CONFIER TOUTE REPARATION A UN PERSONNEL QUALIFIE Ce symbole est destiné à alerter l utilisateur d éviter le risque de décharge électrique Cet équipement ne doit pas être démonté par toute personne autre que le personnel de service qualifié L Utilisation des commandes des réglages ou d autres ...

Страница 3: ...par des objets placés sur ou contre lui en particulier au niveau des fiches prises de courant multiprises et de l endroit où il sort du téléviseur Si la fiche d alimentation ou un coupleur d appareil est utilisé comme dispositif de déconnexion le dispositif de déconnexion doit rester facilement accessible Ne faites pas fonctionner l appareil dans les conditions suivantes Si le cordon d alimentatio...

Страница 4: ...ntraîner une fuite de produits chimiques contenus dans les piles et ou d explosion Veillez à bien suivre les instructions ci dessous Assurez vous de bien respecter les polarités et indiquées à l intérieur du compartiment à pile Les différents types de piles ont des caractéristiques différentes Ne jamais mélanger des piles de type ou de marque différents dans le compartiment par exemple des piles a...

Страница 5: ...RATION DE LA TÉLÉCOMMANDE 12 BRANCHEMENTS DE BASE 13 19 UTILISATION UTILISATION DE BASE 20 26 MENU PRINCIPAL 27 35 PREMIÈRE INSTALLATION 27 MODE TNT 28 34 TV ANALOGIQUE ET AUTRES MODES 35 MODE PC VGA 35 TELETEXTE 36 37 POUR RÉFÉRENCE ENTRETIEN 37 MONTAGE MURAL 38 SPECIFICATIONS 39 DÉPANNAGE 40 MISE AU REBUT EN FIN DE VIE 41 IMPORTATEUR 42 SOMMAIRE ...

Страница 6: ...5 Manuel d instructions Télécommande ACCESSOIRES ...

Страница 7: ...n tourné vers le bas sur un tissu doux ou coussin pour éviter de l endommager Étape 2 Alignez le bas de la TV avec l extrémité du support jusqu à ce que la TV soit totalement installée Étape 3 Serrez les vis fournies à l aide d un tournevis REMARQUE Débranchez la TV de la prise secteur lors de l installation ou du retrait du socle de la TV INSTALLATION DU SOCLE ...

Страница 8: ...ugmenter et réduire le volume ou naviguer vers la droite ou la gauche 5 Bouton CH Pour faire défiler les chaînes vers la précédente et la suivante ou naviguer vers le haut et le bas 6 Bouton MENU Pour entrer dans le menu configuration 7 Bouton SOURCE Pour sélectionner la source d entrée 8 Bouton POWER MARCHE ARRÊT Pour allumer ou éteindre la TV DESCRIPTION DE LA TV Vue avant Vue arrière ...

Страница 9: ... haute définition permet de déporter l affichage HD de votre smartphone ou tablette vers ce Téléviseur lorsqu il est relié par un câble MHL micro USB HDMI non fourni sur cette Entrée HDMI 2 MHL 3 Terminal d entrée VGA 4 Terminal d entrée AUDIO PC 5 Terminal d entrée SCART PERITEL 6 Terminal d entrée RF Pour connecter l antenne extérieure 7 Terminal de sortie CASQUE 8 Ports compatibles USB 1 USB 2 ...

Страница 10: ...uche ROUGE TV GOTO DVD 4 Touche VERTE TV ANGLE DVD 5 Touche BLEUE TV A B DVD 6 Touche JAUNE TV REPEAT DVD 7 FAV Affiche la liste des chaînes favorites 8 TEXT Permet de basculer en mode Télétexte 9 GUIDE TV TNT Affiche le guide des programmes TV TNT D MENU DVD 10 HOLD Pour figer l image à l écran en mode Télétexte FREEZE Pour figer l image en mode TV TNT 11 SUBTITLE Pour active ou désactiver le men...

Страница 11: ...20 Stoppe la lecture en mode MEDIA 21 Accès au fichier SUIVANT INDEX TNT TELETEXTE Affiche la liste des enregistrements en mode TNT ou Affichage la page d Index en mode Télétexte 22 Accès au fichier PRECEDENT 23 MENU Affiche le menu principal ou permet de revenir au menu précédent 24 AUDIO TV Permet de sélectionner les options sonores de votre TV LANG DVD 25 OK Permet de confirmer la sélection de ...

Страница 12: ...s comme le numéro de chaîne TV 34 Permet d entrer un numéro de chaîne à numéro multiples par exemple 2 1 35 Bascule entre la chaîne actuelle vers la chaîne précédente 36 SOURCE Permet de sélectionner la source d entrée 37 P MODE Permet d accéder au menu IMAGE 38 S MODE Permet d accéder au menu SON NOTE Les touches de fonction ci dessus indiquées avec DVD sont uniquement disponibles pour un Télévis...

Страница 13: ...a télécommande Ceci pourrait l endommager et empêcher son bon fonctionnement Si vous prévoyez de ne pas utiliser la télécommande pendant une période prolongée alors retirez les piles UTILISATION TÉLÉCOMMANDE Pointez la télécommande vers le récepteur depuis une distance inférieure à 6 m et selon un angle inférieur à 60 à l avant du lecteur Fig 2 REMARQUE La distance de fonctionnement peut Varier se...

Страница 14: ... appareil uniquement avec le type de source d alimentation indiqué sur l étiquette Toujours débrancher le cordon secteur de la prise murale lorsque vous n utilisez pas l appareil pendant une longue période BRANCHEMENT DE L ANTENNE Branchez une antenne dans la prise d antenne RF pour obtenir la meilleure qualité d image possible BRANCHEMENTS DE BASE Vers la prise secteur murale Antenne Amplificateu...

Страница 15: ...menu de l amplificateur et dans le menu du téléviseur à la fois l option ARC et le protocole CEC voir paragraphe HDMI CEC page 34 HDMI 2 MHL Mobile High Definition Link Connexion à l aide d un câble MHL vers HDMI non fourni Vous pouvez utiliser la fonction MHL Mobile High definition Link pour afficher l écran d un périphérique mobile sur le téléviseur Elle n est cependant disponible que par l inte...

Страница 16: ...e mobile Raccordez le câble MHL vers HDMI au connecteur d entrée HDMI MHL du téléviseur et au port USB du périphérique mobile HDMI 3 2 0 HDMI High Definition Multimedia Interface HDMI est une méthode de transmission de signaux vidéo et audio via un seul et même câble HDMI 2 0 correspond à une évolution de la connectique HDMI notamment adaptée à la prise en charge des signaux Ultra HD Cordon HDMI N...

Страница 17: ...A CONNEXION PERITEL Arrière du DVD enregistreur Cordon Péritel non fourni Arrière du PC Utilisez le câble VGA pour connecter la TV à un PC et utiliser ce produit comme moniteur Câble VGA non fourni Câble audio non fourni ...

Страница 18: ... et Vidéo Câble YPbPr non fourni Vue arrière du DVD enregistreur Arrière du DVD enregistreur Pour connexion basique utilisez un câble composite Audio blanc rouge et CVBS jaune pour connecter l unité à d autres périphériques Câble AUDIO non fourni Câble AV non fourni ...

Страница 19: ...u disque dur externe et pouvoir y lire le contenu Vous pouvez également enregistrer les programmes TV fonction PVR sur votre périphérique de stockage USB lorsqu il est branché sur le port compatible USB 1 ou USB 2 Utilisez un câble coaxial pour connecter un amplificateur audio ou autre appareil de décodage audio pour sortie audio coaxiale Le câble coaxial n est pas fourni ...

Страница 20: ...sque ni le cordon ne sont fourni avec le téléviseur Lorsque vous branchez un casque mettre le volume au minimum et augmentez le volume progressivement jusqu à un volume d écoute agréable A pleine puissance une écoute prolongée avec le casque peut endommager l ouïe de l utilisateur VÉRIFIEZ QUE TOUS LES ÉQUIPEMENTS ET LEURS ADAPTATEURS SECTEUR SONT CONNECTÉS CONVENABLEMENT ET QU ILS SONT CORRECTEME...

Страница 21: ...sourdine et appuyez dessus de nouveau pour l activer de nouveau SÉLECTION DE SOURCE Appuyez sur le bouton SOURCE de la télécommande où sur le dessus de la TV pour afficher la liste des sources disponibles Appuyez sur HAUT ou BAS pour sélectionner la source désirée puis sur OK pour confirmer Options disponibles TNT TV Analogique AV PERITEL YUV HDMI 1 2 3 PC RGB USB Média MODE IMAGE Appuyez sur P MO...

Страница 22: ...ngue multi audio AFFICHAGE DES INFORMATIONS Appuyez sur le bouton DISPLAY sur la télécommande pour afficher les informations sur le programme actuel GUIDE TV EN MODE TNT UNIQUEMENT Appuyez sur le bouton GUIDE sur la télécommande pour afficher le guide des programmes Appuyez sur HAUT BAS pour sélectionner le programme désiré Appuyez sur GAUCHE ou DROITE pour sélectionner la colonne gauche ou droite...

Страница 23: ...r les informations du télétexte disponibles et appuyez de nouveau sur cette touche de manière répétée pour quitter l affichage du Télétexte TV RADIO EN MODE TNT UNIQUEMENT Appuyez sur TV RADIO sur la télécommande pour basculer entre les modes TV TNT et Radio numérique SOUS TITRE Appuyez sur SUBTITLE de manière répétée pour sélectionner la langue des sous titres désirée REMARQUE Avant d essayer cet...

Страница 24: ... afficher la barre d outils ci dessous Appuyez sur GAUCHE ou DROITE pour sélectionner l option désirée Appuyez sur OK pour confirmer la sélection Si la barre d outils se masque appuyez sur EXIT sur la télécommande pour l afficher de nouveau Appuyez sur pour faire apparaître un message de rappel Appuyez sur GAUCHE ou DROITE pour quitter ou continuer la lecture différée LECTURE MULTI MÉDIA Appuyez s...

Страница 25: ...s touches de navigation pour sélectionner l option désirée puis sur OK pour confirmer Appuyez sur EXIT sur la télécommande pour masquer la barre d outils 2 MUSIQUE Appuyez sur GAUCHE ou DROITE pour sélectionner MUSIQUE dans le menu principal puis sur OK pour confirmer Utilisez les touches de navigation pour sélectionner le dossier ou le fichier désiré Appuyez sur ROUGE pour accéder au sous menu pu...

Страница 26: ...n pour sélectionner le dossier ou le fichier désiré Appuyez sur ROUGE pour accéder au sous menu puis appuyez sur OK pour supprimer le fichier mis en surbrillance Utilisez les touches de navigation pour sélectionner puis appuyez sur OK pour ajouter le fichier à la liste de lecture Appuyez sur pour lancer la lecture Appuyez sur DISPLAY pour afficher la barre d outils Utilisez les touches de navigati...

Страница 27: ...onner l option désirée puis sur OK pour confirmer Appuyez sur EXIT pour quitter Fonctionnalités de la télécommande pendant la lecture de fichiers multimédia Appuyez sur sur la télécommande pour lancer ou mettre la lecture en pause Appuyez sur sur la télécommande pour arrêter la lecture Appuyez sur sur la télécommande pour retour rapide Appuyez sur sur la télécommande pour avance rapide Appuyez sur...

Страница 28: ...sur OK pour entrer dans la page de modification Appuyez sur MENU pour enregistrer les paramètres et revenir à la page précédente du menu Appuyez sur EXIT pour quitter le menu Guide de première installation Branchez la TV sur l alimentation secteur et allumez la La page de configuration illustrée ci après s affiche Langue de l OSD Appuyez sur GAUCHE ou DROITE pour sélectionner la langue d affichage...

Страница 29: ...u Appuyez sur GAUCHE ou DROITE pour sélectionner la chaîne Appuyez sur OK pour lancer la recherche 1 3 Edition de chaîne Appuyez sur OK ou DROITE pour entrer dans le sous menu Appuyez sur Haut ou Bas pour sélectionner la chaîne désirée Appuyez sur le bouton ROUGE sur la télécommande pour supprimer la chaîne en surbrillance Appuyez sur JAUNE sur la télécommande pour entrer dans le menu DEPLACER App...

Страница 30: ...te Luminosité Couleur Netteté Valeurs disponibles 0 100 REMARQUE Les valeurs de contraste luminosité couleur et netteté ne sont modifiables que dans le mode Image Personnalisé Teinte option disponible en mode NTSC uniquement 2 2 Température des couleurs Cet élément vous permet de personnaliser l image à votre goût Options disponibles Froid Moyen Chaud Personnalisé Rouge vert bleu Permet de régler ...

Страница 31: ...de proposer un meilleur rendu des mouvements Options disponibles Désactivée Basse Moyenne et Haute 3 SON 3 1 Modes Son Appuyez sur OK ou DROITE pour entrer dans le sous menu Mode Son Options disponibles standard musique film sports personnalisé Aigus Basses Valeurs disponibles 0 100 REMARQUE Les valeurs des aigus et des basses ne sont modifiables que dans le mode Son Personnalisé 3 2 Balance Cette...

Страница 32: ...PDIF Options disponibles Auto PCM désactivé 4 HEURE 4 1 Horloge Affiche l heure actuelle lorsqu une chaîne disponible a été sauvegardée 4 2 Mise hors tension auto Heure de mise hors tension Options disponibles Désactivé Une fois Tous les jours lundi à vendredi lundi à samedi samedi à dimanche dimanche Heures minutes utilisez les touches de navigation pour régler l heure et les minutes lorsque la M...

Страница 33: ...mande Options disponibles Désactivé 1 heure 2 heures 3 heures 6 heures 4 7 Fuseau horaire Cette option permet de définir le fuseau horaire 4 8 Heure d été Cette fonctionnalité permet d activer ou de désactiver la fonction d Heure d été 5 VERROUILLAGE Appuyez sur OK ou DROITE pour entrer dans le sous menu Saisissez le mot de passe par défaut 0000 à l aide des touches numériques de la télécommande A...

Страница 34: ...illage parental Cette option permet de définir le classement des programmes TV de votre choix en fonction de ceux qui doivent être visibles tout public ou réservés au adultes etc Options disponibles désactivé 4 18 6 GÉNÉRAL 6 1 Langue OSD Cette option permet de définir la langue d affichage des menus à l écran 6 2 Langue audio Appuyez sur OK ou DROITE pour entrer dans le sous menu Vous pouvez dans...

Страница 35: ... contrôle par exemple en utilisant une seule télécommande pour piloter plusieurs appareils reliés en HDMI Pour utiliser la fonction HDMI CEC Assurez vous que votre dispositif HDMI amplificateur etc est connecté correctement Appuyez sur SOURCE sur l unité ou sur la télécommande pour sélectionner la source HDMI HDMI CEC Pour activer ou désactiver le HDMI CEC Extinction auto Pour activer ou désactive...

Страница 36: ...nfiguration PC puis sur OK ou DROITE pour afficher le sous menu Appuyez sur HAUT ou BAS pour sélectionner l élément désiré Appuyez sur OK ou DROITE pour entrer dans le sous menu Appuyez sur GAUCHE ou DROITE pour ajuster 1 Réglage auto Cette option permet de régler les valeurs de l écran PC automatiquement 2 Position horizontale Cette option permet de régler la valeur de position horizontale 3 Posi...

Страница 37: ...uyez sur la touche INDEX pour afficher la page principale d index télétexte Augmenter la taille du texte Vous pouvez doubler la taille du texte des pages Télétexte afin de faciliter la lecture 1 Appuyez sur la touche SIZE pour augmenter la taille du texte dans la moitié supérieure de la page télétexte 2 Appuyez de nouveau sur la touche SIZE pour augmenter la taille du texte dans la moitié inférieu...

Страница 38: ...re téléviseur soigneusement et régulièrement votre téléviseur durera plus longtemps Assurez vous de mettre l appareil hors tension et débranchez le cordon d alimentation de votre téléviseur avant de commencer à le nettoyer Nettoyage de l écran TV Pour enlever la poussière de votre écran humectez un chiffon doux avec un mélange d eau tiède et une petite quantité de produit assouplissant ou de liqui...

Страница 39: ...Nous ne pouvons pas être tenus pour responsable de tout dommage ou blessure entraîné par la fixation de la TV Ne fixez pas la TV au mur lorsqu elle est allumée Cela pourrait entraîner des risques de choc électriques Utilisez des vis M6 10 mm 4 vis pour fixer la TV MONTAGE MURAL Vue arrière de votre TV ...

Страница 40: ...B2 CI AV YPbPr Casque 3 5mm Sortie Coaxiale Film AVI MPEG MKV RMVB Musique MP3 WAV Photos JPG JPEG Formats de lecture multimédia via USB Texte TXT Source d alimentation CA 100 240 V 50 60Hz Consommation en Marche 145 W en Veille 0 5 W Température en fonctionnement 5 C to 45 C Dimensions Avec le support 1251 L 309 P 782 H mm Sans le support 1251 L x 92 P x 730 H mm Poids Avec le support 14 1 kg San...

Страница 41: ...tirez tout obstacle potentiel entre la télécommande et le récepteur Les touches ne fonctionnent pas celles de l unité ou de la télécommande Déconnectez le cordon d alimentation puis rebranchez le le lecteur pourrait subir une défaillance suite à de l orage électricité statique etc Problèmes TV Solutions Aucune image ou image de mauvaise qualité Ajustez l antenne ou utilisez une antenne externe Pla...

Страница 42: ...électroniques doivent être traités séparément et conformément aux lois en vigueur en matière de traitement de récupération et de recyclage adéquats de ces appareils En tant que consommateur final votre rôle est primordial dans le cycle de réutilisation de recyclage et les autres formes de valorisation de cet équipement électrique et électronique Des systèmes de reprise et de collecte sont mis à vo...

Страница 43: ...conformité du produit merci d envoyer votre demande à DEMSA S A S 28 Boulevard Zéphirin Camélinat 92230 GENNEVILLIERS FRANCE Cet appareil est conforme aux exigences imposées par la Directive Européenne 2006 95 CE Directives sur la Compatibilité Electromagnétique et Basse Tension IMPORTATEUR ...

Страница 44: ...sk of electric shock of persons To avoid the risk of electric shock do not disassemble this equipment by anyone except a qualified service personnel This equipment is a Class II or double insulated electrical appliance It has been designed in such a way that it does not require a safety connection to electrical earth The exclamation point within an equilateral triangle is intended to alert the use...

Страница 45: ...or pinched by items placed upon or against them paying particular attention to plugs convenience receptacles and the point where they exit from the product Where the MAINS plug or an appliance coupler is used as the disconnect device the disconnect device shall remain readily operable Do not operate this product under the following conditions When the power supply cord or plug is damaged If liquid...

Страница 46: ...otors and transformers Do not use outdoors in inclement weather Do not use the TV while driving this is dangerous and is illegal in some areas CAUTION ON HEADPHONE USE At full volume prolonged listening to the portable audio device may damage the user s hearing BATTERY HANDLING AND USAGE Keep batteries away from children and pets Only adults should handle batteries Never throw batteries into a fir...

Страница 47: ...ONTROL PREPARATION 54 55 BASIC CONNECTIONS 55 61 OPERATIONS BASIC OPERATIONS 62 68 MAIN MENU 69 77 FIRST TIME INSTALLATION 69 DTV MODE 70 76 ATV AND OTHER MODES 76 PC VGA MODE 77 TELETEXT 78 FOR REFERENCE MAINTENANCE 79 WALL MOUNTING 79 SPECIFICATIONS 80 TROUBLESHOOTING 81 DISPOSAL OF OLD ELECTRICAL APPLIANCES 82 IMPORTER 83 TABLE OF CONTENTS ...

Страница 48: ...47 User Manual Remote Control ACCESSORIES ...

Страница 49: ...ion to prevent the panel from being damaged Step 2 Align the Stand with TV bottom and then force the end of stand until the TV is fully seated on the stand Step 3 Tighten the included screws with a screw driver NOTES Unplug the power plug first when installing or removing the TV Stand To avoid any damage to this TV contact one or more partner for assistance when installing or removing the TV stand...

Страница 50: ... unit the indicator light is blue color 3 Stand holder 4 VOL button To increase decrease the volume level or move left right 5 CH button To select next previous channel or move up down 6 MENU button To enter menu setting page 7 SOURCE button To select the input source 8 POWER button To turn the TV ON OFF GENERAL PARTS Front View Back View ...

Страница 51: ...nction allows to mirror HD contents of your Smartphone or Tablet to this TV when connected via a MHL cable not included 3 VGA input terminal 4 PC AUDIO input terminal 5 SCART input terminal 6 RF input terminal To connect the external antenna 7 EARPHONE output terminal 8 USB 1 2 input terminal 9 HDMI 3 HDMI 2 0 input terminal 10 CI input terminal 11 Mini AV input terminal 12 Mini YPbPr input termin...

Страница 52: ...tween TV and Radio DVD 3 RED button TV GOTO DVD 4 GREEN button TV ANGLE DVD 5 BLUE button TV A B DVD 6 YELLOW button TV REPEAT DVD 7 FAV Display the favorite channels list 8 TEXT Display the available Teletext 9 GUIDE DTV Display electronic program guide D MENU DVD 10 HOLD Hold the Teletext FREEZE Hold the picture 11 SUBTITLE Enable disable subtitles 12 SIZE TV Switch Teletext size ZOOM DVD REMOTE...

Страница 53: ...ard 19 DTV Start RECORDING when watching available digital programs D SETUP DVD 20 Stop playing 21 Play the next file INDEX DTV Display the record list or Teletext index 22 Play the previous file 23 MENU Call out the main menu or return to previous menu 24 AUDIO TV Switch the available sound track LANG DVD 25 OK Confirm selection 26 Navigation buttons 27 SLEEP Set desired sleep time REMOTE CONTROL...

Страница 54: ...ch as channel number and so on 34 Switch the digit when watching TV programs 35 Return to previous channel 36 SOURCE Select desired input source 37 P MODE Switch the picture mode 38 S MODE Switch the sound mode NOTE The functions of those buttons which marked with DVD are available only when your TV has fitted a DVD player Not available for your model ATE 55D1044K The marked on some keys means tha...

Страница 55: ... impact the remote control This may damage the parts or lead to malfunction If the remote control is not going to be used for a long time remove the batteries REMOTE CONTROL OPERATION Point the remote control from no more than about 6m from the remote control sensor and within about 60 of the front of the player Fig2 NOTES The operating distance may vary according to the brightness of the room Do ...

Страница 56: ...cals Remove batteries as soon as they are non operable Chemicals that leak from batteries can cause a rash If chemical leakage is found wipe with a cloth The batteries battery pack of batteries installed shall not be exposed to excessive heat such as sunshine fire or the like IMPORTANT NOTE ON BATTERIES Please help to protect the environment It is recommended to dispose of old batteries in collect...

Страница 57: ...le to the RF Input Jack on the back of the unit HDMI CONNECTIONS Outdoor antenna amplifier Indoor antenna amplifier 75 OHM antenna plug Power plug of antenna amplifier Antenna HDMI cable Not included Use HDMI cable to connect the unit with other devices to receive high definition multimedia signal The signals are transferred in Digital Back of DVD VCR ...

Страница 58: ...n Link MHL function to display a mobile device s screen such as a smartphone or tablet on the TV However MHL is only available through the TV s HDMI MHL port and only when used in conjunction with an MHL enabled mobile device For information on configuring MHL on your mobile device refer to the device s User Manual If you connect a mobile device to the TV with an MHL to HDMI cable the TV automatic...

Страница 59: ...ION SCART CONNECTION Back of DVD VCR SCART cable Not included Back of PC Use VGA cable and Audio cable to connect the unit with TV or PC and use this product as a monitor VGA cable Not included Audio cable Not included ...

Страница 60: ...ect the unit with amplifier or other audio decoding devices for coaxial audio signal output Coaxial cable is not included Back of DVD VCR For basic connection use the composite Audio L R white red and CVBS yellow cable to connect the unit with other devices AV cable Not included ...

Страница 61: ...60 YPBPR CONNECTION USB CONNECTION Both USB 1 USB 2 compatible ports are available for Multimedia Playback PVR Record YPbPr cable Not included Back of DVD VCR AUDIO cable Not included Not included ...

Страница 62: ...the unit through your own stereo headphones When you connect headphones to the unit the main speakers will be silenced Notes the headphone is not supplied with the TV set When connecting a headphone please first reduce the volume to the minimum level and then progressively increase it to a comfortable volume level Hearing experts advise against exposure to continuous extended play at loud volume l...

Страница 63: ...on repeatedly to switch the digit VOLUME CONTROL Press VOL or VOL to adjust the level of current volume Available range 0 100 MUTE CONTROL Press MUTE button to mute the sound press it again to turn on the sound SOURCE SETTING Press SOURCE button on the unit or remote control to display the sources list Press UP or DOWN navigation button to select desired input source and then press OK button to co...

Страница 64: ...t desired audio language NOTE To enable this function make sure that the channel you are viewing supports multi audio languages INFORMATION DISPLAY Press DISPLAY button on remote control to display information of current program TV GUIDE FOR DTV MODE ONLY Press GUIDE button on remote control to display programme guide Press UP DOWN navigation button to select preferred program Press LEFT RIGHT nav...

Страница 65: ...ess UP or DOWN navigation button to select preferred channel Press OK button to confirm selection TELETEXT Press TEXT button on remote control to display the available teletext information and press it repeatedly to stop playing the teletext TV RADIO FOR DTV MODE ONLY Press TV RADIO button on remote control to switch the unit between TV and radio mode SUBTITLE Press SUBTITLE button on remote contr...

Страница 66: ...it again Press button to call out a reminding message Use LEFT RIGHT navigation button to exit or continue recording TIMESHIFT FOR DTV MODE ONLY Insert your USB memory device into USB slot first When watching digital programs press button to enable TIMESHIFT function Press LEFT or RIGHT navigation button to select desired option Press OK button to confirm selection If the tool bar disappeared pres...

Страница 67: ...enu and press OK button to delete highlighted file Use navigation buttons to select them and press OK button to add to play list Press button to start playback Press DISPLAY button to call out the tool bar Use navigation buttons to select desired option and press OK to confirm it Press EXIT button to dismiss the tool bar 2 MUSIC Press LEFT RIGHT navigation button to select Music in the main menu a...

Страница 68: ...o enter it Use navigation buttons to select desired folder or file Press RED button to enter submenu and press OK button to delete highlighted file Use navigation buttons to select them and press OK button to add to play list Press button to start playback Press DISPLAY button to call out the tool bar Use navigation buttons to select desired option and press OK to confirm it Press EXIT button to r...

Страница 69: ... desired option and press OK to confirm it Press EXIT button to return Remote operations when playing multimedia files Press button on remote control to play or pause playing Press button on remote control to stop playing Press button on remote control to move fast backward Press button on remote control to move fast forward Press button on remote control to play previous file Press button on remo...

Страница 70: ...ation button to select the item that want to adjust Press OK button to enter adjusting menu page Press MENU button to save current setting and return to previous menu page Press EXIT button to exit menu page First Time Installation Connect to power source and turn on this TV then below setup page will display on the screen OSD Language Press LEFT RIGHT navigation button to select desired on screen...

Страница 71: ...lect the channel Then press OK button to start searching 1 3 Channel Edit Press OK or RIGHT navigation button to enter it Press UP DOWN navigation button to highlight desired channel Press RED button on remote control to delete highlighted channel Press YELLOW button on remote control to enter MOVE mode Then use UP DOWN navigation button to select preferred position and press YELLOW button again t...

Страница 72: ...User Dynamic Contrast Brightness Color Sharpness adjustable value 0 100 NOTE Contrast Brightness Color and Sharpness are adjustable only when Picture Mode is User Tint adjustable only for NTSC system 2 2 Colour Temperature This item is used to adjust the optimum color temperature for suitable viewing Available options Cold Medium Warm User Red Green Blue adjust the color balance only when Color Te...

Страница 73: ...pensate for display motion blur Available options Off Low Medium High 3 SOUND 3 1 Sound Mode Press OK or RIGHT navigation button to enter it Sound Mode available options Standard Music Movie User Sports Treble Bass adjustable value 0 100 NOTE Treble and Bass are adjustable only when Sound Mode is User 3 2 Balance This item is used to adjust the audio output between left and right speaker from 50 t...

Страница 74: ...when you are viewing programs that contain related narration information 3 6 SPDIF Mode Available options Auto PCM Off 4 TIME 4 1 Clock It displays current system time when an available channel was saved 4 2 Off Time Off Time available options Off Once Every Day Mon Fri Mon Sat Sat Sun Sunday Hour Minute use navigation buttons to adjust the Hour Minute when Off Time is not Off 4 3 On Time On Time ...

Страница 75: ... 4 7 Time Zone This item is used to select desired time zone 4 8 Daylight Saving This item is used to turn on off Daylight Saving function 5 LOCK Press OK or RIGHT navigation button to enter it Input the factory default password 0000 using number buttons on remote control Press UP DOWN navigation button to select preferred item NOTE If you forget the password please use the universal password 8899...

Страница 76: ...to select desired program rating Available options Off 4 18 6 GENERAL 6 1 OSD Language This item is used to select desired on screen display language 6 2 Audio Language Press OK or RIGHT navigation button to enter it Then you can select desired primary audio language and secondary audio Language 6 3 Subtitle Language Press OK or RIGHT navigation button to enter it Then you can select desired prima...

Страница 77: ...or example by controlling a television set set top box and DVD player using only the remote control of the TV To use HDMI CEC function Make sure the HDMI device Amplifier etc is connected correctly Press SOURCE button on the unit or remote control to select HDMI input source HDMI CEC turn on off HDMI CEC Auto Turn Off turn on off Auto Turn Off TV Auto Power On turn on off TV Auto Power On Root Men...

Страница 78: ...avigation button to select preferred item Press OK or RIGHT navigation button to enter submenu Press LEFT RIGHT navigation button to adjust the value 1 Auto Adjust This item is used to adjust the PC screen automatically 2 Horizontal Pos This item is used to adjust the value of horizontal position 3 Vertical Pos This item is used to adjust the value of vertical position 4 Size This item is used to ...

Страница 79: ...ext bigger You can double the size of the text on the teletext pages to make it easier to read 4 Press the SIZE button to make the text on the top half of the page bigger 5 Press the SIZE button again to make the text on the bottom half of the page bigger 6 Press the SIZE button again if you want the text reduced to normal size Subpages Some teletext pages may contain several subpages To read the ...

Страница 80: ...hen wipe again with a dry cloth Never use alcohol benzene thinner cleaning fluid or other chemicals And do not use compressed air to remove dust Contact a professional for assistance when wall mounting your TV We are not responsible for any damage to the product or injury to yourself if you mount the TV on your own Do not wall mount the TV while TV is turned on It may cause personal injury due to ...

Страница 81: ...GA PC AUDIO SCART USB 1 2 CI AV YPbPr EARPHONE COAX OUT Movie AVI MPEG MKV RMVB Music MP3 WAV Photo JPG JPEG USB Multimedia Playback Format Text TXT Power Source AC 100 240V 50 60Hz Power Consumption in working mode 145W in standby mode 0 5 W Operation Temperature 5 C to 45 C Measurement With stand 1251 W 309 D 782 H mm Without stand 1251 W 92 D 730 H mm Weight With stand 14 1 kg Without stand 13 ...

Страница 82: ...he remote control unit at a distance of no more than 6m from the remote control sensor Remove the obstacles between the remote control and remote control sensor No key operation by the main unit and or the remote control unit is effective Disconnect the power plug and then reconnect it The player may not be operating properly due to lightning static electricity or some other factors Symptom TV Rem...

Страница 83: ...non recycled waste Used electrical and electronic equipment must be treated separately and in accordance with legislation that requires proper treatment recovery and recycling of used electrical and electronic equipment Local authorities and resellers have set special procedures for the purpose of collecting and recycling this product please contact your local authority for further details You hav...

Страница 84: ...ns concerning the conformity of the product thank you to send your request to DEMSA S A S 28 Boulevard Zéphirin Camélinat 92230 GENNEVILLIERS FRANCE This unit complies with European Council Directive 2006 95 CE Electromagnetic Compatibility Low Voltage Directives IMPORTER ...

Страница 85: ...ATE 55D1044K ...

Отзывы: