Akai ALED2206TBK Скачать руководство пользователя страница 17

English   

- 58 -

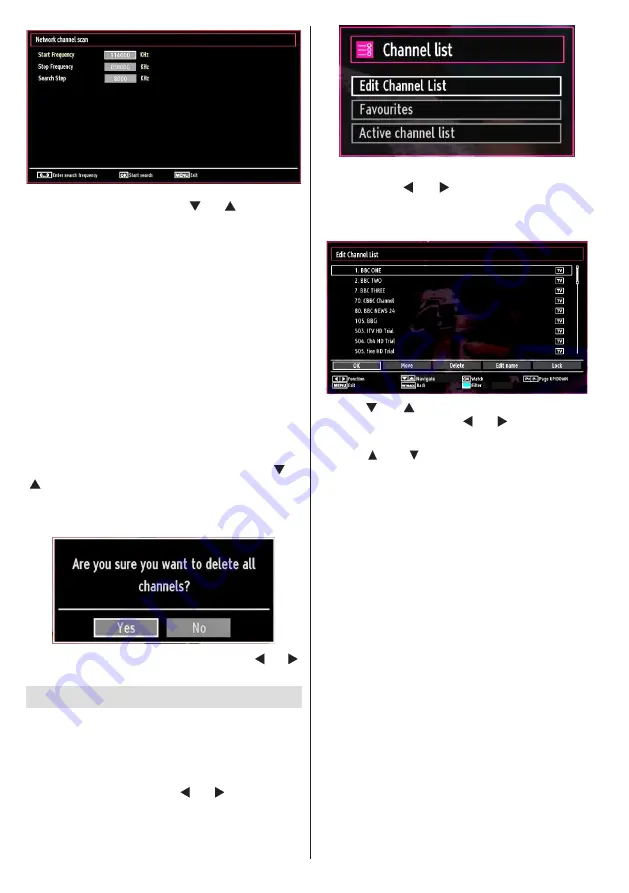
You can select frequency ranges from this screen. For 

highlighting lines you see, use “ ” or “ ” button. You 

can enter the frequency range manually by using the 

numeric buttons on the remote control. Set Start and 

Stop Frequency as desired by using numeric buttons 

on the remote control. After this operation, you can set 

Search Step as 8000 KHz or 1000 KHz. If you select 

1000 KHz, the Tv will perform search process in a 

detailed way. Searching duration will thus increase 

accordingly. When finished, press 

OK

 button to start 

automatic search. Automatic searching screen will be 

displayed during the process.
Note: If you select an extended gap between Start 

and Stop frequency rate, automatic search duration 

will take a longer time..

Clear Service List (*)

(*) This setting is visible only when the Country option 

is set to Denmark, Sweden, Norway or Finland.

Use this setting to clear channels stored. Press “ ” or 

“ ” button to select Clear Service List and then press 

OK. The following OSD message will be displayed 

on the screen:

Press OK to cancel. Select Yes by pressing “ ” or “ ” 

button and press OK to delete all of the channels.

Managing Stations: Channel List

The TV sorts all stored stations in the Channel List. 

You can edit this channel list, set favourites or set 

active stations to be listed by using the Channel List 

options.

• Press 

MENU

 button to view main menu. Select the 

Channel List item by using “ ” or “ ” button. Press 

OK

 to view menu contents.

Select 

Edit Channel List

 to manage all stored 

channels. Use “ ” or “ ”  and 

OK

 buttons to select 

Edit Channel List.

Operating the Channel List

• Press “ ” or “ ” button to select the channel that 

will be processed. Press “ ” or “ ” button to select 

a function on Channel List menu.

• Use 

CH

 or 

CH

 buttons to move page up or down.

• Press 

BLUE

 button to view filtering options.

• Press 

MENU

 button to exit.

Moving a Channel

• First select the desired channel. Select Move option 

in the channel list and press the 

OK

 button.

• Edit Number screen will be displayed. Enter the 

desired channel number by using the numeric 

buttons on the remote control. If there is a previously 

stored channel on that number, a warning screen 

will be displayed. Select Yes if you want to move the 

channel and press 

OK

• Press the 

OK

 button to process. Selected channel 

is now moved.

Deleting a Channel

You can press 

GREEN button to tag/untag all 

channels; 

YELLOW button to tag/untag channel. 

• Select the channel that you want to delete and select 

Delete

 option. Press the 

OK

 button to continue.

• A warning screen will appear. Select 

YES 

to 

delete, select 

No

 to cancel. Press the 

OK

 button 

to continue.

Содержание ALED2206TBK

Страница 1: ...43 1 83 ALED2206TBK LCD TV DVD COMBI WITH DVB T C TUNER...

Страница 2: ...t 59 Operating the Channel List 59 Moving a Channel 59 Deleting a Channel 59 Renaming a Channel 59 Locking a Channel 59 Managing Stations Favourites 60 Button Functions 60 Managing Stations Sorting th...

Страница 3: ...use This appliance is intended solely for private domestic use and may not be used for industrial and commercial purposes We exclude liability in principle if the device is not used as intended or un...

Страница 4: ...y metal free should not be disposed of with household waste Please dispose of used batteries in an environmentally friendly manner Find out about the legal regulations which apply in your area Do not...

Страница 5: ...eatening when swallowed Store batteries out of the reach of small children In case of swallowing a battery medical aid has to be sought immediately Also keep the packaging away from children as there...

Страница 6: ...lable when the TV is in Power Save Mode When the TV is not in use please switch off or disconnect the TV from the mains plug This will also reduce energy consumption Note that annually using the TV se...

Страница 7: ...e selection 15 Source selection 16 Red button 17 Green button 18 Yellow button 19 Menu on off 20 Blue button 21 OK Edit Channel list Hold in TXT mode 22 Cursor right Subpage in TXT mode 23 Cursor down...

Страница 8: ...le of displaying High Definition pictures from devices such as a High Definition Satellite Receiver or DVD Player These devices must be connected via the HDMI or Component source These sockets can acc...

Страница 9: ...ors into the RED and WHITE jack of the supplied side AV connection cable Colours of the connected jacks should match 4 The headphone jack is used for connecting an external headphone to the system Con...

Страница 10: ...nect a PC to the TV When the connection is made switch to PC source See the Input selection section Set the resolution that suits your viewing requirements Resolution information can be found in the a...

Страница 11: ...ayer as illustrated below switch to the HDMI source See Input Selection section DVD players can also be connected through COMPONENT SOCKETS YPbPr can be used only when you connect a device that has a...

Страница 12: ...PC cable not supplied Basic Operations You can operate your TV using both the remote control and onset buttons Operation with the Buttons on the TV Volume Setting You can use the control switch to cha...

Страница 13: ...u want to find When finished press Down button to highlight Start Search and then press OK button to proceed SUBTTL Press SUBTITLE button to view Select Genre menu Using this feature you can search th...

Страница 14: ...t Language Use or to select the desired Teletext Language Press OK button on the remote control to continue and the following message will be displayed on the screen To select the Yes or No option hig...

Страница 15: ...tton Automatic Channel Scan Retune options will be displayed You can select options by using and OK buttons Auto Channel Scan Menu Operation Digital Aerial Searches and stores aerial DVB stations Digi...

Страница 16: ...arch After selecting search type as analogue you can use button to highlight an item and then press or button to set an option Enter the channel number or frequency using the numeric buttons You can t...

Страница 17: ...the Channel List You can edit this channel list set favourites or set active stations to be listed by using the Channel List options Press MENU button to view main menu Select the Channel List item by...

Страница 18: ...t Favourites You can set various channels as favourites so that only the favourite channels are navigated Select a channel by using or button Press OK button to add selected channel to favourites list...

Страница 19: ...will jump to the file starting with the letter you input via the numeric buttons on your remote control Play This OK button Plays the selected file Play GREEN button Plays all media files starting wit...

Страница 20: ...wing Style is set to Folder in Media Browser Settings Music folder will be displayed as sorted and there is no need to sort files again by pressing FAV button INFO Changes filter options Loop Shuffle...

Страница 21: ...sing or button Press OK button to view Picture Settings menu Operating Picture Settings Menu Items Press or button to highlight a menu item Use or button to set an item Press MENU button to exit Pictu...

Страница 22: ...ad VGA mode settings will be added to the Picture Settings while in PC mode PC Picture Settings For adjusting PC picture items do the following Press or button to select Picture icon Picture menu appe...

Страница 23: ...l of advertisements tend to be louder than programmes Dynamic Bass Dynamic Bass is used to increase bass effect of the TV set Digital Out Sets digital out audio type Configuring Your TV s Settings Det...

Страница 24: ...ay change depending on the service provider Press MENU button and select the icon by using or button Press OK button to view Settings menu Use or button to highlight Conditional Access and press OK to...

Страница 25: ...nu Lock optional Menu lock setting enables or disables the menu access You can disable access to the installation menu or the whole menu system Maturity Lock optional When set this option gets the mat...

Страница 26: ...ng a Timer Select the timer you want to delete by pressing or button Press RED button Select YES by using or buttons to delete the timer Select NO to cancel Configuring Date Time Settings Select Date...

Страница 27: ...ication version Hard of Hearing If the broadcaster enables any special signal concerning the audio you can set this setting as On to receive such signals Audio Description Audio description refers to...

Страница 28: ...the signal degrades for example in poor adverse weather conditions some text errors may occur or the teletext mode may be aborted Teletext function buttons are listed below Teletext Mix Activates tele...

Страница 29: ...the picture or teletext unrecognisable Check if you have entered the correct frequency Please retune the channels The picture quality may degrade when two peripherals are connected to the TV at the s...

Страница 30: ...HzB 16 1400x1050 75Hz 85Hz 17 1400x900 65Hz 75Hz 18 1600x1200 60 Hz 19 1680x1050 60 Hz 20 1920x1080 60 HzA 21 1920x1080 60 HzB 22 1920x1200 60HzA 23 1920x1200 60Hz Appendix B AV and HDMI Signal Compa...

Страница 31: ...Upgrade Options menu In Upgrade Options menu select Scan for upgrade and press OK button If a new upgrade is found it starts to download the upgrade A progress bar indicates the remaining download pr...

Страница 32: ...ic mp3 MPEG 1 Layer 1 2 MP3 32Kbps 320Kbps Bit rate 32KHz 48KHz Sampling rate Photo jpg jpeg Baseline JPEG max WxH 15360x8640 4147200bytes Progressive JPEG max WxH 1024x768 6291456bytes bmp max WxH 96...

Страница 33: ...compliant with ISO IEC 13522 5 UK engine Profile 1 for UK Object carousel support compliant with ISO IEC 135818 6 and UK DTT profile Frequency range 474 850 MHz for UK models 170 862 MHz for EU models...

Страница 34: ...3 JPEG MPEG playback NTSC PAL playback according to disc content LPCM audio via coaxial digital audio output optional Multi Audio up to 8 support According to disc content Multi Subtitle up to 32 supp...

Страница 35: ...the disc to direct sunlight or heat sources such as hot air ducts or leave it in a car parked in direct sunlight as the temperature can rise quickly and damage the disc After playing store the disc i...

Страница 36: ...ould press STOP button three times to eject Overview of the Remote Control 1 Standby 2 Numeric buttons 3 Return back 4 Language selection Set language 5 Display time DVD menu 6 Clear 7 Stop 8 No funct...

Страница 37: ...glish 78 General Operation You can operate DVD movie CD music or picture CD s content by using the proper buttons on your remote control Below are main functions of commonly used remote control button...

Страница 38: ...k to the initial settings 7 If a language is selected not supported by the disc the subtitle language will automatically be set to the disc s priority language 8 Usually a circulation will happen whil...

Страница 39: ...TPUT You can set Spdif Output as PCM or RAW If you select PCM from SPDIF Output in DVD menu and play DVD with Dolby audio you can get audio output with two channels via the speakers and the SPDIF Out...

Страница 40: ...und have been recorded by means of digital signals Incorporating a new video compression technology MPEG II and high density recording technology DVD enables aesthetically pleasing full motion video t...

Страница 41: ...lby D igital and M P E G 2 S ystem Vario u s screen and au dio fu nctio n s ca n b e easily selected throu gh th e on scr een m enu A n LP is record ed as an an alo g sig n al w ith m ore d isto rtio...

Отзывы: