background image

- 12 -

CONNECTIONS

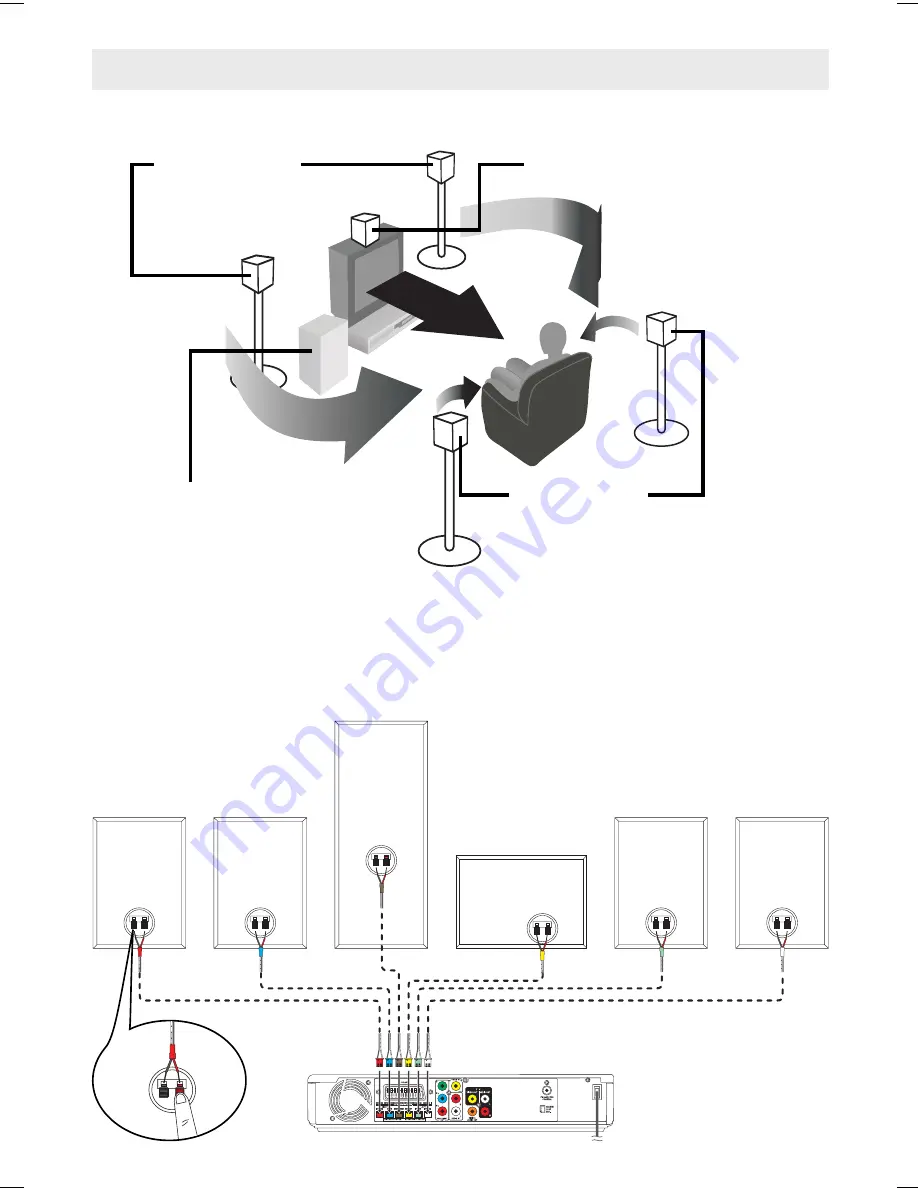
D. Positioning the Speakers and Subwoofer

E. Connecting the Speakers and Subwoofer

6 speaker wires supplied. Both ends of each speker wire are colour marked.
1. Connect the plugs of each speaker wire into the corresponding jacks on the rear of the unit, matching the 

colour of the speaker wire plug to the colour-coded connector.

2.  Connect the wire ends of each speaker wire into the corresponding jacks on the rear of the speakers. The red 

wires plug into the red jacks; the black wires plug into the black jacks. 

Red (+)

Black (–)

FRONT

(RIGHT)

REAR

(RIGHT)

REAR

(LEFT)

FRONT

(LEFT)

SUBWOOFER

CENTER

REAR SPEAKERS

Place right beside or slightly behind 
your listening position, and a little 
higher than your ears.

CENTER

Place on the top of or below the TV.

FRONT SPEAKERS

Place on both sides of the TV, 
equal distances apart.

SUBWOOFER

Can be placed anywhere.

Содержание AHC1200

Страница 1: ......

Страница 2: ...lation Warning Do not block the ventilation openings or holes If the ventilation openings or holes are blocked by a newspaper or cloth etc the heat may not be able to get out Do not operate the unit i...

Страница 3: ...unattended unless it is part of it s normal function to operate in your absence for example a video cassette recorder with timed recording facility LISTEN to headphones at moderate volume levels high...

Страница 4: ...14 Skip forward reverse 14 Fast forward Fast reverse 14 Slow motion play DVD 15 Audio selection 15 Subtitle selection 15 Angle selection 15 Special Function 16 Display function 16 Locating a specific...

Страница 5: ...divided into titles and chapters If the disc has more than one movie on it each movie would be a separate title Chapters are sections of titles Audio CDs are divided into tracks A track is usually on...

Страница 6: ...u will need to replace the batteries Note If the remote control is not going to be used for a long time remove the batteries to avoid damage caused by battery leakage corrosion Corrosion oxidation bat...

Страница 7: ...et stations 13 Number 0 9 buttons Use when creating programs and locating a title chapter or specific time 14 MONO STEREO button Set FM mode to MONO or STEREO sound REPEAT A B button Perform point to...

Страница 8: ...6 PLAY Button Press to start or resume playback of a disc 7 STOP Button Stops playing a disc Switches between FM and MW 8 FUNCTION Button Selects the source 9 STANDBY ON Button Turns the unit on and...

Страница 9: ...outlet before making any connections Refer to the instruction manual of the connected equipment as well FM Fully unwind the wire antenna and position it for the best reception MW Fully unwind the rot...

Страница 10: ...ent video signal Note Press the SETUP button and select Video Out to P Scan Please see CUSTOMIZING THE FUNCTION SETTINGS CONNECTIONS Component video cable good quality To SCART INPUT SCART Cable not s...

Страница 11: ...L CONNECTION Using a coaxial digital audio cable not supplied connect the DIGITAL AUDIO OUT jack on your unit to the DIGITAL AUDIO IN jack on your other source Listening to another audio equipment 1 T...

Страница 12: ...coded connector 2 Connect the wire ends of each speaker wire into the corresponding jacks on the rear of the speakers The red wires plug into the red jacks the black wires plug into the black jacks Re...

Страница 13: ...dio output when the unit is connected to a Dolby Digital 5 1 channel processor or amplifier This unit automatically recognizes DVDs that have been recorded with Dolby Digital Not all Dolby Digital sou...

Страница 14: ...utton on the front panel to open or close the disc tray Do not push the disc tray or you may damage the unit Let the disc tray open completely before removing the disc Press the OPEN CLOSE button to c...

Страница 15: ...is recorded the language does not change About two seconds later playback continues with the new subtitle selected The number of languages recorded differs depending on the disc If no button is press...

Страница 16: ...mber button s for the Track Time Disc time you want 3 Press the OK button to confirm The unit will start playback about 3 seconds later Notes If the time numbers you entered is not permited by the DVD...

Страница 17: ...e indicator displays on the screen The whole disc is played repeatedly To Resume Normal Playback 3 Press the REPEAT DISC button until the indicator displays on the screen You can play a single track o...

Страница 18: ...r All then press the OK button All the programs will be cleared 3 Press the PLAY button to resume playback Notes Some discs may not permit memory playback operation To exit the Program menu press the...

Страница 19: ...press the OK button 2 Use the or button to select Browser view then press the OK button The programmed tracks files appear on the left side of the window 3 Use the cursor buttons to select the progra...

Страница 20: ...1 Press the SETUP button 2 Press the or to select Default 3 Press the button to select Use Default Setting 4 Press the OK button and press the or button to select Yes then press the OK button The orig...

Страница 21: ...search stops The search may not stop at a station with a very weak signal Presetting Stations The unit can store a total of 40 stations in memory 20 FM 20 MW Presetting allows you to tune in to a stat...

Страница 22: ...benzine or alcohol to clean the disc Do NOT use irregular shaped discs example heart shaped octagonal etc They may cause malfunctions Cleaning the Unit Be sure to turn the unit off and disconnect the...

Страница 23: ...put and input connections correct Adjust the speaker volume This unit is too hot Power off for 30 minutes to allow the unit to cool You can use the Test tones setting to test that the speaker output i...

Страница 24: ...e separate collection systems for used electrical and electronic product By ensuring the correct disposal of this product you will help prevent potentially hazardous to the environment and to human he...

Отзывы: