background image

28

General Information

USING YOUR TV WITH A SKY DIGITAL SET TOP BOX

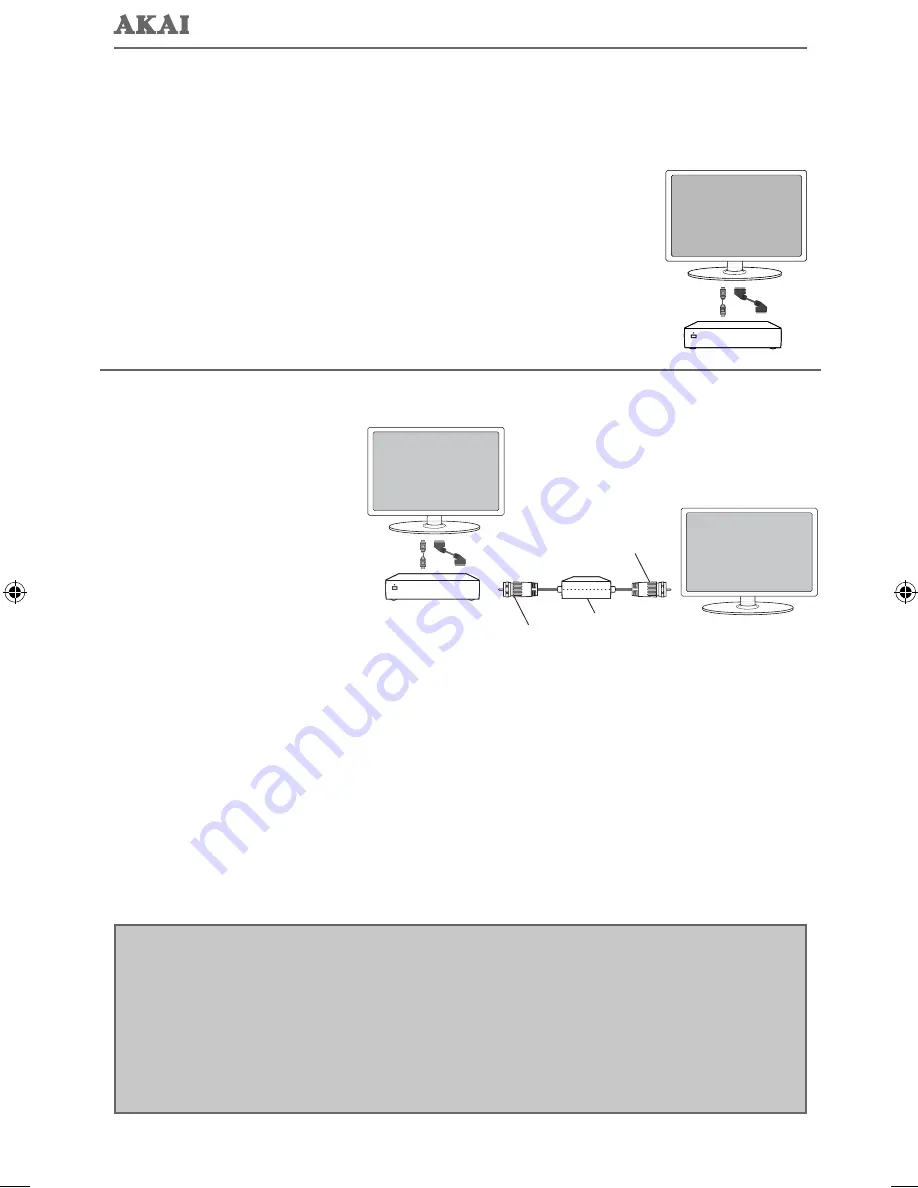
Option 1) Connecting your TV to your Sky box (when both the TV and Sky Box are located 
in the same room) 

Depending on your Sky Box & TV model, connect either by SCART or HDMI cables 
(available separately) 

If connecting by SCART, select the ‘Input source’ on the TV as SCART. 

If connecting by HDMI, select the ‘Input source’ on the TV as HDMI (if the TV has more 
than 1 HDMI port, ensure you select the input source to match the HDMI numbered port 
on the rear of the TV)

If you wish to use your Sky remote to operate the TV’s functions, you will need a Sky 
remote control (Revision 9 or later) and you will need to programme a 4 digit code into it.  
See bottom of this page. 

Option 2) Connecting your TV to your Sky box (when your Sky box is located in a different 
room to the TV) 

Please note, if you are adding a ‘Magic 
Eye/TV Link’ to your system so that 
you can use your Sky remote control 
to change the Sky channel in the room 
where the 2nd TV is located, please 
refer to the instructions included 
with the TV link/magic eye in order to 
ensure the RF or RF2 output on your 
Sky box is powered on. (The red LED 
light on the TV link/magic eye will light 
up if the RF / RF2 output is correctly set 
up)  If you do not have the instructions 
that came with the TV link/magic eye, 
instructions on how to do it can be 
found on our web site. 

1) To tune the TV to the Sky box, on the 2nd TV, select the ‘Analogue’ input source. 
2) Select the channel that you wish to store the Sky box/channel on. (If you do not use channels 1-5 because you 
no longer have analogue terrestrial channels after digital switchover, you may choose to select channel 1 to store 
the Sky box/channel, if you still have and use analogue channels 1-5, you may for example decide that channel 6 is 
the best option for you)  
3) Press the corresponding number on the remote control to select the desired analogue channel chosen as per 
point 2 above. 
4) On the TV remote control, press Menu. Now navigate through the menus to select Manual Tuning or Analogue 
Manual tuning (refer to the Tuning/Channel menu section of this user guide if necessary) 
5) Manually tune in the channel (usually, the Sky box is at a frequency between 800Mhz and 850Mhz) once the 
Sky box/channel is found, press ‘OK’ to store it. 

If you wish to use your Sky remote to operate the TV’s functions, you will need a Sky remote control (Revision 9 or 
later) and you will need to programme a 4 digit code into it.  See below. 

Sky Box

SCART 
or HDMI 
cable

RF/COAX cable from 
Sky Box to 2nd TV

Connect to RF 
or RF2 output 
on the Sky box

Connect to the 
Aerial/RF input 
on the 2nd TV

TV Link/Magic Eye 
(optional)

2nd TV in 
another room

Sky Box

SCART 
or HDMI 
cable

Using a Sky Remote or a Universal Remote to operate your TV

Sky Remote Control, 

If you wish to use your Sky remote to operate the basic functions of your TV, you need to 

programme a 4 digit code into it. Please note. you will need the latest Sky Revision 9 remote control as this is 
the only version that includes the latest software/fi rmware necessary to operate this model of TV.  All codes can 
be found on our website. If you wish to upgrade/replace your existing Sky remote control to the latest version, 
you can do so on our web site. 


Universal Remote Control,

 If you wish to use a Universal remote control to operate your TV, please refer to the 

web site for a full list of codes.  (Please note we only have codes for One for All branded remote controls, if you 
have an alternative brand of Universal remote, please refer to the manufacturer for the code.)

User Guide -185-194J-GB-4B-HCDU-UK, 215-194J-GB-4B-FHCDU-UK.indd   Sec1:28

User Guide -185-194J-GB-4B-HCDU-UK, 215-194J-GB-4B-FHCDU-UK.indd   Sec1:28

5/16/2013   2:10:54 PM

5/16/2013   2:10:54 PM

Содержание 185-194J-GB-4B-HCDU-UK

Страница 1: ...185 194J GB 4B HCDU UK 215 194J GB 4B FHCDU UK LED TV with Freeview DVD Player USB Media Player Model No User Guide...

Страница 2: ...repair the item and then return it to you If we believe we cannot offer a permanent repair we will replace the item Helpline Information Telephone UK 0871 2000 463 ROI 01443 3940 Web support www umc...

Страница 3: ...Never place mobile phones speakers or any other device which may cause magnetic or radio interference with the television If interference is apparent move the device causing the interference away from...

Страница 4: ...image screen burn occurs it will never disappear and is not repairable under warranty How do I dispose of this product UK Waste electrical products should not be disposed of with household waste Separ...

Страница 5: ...TV Buttons and Input Source Menu 12 Remote Control 13 Connections 14 15 TV Menu Operation 16 21 Channel Menu 16 Picture Menu 17 Sound Menu 18 Time Menu 19 Lock Menu 20 Setup Menu 21 PC Operation 22 23...

Страница 6: ...package it correctly The safest way to package your item in the event of warranty service repair is in it s original box packaging WHAT IS INCLUDED IN THE BOX WHAT IS INCLUDED IN THE BOX Accessories I...

Страница 7: ...ecure the neck to the TV by using the c 4 x M4x10 M4x8 screws provided fig 3 Insert the TV into the stand at 45 degrees d Twist the TV into the CLOSE position until it clicks into place e g 2 g 1 g 3...

Страница 8: ...ng where there could be any electric wires water or gas pipes Wall mounting the TV 1 Remove the four screws highlighted below 2 The wall mount can now be easily attached to the mounting holes on the r...

Страница 9: ...witch on the television using the power on off switch located on the side of the TV Power on off As part of our ongoing development to reduce power consumption we have added an extra function to this...

Страница 10: ...s OK B Using the buttons on the Television 1 Press SOURCE 2 Scroll up down using CH CH buttons to the input source you require 3 Press Vol to change input source to the one selected Eject Disc Play Pa...

Страница 11: ...ut current programme ASPECT To switch the screen between the different picture formats SLEEP Press repeatedly to cycle through the sleep options AUDIO To change the audio language if available SUBTITL...

Страница 12: ...input USB USB port EARPHONE 3 5mm Earphone output CI CARD IN Common Interface Card Input HDMI 1 HDMI input VGA PC In VGA PC input VGA PC Audio In 3 5mm PC audio input COMPONENT HD Mini Component inpu...

Страница 13: ...video and audio with minimal loss of quality TVs Input Source should be set to HDMI Option 2 via Component cable If you are supplied with a cable from the device which has RED GREEN BLUE RED WHITE con...

Страница 14: ...amme Edit Allows you to delete skip and add favourite channels Schedule List Lists your programme reminders CI Information Pay per view services require a smartcard to be inserted into the TV If you s...

Страница 15: ...e mode the TV will switch itself to Standby mode after 4 5 hours in the event that the TV buttons or remote control buttons are not pressed see the time menu to de activate this function Contrast Swit...

Страница 16: ...rd Default settings Music Emphasises music over voices Movie Provides live and full sound for movies Personal Selects your personal sound settings Sports Emphasises sound for sports Digital Output Thi...

Страница 17: ...f On Time Allows you to set a speci c time for your TV to turn on the channel it will then display the source it will be on and also the volume This function can then be toggled to repeat every day or...

Страница 18: ...the TV starts on when rst switched on Default Channel Allows the user to set a channel as the default channel on the Digital source The default channel is the channel the TV starts on when rst switche...

Страница 19: ...allows the user to operate multiple devices with one remote control only available with compatible devices language Allows the user to change the language of the menu TT Language Encoding settings fo...

Страница 20: ...er 6 Left click on the drop down for Screen refresh rate and select 60 Hertz if you experience picture noise or ickering select 50 hertz or 70 hertz 7 Click on Apply then click Yes and the settings wi...

Страница 21: ...vision to be used as a computer monitor H Offset Changes the horizontal position of the picture V Offset Changes the vertical position of the picture Size increase picture size Phase To adjust delay t...

Страница 22: ...s LT RT Converts from multi channel sound to mono Stereo Converts from multi channel sound to stereo Dynamic Range This is the difference between the quietest and loudest sounds This setting works onl...

Страница 23: ...the start and end time of all programmes and on all channels for the next 7 days and set reminders 1 Press TV GUIDE The following 7 Day TV Guide will appear 2 Navigate through the menu using You can n...

Страница 24: ...ly has 1 partition you will only see 1 item 3 You can now access the item Press OK to view 4 While viewing you control the item using or by pressing i and using and OK USB mode offers playback of vari...

Страница 25: ...ore the Sky box channel if you still have and use analogue channels 1 5 you may for example decide that channel 6 is the best option for you 3 Press the corresponding number on the remote control to s...

Страница 26: ...Recorder via SCART but it is not recording In addition to connecting via SCART you should connect the aerial cable from the wall socket to your VCR DVD Recorder and another aerial cable from the VCR...

Страница 27: ...194J GB 4B HCDU UK 215 194J GB 4B FHCDU UK Screen size diagonal 18 5 47cm 21 5 55cm Resolution 1366 x 768 1920 x 1080 USB Media Yes RF 75 ohm Antenna PAL SECAM Video Inputs 2 x HDMI up to 1080p 1 x Vi...

Страница 28: ...d Questions 29 Getting Started 11 Horizontal Position PC 23 Language 21 Manual Search 16 Noise Reduction 17 Using your TV with a Sky digital set top box 28 Picture Mode 17 Remote control 13 Reset to d...

Страница 29: ...AKA MAN 0001...

Отзывы: