


3G-AMA Mini-Converter v1.1r1 6
www.aja.com
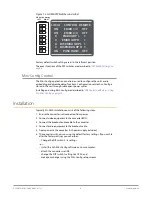
Figure 1. 3G-AMA DIP Switches and Label
1 2 3 4 5 6 7
8
DIP Switch Setting
LEFT RIGHT
LOCAL
ON
ON
0
0
0
0
ON
CONTROL
EMBD 1/2
EMBD 3/4
EMBD GRP L
EMBD GRP H
DISEMBD GRP L
DISEMBD GRP H
PASS HANC
REMOTE
OFF
OFF
1
1
1
1
OFF
Factory default switch settings are all in the leftmost position.
The exact functions of the DIP switches are described in
"DIP Switch Settings" on
page 8
Mini-Config Control
The Mini-Config application can also be used to configure the unit’s audio
embedding and disembedding functions. Configuration set via Mini-Config is
stored in the unit through subsequent power cycles.
Installing and using Mini-Config are described in
"USB Control and Setup—Using
AJA Mini-Config" on page 10
Installation
Typically, 3G-AMA installation consists of the following steps:
1. Ensure the converter is disconnected from power.
2. Connect video equipment to the converter BNCs.
3. Connect the breakout audio cable to the converter.
4. Connect audio equipment to the breakout cable.
5. Apply power to the converter (AJA power supply included).
6. The converter will now run using the default factory settings. If you wish to
alter the factory settings you can either:
• Change the DIP switch 2 - 8 settings.
- or -
• Install the AJA Mini-Config software on your computer,
• attach the converter via USB,
• change the DIP switch 1 setting to LOCAL, and
• make your changes using the Mini-Config setup screens.