


12G-AMA v1.0 7 www.aja.com
User Controls
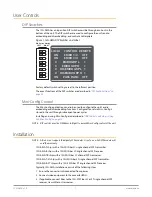
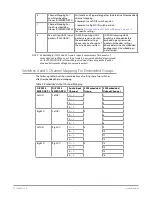
DIP Switches
The 12G-AMA has an 8 position DIP switch accessible through a cut-out in the
bottom of the unit. The DIP switches are used to configure the unit’s audio
embedding and disembedding, and control ancillary data.
Figure 1. 12G-AMA DIP Switches and Label
1 2 3 4 5 6 7
8
DIP Switch Setting
LEFT RIGHT
LOCAL
ON
ON
0
0
0
0
ON
CONTROL
EMBD 1/2
EMBD 3/4
EMBD GRP L
EMBD GRP H
DISEMBD GRP L
DISEMBD GRP H
PASS HANC
REMOTE
OFF
OFF
1
1
1
1
OFF
Factory default switch settings are all in the leftmost position.
The exact functions of the DIP switches are described in
Mini-Config Control
The Mini-Config application can also be used to configure the unit’s audio
embedding and disembedding functions. Configuration set via Mini-Config is
stored in the unit through subsequent power cycles.
Installing and using Mini-Config are described in
NOTE: DIP switch 1 must be ON (Remote, Right) to permit Mini-Config control of the unit.
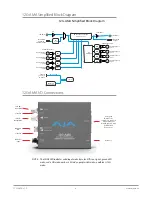
Installation
NOTE: AJA does not support third-party SFP modules. Use of a non-AJA SFP module will
void the warranty.
12G-AMA-T ships with a 12G-SDI Fiber LC single channel SFP transmitter.
12G-AMA-R ships with a 12G-SDI Fiber LC single channel SFP receiver.
12G-AMA-TR ships with a 12G-SDI Fiber LC channel SFP transceiver.
12G-AMA-T-ST ships with a 12G-SDI Fiber ST single channel SFP transmitter.
12G-AMA-R-ST ships with a 12G-SDI Fiber ST single channel SFP receiver.
Typically, 12G-AMA installation consists of the following steps:
1. Ensure the converter is disconnected from power.
2. Connect video equipment to the converter BNCs.
3. If applicable, connect fiber to the 12G-SDI Fiber LC or ST single channel SFP
receiver, transmitter or transceiver.


