The Airplane Factory
Manufacturing Organization
DC-SBU-003-X-X-1
Service Bulletin
Issue 1, 20/11/2015
Page no: 7
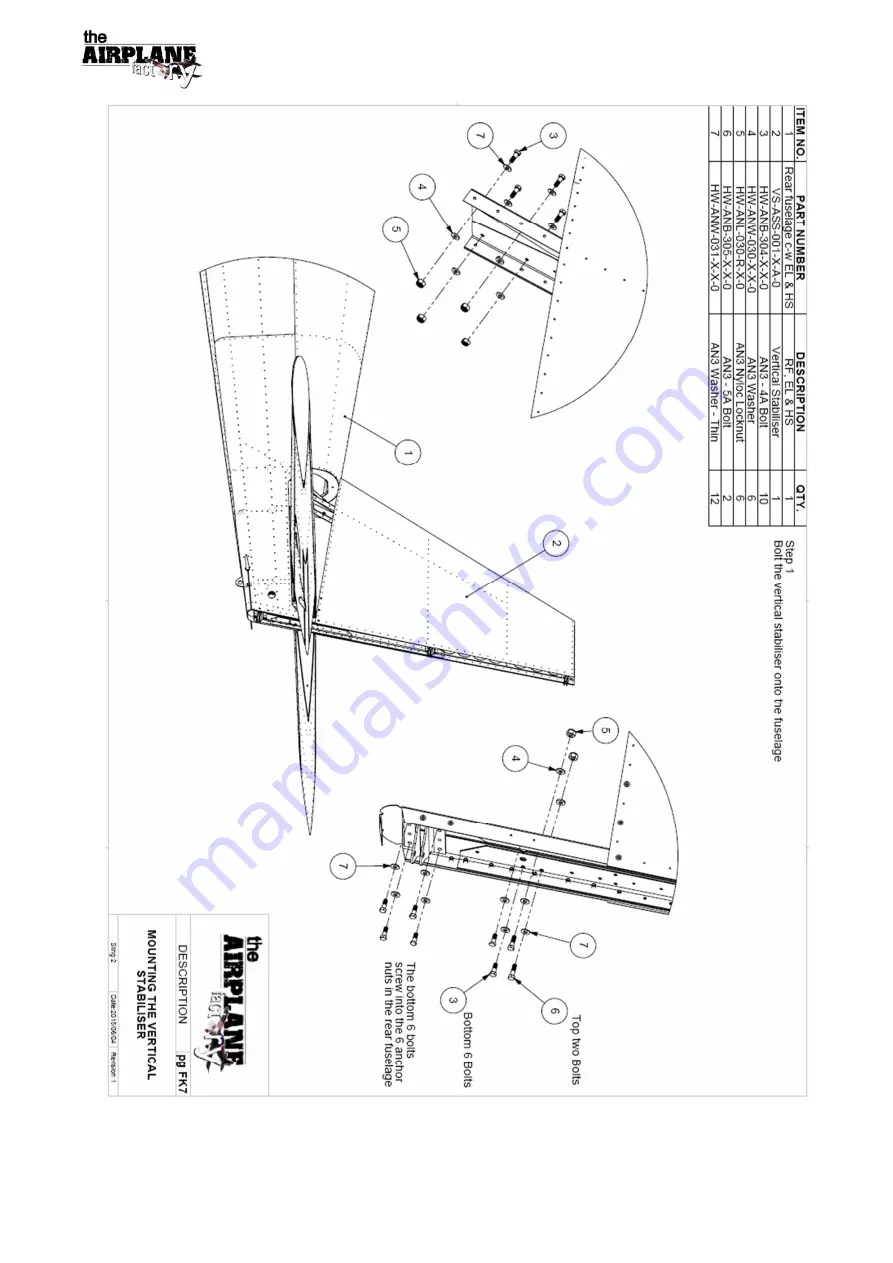
Figure 3: Mounting the vertical stabiliser
Страница 1: ...ndatory RELEASE DATE 26 11 2015 EFFECTIVE DATE 26 11 2015 SUBJECT Amendment to the Sling 2 series annual inspection MODELS AFFECTED Sling LSA Sling 2 Sling 2 Taildragger COMPLIANCE TIME Repetitive Eve...
Страница 2: ...s where the cracks are most likely to be found 3 Should the rib fail the inspection for corrosion or cracks being found the entire rib 601 component will need to be replaced with thicker and stronger...
Страница 3: ...th reference to the below picture using a 3 2 mm drill bit and pneumatic drill de rivet all rivets that attach skin 4 to the fuselage as this skin in its entirety needs to be removed 14 Once skin 4 ha...
Страница 4: ...s where the clecos were Ensure the correct rivets are used in the correct places refer to step 20 22 Attach the horizontal stabiliser to the fuselage by means of tightening all 8 of its bolts to the m...
Страница 5: ...The Airplane Factory Manufacturing Organization DC SBU 003 X X 1 Service Bulletin Issue 1 20 11 2015 Page no 5 Figure 1 Mounting of rear fairing...
Страница 6: ...The Airplane Factory Manufacturing Organization DC SBU 003 X X 1 Service Bulletin Issue 1 20 11 2015 Page no 6 Figure 2 Rudder Mounting...
Страница 7: ...The Airplane Factory Manufacturing Organization DC SBU 003 X X 1 Service Bulletin Issue 1 20 11 2015 Page no 7 Figure 3 Mounting the vertical stabiliser...
Страница 8: ...The Airplane Factory Manufacturing Organization DC SBU 003 X X 1 Service Bulletin Issue 1 20 11 2015 Page no 8 Figure 4 Fitment of horizontal stabiliser...
Страница 9: ...The Airplane Factory Manufacturing Organization DC SBU 003 X X 1 Service Bulletin Issue 1 20 11 2015 Page no 9 Figure 5 Fit upper longerons and side skins...
Страница 10: ...The Airplane Factory Manufacturing Organization DC SBU 003 X X 1 Service Bulletin Issue 1 20 11 2015 Page no 10 Figure 6 Rib 6 assembly...