background image

IAS-2000 v2 

User’s Manual 

.


73

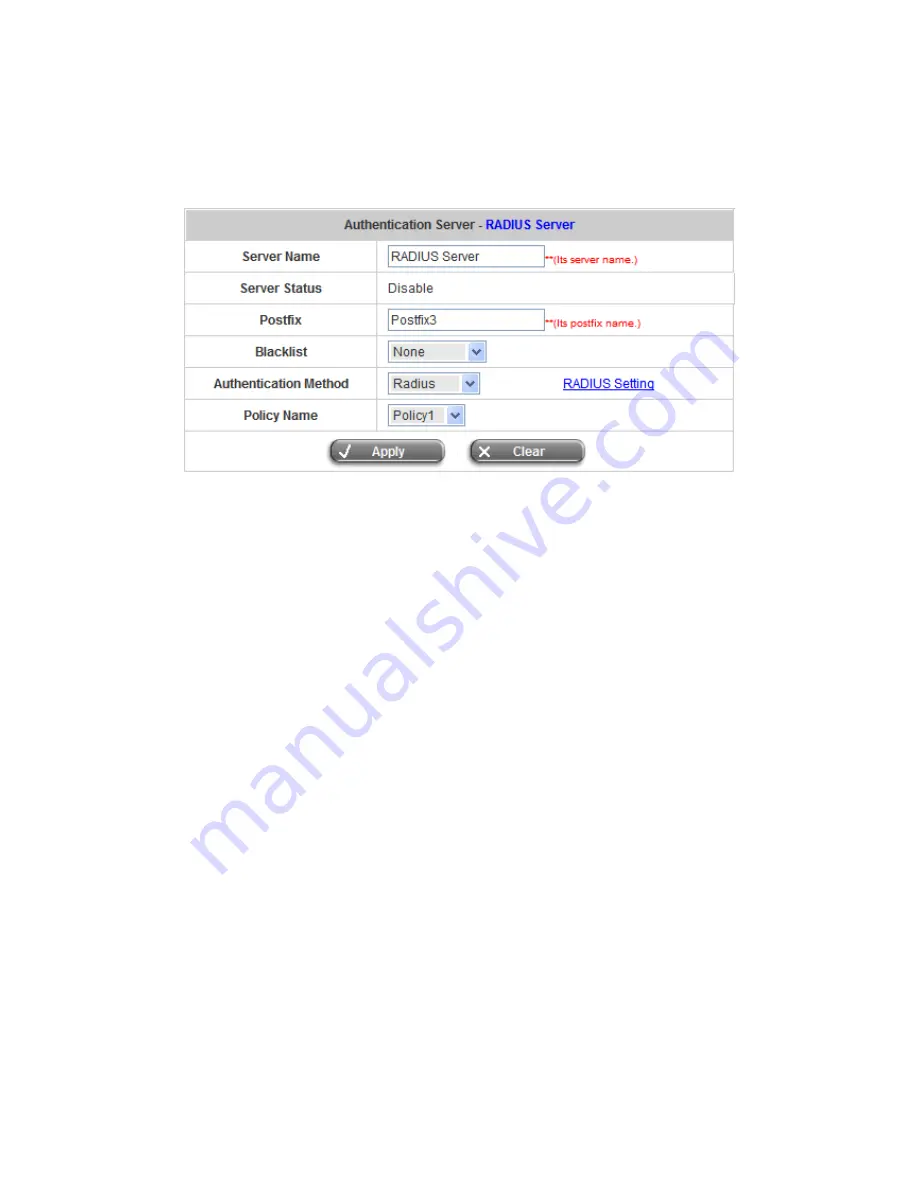
5.3.1.3 Radius 

Server 

Choose

 “Radius”

 in the 

Authentication Method

 field, the hyperlink beside the pull-down menu will become 

“RADIUS Setting”


y


Server Name:

 Set a name for the server using numbers (0 to 9), alphabets (a to z or A to Z), dash (-), 

underline (_) and dot (.) with a maximum of 40 characters, all other letters are not allowed. 

y


Sever Status:

 The status shows that the server is enabled or disabled. 

y


Postfix:

 Set a postfix that is easy to distinguish (e.g. Local) for the server by using numbers (0 to 9), alphabets 

(a to z or A to Z), dash (-), underline (_) and dot (.) with a maximum of 40 characters, all other letters are not 

allowed. 

y


Blacklist:

 There are five sets of the black lists. Select one of them or choose 

“None”

. Please refer to 

5.3.3 

Black List Configuration 

y


Authentication Method: 

There are four authentication methods, 

POP3

Radius

LDAP

 and 

NTDomain

 to 

configure from. Select the desired method and then click the link besides the pull-down menu for more 

advanced configuration. 

y


Policy Name: 

There are ten policies to choose from to apply to this particular server. 


Содержание IAS-2000 V2

Страница 1: ...IAS 2000 v2 Internet Access Gateway User s Manual 1 ...

Страница 2: ...lectrical equipment Voltage fluctuations EN 55024 1998 A1 Information Technology equipment Immunity characteristics Limit 2001 A2 2003 And methods of measurement CE marking Signature Name Albert Yeh Position Title Vice President Stamp Date 2008 10 9 AirLive IAS 2000 v2 is in conformity with In accordance with 2004 108 EC Directive and 1999 5 EC R TTE Directive Manufacturer Importer Hsin Tien City ...

Страница 3: ...s aplicables o exigibles de la Directiva 1999 5 CE pt Português Portuguese OvisLink Corp declara que este AirLive IAS 2000 v2 está conforme com os requisitos essenciais e outras disposições da Directiva 1999 5 CE el Ελληνική Greek ΜΕ ΤΗΝ ΠΑΡΟΥΣΑ OvisLink Corp ΔΗΛΩΝΕΙ ΟΤΙ AirLive IAS 2000 v2 ΣΥΜΜΟΡΦΩΝΕΤΑΙ ΠΡΟΣ ΤΙΣ ΟΥΣΙΩΔΕΙΣ ΑΠΑΙΤΗΣΕΙΣ ΚΑΙ ΤΙΣ ΛΟΙΠΕΣ ΣΧΕΤΙΚΕΣ ΔΙΑΤΑΞΕΙΣ ΤΗΣ ΟΔΗΓΙΑΣ 1999 5 ΕΚ sl Slove...

Страница 4: ...ecutable If distribution of executable or object code is made by offering access to copy from a designated place then offering equivalent access to copy the source code from the same place counts as distribution of the source code even though third parties are not compelled to copy the source along with the object code 4 You may not copy modify sublicense or distribute the Program except as expres...

Страница 5: ... been tested and found to comply with the limits for a Class B digital device pursuant to Part 15 of the FCC Rules These limits are designed to provide reasonable protection against radio interference in a commercial environment This equipment can generate use and radiate radio frequency energy and if not installed and used in accordance with the instructions in this manual may cause harmful inter...

Страница 6: ... for Windows XP 9 4 2 TCP IP Network Setup 12 Chapter 5 Web Interface Configuration 16 5 1 System Configuration 18 5 1 1 Configuration Wizard Also served as Quick Installation 19 5 1 2 System Information 28 5 1 3 WAN1 Configuration 30 5 1 4 WAN2 Failover 33 5 1 5 LAN1 Configuration 36 5 1 6 LAN2 Configuration 43 5 2 Network Configuration 49 5 2 1 Network Address Translation 50 5 2 2 Privilege List...

Страница 7: ...5 4 4 Restart 122 5 5 Status 123 5 5 1 System Status 124 5 5 2 Interface Status 127 5 5 3 Current Users 129 5 5 4 Traffic History 130 5 5 5 Notification Configuration 135 5 5 6 Online Report 138 5 6 Help 140 Appendix A External Network Access 141 Appendix B Console Interface Configuration 143 Appendix C Specifications 146 a Hardware Specification 146 b Technical Specification 146 Appendix D Proxy ...

Страница 8: ...nt Conventions For any caution or warning that requires special attention of readers a highlight box with the eye catching italic font is used as below Warning For security purposes you should immediately change the Administrator s password Indicates that clicking this button will return to the homepage of this section Indicates that clicking this button will return to the previous page Indicates ...

Страница 9: ...er s end is provided by the IAS 2000 v2 server and the SSL encryption is used to protect the webpage In the system IAS 2000 v2 is responsible for authentication authorization and management functions The user account information is stored in the IAS 2000 v2 database or other specified external authentication databases The process of authenticating the user s identity is executed via the SSL encryp...

Страница 10: ...ion If the access right to the network beyond the managed area is required an Internet browser such as the Internet Explorer must be opened and a connection to any website must be performed When the browser attempts to connect to a website IAS 2000 v2 will force the browser to redirect to the user login webpage The user must enter the username and password for authentication After the identity is ...

Страница 11: ...IAS 2000 v2 User s Manual 4 ...

Страница 12: ...interface info LED There are four kinds of LED power status port speed and link act to indicate different status of the system Console Port The system can be configured via HyperTerminal For example if you need to set the Administrator s Password you can connect a PC to this port as a Console Serial Port via a terminal connection program such as the super terminal with the parameters of 9600 8 N 1...

Страница 13: ... machine 3 2 Package Contents The standard package of IAS 2000 v2 includes y IAS 2000 v2 x 1 y CD ROM x 1 y Power Cord x 1 y Ethernet Cable Crossover x 1 y Ethernet Cable Straight x1 y Console Cable x 1 y Accessory Packing x 1 3 3 System Requirement y Standard 10 100BaseT including five network cables with RJ 45 connectors y All PCs need to install the TCP IP network protocol ...

Страница 14: ...light up 3 Connect an Ethernet cable to one LAN port with the user authentication function enabled on the front panel The default port is LAN1 port Note Authentication is required for the users to access the network via this LAN port The LAN port with authentication function is referred to as Public LAN Connect the other end of the Ethernet cable to an AP or switch The LED of this LAN port should ...

Страница 15: ...he front panel Connect the other end of the Ethernet cable to ADSL modem cable modem or a switch hub of the internal network The LED of this WAN should be on to indicate a proper connection Attention Usually a straight RJ 45 could be applied if IAS 2000 v2 is connected to a hub computer which supports automatic crossover such as the Access Point However after the Access Point hardware reset IAS 20...

Страница 16: ...0 v2 is installed the following configurations must be set up on the PC Internet Connection Setup for Windows XP and TCP IP Network Setup 4 1 Internet Connection Setup for Windows XP 1 Choose Start Control Panel Internet Options 2 Choose the Connections label and then click Setup ...

Страница 17: ...2000 v2 User s Manual 10 3 Click Next when Welcome to the New Connection Wizard screen appears 4 Choose Connect to the Internet and then click Next 5 Choose Set up my connection manually and then click Next ...

Страница 18: ...IAS 2000 v2 User s Manual 11 6 Choose Connect using a broadband connection that is always on and then click Next 7 Finally click Finish to exit the Connection Wizard Now the setup has been completed ...

Страница 19: ...ppropriate IP address and related information for each PC If the Windows operating system is not a server version the default settings of the TCP IP will regard the PC as a DHCP client and this function is called Obtain an IP address automatically If checking the TCP IP setup or use the static IP in the LAN1 or LAN2 section is needed please follow the steps below Check the TCP IP Setup of Window X...

Страница 20: ...and click OK This is also the default setting of Windows Then reboot the PC to make sure an IP address is obtained from IAS 2000 v2 4 2 Using Specific IP Address If using specific IP address is desired ask the network administrator for the information of the IAS 2000 v2 IP address Subnet Mask New gateway and DNS server address Caution If your PC has been set up completed please inform the network ...

Страница 21: ...k administrator in IP address and Subnet mask as well as Default gateway If the DNS Server column is blank please choose Use the following DNS server addresses and then enter a known DNS address or the DNS address provided by ISP and then click OK y Then click Advanced in the window of Internet Protocol TCP IP Properties ...

Страница 22: ...d click Add below the Default gateways column and the TCP IP Gateway Address window will appear Enter the gateway address of IAS 2000 v2 in the Gateway of TCP IP Gateway Address window and then click Add After returning to the IP Settings label click OK to finish ...

Страница 23: ...ies Additional Configuration Notification Configuration LAN2 Configuration Dynamic DNS Online Report FUNCTION IP Mobility Caution After finishing the configuration of the settings please click Apply and pay attention to see if a restart message appears on the screen If such message appears system must be restarted to allow the settings to take effect All on line users will be disconnected during r...

Страница 24: ...thentication LAN port or the IP address used does not have the same subnet as the URL Please use default IP address such as 192 168 2 xx in your network and then try it again 2 After successfully logging into IAS 2000 v2 enter the web management interface and see the welcome page There is a Logout button on the upper right corner to log out the system ...

Страница 25: ...00 v2 User s Manual 18 5 1 System Configuration This section includes the following functions Configuration Wizard System Information WAN1 Configuration WAN2 Failover LAN1 Configuration and LAN2 Configuration ...

Страница 26: ...zard has 7 steps providing a simple and easy way to set up IAS 2000 v2 and can be served as Quick Installation There are 7 steps as listed below 1 Change Admin s Password 2 Choose System s Time Zone 3 Set System Information 4 Select the Connection Type for WAN1 Port 5 Configure LAN1 6 Select Authentication Method 7 Restart Now click the System Configuration from the top menu and the System Configu...

Страница 27: ...tart the wizard y Running the Wizard A welcome screen that briefly introduces the 7 steps will appear Click Next to begin y Step 1 Change Admin s Password Enter a new password for the admin account and retype it in the verify password field twenty character maximum and no spaces Click Next to continue ...

Страница 28: ...ronization or use the default DNS Server Enter a DNS Server provided by the ISP Internet Service Provider Contact the ISP if the DNS IP Address is unknown Click Next to continue y Step 4 Select the Connection Type for WAN1 Port There are three types that WAN1 port supports Static IP Address Dynamic IP Address and PPPoE Client Select a proper Internet connection type and click Next to continue Dyna...

Страница 29: ...k Next to continue y Step 5 Configure LAN1 s Information IP Address Enter the Public LAN port IP Address or use the default Subnet Mask Enter the Public LAN port Subnet Mask or use the default Disable DHCP Server If the DHCP server is disabled the clients in Public LAN must be configured with an IP address manually Enable DHCP Server When the option is selected IAS 2000 v2 will automatically provi...

Страница 30: ...name provided by the ISP e g airlive com WINS Server Enter the IP address of the WINS Server Windows Internet Naming Service Server This field is optional Preferred DNS Server The DNS Server settings are provided by the ISP Only the Preferred DNS Server field is mandatory Contact the ISP if the DNS Server settings are unknown Alternate DNS Server The DNS Server settings are provided by the ISP Thi...

Страница 31: ...his authentication method by clicking the ADD bottom Click Next to continue POP3 User Authentication Method POP3 Enter IP Domain Name and server port of the POP3 server provided by the ISP and then choose enable SSL or not Click Next to continue RADIUS User Authentication RADIUS Enter RADIUS server IP Domain Name authentication port accounting port and secret key Then choose to enable accounting s...

Страница 32: ...bute to access the LDAP server If User Account binding type is selected the system will use the Base DN to be the user account to access the LDAP server If Anonymous binding type is selected the system will access the LDAP servers without requiring authentication If Specified DN binding type is selected username and password in the Bind RDN and Bind Password fields must be entered to access the LD...

Страница 33: ...ext to continue NT Domain User Authentication Method NT Domain When NT Domain User is selected enter the information for Server IP Address and enable disable Transparent Login After this setup is completed click Next to continue y Step 7 Restart Click Restart to save the current settings and restart IAS 2000 v2 The Setup Wizard is now completed ...

Страница 34: ...pear on the screen Please do not interrupt IAS 2000 v2 until the message has disappeared This indicates that a complete and successful restart process has finished Caution During every step of the wizard if you wish to go back to modify the setting Please click the Back button to go back to the previous step ...

Страница 35: ...omepage is the company s website or a popular website such as http www airlive com Regardless of the original webpage set in the users computer they will be redirect to this page after login y Remote Management IP Set a specific IP or the IP range or subnet with a system which is able to connect to the web management interface via the WAN port For example 10 2 3 0 24 means that as long as an admin...

Страница 36: ...f a NTP server and select the desired time zone in the system configuration interface for adjusting the time automatically Universal Time is Greenwich Mean Time GMT Time can also be set manually when by selecting Set Device Date and Time Please enter the date and time for these fields y History Report Interval Time interval for sending the history notice ...

Страница 37: ...ss The IP address of the WAN1 port Subnet Mask The subnet mask of the WAN1 port Default Gateway The gateway of the WAN1 port Preferred DNS Server The primary DNS Server of the WAN1 port Alternate DNS Server The substitute DNS Server of the WAN1 port This is not required Enable Bridge Mode WAN1 is set to use a static IP address and Enable Bridge Mode is checked WAN2 and all LAN ports will share the...

Страница 38: ...IAS 2000 v2 User s Manual 31 y Dynamic IP address It is only applicable for the network environment where the DHCP Server is available in the network Click the Renew button to get an IP address ...

Страница 39: ...ng PPPoE to connect to the network please enter the Username and Password There is a Dial on demand function under PPPoE If this function is enabled you can set a Maximum Idle Time When the idle time is reached the system will automatically disconnect itself ...

Страница 40: ... status y Static IP Address Specify the IP Address Subnet Mask Default Gateway of WAN2 Port and Preferred DNS Server which should be applicable for the network environment Up to three URLs can be entered Check Warning of Internet Disconnection to work with the WAN Failover function WAN Failover When WAN1 connection fails the traffic will be routed to WAN2 automatically Fallback to WAN1 when possib...

Страница 41: ...amic IP Address Select this when WAN2 Port can obtain IP address automatically such as a DHCP Server available from WAN2 Port Up to three URLs can be entered Check Warning of Internet Disconnection to work with the WAN Failover function ...

Страница 42: ...lover and Fallback to WAN1 when possible also can be enabled like as the function for Static IP Address If Warning of Internet Disconnection is enabled a warning message can be entered to indicate what the system should display when Internet connection is down ...

Страница 43: ...S 2000 v2 User s Manual 36 5 1 5 LAN1 Configuration User authentication can be chosen to enable or disable in LAN1 port In this part you can set the related configurations about LAN1 port and DHCP server ...

Страница 44: ...he function of the DHCP Server Enable DHCP Server Enter proper setting of Start IP Address End IP Address Preferred DNS Server Alternate DNS Server Domain Name WINS Server Lease Time and Reserved IP Address List See the following figure Fields marked with red asterisks must be filled in ...

Страница 45: ...P addresses if desired Then the setup of the Reserved IP Address List as shown in the following figure will appear Enter the related Reserved IP Address MAC and Description not compulsory When finished click Apply to complete the setup Enable DHCP Relay Specify other DHCP Server IP address if using DHCP Relay is desired See the following figure ...

Страница 46: ...lowing screen will appear Choose the desired Item and click Edit for further configuration See the following figure The system will need confirmation for enabling individual VLAN segment Click Enable to continue See the following figure After enabling this VLAN segment the following screen will appear See the following description and figure for details ...

Страница 47: ...provided NAT mode and ROUTER mode NAT All IP addresses externally connected through the VLAN port these IP addresses must belong to the same network of the VLAN port will be converted into the IP address of the WAN1 port by IAS 2000 v2 and onward to outside the network Router All IP addresses externally connected through the VLAN port use its original IP addresses for external connection Thus IAS ...

Страница 48: ...rver If you want to use the DHCP Server function of IAS 2000 v2 set proper configurations is necessary Related information needed on setting up the DHCP Server is described as follows Start IP Address End IP Address Preferred DNS Server Alternate DNS Server Domain Name WINS Server Lease Time and Reserved IP Address List See the following figure ...

Страница 49: ...anagement interface Then the setup of the Reserved IP Address List as shown in the following figure will appear Enter the related Reserved IP Address MAC and Description not compulsory When finished click Apply to complete the setup Enable DHCP Relay If you want to enable this function you must specify a DHCP Server IP address See the following figure ...

Страница 50: ...S 2000 v2 User s Manual 43 5 1 6 LAN2 Configuration User authentication can be chosen to enable or disable in LAN2 port In this part you can set the related configurations about LAN2 port and DHCP server ...

Страница 51: ...he function of the DHCP Server Enable DHCP Server Enter proper setting of Start IP Address End IP Address Preferred DNS Server Alternate DNS Server Domain Name WINS Server Lease Time and Reserved IP Address List See the following figure Fields marked with red asterisks must be filled in ...

Страница 52: ...P addresses if desired Then the setup of the Reserved IP Address List as shown in the following figure will appear Enter the related Reserved IP Address MAC and Description not compulsory When finished click Apply to complete the setup Enable DHCP Relay Specify other DHCP Server IP address if using DHCP Relay is desired See the following figure ...

Страница 53: ...hoose the desired Item and click Edit for further configuration See the following figure The system will need confirmation for enabling individual VLAN segment Click Enable to continue See the following figure After enabling this VLAN segment the following screen will appear See the following description and figure for details y Enable User Authentication on this individual VLAN ...

Страница 54: ... the network Router All IP addresses externally connected through the VLAN port use its original IP addresses for external connection Thus IAS 2000 v2 acts like a Router IP Address Enter the desired IP address for this VLAN Subnet Mask Enter the desired Subnet Mask for this VLAN y VLAN DHCP Configuration Disable DHCP Server Disable the function of the DHCP Server of IAS 2000 v2 Enable DHCP Server ...

Страница 55: ...anagement interface Then the setup of the Reserved IP Address List as shown in the following figure will appear Enter the related Reserved IP Address MAC and Description not compulsory When finished click Apply to complete the setup Enable DHCP Relay If you want to enable this function you must specify a DHCP Server IP address See the following figure ...

Страница 56: ...er s Manual 49 5 2 Network Configuration This section includes the following functions Network Address Translation Privilege List Monitor IP List Walled Garden List Proxy Server Properties Dynamic DNS and IP Mobility ...

Страница 57: ...ternal to internal IP mapping hence a user on WAN side network can access the private machine via the external IP similar to DMZ usage in firewall product There are 40 sets of static Internal IP Address and External IP Address available If a host needs a static IP address to access the network through WAN port set a static IP for the host These settings will become effective immediately after clic...

Страница 58: ... check the desired server to enable These settings will become effective immediately after clicking the Apply button y Port and IP Redirection This function allows the administrator to set 40 sets of the IP addresses at most for redirection purpose When the user attempts to connect to a destination IP address listed here the connection packet will be converted and redirected to the corresponding d...

Страница 59: ...IAS 2000 v2 User s Manual 52 ...

Страница 60: ... network without authentication and enter the IP addresses of these workstations in this list The Remark blank is not necessary but is useful to keep track IAS 2000 v2 allows 100 privilege IP addresses at most These settings will become effective immediately after clicking Apply Warning Permitting specific IP addresses to have network access rights without going through standard authentication pro...

Страница 61: ...can be exported as well Be sure to enter the MAC address the format is xx xx xx xx xx xx as well as the remark not necessary if manually creating the list is desired and select a policy for the individual entry These settings will become effective immediately after clicking Apply Attention No matter how you choose to create the list you must select an Access Gateway first Warning Permitting specif...

Страница 62: ...e upload The uploading file should be a text file and the format of each line is MAC Policy Remark without the quotes There must be no spaces between the fields and commas The MAC field could be omitted but the trailing comma must be retained When adding user accounts by uploading a file the existing accounts in the embedded database will not be replaced by new ones Export List Click this to expor...

Страница 63: ...mation click Apply and these settings will become effective immediately Click Monitor to check the current status of all the monitored IP The system provides 40 IP addresses a most on the Monitor IP List y Send From The e mail address of the administrator in charge of the monitoring This will show up as the sender s e mail y Send To The e mail address of the person whom the monitoring result is fo...

Страница 64: ... enter the Account Name Password and Domain y Send Test Email Click Send to send out a test e mail of the IP monitoring report y IP Address The IP addresses under monitoring In the Monitor IP result page green light means the IP address is alive and reachable On the other hand red light means the IP address is not reachable now The administrator can understand the some networking devices by this f...

Страница 65: ... and authentication Up to 20 addresses or domain names of the websites can be defined in this list Users without the network access right can still have a chance to experience the actual network service free of charge Please enter the website IP Address or Domain Name in the list and these settings will become effective immediately after clicking Apply ...

Страница 66: ...er the IAS 2000 v2 security management the system will match the External Proxy Server list to the end users proxy setting If there isn t a matching then the end users will no be able to reach the login page and thus unable to access the network If there is a matching then the end users will be directed to the system first for authentication After a successful authentication the end users will be ...

Страница 67: ...also update the newest IP address regularly to the DNS server These settings will become effective immediately after clicking Apply y DDNS Enabling or disabling of this function y Provider Select the DNS provider y Host name The IP address domain name of the WAN port y Username E mail The register ID username or e mail for the DNS provider y Password Key The register password for the DNS provider ...

Страница 68: ... he or she can still authenticate through IAS 2000 v2 and access the network y Mobile IP If several sets of IAS 2000 v2 are used to construct a network environment a client can use the same group of IP configurations When a client roams into different locations the connection will be kept alive therefore no disconnection will occur when for example downloading data ...

Страница 69: ...ser s Manual 62 5 3 User Authentication This section includes the following functions Authentication Configuration Policy Configuration Black List Configuration Guest User Configuration and Additional Configuration ...

Страница 70: ...P3 RADIUS LDAP and NT Domain one On demand User and one PMS User that the administrator can apply with different policies Click on the server name to set the related configurations for that particular server After completing and clicking Apply to save the settings go back to the previous screen to choose a server to be the default server and enable or disable any server on the list ...

Страница 71: ...t the server is enabled or disabled y Postfix Set a postfix that is easy to distinguish e g Local for the server by using numbers 0 to 9 alphabets a to z or A to Z dash underline _ and dot with a maximum of 40 characters all other letters are not allowed y Blacklist There are five sets of the black lists Select one of them or choose None Please refer to 5 3 3 Black List Configuration y Local User ...

Страница 72: ...uration y Edit Local User List Click this to enter the Local User List screen Add User Click this button to enter the Add User page Fill in the necessary information such as Username Password MAC optional and Remark optional Select a desired Maximum Bandwidth Request Bandwidth and Policy ...

Страница 73: ...ick Apply to complete adding the user or users Import User Click this to enter the Upload User Account page Click the Browse button to select the text file for the user account upload Then click Submit to complete the upload process ...

Страница 74: ...r ID Password MAC Max bandwidth Request bandwidth Policy Remark without the quotes There must be no spaces between the fields and commas The MAC field could be omitted but the trailing comma must be retained When adding user accounts by uploading a file the existing accounts in the embedded database will not be replaced by new ones ...

Страница 75: ...IAS 2000 v2 User s Manual 68 Export List Click this to create a txt file and then save it on disk Refresh Click this to refresh the list ...

Страница 76: ...he users at once Delete This will delete the users individually Edit User If editing the content of individual user account is needed click the username of the desired user account to enter the Edit User Interface for that particular user and then modify or add any desired information such as Username Password MAC Maximum Bandwidth Request Bandwidth Policy and Remark optional Then click Apply to c...

Страница 77: ...tings Radius Roaming Out When Radius Roaming Out is selected local users can login from other domains by using their original accounts 802 1x Authentication 802 1x is a security standard for wired and wireless LANs It encapsulates EAP Extensible Authentication Protocol processes into Ethernet packets instead of using the protocol s native PPP Point to Point Protocol environment thus reducing some ...

Страница 78: ...enabled or disabled y Postfix Set a postfix that is easy to distinguish e g Local for the server by using numbers 0 to 9 alphabets a to z or A to Z dash underline _ and dot with a maximum of 40 characters all other letters are not allowed y Blacklist There are five sets of the black lists Select one of them or choose None Please refer to 5 3 3 Black List Configuration y Authentication Method There...

Страница 79: ...ndary server is not required The blanks with red asterisks are necessary information These settings will become effective immediately after clicking the Apply button y Server IP Enter the IP address domain name given by the ISP y Port Enter the Port given by the ISP The default value is 110 y SSL Setting If this option is enabled the POP3 protocol will perform the authentication ...

Страница 80: ...tfix that is easy to distinguish e g Local for the server by using numbers 0 to 9 alphabets a to z or A to Z dash underline _ and dot with a maximum of 40 characters all other letters are not allowed y Blacklist There are five sets of the black lists Select one of them or choose None Please refer to 5 3 3 Black List Configuration y Authentication Method There are four authentication methods POP3 R...

Страница 81: ...02 1x Authentication in 5 3 1 1 Local User y Trans Full Name When enabled the ID and postfix will be transferred to the RADIUS server for authentication When disabled only the ID will be transferred to RADIUS server for authentication y Server IP Enter the IP address domain name of the RADIUS server y Authentication Port Enter the authentication port of the RADIUS server and the default value is 1...

Страница 82: ...x that is easy to distinguish e g Local for the server by using numbers 0 to 9 alphabets a to z or A to Z dash underline _ and dot with a maximum of 40 characters all other letters are not allowed y Blacklist There are five sets of the black lists Select one of them or choose None Please refer to 5 3 3 Black List Configuration y Authentication Method There are four authentication methods POP3 Radi...

Страница 83: ...mmediately after clicking the Apply button y Server IP Enter the IP address domain name of the LDAP server y Port Enter the Port of the LDAP server and the default value is 389 y Base DN Enter the distinguished name of the LDAP server y Binding Type There are four binding types User Account Anonymous Specific DN and Windows AD to select User Account Use the user account s login username and passwo...

Страница 84: ...ount Attribute UID CN or sAMAccountName Specified DN Enter more information for the specific DN username and password in the Bind RDN and Bind Password fields and then select one Account Attribute UID CN or sAMAccountName to access the LDAP server Windows AD Enter the domain name of Windows AD to access the LDAP server ...

Страница 85: ...here are five sets of the black lists Select one of them or choose None Please refer to 5 3 3 Black List Configuration y Authentication Method There are four authentication methods POP3 Radius LDAP and NTDomain to configure from Select the desired method and then click the link besides the pull down menu for more advanced configuration y Policy Name There are ten policies to choose from to apply t...

Страница 86: ...um of 40 characters all other letters are not allowed y Receipt Header There are two fields Receipt Header 1 and Receipt Header 2 for the receipt s header Enter receipt header message or use the default y Receipt Footer Enter receipt footer message here or use the default y Monetary Unit Select the desired monetary unit for a region or input the needed monetary unit if not listed y Policy Name Sel...

Страница 87: ...word will be listed Username The login name of the on demand user Password The login password of the on demand user Remain Time Volume The total time Volume that the user can use currently Status The status of the account Normal indicates that the account is not in use and not overdue Online indicates that the account is in use and not overdue Expire indicates that the account is overdue and canno...

Страница 88: ...aximum volume allowed is 999 999 Mbyte or Time the maximum days allowed is 999 Hrs Expired Info This is the duration of time that the user can use the account after the generation of the account If the account is not activated during this duration the account will self expire Valid Duration This is the duration of time that the user can use the account after the activation of the account After thi...

Страница 89: ... to enter the On demand User Generate page Pressing the Create button for the desired plan an On demand user will be created then click Printout to print a receipt which will contain this on demand user s information There are 2000 On demand user accounts available ...

Страница 90: ... distinguish e g Local for the server by using numbers 0 to 9 alphabets a to z or A to Z dash underline _ and dot with a maximum of 40 characters all other letters are not allowed y Policy Name There are ten policies to select from y Receipt Header There are two fields Receipt Header 1 and Receipt Header 2 for the receipt s header Enter receipt header message or use the default y Receipt Footer En...

Страница 91: ... and not overdue Expire indicates that the account is overdue and cannot be used Expire Valid Time The Valid Time indicates the duration of time that the user can use the Internet service after the account is activated After this duration the account will self expire The Expire Time indicates the duration of time that the account needs to be activated after the generation If the account is not act...

Страница 92: ...ccount After this duration the account will self expire 1 999 hours can be entered Assign to Policy Assign a policy for this billing plan Price The price charged for this billing plan Note There is an Auto Expired mechanism is for preventing that an account is created but never logged in If the account is created but never been logged in the account will be invalid after a period y Create PMS User...

Страница 93: ... user database is empty After entering Room Number and Maximum User then pressing Create button by the desired plan a PMS user will be created Click Printout to print a receipt which will contain this PMS user s information See the following figure ...

Страница 94: ...olicy But Global policy only has Firewall Profile and Specific Route Profile settings y Global Policy Select Policy Select Global to set the Firewall Profile and Specific Route Profile Firewall Profile Click the hyperlink of Setting for Firewall Profile the Firewall Profiles page will appear Click the numbers of Filter Rule Item to edit individual rules and click Apply to save the settings The rul...

Страница 95: ...ss is to permit packets passing Protocol There are three protocols to select TCP UDP and ICMP or choose ALL to use all three protocols Source MAC Address The MAC address of the source IP address This is for specific MAC address filter Source Destination Interface There are five interfaces to choose ALL WAN1 WAN2 LAN1 and LAN2 Source Destination IP Enter the source and destination IP addresses Sour...

Страница 96: ...e can be changed here Destination IP Address The destination IP address of the host or the network Destination Subnet Netmask Select a destination subnet netmask of the host or the network Gateway IP Address The IP address of the next router to the destination View System Route Table Click the hyperlink of View System Route Table to see the information of the hosts or the networks ...

Страница 97: ...ction for a fixed time period y Policy 1 Policy 10 Select Policy Policy Name Select a desired policy and rename it in the Policy Name field if desired Firewall Profile Click the hyperlink of Setting for Firewall Profile the Firewall Profiles page will appear Click the numbers of Filter Rule Item to edit individual rules and click Apply to save the settings The rule status will show on the list Che...

Страница 98: ...on the rule will be enabled Action There are two options Block and Pass Block is to prevent packets from passing and Pass is to permit packets passing Protocol There are three protocols to select TCP UDP and ICMP or choose ALL to use all three protocols Source MAC Address The MAC address of the source IP address This is for specific MAC address filter ...

Страница 99: ...ation IP Address The destination IP address of the host or the network Destination Subnet Netmask Select a destination subnet netmask of the host or the network Gateway IP Address The IP address of the next router to the destination Default Check this option to apply to the default values Schedule Profile Click the hyperlink of Setting for Schedule Profile to enter the Schedule Profile list Select...

Страница 100: ...IAS 2000 v2 User s Manual 93 Bandwidth Choose one bandwidth limit for that particular policy ...

Страница 101: ... Maximum Concurrent Sessions The concurrent sessions for each user it can be restricted by administrator When a user reaches the session limit this user will be implicitly suspended from any new connection for a fixed time period ...

Страница 102: ...k list wants to log into the system the user s access will be denied The administrator can use the pull down menu to select the desired black list y Select Black List There are 5 lists to select from for the desired black list y Name Set the black list name and it will show on the pull down menu above Add User to List Click the hyperlink to add users to the selected black list click Apply to add t...

Страница 103: ...S 2000 v2 User s Manual 96 If the administrator wants to remove a user from the black list just select the user s Delete check box and then click the Delete button to remove that user from the black list ...

Страница 104: ...plete the upload process The uploading file should be a text file and the format of each line should be ID Remark without the quotes There must be no spaces between the fields and commas When adding user accounts by uploading a file existing accounts in the embedded database that are also defined in the data file will not be replaced by the new ones Export Black List Click Export List to create a ...

Страница 105: ...List IAS 2000 v2 offers ten guest user accounts To activate a guest user just enter the password in the corresponding Password field for that guest account Guest accounts with blank password will not be activated y Session Length This restricts the connection time of the guest users The default session length is 6 hours and the available session time ranges from 1 to 12 hours or unlimited ...

Страница 106: ...thentication method Friendly Logout When a user logs into the network a small login successful window will appear to show the user s information If enabled when users try to close the small window a confirming popup window will appear to notify users in case users close the small window by accident y Roaming Out Timer Session Timeout The time that the user can access the network while roaming When...

Страница 107: ...ubmit to complete the upload process Click Set To Default and then click restart to use the default certificate and key 2 Login Page The administrator can use the default login page or get the customized login page by setting the template page uploading the page or downloading from the specific external website After finishing the setting Click Preview to see the login page a Choose Default Page t...

Страница 108: ...IAS 2000 v2 User s Manual 101 b Choose Template Page to make a customized login page here Click Select to pick up a color and then fill in all of the blanks Click Preview to see the result first ...

Страница 109: ...d Page and upload a login page Click the Browse button to select the file to upload Then click Submit to complete the upload process After the upload process is completed the new login page can be previewed by clicking Preview button at the bottom ...

Страница 110: ...ter or browse the filename of the images to upload in the Upload Images field on the Upload Images Files page and then click Submit The system will show the used space and the maximum size of the image file of 512K If the administrator wishes to restore the factory default of the login page click the Use Default Page button to restore it to default After the image file is uploaded the file name wi...

Страница 111: ... selection and get the login page from the specific website Enter the website address in the External Page Setting field and then click Apply After applying the setting the new login page can be previewed by clicking Preview button at the bottom of this page ...

Страница 112: ...L code of the user defined logout interface must include the following HTML code that the user can enter the username and password After the upload is completed the user defined login user interface can be previewed by clicking Preview at the bottom of this page If want to restore the factory default setting of the logout interface click the Use Default Page button ...

Страница 113: ...ge for On Demand or get the customized login success page for On Demand by setting the template page uploading the page or downloading from the specific website After finishing the setting click Preview to see the login success page for On Demand a Choose Default Page to use the default login success page for On Demand ...

Страница 114: ...0 v2 User s Manual 107 b Choose Template Page to make a customized login success page for On Demand here Click Select to pick up a color and then fill in all of the blanks Click Preview to see the result first ...

Страница 115: ...g Preview button at the bottom If the user defined login success page for On Demand includes an image file the image file path in the HTML code must be the image file to be uploaded Then enter or browse the filename of the images to upload in the Upload Images field on the Upload Images Files page and then click Submit The system will show the used space and the maximum size of the image file of 5...

Страница 116: ... Setting field and then click Apply After applying the setting the new login success page for On Demand can be previewed by clicking Preview button at the bottom of this page 5 Login Success Page The administrator can use the default login success page or get the customized login success page by setting the template page uploading the page or downloading from the specific website After finishing t...

Страница 117: ...IAS 2000 v2 User s Manual 110 b Choose Template Page to make a customized login success page here Click Select to pick up a color and then fill in all of the blanks Click Preview to see the result first ...

Страница 118: ...button at the bottom If the user defined login success page includes an image file the image file path in the HTML code must be the image file to be uploaded Then enter or browse the filename of the images to upload in the Upload Images field on the Upload Images Files page and then click Submit The system will show the used space and the maximum size of the image file of 512K If the administrator...

Страница 119: ...ose the External Page selection and get the login success page from the specific website Enter the website address in the External Page Setting field and then click Apply After applying the setting the new login success page can be previewed by clicking Preview button at the bottom of this page Please note that is needed in your HTML code to make sure the page works correctly ...

Страница 120: ...ge uploading the page or downloading from the specific external website After finishing the setting click Preview to see the logout success page a Choose Default Page to use the default logout success page b Choose Template Page to make a customized logout success page here Click Select to pick up a color and then fill in all of the blanks Click Preview to see the result first ...

Страница 121: ... logout success page to be uploaded Then click Submit to complete the upload process After the upload process is completed the new logout success page can be previewed by clicking Preview button at the bottom If the user defined logout success page includes an image file the image file path in the HTML code must be the image file to be uploaded ...

Страница 122: ...success page click the Use Default Page button to restore it to default After the image file is uploaded the file name will show on the Existing Image Files field Check the file and click Delete to delete the file d Choose the External Page selection and get the logout success page from the specific external website Enter the website address in the External Page Setting field and then click Apply ...

Страница 123: ...n out There are two kinds of reminder Volume and Time The default reminding trigger level for Volume is 1Mbyte and the level for Time is 5 minutes y POP3 Message If a user tries to retrieve mail from POP3 mail server before login the users will receive a welcome mail from IAS 2000 v2 The administrator can edit the content of this welcome mail ...

Страница 124: ...nto IAS 2000 v2 There will only be 40 users allowed in this MAC address list User authentication is still required for these users Please click the hyper link of Permitted MAC Address List to enter the MAC Address Control page and fill in the wanted MAC addresses Caution The format of the MAC address is xx xx xx xx xx xx or xx xx xx xx xx xx ...

Страница 125: ...IAS 2000 v2 User s Manual 118 5 4 Utilities This section provides four utilities to customize and maintain the system including Change Password Backup Restore Setting Firmware Upgrade and Restart ...

Страница 126: ...ds here Please enter the required fields marked with red asterisks Click Apply to activate the new passwords Caution If the administrator s password is lost the administrator s password still can be changed through the text mode management interface on the serial port console printer port ...

Страница 127: ...d save it on disk y Restore system settings Click Browse to search for a db database backup file created by IAS 2000 v2 and click Restore system settings to restore to the backup settings saved previously y Reset to the factory default settings Click Reset to load the factory default settings of IAS 2000 v2 Caution Resetting to factory default settings will clear restore all settings such as polic...

Страница 128: ... a few minutes before the upgrade process completes and the system needs to be restarted afterwards to make the new firmware effective Warning 1 Firmware upgrade may cause the loss of some of the data Please refer to the release notes for the limitation before upgrading the firmware 2 Please restart the system after upgrading the firmware Do not power on off the system during the upgrade or the re...

Страница 129: ...e minutes Click YES to restart IAS 2000 v2 click NO to go back to the previous screen If turning off the power is necessary restarting IAS 2000 v2 first and turning off the power after completing the restart process is recommended Caution The connection of all online users of the system will be disconnected when system is in the process of restarting ...

Страница 130: ...ser s Manual 123 5 5 Status This section includes System Status Interface Status Current Users Traffic History Notification Configuration and Online Report to provide system status information and online user status ...

Страница 131: ...IAS 2000 v2 User s Manual 124 5 5 1 System Status This section provides an overview of the system for the administrator ...

Страница 132: ...emote Management IP The IP or IP range that is allowed for accessing the management interface Manage SNMP Enabled Disabled stands for the current status of the SNMP management function Retainable Days The maximum number of days for the system to retain the users information History Traffic log Email To The email address that the traffic history information will be sent to NTP Server The network ti...

Страница 133: ...g to allow or disallow recording logs at syslog server Email Enabled Disabled stands for the current setting to allow or disallow mailing out logs to specific recipient Session Log FTP Server Enabled Disabled stands for the current setting to allow or disallow sending out logs at FTP server ...

Страница 134: ...IAS 2000 v2 User s Manual 127 5 5 2 Interface Status Provide an overview of the interface for the administrator including WAN1 WAN2 LAN1 and LAN2 ...

Страница 135: ...DNS server of the LAN1 WINS IP Address The WINS server IP N A means that it is not configured Start IP Address The start IP address of the DHCP IP range of LAN1 End IP Address The end IP address of the DHCP IP range of LAN1 LAN1 DHCP Server Lease Time Minutes of the lease time of the IP address of LAN1 Mode The mode of the LAN2 MAC Address The MAC address of the LAN2 IP Address The IP address of t...

Страница 136: ... Username IP MAC Pkts In Bytes In Pkts Out Bytes Out Idle and Kick Out can be obtained Administrator can use this function to force a specific online user to log out Just click the hyperlink of Kick Out next to the online user s name to logout that particular user Click Refresh to renew the Current User List ...

Страница 137: ...IAS 2000 v2 User s Manual 130 5 5 4 Traffic History This function is used to check the history of IAS 2000 v2 The history of each day will be saved separately in the DRAM for 3 days ...

Страница 138: ...Caution Since the history is saved in the DRAM if you need to restart the system and also keep the history then please manually copy and save the information before restarting Click Download to save every history log in a text file ...

Страница 139: ... Bytes In Pkts Out and Bytes Out of user activities y On demand User Log As shown in the following figure each line is a on demand user log record consisting of 13 fields Date System Name Type Name IP MAC Pkts In Bytes In Pkts Out Bytes Out Expiretime Validtime and Remark of user activities y PMS User Log As shown in the following figure each line is a on demand user log record consisting of 14 fi...

Страница 140: ...of user activities y Roaming In Traffic History As shown in the following figure each line is a roaming in traffic history record consisting of 15 fields Date Type Name NSID NASIP NASPort UserMAC UserIP SessionID SessionTime Bytes in Bytes Out Pkts In Pkts Out and Message of user activities y Interface Performance As shown in the following figure the history record consists of 5 fields Interface S...

Страница 141: ...erver RADIUS Server Proxy Server and Redirector Server for network service status y System Performance As shown in the following figure the history record consists of 5 fields CPU Usage Memory Usage Total Memory KB Memory Used KB and Memory Free KB of IAS 2000 v2 status y Monthly Report As shown in the following figure 5 fields Local Roaming in Roaming out On Demand Users PMS Users is provided ...

Страница 142: ...rt y SMTP Server The IP address of the SMTP server y SMTP Auth Method The system provides four authentication methods PLAIN LOGIN CRAM MD5 and NTLMv1 or NONE to use none of the above Depending on which authentication method selected enter the Account Name Password and Domain NTLMv1 is not currently available for general use Plain and CRAM MD5 are standardized authentication mechanisms while LOGIN ...

Страница 143: ... of the person whom the history email is for This will be the receiver s e mail SMTP Server The IP address of the SMTP server SMTP Auth Method The system provides four authentication methods PLAIN LOGIN CRAM MD5 and NTLMv1 or NONE to use none of the above Depending on which authentication method selected enter the Account Name Password and Domain SMTP Setting Test Click Send Test Log button to sen...

Страница 144: ...IAS 2000 v2 User s Manual 137 Password Specify FTP account password FTP Setting Test Click Send Test Log button to send a test report to FTP server ...

Страница 145: ...tatus y System Status As shown in the following figure the online report consists of 5 fields CPU Usage Memory Usage Total Memory Memory Used and Memory Free of IAS 2000 v2 status y Service Status As shown in the following figure the online report consists of 6 fields DHCP Server Syslog Server SNMP Server HTTP Server Agent SSH Server RADIUS Server Proxy Server and Redirector Server for network ser...

Страница 146: ...ists of 5 fields Interface Speed IN bps Speed OUT bps Packet IN pps and Packet OUT pps for WAN and LAN status y Network Session Status As shown in the following figure the online report consists of 3 fields IP TCP session count and UDP session count This report tells how many connections each IP address uses now ...

Страница 147: ...IAS 2000 v2 User s Manual 140 5 6 Help On the screen the Help button is on the upper right corner Click Help to the Online Help window and then click the hyperlink of the items to get the information ...

Страница 148: ... the dynamical access network After the user end obtains the network address please open an Internet browser and the default login webpage will appear on the Internet browser Key in the username and password created in the local user account or the on demand user account in the interface and then click Submit button Here we key in the local user account e g jacky for the username and 1234 for the ...

Страница 149: ...ng Remaining usage and a Redeem button y Remaining usage Show the rest of use time that the on demand user can surf Internet y Redeem When the remaining time or data size is insufficient the user has to pay for adding credit at the counter and then the user will get a new username and password After clicking the Redeem button the following screen will show up Please enter the new username and pass...

Страница 150: ...rface with dialog boxes Please use arrow keys on the keyboard to browse the menu and press the Enter key to make selection or confirm what you enter 3 Once the console port of IAS 2000 v2 is connected properly the console main screen will appear automatically If the screen does not appear in the terminal simulation program automatically please try to press the arrow keys so that the terminal simul...

Страница 151: ...tem is displayed Display iptables The internal iptables of the system is displayed Display CPU and RAM by top The CPU and RAM usage of the system is displayed by Linux utility Top Display network traffic The network traffic of the system is displayed Display system up time The system live time time for system being turn on is displayed Check service status Check and display the status of the syste...

Страница 152: ...min and the default password is also airlive which is the same as for the web management interface The administrator s password can be changed here Even if the password is forgotten and the management interface can not be accessed from the web or the remote end of the SSH use the null modem to connect the console management interface and set the administrator s password again Caution Although it d...

Страница 153: ...AN interface supports Static IP DHCP client and PPPoE client Interface supports static IP Supports NAT mode and router mode Built in DHCP server Built in NTP client Supports Redirect of network data Supports IPSec ESP PPTP and H 323 pass through under NAT Customizable static routing table Supports Virtual Server Supports DMZ Server Supports machine operation status monitoring and reporting system ...

Страница 154: ...Supports web based login Supports several friendly logout methods Supports RADIUS accounting protocol to generate the billing record on RADIUS server y Administration Provides online status monitoring and history traffic Supports SSL encrypted web administration interface and user login interface Customizable user login logout web interface Customizable redirect after users are successfully authen...

Страница 155: ...architecture and using some proxy servers provided by Internet Service Providers In Hotspots users usually enable their proxy setting of the browsers such as IE and Firefox Therefore so we need to set some proxy configuration in the Gateway need to be set Please follow the steps to complete the proxy configuration 1 Login Gateway by using admin 2 Click the Network Configuration from top menu and t...

Страница 156: ...0 v2 User s Manual 149 3 Click the Proxy Server Properties from left menu and the homepage of the Proxy Server Properties will appear 4 Add the ISP s proxy Server IP and Port into External Proxy Server Setting ...

Страница 157: ...IAS 2000 v2 User s Manual 150 5 Enable Built in Proxy Server in Internal Proxy Server Setting 6 Click Apply to save the settings ...

Страница 158: ...f may often ask their users to enable their proxy setting of the browsers such as IE and Firefox to reduce the internet access loading Therefore some proxy configurations in the Gateway need to be set Caution Some enterprises will automatically redirect packets to proxy server by using core switch or Layer 7 devices By the way the clients don t need to enable their browsers proxy settings and admi...

Страница 159: ...IAS 2000 v2 User s Manual 152 Gateway setting 1 Login Gateway by using admin 2 Click the Network Configuration from top menu and the homepage of the Network Configuration will appear ...

Страница 160: ...000 v2 User s Manual 153 3 Click the Proxy Server Properties from left menu and the homepage of the Proxy Server Properties will appear 4 Add your proxy Server IP and Port into External Proxy Server Setting ...

Страница 161: ...er Setting 6 Click Apply to save the settings Warning If your proxy server is disabled it will make the user authentication operation abnormal When users open the browser the login page won t appear because the proxy server is down Please make sure your proxy server is always available ...

Страница 162: ...P address into proxy exception information so the user login successful page can show up normally 1 Use command ipconfig to get Default Gateway IP Address 2 Open browser to add default gateway IP address e g 192 168 1 254 and logout page IP address 1 1 1 1 into proxy exception information z For I E ...

Страница 163: ...IAS 2000 v2 User s Manual 156 z For Firefox ...

Отзывы: