background image

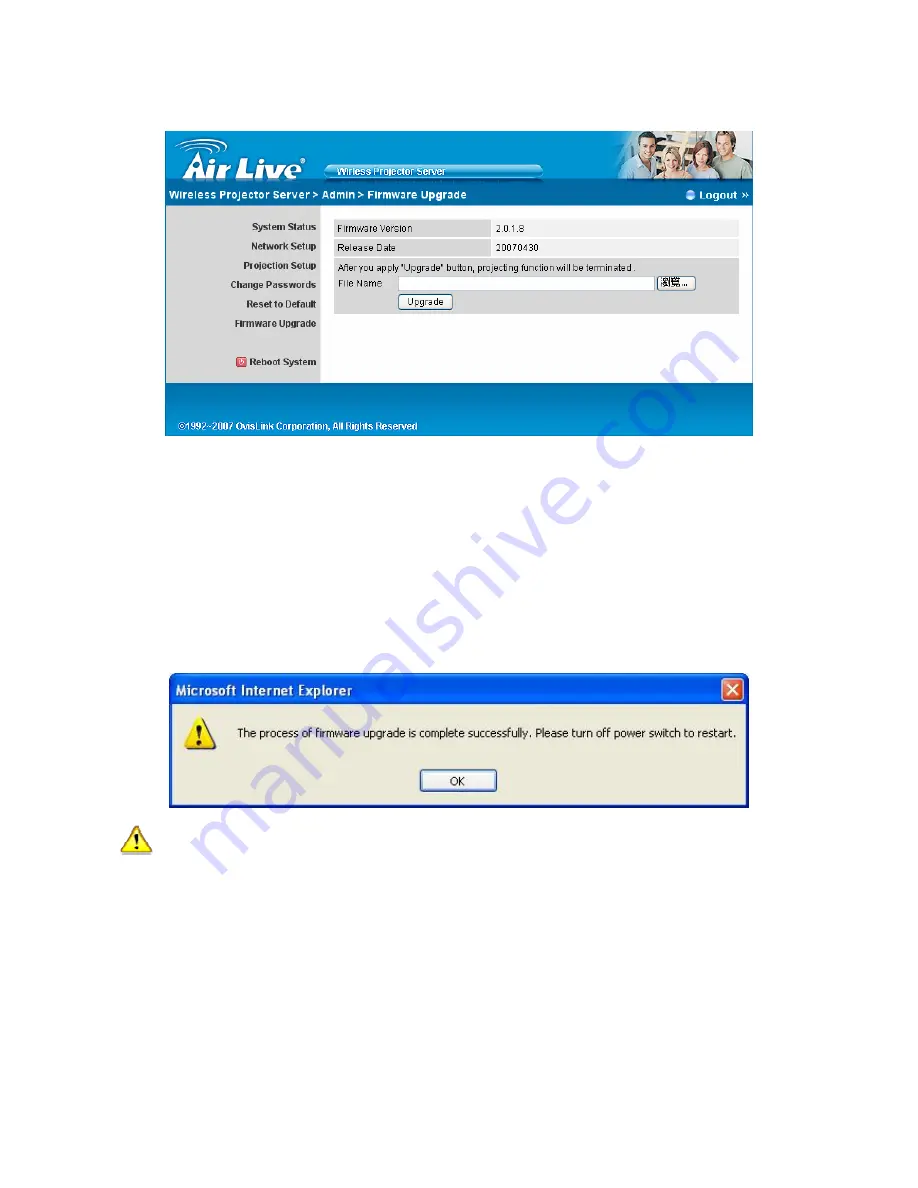
4-10 Firmware Upgrade 


*** Click 

[Firmware Upgrade]

 button to upgrade firmware.   


1.  Firstly, you have to get latest firmware image file from your vendor. 

2. Click 

<Browse> 

to specify file name you want to upgrade. 

3. Click 

<Upgrade> 

to start. 

4.  A warning message shown and count down counter on the screen. 

5.  After a few minutes, a complete message shown on the screen.   

6.  Restart AirVideo-2000 box to take effect.     


 Warning:

    Don’t power off AirVideo-2000 while firmware upgrade in progress, otherwise 

will cause your Box doesn’t work and have to return device to your vendor for fixing.

AirVideo-2000 

User’s Manual


26 

Содержание AIRVIDEO-2000

Страница 1: ...AirVideo 2000 User s Manual 0 AirVideo 2000 802 11g Wireless Video Presenter User s Manual ...

Страница 2: ...rd to demonstrate the compliance of low power Electronic and electrical apparatus with the basic restrictions related to human exposure to electromagnetic field 10MHz 300GHz General public Safety for information technology equipment including electrical business equipment Manufacturer Importer Position Title Vice President OvisLink Corp 5F NO 6 Lane 130 Min Chuan Rd Hsin Tien City Taipei County Ta...

Страница 3: ...es aplicables o exigibles de la Directiva 1999 5 CE pt Português Portuguese OvisLink Corp declara que este AirLive AirVideo 2000 está conforme com os requisitos essenciais e outras disposições da Directiva 1999 5 CE el Ελληνική Greek ΜΕ ΤΗΝ ΠΑΡΟΥΣΑ OvisLink Corp ΔΗΛΩΝΕΙ ΟΤΙ AirLive AirVideo 2000 ΣΥΜΜΟΡΦΩΝΕΤΑΙ ΠΡΟΣ ΤΙΣ ΟΥΣΙΩΔΕΙΣ ΑΠΑΙΤΗΣΕΙΣ ΚΑΙ ΤΙΣ ΛΟΙΠΕΣ ΣΧΕΤΙΚΕΣ ΔΙΑΤΑΞΕΙΣ ΤΗΣ ΟΔΗΓΙΑΣ 1999 5 ΕΚ sl ...

Страница 4: ...nnect the equipment into an outlet on a circuit different from that to which the receiver is connected 4 Consult the dealer or an experienced radio technician for help FCC Caution This device and its antenna must not be co located or operating in conjunction with any other antenna or transmitter This device complies with Part 15 of the FCC Rules Operation is subject to the following two conditions...

Страница 5: ...n and the United Kingdom The ETSI version of this device is also authorized for use in EFTA member states Iceland Liechtenstein Norway and Switzerland COPYRIGHT Copyright 2007 by OvisLink Corp All rights reserved No part of this publication may be reproduced transmitted transcribed stored in a retrieval system or translated into any language or computer language in any form or by any means electro...

Страница 6: ...ng Server 13 3 8 Repeat 14 3 9 Make PnS Token 14 3 10 System Information 16 3 11 Searching Server 16 3 12 System Information 17 3 13 Exit Program 17 Chapter 4 Web Management 18 4 1 Home Page 18 4 2 Download Software 18 4 3 Conference Control 19 4 4 Login Web Admin 21 4 5 System Status 21 4 6 Network Setup 22 4 7 Projection Setup 23 4 8 Change Passwords 24 4 9 Reset to Default 25 4 10 Firmware Upgr...

Страница 7: ...ouse click Nor more cable swapping hassles Performance Wireless Video Presenter has the ability to deliver real time animation screens for up to 1024x768 resolutions in 24 bit color depth It also provides friendly web based administrating UI for easy configuration and wireless security setups Security Support Login code to protect other users from accessing presentation contents During presentatio...

Страница 8: ... time display for PowerPoint presentations images and applications Supports display resolutions up to 1024x768 with 24 bit color No installation CD required software is directly downloaded from the device Provide session security login and wireless WEP key to protect presentation contents Conference control function is provided for the host to moderate a meeting Provide friendly web based user int...

Страница 9: ...creen as below it indicates the AirVideo 2000 box is ready now 3 Make sure your PC WLAN is enabled already and connect your PC with AirVideo 2000 box 4 Open your browser and enter the IP address to get in AirVideo 2000 web home page The default IP address of AirVideo 2000 is 192 168 1 1 or refers to the IP address shown on the left corner of projector screen AirVideo 2000 User s Manual 6 ...

Страница 10: ... 7 5 Click on Download Software and execute the installation program After install the program AirVideo 2000 shortcut will come out on the PC screen 6 Make sure your personal firewall allows AirVideo 2000 software to pass through ...

Страница 11: ...7 Enter the LOGIN CODE and You can see the login code on the projector screen 8 Click the Play button to start projection AirVideo 2000 User s Manual 8 ...

Страница 12: ...000 icon to execute the program 2 Program start to search for AirVideo 2000 box automatically 3 If AirVideo 2000 box founded then Login Code dialog box will be pop up on the PC screen 4 If not will enter to disconnected state and Reconnect button shown for you to try again z Searching for AirVideo 2000 box z AirVideo 2000 box is founded and enter login code to start z Failed to find AirVideo 2000 ...

Страница 13: ...e login code shown on the projector screen 3 3 Buttons Description 1 After login successfully you will see main UI of AirVideo 2000 application 2 Click following buttons to manipulate AirVideo 2000 Application Presentation Mode Video Mode Start projecting Stop projecting AirVideo 2000 User s Manual 10 ...

Страница 14: ...cting in progress this icon is blinking Start Playing Video Stop Playing Video Open Video File While playing video it will be blinking Function menu Minimize the program Exit the program 3 4 Start Stop Presentation Click to start wireless presentation Click to stop wireless presentation ...

Страница 15: ...3 5 Start Stop Playing Video Click to switch to Video Mode Click to open the video file and submit to play it Supported Video Format MPG MPEG DAT VOB WMV9 ASF AirVideo 2000 User s Manual 12 ...

Страница 16: ...al 13 3 6 Open Admin Web Page Click to open function menu and select Web Admin management web page The web page detailed functions will be described on next chapter 3 7 Searching Server Click Search Server to search for WPS box ...

Страница 17: ...epeat Click Repeat to enable disable video repeat capability 3 9 Make PnS Token Click Make PnS Token to make a USB Plug and Show Token Then follow the wizard to make the token AirVideo 2000 User s Manual 14 ...

Страница 18: ...AirVideo 2000 User s Manual 15 ...

Страница 19: ...formation Click Info to show system information It includes product model name IP address and other information 3 11 Searching Server Click Search Server to search for AirVideo 2000 box AirVideo 2000 User s Manual 16 ...

Страница 20: ...irVideo 2000 User s Manual 17 3 12 System Information Click Info to show system information It includes product model number IP address and other information 3 13 Exit Program Click to exit this program ...

Страница 21: ... 1 Select Download software function 2 Press Login button to download Utility the default password is airlive 3 You can save file first then execute later or execute this utility directly 4 Follow Installation Wizard instructions to proceed till the installation process complete 5 If pop up Windows Security Alert because Windows firewall block this program You just press Unblock button to continue...

Страница 22: ...efault value is trainer and then press Login 4 After login you can see a User List on the screen which indicates all of users connected to AirVideo 2000 box 5 There are three columns Computer Name Play Control and IP Address 6 You can press Play Control button to control who is next presenter by Play button and Stop button 7 z Computer Name The name of PC connected to AirVideo 2000 box z Play cont...

Страница 23: ... Stop projecting z IP address The IP address of PC AirVideo 2000 User s Manual 20 ...

Страница 24: ...s Manual 21 4 4 Login Web Admin 1 Click Admin and then enter password to login web page 2 The password default value is admin 4 5 System Status Click System Status shows current system status Model Name Product model name ...

Страница 25: ...s of AirVideo 2000 3 MAC address 4 Subnet Mask 5 Default Gateway Connection Status 1 Projecting status which is Waiting for projecting or Projecting 2 Total Users how many users login to AirVideo 2000 now 4 6 Network Setup IP Setup IP Address The default value is 192 168 1 1 Subnet Mask The default value is 255 255 255 0 Default Gateway The default value is 192 168 1 1 AirVideo 2000 User s Manual ...

Страница 26: ...e WEP key or select one of 64bit or 128bit in ASCII or HEX string Key If WEP is enabled you have to set key value according to WEP mode you selected Apply press button to select this mode Cancel press button to abort action Back Back to Operating mode main menu 4 7 Projection Setup Click Projection Setup button Resolution 1024x768 and 800x600 Color Depth provide AirVideo 2000 output with 16bit or ...

Страница 27: ...assword button to change password value Enter New Password enter new password you want to change for each category Confirm New Password double confirm new password Apply Confirmation and Save modifications AirVideo 2000 User s Manual 24 ...

Страница 28: ...ngs Apply Confirmation and action Another way to restore Factory Default Settings Follow below procedures 1 Power off AirVideo 2000 2 On the rear panel press Reset button and Hold 3 Turn on AirVideo 2000 box 4 Wait for over 10 seconds and relief Reset button 5 It will take effect to restore factory default settings ...

Страница 29: ...rade 3 Click Upgrade to start 4 A warning message shown and count down counter on the screen 5 After a few minutes a complete message shown on the screen 6 Restart AirVideo 2000 box to take effect Warning Don t power off AirVideo 2000 while firmware upgrade in progress otherwise will cause your Box doesn t work and have to return device to your vendor for fixing AirVideo 2000 User s Manual 26 ...

Страница 30: ...AirVideo 2000 User s Manual 27 4 11 Reboot System Click Reboot System button to restart system Reboot reboot system automatically 4 12 Logout Click Logout button to back Web home page ...

Страница 31: ...Chapter 5 Appendix 5 1 Wall Mount Instructions Optional AirVideo 2000 User s Manual 28 ...

Отзывы: