Airlink101 AICN500 Скачать руководство пользователя страница 45


- 44 -

„


Factory Reset 

Click 

Reset

 to restore all factory default settings for the camera. 

„


System Reboot 

Click 

Reboot

 to restart the camera just like turning the device off and on. The camera configuration 

will be retained after rebooting. 

„


Configuration 

You can save your camera configuration as a backup file on your computer. Whenever you want to 
resume the original settings, you can restore them by retrieving the backup file. 

-


Backup: 

Click 

Get the backup file

 to save the current configuration of the camera. 

-


Restore:

 Click 

Browse

 to locate the backup file and then click 

Restore

„


Update Firmware 

This item displays the current firmware version. You can upgrade the firmware for your camera once 
you obtained a latest version of firmware. 

-


Select the firmware:

 Click 

Browse

 to locate the backup file and then click 

Update

NOTE

 Make sure to keep the camera connected to the power source during the process of upgrading 

firmware. Otherwise, the camera might be damaged because of failure of upgrading firmware. 
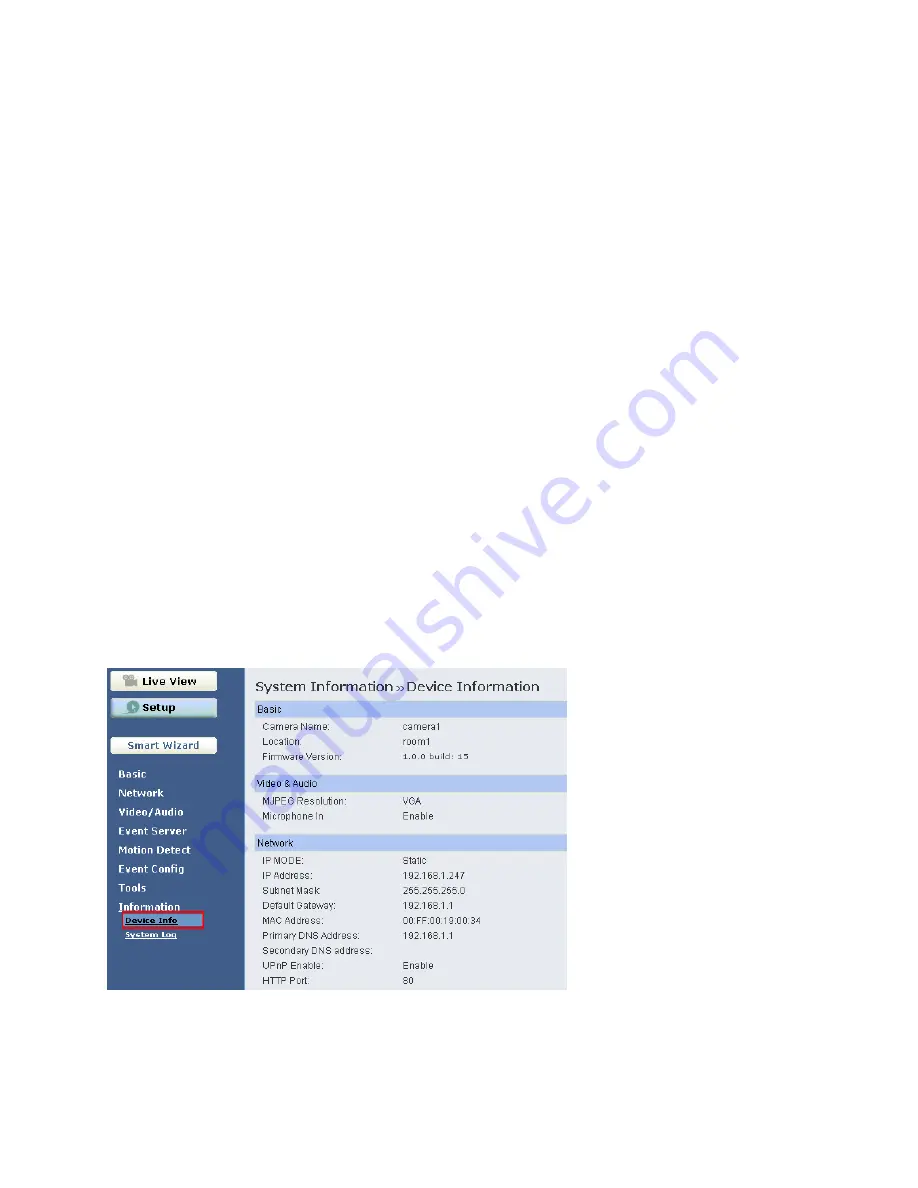


4.9 Information 

The Information menu displays the current configuration and events log of the camera.


„


Device Info 


Display the Basic, Video & Audio, and Network settings of the camera. 

Содержание AICN500

Страница 1: ...SkyIPCam500 Night Vision Network Camera Model AICN500 User s Manual Ver 1 0...

Страница 2: ...of the Camera 6 CHAPTER 3 7 SOFTWARE INSTALLATION 7 3 1 Installing SkyIPCam Utility 7 3 2 Using SkyIPCam Utility 8 3 3 Viewing Images 13 3 4 Using SkyIPCam View 15 CHAPTER 4 32 CONFIGURATION 32 4 1 Us...

Страница 3: ...any item contained is damaged or missing contact the store where you purchased the product 1 2 Getting to Know Your Camera Front View Lens Assembly Power LED indicates the camera is powered on with a...

Страница 4: ...graded over the network when a new firmware is available The users are also allowed to monitor the images and take snapshots via the network Multiple Platforms Supported The camera supports multiple n...

Страница 5: ...P Vista CPU Intel Pentium III 350MHz or above RAM 128MB Resolution 800x600 or above User Interface Microsoft Internet Explorer 6 0 or above Apple Safari 2 or above Mozilla Firefox 2 or above Some web...

Страница 6: ...ough the three screw holes located in the base of the camera stand The Camera Stand 2 2 Connecting the Camera to LAN Use the provided Ethernet cable to connect the camera to your local area network LA...

Страница 7: ...Internet or Intranet Capture still images and video clips remotely Upload images or send email messages with the still images attached The following diagram explains some of the typical applications f...

Страница 8: ...uto run screen to appear Step 2 Click on Install SkyIPCam Utility Note If the autorun screen does not appear automatically go to Start Run type D Utility Setup exe where D is the letter of your CD dri...

Страница 9: ...am Utiliy Step 2 Select the IP Camera you want to configure from the list and click on the Change IP button Note If the Camera s IP address does not show up in the window make sure the camera is prope...

Страница 10: ...another device in the same network Another option is that if your router s DHCP server is enabled you can select DCHP so the router will automatically assign a dynamic IP address to your camera Enter...

Страница 11: ...in for both User name and Password and click OK Step 6 The camera viewing window will appear Click on Setup and then click Smart Wizard Step 7 Enter a name for your camera and a location if you like T...

Страница 12: ...w window and click Next Step 9 If you would like to set up email alerts that you can receive in the future Please enter your email information here You can get this information from your internet serv...

Страница 13: ...12 Step 10 Confirm your settings at the last window If everything is correct click Apply and the configuration is complete...

Страница 14: ...ess of your camera the default IP is 192 168 1 240 in the Address bar and then press Enter Step 3 Enter admin for both the User name and Password and click OK Step 4 If it is the first time for your c...

Страница 15: ...14 Step 5 Click on Install and then you may be able to view images Step 6 To get a clear view of images you can simply rotate the camera s lens clockwise or counter clockwise to adjust the focus...

Страница 16: ...he Airlink101 SkyIPCam Utility Step 2 Select your camera from the list and click Link Step 3 Follow Step 3 to Step 6 mentioned in Method 1 3 4 Using SkyIPCam View To Install the Program Step 1 Insert...

Страница 17: ...16 Step 2 Keep clicking Next on the following windows Step 3 Click Close to complete the installation...

Страница 18: ...am click Start Programs AirLink101 AirLink101 SkyIPCam View and the main screen will appear as below NOTE Please set the resolution to 1024x768 or above on your computer while using SkyIPCam View othe...

Страница 19: ...gain to resume controls for the camera If you have set ID and Password in SETTING Account you will be asked to enter the required information to unlock ALL RECORD Click to start recording video clips...

Страница 20: ...play the video views as the main window in turn PREV When you connect multiple cameras click this button to switch the video view to the previous camera NEXT When you connect multiple cameras click th...

Страница 21: ...a still image using the selected camera and save the file in the computer RECORD Click to start recording a video clip using the selected camera Click again to stop recording and save the file in the...

Страница 22: ...p Down Left Right Left Up Left Down Right Up Right Down Click the Home button to return the camera to the default position SWING If you have saved two or more positions for the selected camera click t...

Страница 23: ...arch tab if you are not sure of the camera s IP address Click Search camera to search the available camera within the network Once the camera is found and is shown in the list select it and click Add...

Страница 24: ...displayed in the Camera List 5 Click SETTING to return to the Video View Window The video view of the selected camera will be displayed now To Remove a Camera 1 Click SETTING in the CONTROLS panel to...

Страница 25: ...s to record by motion detection the third is to set the recording schedule in Setting Recording Configuration Schedule Recording Configuration z Manually recording Click RECORD ALL RECORD and it start...

Страница 26: ...dule Recording Configuration The recording schedule can be defined by Schedule Period or Recording Time Schedule Period First select the camera from the pull down list Then click Add to set the Start...

Страница 27: ...Recording File Path box to assign a new folder z Each Recording File Size This option allows you to select from 20 to 200 MB so that the video will be recorded as another file automatically when the r...

Страница 28: ...PLAY button on the CONTROLS panel and the following dialog screen will appear allowing you to select the file to playback Select the recorded video file under the camera path and then click Open to l...

Страница 29: ...lect Music you can customize the sound by clicking Browse and then selecting your favorite music wav or mp3 file in the computer z Recording Select this option to enable the camera to record by motion...

Страница 30: ...com Mail To Enter the email address of the user who will receive the email User Name Enter the user name to login the mail server Password Enter the password to login the mail server Subject Enter a s...

Страница 31: ...30 Other Allows you to set the rotation interval if monitoring multiple cameras...

Страница 32: ...31 Information Click SETTING About to display the information of the software application...

Страница 33: ...click Setup on the main page of Web Configuration The Web Configuration will start from the Basic page 4 2 Basic Setup The Basic menu contains three sub menus that provide the system settings for the...

Страница 34: ...Server Select this option and the time will be synchronized with the NTP Server You need to enter the IP address of the server and select the update interval in the following two boxes Manual Select t...

Страница 35: ...he new guest UserList Display the existing guests of the camera To delete a user select the one you want to delete and click Delete NOTE A General User can access the camera and control the Function b...

Страница 36: ...E Select this option when you use a direct connection via the ADSL modem You should have a PPPoE account from your Internet service provider Enter the User Name and Password The camera will get an IP...

Страница 37: ...nd End IP address When you are finished click Add to save the range setting You can repeat the action to assign multiple ranges for the camera For example when you enter 192 168 0 50 in Start IP Addre...

Страница 38: ...ve Mirror Select the Horizontal option to mirror the image horizontally Select the Vertical option to mirror the image vertically Light Frequency Select the proper frequency according to the camera s...

Страница 39: ...A obtains better video quality while it uses more resource within your network QQVGA is the lowest video quality setting but it provides the best speed over the network Video Quality Select the desire...

Страница 40: ...m the camera 4 5 Event Server Configuration The Event Server menu contains two sub menus that allow you to upload images to FTP and send emails that include still images When you complete the required...

Страница 41: ...nter the email address of the user who will send the email For example John mymail com Sender User Name Enter the user name to login the mail server Sender Password Enter the password to login the mai...

Страница 42: ...igure event profiles Event Configuration General Setting Snapshot Recording Subfolder You can assign a given sub folder for captured file Otherwise leave this option blank to use the default setting E...

Страница 43: ...lick Delete this from all weekdays to remove the selected time period from every weekday Click Delete to remove the selected time period Start End Time Enter the start and end time and then click Add...

Страница 44: ...Email or FTP Select the Enable option on each item and then select a Schedule Profile from the pull down list and set the Interval time 4 8 Tools The Tools menu provides the commands that allow you t...

Страница 45: ...n of the camera Restore Click Browse to locate the backup file and then click Restore Update Firmware This item displays the current firmware version You can upgrade the firmware for your camera once...

Страница 46: ...45 System Log The Logs table displays the events log recorded by the system...

Страница 47: ...TCP IP UDP ICMP DHCP NTP DNS DDNS SMTP FTP PPPoE UPnP User Interface LAN One RJ 45 port Reset One Reset button LEDs Power LED amber Link LED green Audio Input Built in MIC Codec PCM Software OS Suppo...

Страница 48: ...file type a common format for small movies and videos B BOOTP Bootstrap Protocol is an Internet protocol that can automatically configure a network device in a diskless workstation to give its own IP...

Страница 49: ...ugh the firewall which examines each message and blocks those that do not meet the specified security criteria G Gateway A gateway links computers that use different data formats together Group Groups...

Страница 50: ...lator generally applied by a router that makes many different IP addresses on an internal network appear to the Internet as a single address For routing messages properly within your network each devi...

Страница 51: ...lications RTSP RTSP Real time Streaming Protocol is the standard used to transmit stored media to the client s at the same time which provides client controls for random access to the content stream S...

Страница 52: ...s widely used as the basic security protocol in Wi Fi networks which secures data transmissions using 64 bit or 128 bit encryption Windows Windows is a graphical user interface for workstations that u...

Страница 53: ...Site www airlink101 com Actual data throughput will vary Network conditions and environmental factors lower actual data throughput rate Specifications are subject to change without notice All product...

Отзывы: