Aire-Flo 18 Скачать руководство пользователя страница 6

Page 6

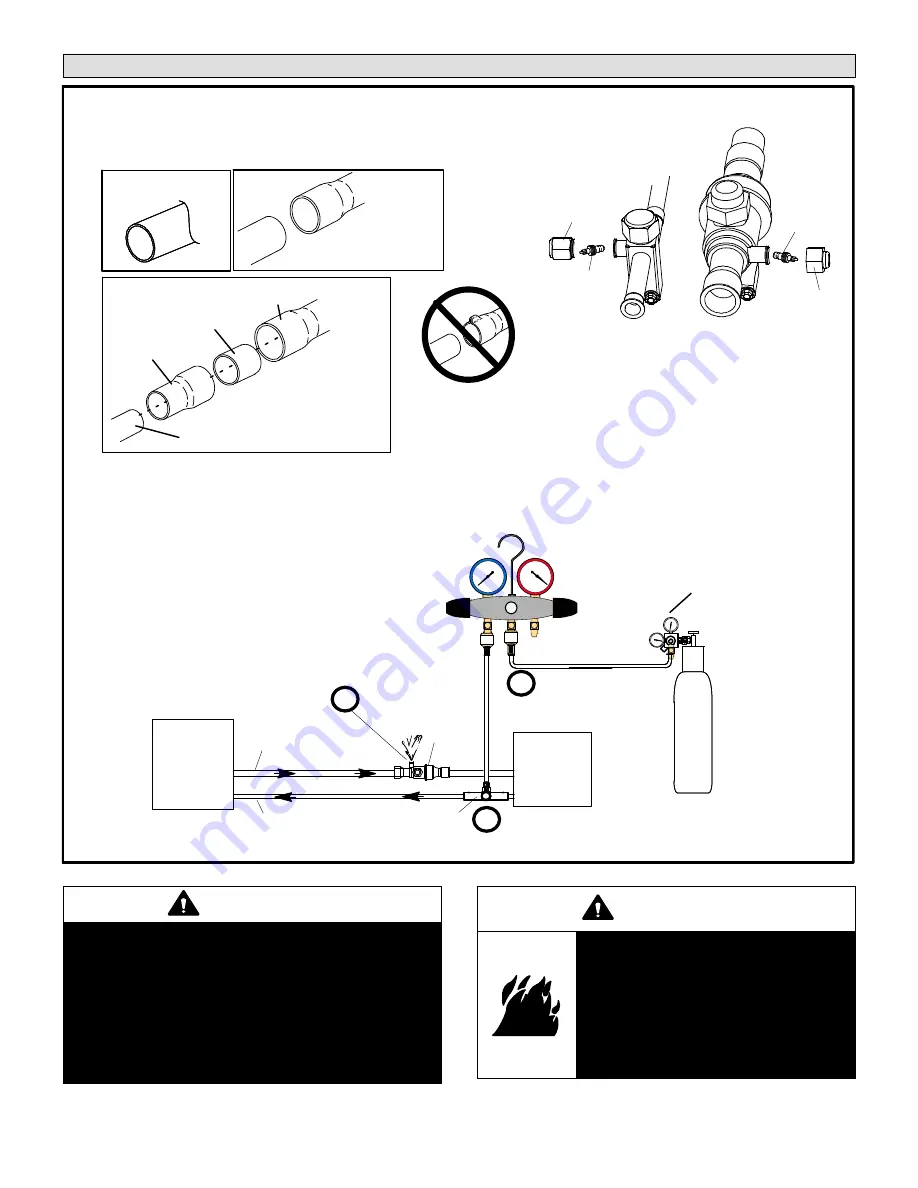
STEP 2 -- REFRIGERANT PIPING -- Brazing Procedures

ATTACH THE MANIFOLD GAUGE SET FOR BRAZING LIQUID AND SUCTION LINE SERVICE VALVES

OUTDOOR

UNIT

LIQUID LINE

SUCTION LINE

LIQUID LINE SERVICE

VALVE

SUCTION

LINE

SERVICE

VALVE

ATTACH

GAUGES


INDOOR

UNIT

SUCTION SERVICE PORT MUST BE OPEN TO

ALLOW EXIT POINT FOR NITROGEN

A -

Connect gauge set low pressure side to
liquid line service valve (service port).

B -

Connect gauge set center port to bottle of
nitrogen with regulator.

C -

Remove core from valve in suction line
service port to allow nitrogen to escape.

NITROGEN

HIGH

LOW

USE REGULATOR TO FLOW

NITROGEN AT 1 TO 2 PSIG.

B

A

C

WHEN BRAZING LINE SET TO

SERVICE VALVES, POINT FLAME

AWAY FROM SERVICE VALVE.

Flow regulated nitrogen (at 1 to 2 psig) through the low-side refrigeration gauge set into the liquid line service port valve, and out of the suction
line service port valve.

CUT AND DEBUR

CAP AND CORE REMOVAL

Cut ends of the refrigerant lines square (free from nicks or dents)
and debur the ends. The pipe must remain round. Do not crimp end
of the line.

Remove service cap and core from
both the suction and liquid line service
ports.

1

2

ANGLE-TYPE SERVICE

VALVE

SERVICE

PORT

CORE

SERVICE PORT

CAP

SERVICE

PORT

CORE

SERVICE
PORT CAP

CUT AND DEBUR

LINE SET SIZE MATCHES

SERVICE VALVE CONNECTION

COPPER TUBE

STUB

SERVICE VALVE
CONNECTION

REFRIGERANT LINE

DO NOT CRIMP SERVICE VALVE

CONNECTOR WHEN PIPE IS

SMALLER THAN CONNECTION

REDUCER

3

BALL-TYPE SERVICE

VALVE

LINE SET SIZE IS SMALLER

THAN CONNECTION

FIGURE 7

CAUTION

Brazing alloys and flux contain materials which are
hazardous to your health.
Avoid breathing vapors or fumes from brazing
operations. Perform operations only in well-ventilated
areas.
Wear gloves and protective goggles or face shield to
protect against burns.
Wash hands with soap and water after handling brazing
alloys and flux.

WARNING

Danger of fire. Bleeding the refrigerant
charge from only the high side may result
in pressurization of the low side shell and
suction tubing. Application of a brazing
torch to a pressurized system may result
in ignition of the refrigerant and oil
mixture. Check the high and low
pressures before applying heat.

Содержание 18

Страница 1: ...vice clearance of 30 in 762 mm must be maintained on one of the sides adjacent to the control box Clearance to one of the other three sides must be 36 in 914 mm Clearance to one of the remaining two sides may be 12 in 305 mm and the final side may be 6 in 152 mm A clearance of 24 in must be maintained between two units 48 in 1219 mm clearance required on top of unit See NOTES See NOTES See NOTES S...

Страница 2: ...all unit level or if on a slope maintain slope tolerance of 2 degrees or 2 inches per 5 feet 50 mm per 1 5 m away from building structure GROUND LEVEL MOUNTING SLAB BUILDING STRUCTURE DISCHARGE AIR SLAB MOUNTING FIGURE 3 STEP 2 REFRIGERANT PIPING Flush ing Existing Line Set and Indoor Coil Flush the existing line set per the following instructions CAUTION DO NOT attempt to flush and re use existin...

Страница 3: ...en low pressure rises above 40 psig DO NOT REPLACE COMPRESSOR LIQUID LINE FILTER DRIER INSTALLATION The provided filter drier must be field installed in the liquid line between the outdoor unit s liquid line service valve and the indoor coil s metering device fixed orifice or TXV as illustrated in figure 4 This filter drier must be installed to ensure a clean moisture free system OUTDOOR UNIT LIQU...

Страница 4: ...IQUID LINE TO THE SUCTION LINE FLOOR JOIST OR ROOF RAFTER REFRIGERANT LINE SET INSTALLING HORIZONTAL RUNS NOTE Similar installation practices should be used if line set is to be installed on exterior of outside wall PVC PIPE FIBERGLASS INSULATION CAULK OUTSIDE WALL SUCTION LINE WRAPPED WITH ARMAFLEX LIQUID LINE OUTSIDE WALL LIQUID LINE SUCTION LINE WOOD BLOCK BETWEEN STUDS STRAP WOOD BLOCK STRAP S...

Страница 5: ... unit s liquid line orifice housing LOW HIGH EXISTING INDOOR UNIT GAUGE MANIFOLD CYLINDER CONTAINING CLEAN HCFC 22 TO BE USED FOR FLUSHING Positioned to deliver liquid refrigerant LIQUID LINE SERVICE VALVE INLET DISCHARGE TANK RETURN CLOSED OPENED RECOVERY CYLINDER RECOVERY MACHINE NEW OUTDOOR UNIT SUCTION LINE SERVICE VALVE SUCTION LIQUID 1 A HCFC 22 cylinder with clean refrigerant positioned to ...

Страница 6: ...ur the ends The pipe must remain round Do not crimp end of the line Remove service cap and core from both the suction and liquid line service ports 1 2 ANGLE TYPE SERVICE VALVE SERVICE PORT CORE SERVICE PORT CAP SERVICE PORT CORE SERVICE PORT CAP CUT AND DEBUR LINE SET SIZE MATCHES SERVICE VALVE CONNECTION COPPER TUBE STUB SERVICE VALVE CONNECTION REFRIGERANT LINE DO NOT CRIMP SERVICE VALVE CONNEC...

Страница 7: ...ve all water saturated cloths WHEN BRAZING LINE SET TO SERVICE VALVES POINT FLAME AWAY FROM SERVICE VALVE PREPARATION FOR NEXT STEP 7 WRAP SERVICE VALVES To help protect service valve seals during brazing wrap water saturated cloths around service valve bodies and copper tube stubs Use additionalwater saturated cloths underneath the valve body to protect the base paint 4 FLOW NITROGEN Flow regulat...

Страница 8: ...ard either the flare seal cap or flare nut with copper flare seal bonnet from the equalizer line port on the suc tion line as illustrated in the figure below B Remove the field provided fitting that temporarily reconnected the liquid line to the indoor unit s distributor assembly INDOOR EXPANSION VALVE INSTALLATION C Install one of the provided Teflon rings around the stubbed end of the check expa...

Страница 9: ...unit E After a few minutes open one of the service valve ports and verify that the refrigerant added to the system earlier is measurable with a leak detector F After leak testing disconnect gauges from service ports After the line set has been connected to the indoor and outdoor units check the line set connections and indoor unit for leaks Use the following procedure to test for leaks A Connect t...

Страница 10: ...g off the vacuum pump and closing the manifold gauge valves F When the absolute pressure requirement above has been met disconnect the manifold hose from the vacuum pump and connect it to a cylinder of HFC 410A positioned to deliver liquid refrigerant Open the manifold gauge valve 1 to 2 psig in order to release the vacuum in the line set and indoor unit G Perform the following A Connect low side ...

Страница 11: ... Use copper wire only with this product CAUTION Failure to use properly sized wiring and circuit breaker may result in property damage Size wiring and circuit breaker s per unit rating plate CAUTION ELECTROSTATIC DISCHARGE ESD Precautions and Procedures Electrostatic discharge can affect electroniccomponents Takecareduring unitinstallationandservice toprotectthe unit s electronic controls Precauti...

Страница 12: ...tat wire control wires gauge per table above NOTE Do not bundle any excess 24VAC control wires inside control panel Install low voltage wiring from outdoor to indoor unit and from thermostat to indoor unit as illustrated A Run 24VAC control wires through hole with grommet and secure with provided wire tie B Make 24VAC thermostat wire connections Locate the two wires from the contactor and make con...

Страница 13: ... wiring for loose connections 3 After evacuation is complete open the liquid line and suction line service valve stems to release the refrigerant charge contained in outdoor unit into the system 4 Replace the stem caps and tighten to the value listed in table 2 5 Check voltage supply at the disconnect switch The voltage must be within the range listed on the unit s nameplate If not do not start th...

Страница 14: ...ly use a manifold gauge set that features low loss anti blow back fittings Manifold gauge set used with HFC 410A refrigerant systems must be capable of handling the higher system operating pressures The gauges should be rated for use with pressures of 0 800 psig on the high side and a low side of 30 vacuum to 250 psig with dampened speed to 500 psi Gauge hoses must be rated for use at up to 800 ps...

Страница 15: ... it as needed Disposable filters should be replaced with a filter of the same type and size Check the indoor unit drain line for obstructions monthly during the cooling season The indoor evaporator coil is equipped with a drain pan to collect condensate formed as your system removes humidity from the inside air Have your installer show you the location of the drain line and how to check for obstru...

Страница 16: ... loose worn or damaged connections Confirm proper voltage plus amperage indoor unit 2 Inspect and clean or replace air filters in indoor unit 3 Check the cleanliness of indoor blower and clean blower if necessary 4 Inspect the evaporator coil Indoor drain pans and condensate drains for rust debris obstructions leaks or cracks Pour water in pans to confirm proper drainage from the pan through to th...

Страница 17: ...y Air Temperature Ambient Temperature Return Air Temperature System Refrigerant Charge Refer to manufacturer s information on unit or installation instructions for required subcooling and approach temperatures Subcooling A B SUBCOOLING Saturated Condensing Temperature A minus Liquid Line Temperature B Approach A B APPROACH Liquid Line Temperature A minus Outdoor Air Temperature B Indoor Coil Tempe...

Отзывы: