background image

4. 

General Overview

Chapter 4

General Overview

23

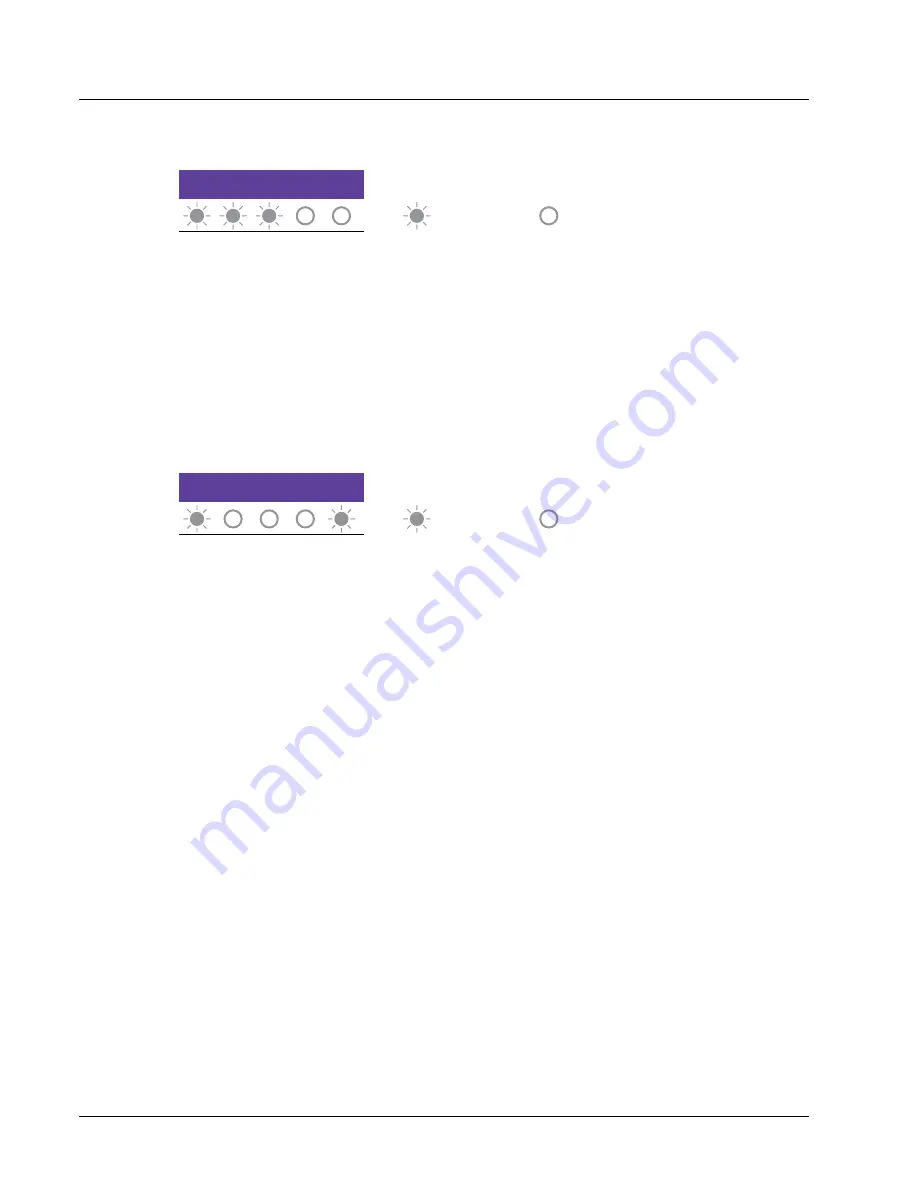
Other error codes usually mean hardware/firmware problems.

Common status:

Battery is in Safe Mode while the firmware is being updated.
This status is also displayed if the battery inserted into the unfolded 
AirDog or connected to the charger was previously switched to Safe 
Mode.

The battery is damaged, stop using it. The storage of this battery could 
be dangerous. Recycle the battery (see 5.2.5 Battery Disposal) or contact 
your AirDog representative.

Battery Recovery Process

4.3.5

Follow the steps detailed below if the LED indicators on the battery 
display an error code and you are unsure what the problem is or if there 
seems to be an issue with the battery which behaves strange.

1.  Use AirLoader to check that you have the latest firmware installed on 

your AirDog and AirLeash. Run the updates if necessary.

2.  Insert the battery into the unfolded AirDog.

— blinking

— blinking

— empty

— empty

LEDs status

LEDs status

Содержание AD10

Страница 1: ...r Manual V 2 April 2016 We will be adding more content to this user manual over time as we receive feedback from users and develop new functions Please check our website on a regular basis for user manual updates ...

Страница 2: ...sh Display 1 5 AirDog Mobile App Specifications 4 1 2 Battery 4 2 2 AirLeash Icons 1 6 AirDog Desktop App Specifications 4 1 3 Gimbal 4 1 4 Fold Up Arms 1 7 What s In The Box 1 3 Safety Guidelines For Small Unmanned Aircraft Systems sUAS Recreational Users Chapter 1 Before You Begin Chapter 4 General Overview Chapter 3 Get To Know AirDog Chapter 2 AirDog Support Table Of Contents 1 Table Of Conten...

Страница 3: ... 5 2 4 Storage And Transportation 5 1 3 Attaching The Propellers 5 1 4 Recommended GoPro Settings 5 2 3 Before Using The Battery 5 1 6 Inserting The Battery 5 2 5 Battery Disposal 4 3 1 Level Indicator 5 1 1 Unfolding The Arms 5 2 1 Charging The Battery Chapter 5 System Preparation Table Of Contents 2 25 26 26 24 30 33 27 4 4 Mobile App Overview 4 5 AirLoader Desktop App Overview 4 6 Sport Modes 4...

Страница 4: ...tion 5 6 1 2 AirLeash Accelerometer Accels Calibration 5 6 2 2 AirDog Accelerometer Accels Calibration 5 6 3 2 Gimbal Accelerometer Accels Calibration 5 6 1 3 AirLeash Gyroscope Gyro Calibration 5 6 2 3 AirDog Gyroscope Gyro Calibration 5 4 1 Download And Install AirDog app 5 6 1 AirLeash Calibration 5 6 2 AirDog Calibration 5 6 3 Gimbal Calibration 76 76 76 6 1 Know Your Surroundings And Flight S...

Страница 5: ...s 6 1 4 Flight Limits 6 1 5 Laser Warning 6 1 3 Flight Location Prohibited Takeoff Locations 7 1 1 Sensor Check 7 3 1 Altitude Adjustment 7 3 2 Angle Adjustment 7 3 3 Farther Closer 7 3 4 Play Pause Follow 9 2 1 What Is Covered and For How Long 9 3 1 FCC Compliance 7 3 5 Come To Me CTM 9 2 2 What Is Not Covered 9 3 2 IC RSS Compliance 9 3 3 EC Declaration Of Conformity Chapter 7 Flight Chapter 8 S...

Страница 6: ...ch impact in the industry For AirDog following is not a feature but its core essence It will follow and film you in many different ways because every sport is different so we ve custom engineered auto follow flight modes for various action sports Be careful and always pay close attention to the selected sport flight mode to ensure the sport flight mode matches your sport AirDog is future proof and...

Страница 7: ...Have fun Follow community based safety guidelines as developed by organizations such as the Academy of Model Aeronautics AMA Fly no higher than 400 feet 120 meters and remain below any surrounding obstacles when possible Keep your sUAS in eyesight at all times and use an observer to assist if needed Remain well clear of and do not interfere with manned aircraft operations and you must see and avoi...

Страница 8: ...iness operators of unmanned aircraft systems the tools to know how to fly safely and responsibly before taking to the skies If you own a drone you must register it with the Federal Aviation Administration s Unmanned Aircraft System UAS registry A federal law effective December 21 2015 requires unmanned aircraft registration and you are subject to civil and criminal penalties if you do not register...

Страница 9: ...id versions 4 3 to 5 1 Download and install the app on your device before the first flight The app is compatible with AirDog only Download the free AirDog desktop app from our web page www airdog com support Supported Operating Systems Mac OS X AirLoader desktop app can be installed on 10 10 Yosemite 10 11 El Capitan Microsoft Windows AirLoader desktop app can be installed on Windows 7 8 8 1 10 Li...

Страница 10: ...eash 1x unit Strap 1x unit USB wall adapter 1x unit GoPro camera and GoPro camera housing not included US and EU adapters included Battery 1x unit Micro USB cable 1x unit Battery charger 1x unit Power cord 1x unit Chapter 1 Before You Begin 9 1 Before You Begin ...

Страница 11: ...registered trademarks of AirDog Inc GoPro HERO the GoPro logo and the GoPro Be a HERO logo are trademarks or registered trademarks of GoPro Inc App Store is a trademark of Apple Inc Google Play is a trademark of Google Inc Bluetooth is a trademark of Bluetooth SIG Inc All other trademarks mentioned in this user manual are protected and are the property of their respective owners Airdog SIA Aristid...

Страница 12: ...ing kitesurfing wakeboarding surfing biking skiing anything that gets the adrenaline going and gives us motivation to be bold push our boundaries and find actions We set out to revolutionize how you can capture your actions and created AirDog the world s first auto follow drone with action sport flight modes AirDog enables you to capture yourself in action easily without assistance and from any an...

Страница 13: ...ds The front left and rear right propellers spin counter clockwise The front right and rear left propellers spin clockwise Propellers are self tightening and can be removed and reattached AirDog can be folded and transported with propellers attached or removed AirDog uses a rechargeable Lithium polymer 4 cell 5600mAh battery Depending on conditions it can stay airborne up to 18 minutes To ensure s...

Страница 14: ...LED status indicator 2 Axis Camera Gimbal Camera Connector Landing Gear front Propeller Hub Fold Up Arm Battery Propeller Motor In order to avoid signal interference disable and turn off the WiFi on the GoPro camera before each flight Do not fly your AirDog with the GoPro WiFi on To start recording manually turn on the GoPro camera using the power button on the GoPro camera before each flight Comp...

Страница 15: ... the user to control the positioning of AirDog and the camera angles AirLeash Display AirLeash Icons 4 2 1 4 2 2 A display is built into AirLeash allowing you to view and change all current settings and navigate the menu 1 Information bar Shows various messages about AirDog s status and selected sport 2 Current selected follow mode 3 AirLeash battery level 4 Current selected landing mode 5 AirDog ...

Страница 16: ...ibration menu Magnetometer calibration This icon is used for AirDog and AirLeash magnetometer calibration Accelerometer calibration This icon is used for AirDog and AirLeash accelerometer calibration Gyro calibration This icon is used for AirDog and AirLeash gyro calibration Factory Reset Reset AirLeash to factory settings You need to update the latest firmware after the reset Sports Enter Sport F...

Страница 17: ...ettings SP short press LP long press 3 sec Button On ground In flight LP 3sec Power AirLeash on off SP Select Confirm LP 20sec Hard shutdown LP 3sec Power AirLeash on off SP Stop repositioning LP 20sec Hard shutdown SP Enter menu Back in menu LP back to main SP Enter exit Joystick mode SP Change value for flight parameter SP Increase altitude by one step Move farther away while in Joystick mode LP...

Страница 18: ...by one step LP Continuously orbit around you until button is pressed SP Move Right while in menu SP Orbit Right by one step LP Continuously orbit around you until button is pressed SP Initiate takeoff SP Start Stop follow mode and pause Landing Inactive SP Initiates Come to Me command Inactive SP Initiates land on SPOT command LP Initiates Return to Home command Inactive Inactive 4 General Overvie...

Страница 19: ...is charging Solid green AirLeash is fully charged Blue Leashed LED LED Status Meaning Off AirLeash is not connected to AirDog Solid blue AirLeash is connected to AirDog Blinks blue AirLeash is in pairing mode Red LED LED Status Meaning Off Everything is ok Solid red System is faulty check info on the LCD Blinks red AirDog battery is running low ...

Страница 20: ...ed flight time of 10 18 min depending on flight speed and wind conditions It must only be charged with an original AirDog battery charger We recommend purchasing multiple batteries to extend the flight time and use of AirDog during your action Level Indicator 4 3 1 The AirDog battery level Indicator shows how much power remains in the battery To check the battery level press the button below the L...

Страница 21: ... is remaining To check battery charge level press battery button for a short time while it is not inserted to any equipment After short calculations battery will show its charge See below for details solid blinking empty LEDs status Level 40 50 30 40 20 30 10 20 0 10 We do not recommend using AirDog when the battery shows three or less solid LEDs ...

Страница 22: ...rrent battery level see 4 3 1 Level Indicator If the battery is inserted into the unfolded AirDog its firmware will be automatically updated and once completed the battery will automatically switch to Normal Mode Firmware Update 4 3 3 The system will automatically check if the battery firmware needs an update every time the battery is inserted into the unfolded AirDog At the time of updating AirLe...

Страница 23: ...press 12 sec the battery button below the LED indicators until you hear a tone and the LEDs start blinking 3 Quickly release the battery button don t wait more than 3 sec after you hear a tone The battery will switch automatically to Safe Mode and the LEDs will display the current battery status see 4 3 4 Error And Status Codes 4 Insert the battery into the unfolded AirDog AirDog will now update t...

Страница 24: ...f this battery could be dangerous Recycle the battery see 5 2 5 Battery Disposal or contact your AirDog representative Battery Recovery Process 4 3 5 Follow the steps detailed below if the LED indicators on the battery display an error code and you are unsure what the problem is or if there seems to be an issue with the battery which behaves strange 1 Use AirLoader to check that you have the lates...

Страница 25: ...EU are included in the AirDog packaging 3 Power AirLeash on 4 Wait until AirDog is paired with AirLeash or go through the pairing process 5 Follow the steps on the AirLeash display Sometimes this process will reset the battery even if AirLeash does not display any message In case the process fails and the battery cannot power AirDog anymore contact your AirDog representative ...

Страница 26: ...se the app with AirDog AirDog is controlled by AirLeash only the AirDog mobile app is for customizing settings through the ease of your smart device only Chapter 4 General Overview 25 The AirDog app does not let you select a sport and control AirDog The app lets you customize the settings only When customizing a sport flight mode always chose a sport that reflects the sport you are going to carry ...

Страница 27: ...can select with AirLeash Each sport mode consists of a Follow mode Landing mode and sport specific flight parameters Flight parameters in each sport mode can be customized for better user experience We recommend you first get acquainted with the preset Sport Modes before you customize your own sport AirDog will add new sports and flight parameters through software and app updates In the Custom Spo...

Страница 28: ...tings of a sport always select a sport which corresponds to the sport that you are effectively performing Do not select a sport or customize the settings of a sport which does not correspond to the sport you are to carry out In the Custom Sport icon always verify that you don t select Land On SPOT as a landing mode and Follow terrain if you are going to practice a sport on the water Backcountry He...

Страница 29: ... landing HOME zone on the beach initiate takeoff grab your board and ride Follow mode FIXED default Altitude 13 meters 43 feet Follow distance 18 meters 60 feet Follow terrain OFF Landing mode HOME Wake Line If you are riding in straight line cable parks AirDog will stay safe and away from the cables So all you need to do is to set two endpoints in the map of desired flight path typically parallel...

Страница 30: ...hapter 4 General Overview 29 Surf When the surf s up just unfold AirDog set a timer the amount of time you need to get to the break set the distance to the break point AirDog with the camera in the direction you ll paddle out to and leave it in a safe takeoff landing HOME spot grab your board paddle in After the timer runs out AirDog will take off and fly to your position wait until you catch the ...

Страница 31: ...o avoid such as surfing or when flying at an altitude high above any potential obstacles FIXED Fixed follow Chapter 4 General Overview 30 The AirDog limited warranty is void when there is a damage caused by the drone or the loss of the drone resulting from the use of the Custom mode which does not respect the following restrictions Ensure that the use of AirDog is authorized in your flight area an...

Страница 32: ... line but being able to move around freely This is the simplest filming mode in which you can position AirDog at a fixed position and altitude and it will simply pan around and adjust camera pitch to keep you in frame This was developed for tight places such as smaller skate parks with trees around or race tracks where you want to film a much faster moving car or bike than AirDog can actually fly ...

Страница 33: ...ou stop while AirDog is repositioning it will stop too You can set AirDog to stay behind you and it will result in a chasing behaviour AirDog will try to repeat your path and trajectory In this mode AirDog rotates around you continuously even if you are moving In simpler terms it will always fly around you and follow you This mode is used for sports where you have a wide open space and there are n...

Страница 34: ...Home landing mode manually by long pressing 4sec the button on AirLeash HOME landing will be initiated automatically when low battery level approx 30 is reached HOME Return To Home 4 General Overview Chapter 4 General Overview 33 Landing Modes 4 6 3 Landing is completely autonomous allowing you to focus on your action AirDog will land at the end of your run in close proximity to you or return to t...

Страница 35: ...ery is low You can initiate the Land On Spot landing mode manually by short pressing the button on AirLeash Land On SPOT landing mode will be initiated automatically when critical battery level approx 20 is reached SPOT landing may be performed also if AirDog detects technical failure In the Custom sport icon of AirDog app always verify that you don t select Land On Spot as a landing mode if you a...

Страница 36: ... AirDog 5 1 Unfolding The Arms 5 1 1 The arms on AirDog are designed to fold in tightly This makes it easy to store in a small case or backpack To unfold the front arms push pull them until a snap is heard To fold the arms back together 1 Carefully press the small release button 2 Slowly fold the arm back to AirDog s body A B ...

Страница 37: ...e landing gear in place Chapter 5 System Preparation 36 Be careful while folding the arms as there is a risk of pinching your fingers when your press the small release button with your thumb Ensure the arms are unfolded correctly until a click is heard and in good condition before each flight Do not try to unfold or fold the arms while the propellers are rotating and always turn off AirDog before ...

Страница 38: ...hem are for the front arms motors face down and two are for the rear arms motors face up Before attaching the propellers turn them face up so you can see the padlock symbol Place AirDog in front of you with the arms unfolded 1 4 Back Front Left Right 2 3 5 System Preparation Chapter 5 System Preparation 37 ...

Страница 39: ...hite stripes facing down Propeller 2 Front Left 2 Padlock facing up Black nut facing down Propeller 3 Back Left 3 Padlock facing up Black nut facing up Propeller 4 Back Right 4 Padlock facing up Black nut with white stripes facing up Chapter 5 System Preparation 38 ...

Страница 40: ...xcessive force this risks damaging the threads in the hubs Always use original AirDog propellers Rotating propellers may cause injury to persons animals or property Do not touch AirDog when the propellers are rotating and always turn off AirDog before handling AirDog or the propellers Ensure that rotating propellers are always at least 10 feet 3 meters away from any person animal or property befor...

Страница 41: ...tor securely 2 Take the action camera housing and position the bottom part first 3 Push the camera housing s top so it fits over the camera 4 Secure the action camera housing s top by pressing down on the housing s lever 5 Secure the action camera housing s bottom by tightening the security screw on the bottom A B C D E ...

Страница 42: ...ery 1 Press and hold the release button 2 Pull the battery outside Ensure the battery is inserted correctly until a snap is heard and in good condition before each flight AirDog will only power if all of the arms are unfolded properly Always ensure the camera is mounted and connected correctly before each flight Never try to mount or unmount the camera while the propellers are rotating Always turn...

Страница 43: ...odic full discharge cycles to prolong life Once the battery is connected to the powered charger the LED indicators on the battery will display the connected status code and the battery will emit a beep While it is charging the LED indicators will display the current battery level see 4 3 1 Level Indicator The battery is designed to charge when the temperature range is between 41 F 5 C and 104 F 40...

Страница 44: ...cted to an unpowered charger for more than 30 minutes The battery will resume charging after you ve disconnected then connected it again to the powered charger If a damaged battery is connected to the powered charger the LED indicators will display an error code see 4 3 4 Error And Status Codes and the charging process will not start Pressing the battery button while the battery is charging provid...

Страница 45: ...ng to charge a battery that has begun to swell will result in fire Never expose store or charge the battery in extreme temperatures since extreme temperature could cause fire Stop using the battery if you notice it is draining faster than normal Do not operate the battery charger with a damaged cord or plug Do not operate the battery charger if it has received a sharp blow been dropped or otherwis...

Страница 46: ... AirLeash USB US and Euro wall adapters included Connect the supplied micro USB cable to your computer or any power source with a USB out like the USB wall adapter included with your AirLeash Batteries that lose 20 of their capacity must be removed from service Before recycling discharge the battery make sure output wires are correctly insulated and then wrap the battery in a bag Do not dispose of...

Страница 47: ...sert the battery 7 Long press 3sec tail button until you hear a long beep to switch Pairing Mode on AirDog s all LEDs will begin flashing when it is in Pairing Mode Pairing process can take up to 2 minutes Pair With AirDog 5 3 2 The easiest way to check if your AirDog is paired with AirLeash is to turn them both on and then wait about 30sec and look at the Leashed Blue LED on AirLeash If it lights...

Страница 48: ...ound your wrist Step 1 Step 2 8 When you see the message Pairing done now it is safe to turn off pairing on AirDog your AirLeash is paired to your AirDog If you have another AirLeash that you want to pair to this AirDog then repeat steps 1 5 without exiting the Pairing mode pairing another AirLeash will be available with software updates 9 After you have successfully paired your AirLeash with AirD...

Страница 49: ...rrectly and firmly around the wrist or the upper arm Do not disassemble or open AirLeash It will no longer be waterproof if it is opened Opening AirLeash may cause damage that is not covered by the limited warranty Switch off all other Bluetooth devices within range or disable their Bluetooth functionality such as wireless headphones or fitness trackers Do not place AirLeash in a pocket or cover i...

Страница 50: ...irDog for the first time it will display the Activate button Press it and your AirDog will be registered to your account and activated Please note that AirDog must be registered and activated before use 5 System Preparation Activation Of AirDog How To Customize A Sport Mode Via AirDog Mobile App 5 4 2 5 4 3 Example customization of a sport mode Chapter 5 System Preparation 49 Turn on AirDog by unf...

Страница 51: ...on 50 Follow mode choose from available Follow modes Distance customize distance between the user and AirDog Altitude customize takeoff and follow altitude Enforce home landing forces AirDog to land at HOME even if SPOT landing requested from AirLeash Landing mode choose from different landing modes Start follow after takeoff choose if you want AirDog to skip Hover Aim mode and switch to follow im...

Страница 52: ...g and AirLeash do not require calibration before each flight even if you are moving to a new flight location Please note that all AirDog and AirLeash sensors have been factory calibrated Accelerometer and Gyroscope sensors should be recalibrated ONLY if AirLeash displays such warning message Compass calibration shouldn t be done unless there is a physical sensor replacement or the AirLeash display...

Страница 53: ... 3 Navigate through Menu with arrows until you see the Settings icon on the LCD screen 4 Short press on Power OK to enter Settings 5 Navigate through Settings with arrows until you see the Calibration icon on the LCD screen 6 Short press on Power OK to enter Calibration menu 7 Navigate through Calibration menu with arrows until you see the AirLeash Calibration icon 8 Short press on Power OK to ent...

Страница 54: ...d level until you see a message Rotate AirLeash 360 degrees do not rotate until you see the message 12 After a full rotation AirLeash will display the next message Hold THIS side up it will be upside down so you have to rotate AirLeash so that the text is readable 13 Hold AirLeash steady and at a 90º angle respective to the ground level until you see a message Rotate AirLeash 360 degrees only then...

Страница 55: ...l you see a message Rotate AirLeash 360 degrees only then start rotating 360 degrees 16 After a full rotation AirLeash will display the next message Hold THIS side up it will be upside down so you have to rotate AirLeash so that the text is readable 17 Hold AirLeash steady and at a 90º angle respective to the ground level until you see a message Rotate AirLeash 360 degrees only then start rotating...

Страница 56: ...grees 20 After a full rotation AirLeash will display the next message Hold AirLeash display DOWN 21 Hold AirLeash steady and at a 90º angle respective to the ground level until you hear the calibrating tone only then start rotating 360 degrees 22 Continue rotating until you ll hear a success tone and then turn AirLeash display UP so you see the message Calibration COMPLETED Press OK short press on...

Страница 57: ...any sensors Press Power OK and you will be forwarded to the next info screen where you can choose to either read more calibration tips press Power OK button to see them or you can skip the tips by pressing the Play Pause button AirLeash Accelerometer Accels Calibration 5 6 1 2 Calibrate Accelerometer on AirLeash ONLY if you are notified that it is necessary Follow the figures as indicated below to...

Страница 58: ...HOLD STILL will appear do not move while this message is visible 13 When you hear a different tone and the message HOLD STILL changes to the next message Hold THIS side up rotate AirLeash so that the text is readable 14 Hold AirLeash steady at a 90º angle respective to the ground level a message HOLD STILL will appear do not move while this message is visible 15 When you hear a different tone and ...

Страница 59: ...e message HOLD STILL changes to the next message Hold THIS side up rotate AirLeash so that the text is readable 18 Hold AirLeash steady at a 90º angle respective to the ground level a message HOLD STILL will appear do not move while this message is visible 19 When you hear a different tone and the message HOLD STILL changes to the next message Hold AirLeash Display UP place AirLeash on level surfa...

Страница 60: ...see the Settings icon on the LCD screen HOLD AirLeash Display DOWN 21 When you hear a different tone and the message HOLD STILL changes to the next message Hold AirLeash Display DOWN place AirLeash on level surface display facing down 22 When you hear the success tone turn the AirLeash display UP so you see the message Calibration COMPLETED Press OK short press on Power OK to complete calibration ...

Страница 61: ...p airdog com it is strongly advised to go and watch the calibration videos before you calibrate any sensors Press Power OK and you will be forwarded to the next info screen where you can choose to either read more calibration tips press Power OK button to see them or you can skip the tips by pressing Play Pause button 11 Calibration will start after 5 sec a message stating HOLD STILL will appear d...

Страница 62: ...nce free environment Stay away from metal and concrete structures such as buildings parking or any metal structures Do not wear gloves or rings with magnets or other ferromagnetic metals while performing the calibration steps AirDog is only meant to work outdoors and indoor calibration will lead to faulty measurements Magnetometer calibration process 1 Insert the battery in the unfolded AirDog 2 L...

Страница 63: ...bration videos before you calibrate any sensors Press Power OK and you will be forwarded to the next info screen where you can choose to either read more calibration tips press Power OK button to see them or to skip the tips by pressing Play Pause 13 Calibration will start after 5 sec a message stating Hold AirDog Belly UP will appear pick up AirDog from ground and turn belly up 14 Hold AirDog ste...

Страница 64: ...the message 17 After a full rotation AirDog will display the next message Hold AirDog Left arms UP you ll have to turn AirDog so that left arms are up 18 Hold AirDog steady at a 90º angle respective to the ground level until you see a message Rotate AirDog 360 degrees do not rotate until you see the message 19 After a full rotation AirDog will display the next message Hold AirDog Right arms UP you...

Страница 65: ...er a full rotation AirDog will display the next message Hold AirDog Camera UP you ll have to turn AirDog so that the camera is facing up 22 Hold AirDog steady and at a 90º angle respective to the ground level until you see a message Rotate AirDog 360 degrees do not rotate until you see the message 23 After a full rotation AirDog will display the next message Hold AirDog Camera DOWN you ll have to ...

Страница 66: ...he ground level until you see a message Rotate AirDog 360 degrees do not rotate until you see the message 25 Continue rotating even if you don t hear a tone until you ll hear a success tone and see the message Calibration COMPLETED Press OK short press on Power OK to complete the calibration process 26 During calibration you may see two error messages a If you see FAILED motion detected hold still...

Страница 67: ...enu with arrows until you see the AirDog Calibration icon 9 Short press on Power OK to enter AirDog Calibration menu 10 Navigate through the AirDog menu with arrows until you see Accels icon on the LCD screen 11 Short press Power OK and you will see a message Watch video help airdog com it is strongly advised to watch the calibration videos before you calibrate any sensors Press Power OK and you w...

Страница 68: ...hen you hear a different tone and the message HOLD STILL changes to the next message Hold AirDog Camera DOWN flip AirDog so that camera is facing down 15 Hold AirDog steady at a 90º angle respective to the ground level a message HOLD STILL will appear do not move while this message is visible 16 When you hear a different tone and the message HOLD STILL changes to the next message Hold AirDog Left ...

Страница 69: ...TILL changes to the next message Hold AirDog Right arms UP rotate AirDog so that the right arms are up 19 Hold AirDog steady at a 90º angle respective to the ground level a message HOLD STILL will appear do not move while this message is visible 20 When you hear a different tone and the message HOLD STILL changes to the next message Hold AirDog Belly UP flip AirDog so that the belly is facing up a...

Страница 70: ...on a level surface and a message HOLD STILL will appear do not move while this message is visible 24 When you hear the success tone AirLeash display will show the message Calibration COMPLETED Press OK short press on Power OK to complete the calibration process 25 During calibration you may see two error messages a If you see FAILED motion detected recalibrate and hold still restart calibration ag...

Страница 71: ...forwarded to the next info screen where you can choose to either read more calibration tips press Power OK button to see them or you can skip the tips by pressing the Play Pause AirDog Gyroscope Gyro Calibration 5 6 2 3 Calibrate Gyroscope on AirDog ONLY if you are notified that it is necessary Follow the figure as indicated below to complete gyroscope calibration Make sure you do not touch move o...

Страница 72: ... sensor is faulty please initiate Sensor check manually 12 Calibration will start after 5 sec a message stating HOLD STILL will appear do not move AirDog while this message is visible 13 When you hear the success tone AirLeash display will show the message Calibration COMPLETED Press OK short press on Power OK to complete calibration process 14 During calibration you may see a error message FAILED...

Страница 73: ...position of the gimbal does not matter as long as it does not move at all AirDog is only meant to work outdoors and indoor calibration will lead to faulty measurements Gimbal gyroscope calibration process Chapter 5 System Preparation 72 Gimbal gyro calibration is completed when AirDog stops the beeping tone 2 Short press three times the frame button at the rear of AirDog you will hear three beeps ...

Страница 74: ...he calibration process turn off camera AirDog is only meant to work outdoors and indoor calibration will lead to faulty measurements Gimbal accelerometer calibration process Chapter 5 System Preparation 73 1st Axis position Camera pointing forward 1 Insert the battery in the unfolded AirDog and wait until AirDog automatically switches gimbal off 2 Position the gimbal in the 1st Axis position hold ...

Страница 75: ...e stops You can then only move to the next axis If you don t hear the calibration tone you may not not have short pressed fast enough just try again Chapter 5 System Preparation 74 3 Repeat the step 2 for each remaining axis position 4th Axis position Camera facing up 3rd Axis position Camera on left side ...

Страница 76: ...ormal position and slowly drifts to either side or is shaking rapidly you must start the process again from the beginning Note that gimbal will automatically switch off after 10sec after battery insertion Chapter 5 System Preparation 75 Depending on where and how you fly you could be unknowingly risking the safety of people around you That s not something to be taken lightly and this is why safety...

Страница 77: ... and it is securely inserted AirLeash battery is fully charged and AirLeash is securely attached around the wrist or upper arm GoPro camera is securely locked in place turned on and Wi Fi is disabled Landing gears are oriented down Takeoff location place AirDog on safe level surface Make sure that altitude difference between AirLeash and AirDog does not exceed 6 7 feet 2 meters Weather conditions ...

Страница 78: ... 32 miles per hour 52 kilometers per hour Reduce the chance of electromagnetic interference by not flying AirDog in areas with significant high levels of electromagnetism such as base stations radio towers or on board radio transmission equipment Do not use AirDog under the influence of medications drugs or alcohol Drones should always be kept away from police operations accident scenes building f...

Страница 79: ... 160 kilometers per hour Be aware that by default the maximum flight speed for AirDog cannot exceed a speed of 38 knots 20 meters per second 44 miles per hour 70 kilometers per hour AirDog is equipped with a downward LIDAR sensor circular lenses under the drone which is a remote sensing technology that measures distance between AirDog and the ground by illuminating a target with a laser and analyz...

Страница 80: ... signal to fly autonomously A clear view of the sky will produce the highest satellite count and the best accuracy Obstructions such as trees buildings and mountains electromagnetic interference from radio towers or onboard radio transmission equipment or the time of day can reduce the quality of GPS Chapter 7 Flight 79 Before Flight 7 1 Place AirDog and AirLeash on a level surface as shown below ...

Страница 81: ...ice to select the Sport Mode Check if AirDog battery is fully charged by pressing the status button on the battery Refer to AirLeash Buttons on paragraph 4 2 4 for more information Your selected sport mode will flash on the upper left corner and change between Getting GPS or READY statuses To select a Sport Mode To customize selected Sport Mode Chapter 7 Flight 80 Check if you have selected approp...

Страница 82: ...eter save Sensor check is a procedure that verifies if AirDog and AirLeash sensors are ok to fly Sensor check will be initiated automatically after AirDog and AirLeash get a good GPS lock You will have to do it only once a day The procedure consists of two parts first you check if AirDog sensors are ok after that you check AirLeash sensors Step 1 Turn ON AirDog and AirLeash Place AirDog on a level...

Страница 83: ...l see the message wait when you see this message please do not move AirDog Step 3 Once you hear a beeping tone and see the message Rotate 90 degrees as shown turn AirDog 90 degrees to the right clockwise Do this in a smooth and controlled motion Step 4 Once you hear the second quick beep after rotating AirDog 90 degrees clockwise and AirLeash displays the message Roll right with left arms up pick ...

Страница 84: ...rface on which you placed AirDog isn t level enough reposition AirDog and try sensor check again if you see this message again and you are sure that the surface is level then only calibrate AirDog Accels Vibrations detected try again or calibrate gyro try sensor check again if you get the same error message calibrate AirDog gyro Vibrations detected try again or calibrate accel try sensor check aga...

Страница 85: ...irdog com it is strongly advised to watch the calibration videos before you calibrate any sensors Press Power OK and you will be forwarded to the next info screen where you can choose to either read more sensor check tips press Power OK to see them or skip the tips by pressing Play Pause Put AirLeash on a level surface and short press Power OK You will see message wait while you see this message p...

Страница 86: ...ted via the AirLeash menu or the AirDog app AirDog will stay in Hover Aim mode if you have not activated the Follow immediately function via AirLeash or AirDog mobile app Rotating propellers can cause serious injury Never command or initiate AirDog to take off from your hand or while holding AirDog Make sure that you and AirLeash are on the same altitude as AirDog before initiating takeoff Wait un...

Страница 87: ...til you short press Power OK button or until it reaches the max altitude If you press the arrow down once AirDog will decrease its altitude by 1 meter 3 feet but if you long press 3sec arrow down AirDog will decrease its altitude until you short press on Power OK button or until it reaches the min altitude from ground 5 meters or 16 feet Altitude Adjustment 7 3 1 Chapter 7 Flight 86 You can reposi...

Страница 88: ...t but if you long press 3sec arrow left AirDog will rotate around you counterclockwise to the left until you short press on Power OK button You won t be able to reposition AirDog clockwise or counterclockwise in Sport Modes that include one of the following modes Follow line please refer to paragraph 4 6 1 for more information to find out which are these Sport Modes You can reposition AirDog farth...

Страница 89: ...utton on AirLeash You can call AirDog to your position with a short press of the CTM button on AirLeash AirDog will immediately fly over in a straight line and initiate Hover Aim mode over the position where CTM was initiated If you initiate CTM when you are at a higher altitude than AirDog you re higher up the mountain AirDog will ascend until it reaches the initial takeoff altitude offset your c...

Страница 90: ...battery level is critical this action will not be available If you have selected HOME landing before the flight and AirDog s battery level drops below 30 during the flight AirDog will automatically initiate the Return to Home HOME landing sequence If you have selected SPOT landing before your flight and AirDog s battery level drops below 20 during the flight AirDog will automatically initiate the ...

Страница 91: ...ect your AirDog and AirLeash to our desktop app AirLoader to check if your devices have the latest firmware Firmware updates will fix any bugs or problems which AirDog AirLeash has identified and may also bring new features such as new Sport Modes etc Download and install the latest AirLoader version You can get it here https www airdog com support Chapter 8 Software Update via Desktop app AirLoad...

Страница 92: ... 2 7 cm Left arms black nuts Right arms black nuts and white stripes Battery Interchangeable 14 8V 5600 mAh lithium polymer battery Range Maximum speed 38 knots 44 miles per hour 70 kilometers per hour Maximum flight altitude 11 500 feet 3 500 meters above sea level Range 400 feet 120 meters Wind limitation 28 knots 14 meters per second Estimated flight time 10 18 min depending on flight speed win...

Страница 93: ...o USB Frequency type Long range Bluetooth Range 820 feet 250 meters Operating temperature range 23 F 104 F 5 C to 40 C Operating relative humidity range 0 85 RH AirDog Battery Dimension 6 85 in x 2 08 in x 1 77 in 174 mm x 53 mm x 45 mm Type Interchangeable 14 8V 5600 mAh lithium polymer battery Weight 1 05 lbs 0 48 kg Energy 82 88Wh Operating temperature range 23 F 104 F 5 C to 40 C Maximum charg...

Страница 94: ...duct within a reasonable period of time and free of charge Refurbished means a product or part that has been returned to its original specifications This limited warranty only covers product issues caused by defects in material or workmanship during ordinary consumer use for the period commencing upon the date of purchase and continuing for the following specified period of time after that date Ai...

Страница 95: ...c 8 Unauthorized opening modification of or to any part of the product or product purchased which did not follow the instruction of official manuals 9 Unauthorized opening modification from other than AirDog or AirDog authorized retailers 10 Malfunction results from the use of the product in conjunction with accessories products services software or peripheral equipment not expressly approved or p...

Страница 96: ...tal or consequential damages for breach of any express or implied warranty on this product including injury death loss or other claim related to or resulting from the use of this product In no event shall company s liability exceed the purchase price of the product Some states countries and provinces do not allow the exclusion or limitation of incidental or consequential damages or allow limitatio...

Страница 97: ... with part 15 of the FCC Rules Operation is subject to the condition that this device does not cause harmful interference FCC Rules Part 15 Warning This equipment has been tested and found to comply with the limits for a class B digital device pursuant to Part 15 of the FCC rules These limits are designed to provide reasonable protection against harmful interference in a residential installation T...

Страница 98: ...paration between the equipment and receiver Connect the equipment to an outlet on a circuit different from that to which the receiver is connected Consult the dealer or an experienced radio TV technician for help determined by turning the equipment off and on the user is encouraged to try to correct the interference by one or more of the following measurements 1 this device may not cause interfere...

Страница 99: ...onjunction with any other antenna or transmitter Changes or modifications not expressly approved by Airdog could void the user s authority to operate the equipment Avertissement IC à l Exposition Aux Rayonnements L équipement AirDog a été testé et est conforme aux limites d exposition IC RF aux rayonnements fixées pour un environnement non contrôlé L équipement AirDog doit être installé et utilisé...

Страница 100: ...1 on the restriction of the use of certain hazardous substances in electrical and electronic equipment RoHS Used standards LVS EN 60950 1 2006 A11 2009 A1 2010 A12 2011 A2 2013 LVS EN 55032 2012 AC 2013 AC 2014 LVS EN 55024 2011 ETSI EN 301 489 1 V1 9 2 2011 09 Confirmation of conformity EC Certificates of Conformity No 2 060 067 2015 dated October 16 2015 ICQC Ltd Notified Body No 2549 Accredited...

Страница 101: ...vendor No warranty or representation either expressed or implied is made with respect to the quality accuracy or fitness for any particular purpose of this document The manufacturer reserves the right to make changes to the content of this document and or the products associated with it at any time without obligation to notify any person or organisation of such changes In no event will the manufac...

Страница 102: ...airdog com ...

Отзывы: