FITTING
THE AIRCAST
XP DIABETIC WALKER
•
Please ensure you are seated when fitting the XP Diabetic Walker.
•
For comfort and hygiene, we recommend using the sock provided with the walker boot.
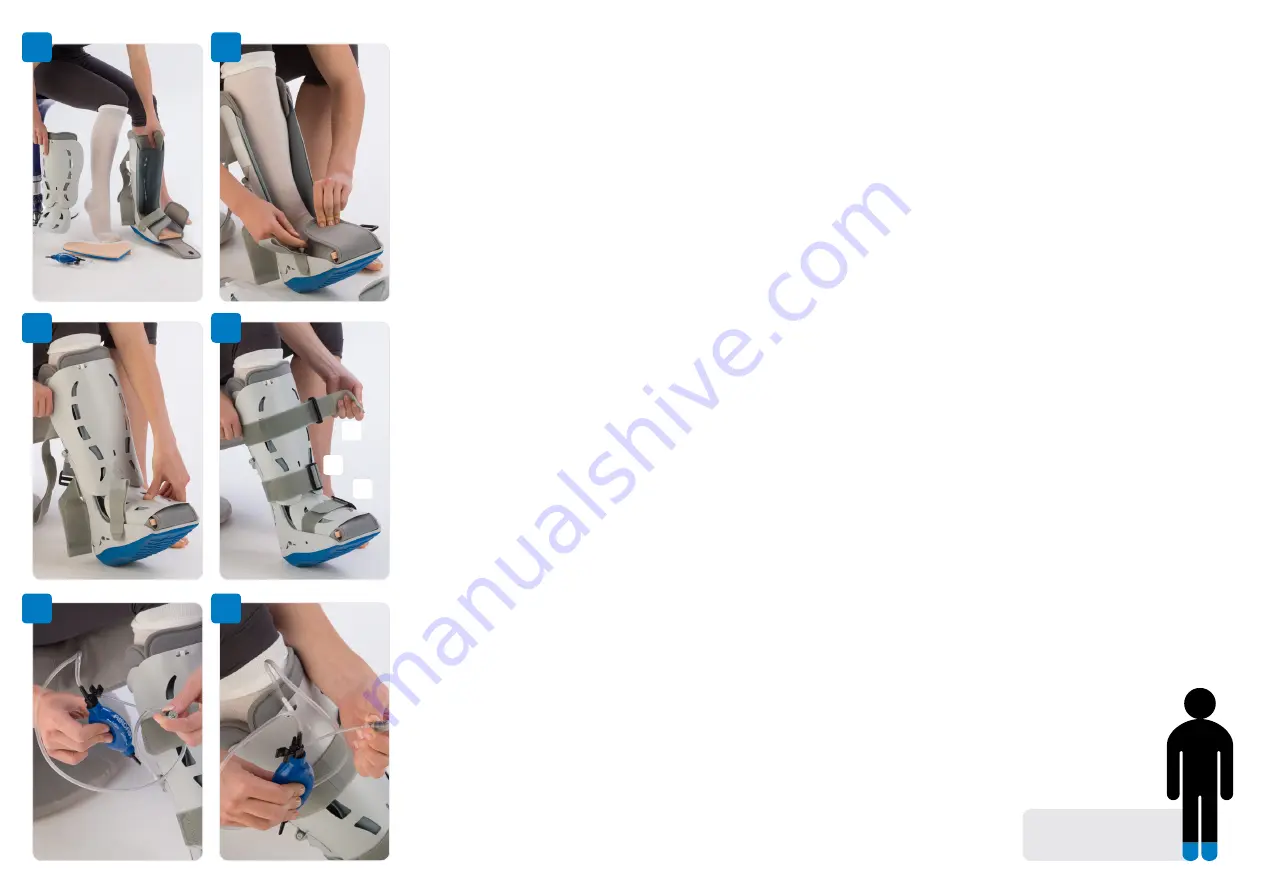
1. Prepare Walker Boot:
•
Check aircells are deflated (See Step 1 of ‘Removing the XP Diabetic Walker’).
•
Unfasten straps, remove front panel and open toe cover and foot flaps.
2. Position heel against back of the boot,
smoothing any wrinkles in sock. Wrap foot
flaps over the foot and toe cover over the toes.
3. Replace front panel.
Position so that:
•
Foot panel is positioned inside the boot.
•
Upper part of front panel remains outside the boot.
4. Secure straps from bottom to top
(A, B & C).
•
Tighten until the boot feels snug and comfortable.
5. Adjust Aircell compression. Inflate in the following order:
•
Front Panel (valve 1)
•
Inside of leg then outside of leg (valve 2, located on both sides)
•
Back of brace (valve 3)
6. To inflate aircell,
firmly insert “inflate” tip of hand bulb into front panel valve (1).
•
Squeeze hand bulb until bottom edge of black pressure gauge indicator is above number 30.
•
Leave air tube in valve and stop squeezing hand bulb – the pressure gauge indicator will
slowly fall.
•
Pull air tube out of valve when the bottom edge of the indicator falls within 10 and 20.
•
Repeat process for valves 2 and 3. For valve 2, pressure gauge indicator should be between
20 and 30 before air tube disconnected and between 10 and 20 for valve 3.
Note:
The walker comes with two insoles: a pink Plastazote Insole (placed in walker) and
an Impax Grid Insole (inside accessory bag). Your healthcare professional will recommend
which sole to use.
If using the Impax Grid Insole: locate and remove the pre-cut foam cubes from the underside
of the insole around the wound site/s for pressure relief. Remove the pink Plastazote Insole
from the walker and replace with the Impax Grid Insole (pink side down). Blue side of Impax
Grid Insole should be against the sole of the foot.
REMOVING
THE AIRCAST
XP DIABETIC WALKER
•
Deflate aircells before removing boot for proper fit when reapplying.
1.
To deflate, firmly insert black tip of hand bulb marked “deflate” in valve and squeeze bulb.
2.
Undo the 3 straps (the order is unimportant).
3.
Remove front panel and open foot flaps and toe cover, before removing leg from the boot.
PRECAUTIONS
•
Do not over-inflate aircells. Improper aircell inflation may cause significant skin irritation
in patients with diabetic neuropathy.
•
Check your skin frequently for “hot spots” and skin irritation. If you see any skin changes or
feelings of discomfort, reduce the aircell compression.
•
Consult a medical professional if you are concerned about any symptoms.
•
Do not use the boot if you cannot feel sensations, whether due to post-op anaesthesia,
nerve, skin or other conditions.
NOTES
•
Higher pressure provides more support when walking; lower pressure is more comfortable
when sitting or reclining. Pressure can also be adjusted by tightening or loosening
the straps.
•
If on an airline flight, deflate cells and loosen straps.
•
Use caution when walking on slippery or wet surfaces to avoid injury.
For further information,
see product Instructions For Use.
FOOT AND ANKLE
1
2
3
4
5
6
C
B
A


