3401 Airway Blvd.
Amarillo, Texas 79118
806-373-7788
®
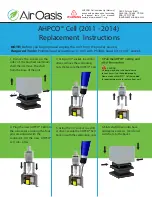
1. Remove the screws on the
sides of the brushed aluminum
shell then remove the shell
from the base of the unit.
4. Plug the new AHPCO
® Cell
into
the connector, ensuring the four
pins are aligned with the
connector. Put the new AHPCO
®
Cell into place.
6. Slide shell down onto base
and replace screws. (Cord and
switch are to the back.)
5. Using the 1/4” socket, in a drill
or driver, secure the AHPCO
®
Cell
back on with the self-locking nuts.
2. Using a 1/4” socket, in a drill or
driver, remove the self-locking
nuts that secure the AHPCO
®
Cell.
Phillips head screwdriver or drill with Phillips head bit or 1/4” socket.
Required Tools:
NOTE: Before you begin please unplug the unit from it's power source.
AHPCO® Cell (2011 - 2014)
Replacement Instructions
3. Pull the AHPCO® Cell Up and
CAUTION
UV lamp may be hot and could cause
serious burns if not handled properly.
Please wait until AHPCO® Cell has cooled
to room temperature to remove from unit.
WARNING
AHPCO® Cell contains Hg (Mercury)
and should be disposed of according
to disposal laws. Find disposal
centers at www.earth911.org.


