background image

5. Administrating the Device 


AirLive POE-5010HD User’s Manual 

26

Default Gateway 

Enter the Default Gateway of the camera. The default 

setting is 

192.168.1.254


Primary/ 

Secondary DNS 

DNS (Domain Name System) translates domain names into 

IP addresses. Enter the Primary DNS and Secondary DNS 

that are provided by ISP. 

HTTP Port 

The default HTTP port is 

80

RTSP Port 

The default RTSP Port (Real Time Streaming Protocol) is 

554

RTP Data Port 

RTP (Real-time Transport Protocol) is a data transfer 

protocol defined to deliver live media to the clients at the 

same time, which defines the transmission of video and 

audio files in real time for Internet applications. The default 

RTP Data Port is 

5556


Enable Multicast: 

Select this option to enable the multicast function of the camera, and 

then complete the following settings so that you can deliver information from your camera 

to a set of receivers.


Multicast Group Address: 

Assign a category of IP addresses to receive the 

information from the camera. 

Multicast Video Port:

 Assign a multicast port for video in the text box. The default 

port is 

5560

Multicast RTCP Video Port: 

Assign a multicast port for RTCP (real-time transport 

control protocol) video in the text box. The default port is 

5561

.


Multicast Audio Port:

 Assign a multicast port for audio in the text box. The default 

port is 

5562

.


Multicast RTCP Audio Port:

 Assign a multicast port for RTCP (real-time transport 

control protocol) audio in the text box. The default port is 

5563

.


Multicast TTL:

 Set the value from 1 to 255. TTL (time to live) is used to specify the 

time to live in the IP header so that the system is able to decide whether or not the 

packet has been in the network too long and should be discarded.


Enable PPPoE: 

Select this option when you use a direct connection via the ADSL modem. 

You should have a PPPoE account from your Internet service provider. Enter the 

User 

Name

 and 

Password

. The camera will get an IP address from the ISP as starting up. 


Содержание POE-5010HD

Страница 1: ...User s Manual POE 5 Mega Pixel Box Type IP Camera with ICR POE 5010HD ...

Страница 2: ...t effort to ensure the accuracy of the information in this user s guide However we are not liable for the inaccuracies or errors in this guide Please use with caution All information is subject to change without notice This product contains some codes from GPL In compliance with GPL agreement AirLive will publish the GPL codes on our website Please go to www airlive com and go to the Support GPL m...

Страница 3: ...ows XP or Vista 15 3 3 Install the Device behind a NAT Router 16 3 4 Access the device from the Internet Explorer for the first time 17 4 Operating the Network Camera 19 5 Administrating the Device 21 5 1 System Setting Configure and maintain system 22 5 1 1 Device Settings 22 5 1 2 Maintenance 23 5 2 Network Configure Network Settings 24 5 2 1 General 25 5 2 2 UPnP Bonjour QoS 27 5 2 3 IP Filter ...

Страница 4: ... 43 5 5 5 RS 485 44 5 5 6 SD File List 45 5 6 Status 45 Appendix A Alarm I O Connector 46 Appendix B Frequently Asked Questions 48 Appendix C PING IP Address 53 Appendix D Bandwidth Estimation 54 Appendix E Specifications 55 Appendix F Configure Port Forwarding Manually 57 Appendix G DDNS Application 61 Appendix H Power Line Frequency 68 Appendix I 3GPP 69 Appendix J Enable UPnP of Windows XP 70 ...

Страница 5: ...ol signal required for adjusting the lens through the DC Iris connector 4 pin on the side panel of the camera You can attach any standard DC Iris lens for specific purpose such outdoor applications In addition the camera can attach a variety of external devices for your specific purposes through the GPIO connectors Compared to the conventional PC camera this camera features a built in CPU and web ...

Страница 6: ...ion Multiple Profiles Supported H 264 MPEG4 MJPEG and 3GPP HTTP RTSP protocols selectable 3GPP for 3G mobile remote application 8 fps for 5 Mega pixel mode 15 fps for 3 Mega pixel mode 20 fps for 1080P mode Digital zoom Support both built in and external microphone Audio line out Two way audio Intelligent motion detection up to 3 zones Image transmission using an FTP or e mail for event DDNS and P...

Страница 7: ...ded file VGA Monitor resolution 1280 x 1024 or higher Pentium 4 2 0 GHz or higher Memory Size 512MB or more Windows XP Vista 7 Microsoft Internet Explorer 7 0 or above Apple Safari 2 or above Mozilla Firefox 2 00 or above Google Chrome Note If you connect multiple cameras to monitor various places simultaneously you are recommended to use a computer with higher performance ...

Страница 8: ...or further information about the lens please check with your installer 2 Power Adapter dedicates 12V DC electric power output to Network Camera 3 User s Manual CD provides installation software application program important information and instructions for operating the Network Camera 4 Quick Start Guide provides important information and instructions for installing this device If any of the above...

Страница 9: ... iris Connector It allows you to attach the DC Iris lens optional 2 Reset Button This button is used to restore the all factory default settings Sometimes restarting the device will make the system back to a normal state However if the system still got problems after restart user can restore the factory default settings and install it again Restore the device i Press the button down continuously i...

Страница 10: ...the screw hole of the camera Back Panel 1 RJ45 LAN socket Connect to PC or Hub Switch For connections to 10Base T Ethernet or 100Base TX Fast Ethernet cabling This Ethernet port built N Way protocol can detect or negotiate the transmission speed of the network automatically Please use Category 5 cable to connect the Network Camera to a 100Mbps Fast Ethernet network switch or hub In the LAN socket ...

Страница 11: ...ower Input AC power 24V 7 RS 485 TX 8 RS 485 TX Compliant to RS 485 3 DC in Jack The input power is 12VDC Note that supply the power to the Network Camera with the power adapter included in package 4 Audio I O Connectors MIC in audio in Connect a microphone to the network camera Line out audio out Connect a loud speaker to the network camera This function is for voice alerting and two way audio 5 ...

Страница 12: ...e camera can be mounted on the wall or ceiling securely through the three screw holes on the base of the Wall Mount Kit Fix the camera to ceiling with the three supplied screws 2 Connecting to LAN Use the provided Ethernet cable to connect the camera to your local area network LAN When you connect the AC power adapter the camera is powered on automatically You can verify the power status from the ...

Страница 13: ...on it means the system is booting up successfully Furthermore if you have a proper network connection and access to the camera the LAN LED green will flash 4 Replacing the Lens Assembly The camera is designed with a CS mount allowing you to install any standard C or CS lens that are commonly used in the surveillance application Installing the Lens Assembly To install new lens assembly follow the i...

Страница 14: ...nual 10 When you use a DC Iris lens on your camera you can adjust the brightness of the video image through the Iris Level screw know on the back panel of the camera Adjusting the Focus You can use the provided L type wrench to adjust the lens focus ...

Страница 15: ... local and remote places and objects via Internet or Intranet z Capture still images and video clips remotely z Upload images or send email messages with the still images attached The following diagram explains one of the typical applications for your camera and provides a basic example for installing the camera Home Applications of the Internet Cameras ...

Страница 16: ...ays to search your Cameras by IPWizard II or UPnP discovery Here is the way to execute IPWizard II to discover Camera s IP address and set up related parameter in a Camera Search When launch the IPWizard II a searching window will pop up IPWizard II is starting to search Network Cameras on the LAN The existed devices will be listed as below 3 3 Preparation ...

Страница 17: ...eters of wired interface please select the device you want to configure and click the LAN button Relative settings will be carried out as below You could modify the relative settings of the selected device Click button will quit the LAN setting procedure and click button will move to next page as below ...

Страница 18: ...orm your setting accordingly Click button will go back to previous page If you like to change username and or password of the device just click the check button Then the related fields will show up as below After keying in new username and password click Submit button to perform your setting accordingly Click button will go back to previous page ...

Страница 19: ...ng equipment software and peripherals This device is an UPnP enabled device If the operating system Windows XP or Vista of your PC is UPnP enabled the Network Camera will be very easy to be found Please refer to Appendix J to enable UPnP settings only if your operating system of PC is running Windows XP Note Windows 2000 does not support UPnP feature To discover your device go to your Desktop and ...

Страница 20: ... enable the NAT traversal feature which will attempt to automatically configure the router to allow access to the camera Installing the device with an UPnP router on your network is an easy 3 step procedure 1 Enable UPnP option of your NAT router 2 Enable UPnP NAT traversal option of the Network Camera 3 Access your Network Camera by DIPS 1 Enable UPnP option of your NAT router To use UPnP IGD fun...

Страница 21: ...r login name and password under USERNAME and PASSWORD textbox For the first time use default value input the User Name admin Password airlive That s type in admin on the USERNAME as a default name and leave PASSWORD textbox airlive Click OK button to start the main menu 3 According your browser s security setting the IE Web Page may prompt the Security Warning window If so select Yes to install an...

Страница 22: ...and ran the first image will be displayed Logging in as an User If you log in the Camera as an ordinary User Setting function will be not accessible Logging in as an Administrator If you log in the Network Camera as the Administrator you can perform all the settings provided within the device ...

Страница 23: ... appear on the left top of Live View Window You can enlarge the video image digitally by sliding the Zoom IN OUT bar and select the area of the image to display by moving the Pan window z Click to mute unmute the microphone of the camera When it is unmuted you to receive the on site sound voice where the camera is installed NOTE The button is available only when the microphone function is enabled ...

Страница 24: ...ck on each menu name to display its setting page Item Action Setup The Setup menu contains two sub menus that provide the system settings for the camera such as the Camera Name Location Date Time etc Network The Network menu contains the networking related settings for the camera such as the IP Setting DDNS Setting IP Filter etc Image Adjust camera parameters day night Video Configure bit rate and...

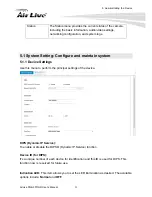
Страница 25: ...and maintain system 5 1 1 Device Settings Use this menu to perform the principal settings of the device DIPS Dynamic IP Service To enable or disable the DIPS Dynamic IP Service function Device ID for DIPS It s a unique number of each device for identification and this ID is used for DIPS This function now is reserved for future use Indication LED This item allows you to set the LED illumination as...

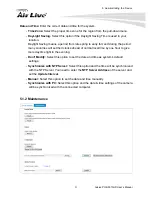
Страница 26: ...tries will set their clocks ahead of normal local time by one hour to give more daytime light in the evening Don t Modify Select this option to set the date and time as system s default settings Synchronize with NTP Server Select this option and the time will be synchronized with the NTP Server You need to enter the NTP Server Address of the server and set the Update Interval Manual Select this op...

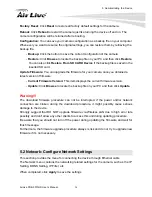
Страница 27: ...urrent Firmware Version This item displays the current firmware version Update Click Browse to locate the backup file on your PC and then click Update Warning The download firmware procedure can not be interrupted If the power and or network connection are broken during the download procedure it might possibly cause serious damage to the device Strongly suggest that DO NOT upgrade firmware via Wir...

Страница 28: ...the configuration parameters e g the IPv6 network addressed to the IPv6 nodes which offers the capability of automatic allocation of reusable network addresses and additional configuration flexibility Select this option if your network supports DHCP IPv6 protocol When the camera starts up it will be assigned an IP address from the DHCP server automatically Static IPv4 IPv6 Select this option to as...

Страница 29: ...f receivers Multicast Group Address Assign a category of IP addresses to receive the information from the camera Multicast Video Port Assign a multicast port for video in the text box The default port is 5560 Multicast RTCP Video Port Assign a multicast port for RTCP real time transport control protocol video in the text box The default port is 5561 Multicast Audio Port Assign a multicast port for...

Страница 30: ...ss To set up the DDNS select the Provider from the pull down menu and then enter the required information in the Host Name User Name and Password text boxes NOTE You have to sign up for DDNS service with the service provider before configuring this feature 5 2 2 UPnP Bonjour QoS UPnP The camera supports UPnP Universal Plug and Play which is a set of computer network protocols that enable the devic...

Страница 31: ...P address The Apple Safari is already with Bonjour You can download the complete Bonjour for Internet Explorer browser from Apple s web site by visiting http www apple com bonjour QoS QoS quality of service is the ability to provide different priority to different applications or data flows Video DSCP Assign the DSCP DiffServ Code Point of the stream video from the camera by setting the value from...

Страница 32: ...you enter 192 168 0 50 192 168 0 80 in Start End IP Address of Accept IP Address and then click Add the user whose IP address located within 192 168 0 50 192 168 0 80 will be allowed to access the camera On the other hand if you enter the IP range in Start End IP Address of Deny IP Address and then click Add the user whose IP address located within the range will not be allowed to access the camer...

Страница 33: ...tion If enable this function then the TCP Server TCP Port and Message fields need to be filled TCP Server Type the server name or the IP address of the TCP server TCP Port Set port number of TCP server Message The message will be sent to FTP server HTTP Notification If enable this function then the fields below need to be filled URL Type the server name or the IP address of the HTTP server HTTP Lo...

Страница 34: ... x 1960 8fps When the option is selected you can select the desired option from the Main Stream pull down menu and then complete the following to set the camera to capture images in H 264 MPEG4 or MJEPG format Computer View Select the desired resolution that you can view on PC from the Video Resolution pull down menu up to 2592 x 1960 if High Resolution is selected You also need to select a proper...

Страница 35: ...ble this feature Otherwise select 3GPP Without Audio or 3GPP With Audio to transfer the video clips without or with audio If you use a mobile phone that supports 3GPP you can also view the real time streaming image captured by the camera on your phone with the default player on the phone by entering the RTSP link rtsp IP address of the camera 3gp NOTE Your mobile phone and the service provider mus...

Страница 36: ...irror the image vertically or select Horizontal to mirror the image horizontally Power Line Frequency Select the proper frequency according to the camera s location to reduce the flicker NTSC 60Hz or PAL 50Hz Auto Iris When you attach a DC Iris lens with the auto Iris function select ON OFF to enable disable the feature IR Cut IR Cut filter is used for the camera to produce true color images which...

Страница 37: ...splayed text in transparent mode by selecting the Transparent option Enable Image Overlay Select Default Logo or User Define Image to display the image overlay on the live view image You can set the displayed image in transparent mode by selecting the Transparent option and select the background color as white or black When you select User Define Image you can click Browse to select the image file...

Страница 38: ...is set to High Resolution user can select specified region for monitoring for this will saving the bandwidth if there are too many collision on the network 5 4 Security The Security menu provides the required options for administrator to control the camera for security purpose When completed click Apply to save the settings ...

Страница 39: ...sword Type the administrator password twice and then click Modify to set and confirm the password Users User Name Password Confirm Password Enter the user s name you want to add to use the camera Then enter the password twice for the new user When done click Add to add the new user for the camera User List Display the existing users of the camera To delete a user select the one you want to delete ...

Страница 40: ...uration the Guest can only view the live view image from the Main screen of the Web Configuration while accessing the camera Only the Admin is allowed to configure the camera through the Web Configuration 5 4 2 HTTPS HTTPS Select the Enable HTTPS option to enable HTTPS which is a secure protocol to provide authenticated and encrypted communication within your network HTTPS Port Assign a HTTPS port...

Страница 41: ...d in Pre Event or Post Event time when the event has been triggered FTP Event Server Select Enable to enable the FTP server for the camera FTP Server Enter the IP address of the target FTP server Port Enter the port number used for the FTP server User Name Enter the user name to login into the FTP server Password Enter the password to login into the FTP server File Path Name Enter the destination ...

Страница 42: ... according to the mail server configuration User Name Enter the user name to login the mail server Password Enter the password to login the mail server Test SMTP When done click the button to test the SMTP server SSL Encryption If the mail server requires an encrypted connection you should select the SSL option NOTE Due to the network environment the camera may not upload number of images that you...

Страница 43: ...he Http server for the camera URL Enter the IP address of the HTTP server HTTP Port Set port number of HTTP server User Name Enter the user name to login into the HTTP server Password Enter the password to login into the HTTP server NOTE Due to the network environment the camera may not upload number of images that you set 5 5 2 Event Schedule This menu is used to specify the schedule of Event or ...

Страница 44: ... Input 2 8 S AIL The camera will send the attachment to the assigned receiver when The camera will transfer the attachment to the network storage P The camera will send instant message to the TCP server when Select the Trigger by Motion De elect the Action when triggered Enable FTP The camera will upload the attachment to FTP when triggered Enable EM triggered Enable Samba when triggered Enable TC...

Страница 45: ...ant message to the HTTP server when triggered GO Preset The camera will move to the preset position when trigg that the function is available only when a RS 485 device such as an external camera stand with rot Enable SD CARD The camera will store the attachment to the SD card whe triggered Trigger digital output The camera will trigger the connected device camera s output for 1 60 seconds accordin...

Страница 46: ...teps below to set up the Motion Detection functio 1 Select Enable Motion Detection 2 Select Window 1 2 3 When the detecting area is enabled you can use the mouse to 4 When done click 5 5 4 Recording The Enable ect the option to enable the SMB CIFS server FS ser name to login into the Network Storage CIFS server Recording option allows you to set up the recording schedule for the camera SMB CIFS Re...

Страница 47: ... then set the day and time to record When done click Apply to save the settings 5 5 5 RS 485 um Size of Each File This option allows you to limit the file size to be to the server Timestamp Select this option to add th The RS 485 option provides the control settings for external device through the I O port Select Enable RS 485 and complete the required settings to activate the RS 485 function of t...

Страница 48: ...be able to use the RS 485 Buttons on the live view screen to control the camera Use Custom Protocol Select this option to configure the commands protocol ma W You can click Test to t Please note that the setting values in the Command Name string boxes should be from the connected external device please refer to the manual of the connected device 5 5 6 SD File List This page shows the files list in...

Страница 49: ...rry surveillance and security products Electrically they must be able to provide a momentary contact closure This Camera provides wires for general I O terminal and RS485 interface as below Cable for I O connectors PIN SPECIFICATION 1 Ground Common GND 2 GPIO Out 1 Close circuit current maximum 70mA AC or 100mA Output resistance 30 ohm Open circuit voltage maximum 240V AC or 350V DC 3 GPIO In 1 4 ...

Страница 50: ...ICIAN SHOULD DO THE WIRING NOT BY YOURSELF INCORRECT WIRING COULD DAMAGE NWTWORK CAMERA YOU COULD RECEIVE THE FATAL ELECTRIC SHOCK THE EXTERNAL I O IS NOT CAPABLE OF CONNECTING DIRECTLY TO DEVICES THAT REQUIRE LARGE AMOUNTS OF CURRENT IN SOME CASES A CUSTOM INTERFACE CIRCUIT CUSTOMER PROVIDED MAY HAVE TO BE USED SERIOUS DAMAGE TO NETWORK CAMERA MAY RESULT IF A DEVICE IS CONNECTED TO THE EXTERNAL I...

Страница 51: ...ers are logged on The device can be used outdoors or not The device is not weatherproof It needs to be equipped with a weatherproof case for outdoors using However equipped with a weatherproof case might disable the audio function of the device Install this device Status LED does not light up Check and confirm that the DC power adaptor included in packaged is used Secure the power connector and re...

Страница 52: ...he device UPnP NAT Traversal Can not work with NAT router Maybe NAT router does not support UPnP function Please check user s manual of router and turn on UPnP function Maybe UPnP function of NAT router is not compatible to the IP camera Please contact your dealer to get the approval routers list Some IP cameras are working but others are failed Maybe too many IP cameras have been installed on the...

Страница 53: ... it s not working after above procedure reset Network Camera to default setting and installed it again If the problem is not solved the Network Camera might be faulty Contact your dealer for further help Image or video does not appear in the main page The first time the PC connects to Network Camera a pop up Security Warning window will appear to download ActiveX Controls When using Windows XP or ...

Страница 54: ...streaming will not work correctly Ethernet switching hub can smooth the frame rate Blank screen or very slow video when audio is enabled Your connection to the device does not have enough bandwidth to support a higher frame rate for the streamed image size Try reducing the video streaming size to 160x120 or 320x240 and or disabling audio Audio will consume 32 kbps Disable audio to improve video Yo...

Страница 55: ...image related parameters such as brightness contrast hue and sharpness properly Image flickers Wrong power line frequency makes images flicker Make sure the 50 or 60Hz format of your device If the object is dark the image will flicker Make the condition around the Camera brighter Noisy images occur The video images might be noisy if the device is located in a very low light environment Make the co...

Страница 56: ...talled or if the IP address conflicts with any other devices over the network If you want to make sure the IP address of Network Camera utilize the PING command as follows z Start a DOS window z Type ping x x x x where x x x x is the IP address of the Network Camera The replies as illustrated below will provide an explanation to the problem If you want to detect any other devices conflicts with th...

Страница 57: ...olution Average range of data sizes for JPEG mode Average bit rate for MPEG4 mode Average bit rate for H 264 mode 160 x 120 QQVGA 3 6k byte per frame 64kbps 256kbps 30fps 32kbps 192kbps 30fps 320 x 240 QVGA 8 20k byte per frame 256kbps 768kbps 30fps 192kbps 512kbps 30fps 640 x 480 VGA 20 50K byte per frame 512kbps 2048kbps 30fps 384kbps 1536kbps 30fps 1280x1024 SXGA 100 200k byte per frame NA 512k...

Страница 58: ...0 25 fps 1280 x960 30 fps 1280 x 720 30 fps 720 x 480 30 fps 640 x 480 30 fps 320 x 240 30 fps 176 x 144 30 fps Audio Audio Encoder G 711 Audio Streaming One way or two way Microphone Internal Omni Directional Microphone Audio Output Line level out Network Supported Protocols TCP IP IPV6 UDP ICMP DHCP NTP DNS DDNS SMTP FTP HTTP HTTPS SAMBA PPPoE UPnP Bonjour RTP RTSP and RTCP Security Password pro...

Страница 59: ...ter PoE IEEE 802 3af for wired model only Power Consumption 8W max Connectors RJ 45 10BaseT 100BaseTX DC jack 1 alarm input and 1 output Audio in out SD Slot Indication LED Two LEDs on the LAN socket Protection Class Indoor use Operating Temperature 0 C to 50 C 32 F to 122 F Operating Humidity 20 85 non condensing Dimension HxWxD 208x82x80 mm Viewing System OS Windows XP Vista Win7 Browser IE 6 0 ...

Страница 60: ...setup the device with a fixed IP address for example 192 168 0 100 2 Access the Router with Your Web browser The following steps generally apply to any router that you have on your network The WN 300R is used as an example to clarify the configuration process Configure the initial settings of the router by following the steps outlined in the router s Quick Installation Guide If you have cable or D...

Страница 61: ...ase refer to Appendix G for more information 3 Open set Virtual Server Ports to enable remote image viewing The firewall security features built into the router and most routers prevent users from accessing the video from the device over the Internet The router connects to the Internet over a series of numbered ports The ports normally used by the device are blocked from access over the Internet T...

Страница 62: ... into the Public and Private Port section click Apply Scheduling should be set to Always so that the camera images can be accessed at any time A check mark appearing before the entry name will indicate that the ports are enabled Important Some ISPs block access to port 80 Be sure to check with your ISP so that you can open the appropriate ports accordingly If your ISP does not pass traffic on port...

Страница 63: ...nual 60 Enter valid ports in the Virtual Server section of your router Please make sure to check the box on this line to enable settings Then the device can be access from WAN by the router s WAN IP Address By now you have finished your entire PC configuration for this device ...

Страница 64: ...k etc 2 Ethernet Network Environment Normally DDNS service is only necessary for the users that could only obtain dynamic IP addresses As to the users that could obtain the static valid IP address they do not usually have to apply the DDNS service Before we decide if DDNS is necessary for the users we have to check what kind of Ethernet network environment we have to install our Networked Device o...

Страница 65: ...Application AirLive POE 5010HD User s Manual 62 3 Application Steps DDNS Domain Name 1 Visit the following web site http www dyndns org 2 Click Account 3 After the columns show up at the left side click Create Account ...

Страница 66: ...10HD User s Manual 63 4 Fill the application agreement and necessary information a Username b E mail address and confirmation c Password and confirmation d Submit all the input information and finish creating an account Click these two options ...

Страница 67: ...th a title Your DynDNS Account Information Click the hyperlink address to confirm the DDNS service that you just applied Then DDNS you applied activated Click to confirm 6 Enter the web page http www dyndns org again Input your username and password that you just applied to login administration interface of DDNS server ...

Страница 68: ...rofile Select to transmit and record the video using H 264 MPEG4 or MJPEG compression Streaming Protocol User can select proper streaming protocol according to networking environment Digital Output This item allows you to trigger on off the GPIO output manually Language The device could provide multiple languages to meet customer s requirement 4 4 Operating the Network Camera Digital Output Stream...

Страница 69: ...ation AirLive POE 5010HD User s Manual 65 Input your account 7 If the correct username and password are input you can see the following picture at the top right of the login page 8 Click the Services 9 Click the Dynamic DNS ...

Страница 70: ... name without any charge at this step First we input the host name Pink No 1 Then we pick a domain that is easy to remember Pink No 2 The 3rd step is to click Offline Hostname from Service Type Pink No 3 Finally click the Create Host to submit the domain name information and finish DDNS application Pink No 4 1 2 3 4 ...

Страница 71: ...enter the web page of Networked Device and setup the necessary information of DDNS and PPPoE after the application of DDNS service Please check the user manual to access the DDNS and PPPoE pages After saving the modification restart the device Then the external users could browse the Networked Device by the input of their domain name ...

Страница 72: ...y be found in some hotels Other areas are 220V only with the exception of Fortaleza 240V Canada 120V 60 Hz China People s Republic of 220V 50 Hz Finland 230V 50 Hz France 230V 50 Hz Germany 230V 50 Hz Hong Kong 220V 50 Hz India 230V 50 Hz Italy 230V 50 Hz Japan 100V 50 60 Hz Eastern Japan 50 Hz Tokyo Kawasaki Sapporo Yokohoma and Sendai Western Japan 60 Hz Osaka Kyoto Nagoya Hiroshima Malaysia 240...

Страница 73: ...d IP address without any firewall protection RTSP Port Port 554 is the default for RTSP service However sometimes some service providers change this port number for some reasons If so user needs to change this port accordingly Dialing procedure 1 Choose a verified player PacketVideo or Realplayer currently 2 Use the following URL to access rtsp host mpeg4 Where host is the host name or IP address ...

Страница 74: ...OE 5010HD User s Manual 70 Appendix J Enable UPnP of Windows XP Use the following steps to enable UPnP settings only if your operating system of PC is running Windows XP Go to Start Settings and then click Control Panel Click Add or Remove Programs ...

Страница 75: ...Appendix J Enable UPnP of Windows XP AirLive POE 5010HD User s Manual 71 Click Add Remove Windows Components The following screen will appear Select Networking Services and then click Details ...

Страница 76: ...Appendix J Enable UPnP of Windows XP AirLive POE 5010HD User s Manual 72 Select Universal Plug and Play and then click OK Click Next ...

Страница 77: ...Appendix J Enable UPnP of Windows XP AirLive POE 5010HD User s Manual 73 Please wait while Setup configures the components Click Finish ...

Отзывы: