6.
Restore power and test your installation.
SECTION 7
Programming the Occupancy Sensor
1a.
Setting the Occupancy Time Delay.
This will set the amount
of time the fan will continue to operate after the room is
vacated. Locate the motion sensor on the fan’s grill and press
the button 2 times. The LED on the sensor will then flash the
number of times to indicate the current setting, this will repeat
3 times:
1 time = 30 seconds
2 times = 2.5 minutes 6 times = 12.5 minutes
3 times = 5 minutes 7 times = 15 minutes
4 times = 7.5 minutes 8 times = 17.5 minutes
5 times = 10 minutes 9 times = 20 minutes
1b. To adjust the setting, while the sensor is still flashing from
Step 1a
, press the button the
number of times that corresponds with the amount of time you desire, for instance 3 times
sets the delay to 5 minutes (see numbers in
Step 1
). The sensor will then flash the number
of times for the new setting 3 times before exiting back to the programming mode.
2a
Setting the Minimum On Time.
This sets the minimum time the fan will operate once
motion is detected within the room. This works in conjunction with the Occupancy Time
Delay feature set in
Steps 1a
and
1b
. For instance if you set the minimum time on for 15
minutes and the Time Delay for 5 minutes, the fan will operate for at least 15 minutes
then 5 additional minutes.
NOTE:
This is a minimum time that the fan will operate. If the room is occupied longer, the
fan will continue to run until the room is vacated and the occupancy time delay has elapsed.
2b. Locate the motion sensor on the fan’s grill and press the button 10 times. The LED on
the sensor will then flash the number of times to indicate the current setting, this will
repeat 3 times:
1 time = 0 minutes
4 times = 45 minutes
2 times = 15 minutes
5 times = 60 minutes
3 times = 30 minutes
2c. To adjust the setting, while the sensor is still flashing from
Step 2b
, press the button
the number of times that corresponds with the amount of time you desire, for instance
3 times sets the minimum on time to 30 minutes (see numbers in
Step 2b
). The sensor
will then flash the number of times for the new setting 3 times before exiting back to the
programming mode.
3. Once all setting have been made and the sensor will return to detection mode and the
LED will flash when occupancy of the room is detected.
www.airkinglimited.com
6728055 Rev. B 5-14
4 of 12
SECTION 8
Setting the Humidistat
This fan is equipped with a humidity sensor that automatically turns the fan on when humidity
is above set point and off when humidity is at or below set point. If the fan is operating too long
or not enough, first check to see the humidity sensor set point. In cases where the ambient
humidity level of the room rises higher than the preset level, the fan will turn on even if the
room is not occupied. This helps prevent conditions that lead to mold growth.
CAUTION:
MAKE SURE POWER IS SWITCHED OFF AT SERVICE PANEL BEFORE
SERVICING THE UNIT.
1.
To set the desired humidity level of the room, remove the grill and locate the
dehumidistat dial located on the wire compartment cover.
2.
Set the dial to the relative humidity you want the fan to maintain usually between 50 &
80%. Moist climates will require higher settings than dry climates. When the humidity
level of the room is below this setting the fan will remain off. When the humidity level
rises about this setting the fan will turn on and run until the humidity level falls below
this setting.
3.
Reinstall the grill and restore power.
SECTION 9
Activating the Boost Speed
Should it be determined that additional flow is necessary due to excessive duct resistance or
other field conditions this model is equipped with a boost speed. To activate the boost speed:
Single Speed Models
1a. Remove the grill and find the 2 pin wire harness from the fan motor to the capacitor.
1b. Disconnect the harness from the capacitor at the quick connect fitting and remove the
“Boost Label” from the quick connect fitting on the boost capacitor.
1c. Plug the motor harness into the boost capacitor and reinstall grill.
Dual Speed Models
2a. Remove the grill and find the rocker switch located on the main wire compartment in
the corner of the fan housing.
2b. Push the rocker switch to the boost position and reinstall grill.
SECTION 10
Use and Care
CAUTION:
MAKE SURE POWER IS SWITCHED OFF AT SERVICE PANEL BEFORE
SERVICING THE UNIT.
1.
Cleaning the Grill:
Remove grill and use a mild detergent, such as dishwashing liquid,
and dry with a soft cloth. NEVER USE ANY ABRASIVE PADS OR SCOURING POWDERS.
Completely dry grill before reinstalling. Refer to instructions in
Section 5
Finishing the
Installation
, to reinstall grill.
2.
Cleaning the Fan Assembly:
Wipe all parts with a dry cloth or gently vacuum the fan.
NEVER IMMERSE ELECTRICAL PARTS IN WATER.
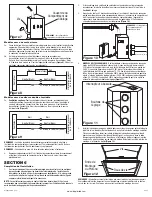
Figure 13


