AIPTEK POCKETCAM 5200 Скачать руководство пользователя страница 13

12

1.

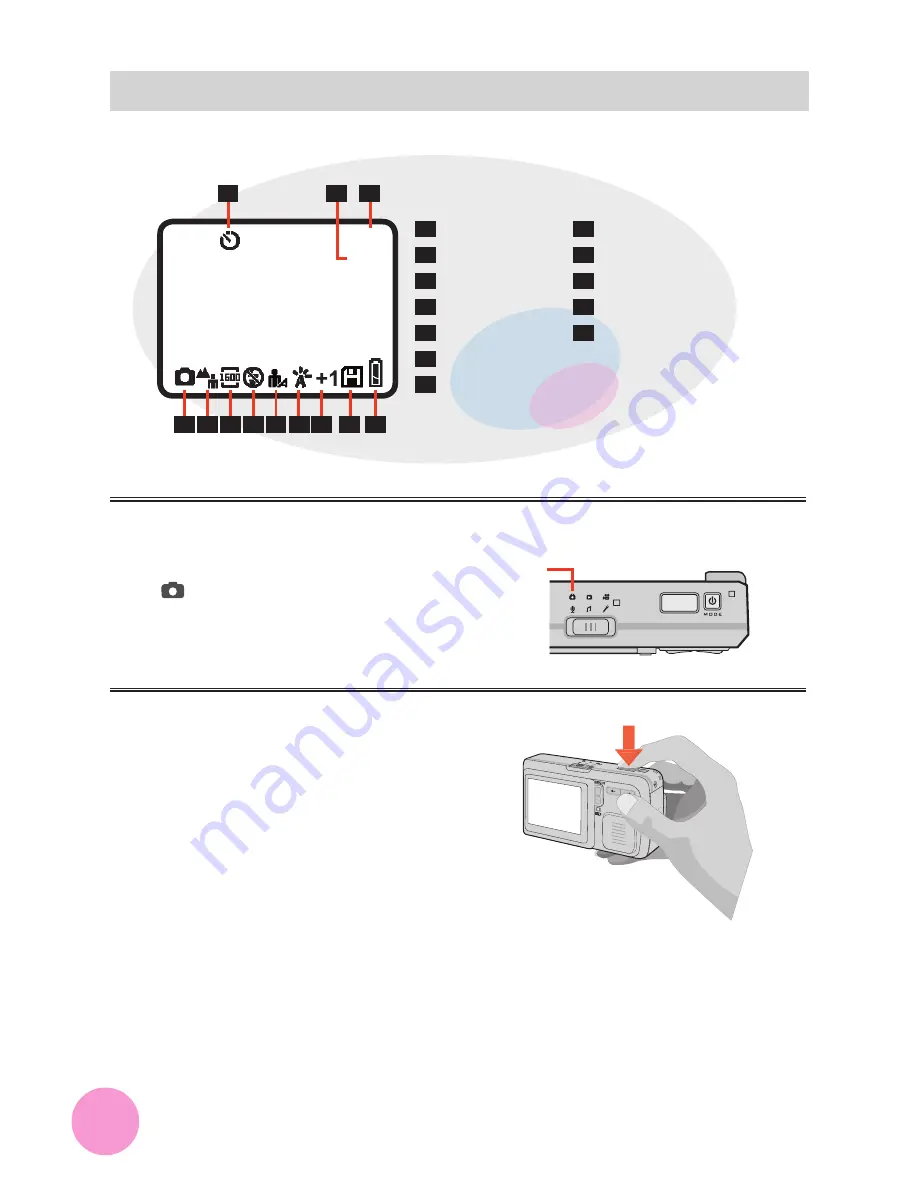
 Turn on the camera, and set the 

Mode Switch

 to Digital Camera 

(   ) mode.

2.

 Press the 

Shutter/Record 

Button

 to take a still picture.

► Taking a still picture

1

 Selftimer

2

 Zoom ratio

3

 Pictures

4

 Battery

5

 SD card present

6

 Exposure value*

7

 White balance*

8

 Exposure method*

9

 Flash strobe

10

 Resolution

11

 Focus

12

 Mode indicator

Digital camera mode LCD illustration

* visible when non-default  

  settings are selected

Digital 

Camera

01

1

3

4

5

6

7

8

9

10

11

1.0X

2

12

Содержание POCKETCAM 5200

Страница 1: ...User s Manual English POCKETCAM 5200...

Страница 2: ...rature or leave it in direct sunlight Doing so may damage the camera 4 Use the camera with care Avoid pressing hard on the camera body 5 For your own safety avoid using the camera when there is a stor...

Страница 3: ...cus 1 5 Recording a voice clip 1 6 Playing back your recordings 1 7 Playing back your recordings thumbnails 1 9 Connecting the camera to your TV 2 0 Advanced operations 2 1 Digital Camera Recording vo...

Страница 4: ...Connecting the camera to your PC 4 5 Copying files to the PC 4 6 Viewing Playing files on your PC 4 8 File Location 4 9 Using MP3 player 5 0 Copying MP3 files to the camera 5 0 Setting the output devi...

Страница 5: ...TV out Connector Earphone Connector 7 Focus Switch 8 USB Port 9 Lens 10 LCD Panel 11 Display Toggle Button 12 Menu OK Button 13 Strap Holes 14 Zoom Left Right Buttons 15 Battery Card Cover 16 Speaker...

Страница 6: ...on 2 Place the Li Ion rechargeable battery into the compartment with the label side facing up 3 After the battery is properly installed replace the battery card cover Loading the battery Li Ion rechar...

Страница 7: ...lace the depleted battery pack into the charger 3 The charging indicator turns red and the charge starts 4 When the charging indicator turns green the battery pack is fully charged This charger can on...

Страница 8: ...ard as the main storage media Files stored in the camera s built in memory will become inaccessible until the SD MMC card is removed Inserting the SD MMC card optional The SD card comes with a write p...

Страница 9: ...o attach the carrying strap thread the strap as illustrated on the right Using the tripod optional The tripod can be attached to your camera to minimize camera movement and ensure optimal image qualit...

Страница 10: ...e How to hold your camera Tips for best shooting 1 Keep the focus set to except for close ups 2 Make sure your subject is well lit from the front 3 Keep the camera level and steady when releasing the...

Страница 11: ...echargeable battery installed in the camera 2 The battery has enough power left 3 The direction of the installed battery is correct 1 Press and hold down the Power Button for 2 seconds to turn on the...

Страница 12: ...the camera is turned on you can press and quick release the Power Button to alternate between two available modes To turn off the camera press and hold down the Power Button for a longer period of ti...

Страница 13: ...Taking a still picture 1 Selftimer 2 Zoom ratio 3 Pictures 4 Battery 5 SD card present 6 Exposure value 7 White balance 8 Exposure method 9 Flash strobe 10 Resolution 11 Focus 12 Mode indicator Digit...

Страница 14: ...retaining the best result Zooming Setting focus Before taking a still picture you can use the Focus Switch to set focus as appropriate The available settings are Macro 20 24 50cm 60cm Normal 24 60cm...

Страница 15: ...the Shutter Record Button to start recording 3 Press the Shutter Record Button again to stop recording 1 Zoom ratio 2 Video clips 3 Battery 4 SD card present 5 Resolution 6 Focus 7 Mode indicator Digi...

Страница 16: ...retaining the best result Setting focus In Digital Camcorder mode or during recording you can use the Focus Switch to set focus as appropriate The available settings are Macro 20 24 50cm 60cm Normal...

Страница 17: ...Recording mode 2 Press the Shutter Record Button to start recording 3 Press the Shutter Record Button again to stop recording 1 Voice clips 2 Battery 3 SD card present 4 Mode indicator Voice recording...

Страница 18: ...ight Buttons to shift between les If you review a picture with memo recording page 21 and the voice memo option is toggled ON page 31 the voice memo will be automatically played back 1 File type JPEG...

Страница 19: ...g the Shutter Record Button will enable you to use the Zoom Buttons to zoom in or zoom out the picture If you zoom in the picture and then press the Shutter Record Button you will be able to browse th...

Страница 20: ...kly search the le you want to play 2 While in the thumbnail screen you can use the Menu OK Button and the Display Toggle Button to scroll up and scroll down pages The Left Right Buttons can move the c...

Страница 21: ...o and video ends of the AV cable to your TV 3 Connect the other end of the video cable to your camera 4 Turn on the camera Before connecting the camera to TV you need to enable the TV out setting Plea...

Страница 22: ...ording voice memo lets you add voice memos to your pictures Here are some notes on using this feature 1 Each voice memo lasts for 10 seconds 2 This function is available after taking a picture If you...

Страница 23: ...tton to con rm 3 In the subsequent menu use the Left Right Buttons to select your desired item and press the Menu OK Button to con rm The available items are 1280x1024 suitable for viewing on PC 1600x...

Страница 24: ...ghlight the Strobe item and press the Menu OK Button to con rm 3 Use the Left Right Buttons to select the desired item and then press the Menu OK Button to con rm The available items are Auto the ash...

Страница 25: ...he Menu OK Button 2 In the menu use the Left Right Buttons to highlight the Selftimer item and press the Menu OK Button to con rm 3 In the subsequent menu use the Left Right Buttons to select On or Of...

Страница 26: ...3 In the subsequent menu use the Left Right Buttons to select your desired item and press the Menu OK Button to con rm The available items are Normal the picture will display in natural color Classic...

Страница 27: ...the Left Right Buttons to select your desired item and press the Menu OK Button to con rm The available items are Auto the white balance is automatically adjusted Sunny suitable for shoot ing under su...

Страница 28: ...select the Scene item and press the Menu OK Button to con rm 3 In the subsequent menu use the Left Right Buttons to select your desired item and press the Menu OK Button to con rm The available items...

Страница 29: ...equent menu use the Left Right Buttons to select your desired item and press the Menu OK Button to con rm The available items are 3 the exposure is dra matically increased 2 the exposure is mod eratel...

Страница 30: ...ns to highlight the Size item and press the Menu OK Button to con rm 3 In the subsequent menu use the Left Right Buttons to select your desired item and press the Menu OK Button to con rm The availabl...

Страница 31: ...ect item and press the Menu OK Button to con rm 3 In the subsequent menu use the Left Right Buttons to select your desired item and press the Menu OK Button to con rm The available items are Normal th...

Страница 32: ...rm 3 In the subsequent menu use the Left Right Buttons to select On or Off and press the Menu OK Button to con rm Enabling this function will let you hear voice memos see page 21 while reviewing your...

Страница 33: ...ht the Delete One or Delete All item and press the Menu OK Button to con rm 3 In the subsequent menu use the Left Right Buttons to select Yes or No and press the Menu OK Button to con rm Deleted files...

Страница 34: ...u use the Left Right Buttons to select your desired item and press the Menu OK Button to con rm The available items are All all sorts of les are displayed JPEG only pictures are displayed ASF only vid...

Страница 35: ...e menu use the Left Right Buttons to highlight the File Infor File information item and press the Menu OK Button to con rm 3 In the subsequent menu use the Left Right Buttons to select On or Off and p...

Страница 36: ...Time item and press the Menu OK Button 2 Use the Left Right Buttons to adjust the value Press the Menu OK Button to con rm the setting and move to next eld Repeat the setting until all elds are done...

Страница 37: ...Use the Left Right Buttons to select On or Off and press the Menu OK Button to con rm Setting date stamp 1 Select the Date Stamp item and press the Menu OK Button 2 Use the Left Right Buttons to sele...

Страница 38: ...ttons to select your desired item and press the Menu OK Button to con rm Setting icker 1 Select the Flicker item and press the Menu OK Button 2 Use the Left Right Buttons to select 50HZ or 60HZ accord...

Страница 39: ...rm Pressing the Shutter Record Button can quick exit the menu Setting TV system 1 Select the TV Set item and press the Menu OK Button In the next menu select the TV System item and press the Menu OK...

Страница 40: ...e Menu OK Button to con rm To take advantage of this setting you need to connect the camera to your TV Please see page 20 for more information If your camera is not connected to TV yet after the camer...

Страница 41: ...ton In the next menu select the Default item and press the Menu OK Button to continue 2 Use the Left Right Buttons to select Yes or No and press the Menu OK Button to con rm Restoring default settings...

Страница 42: ...In the next menu select the Format item and press the Menu OK Button to continue 2 Use the Left Right Buttons to select Yes or No and press the Menu OK Button to con rm Formatting the media will eras...

Страница 43: ...ct your camera and the computer by the USB cable until the driver installation is completed 2 Shut down all other applications running on your computer 3 If the title screen does not appear automatica...

Страница 44: ...k on Next and follow the on screen instructions to continue 4 Select Complete if you want to install the driver and the PC Camera application Select Custom if you want to customize the installation op...

Страница 45: ...ck on Yes and follow the on screen instructions to complete the installation 8 If the program prompts you to install Direct X 8 1 please click on Yes and follow the on screen instructions to complete...

Страница 46: ...her end of the USB cable to your camera Notice for Windows 2000 XP ME users When you want to disconnect the camera from the computer please follow these steps 1 Double click on on the system tray 2 Cl...

Страница 47: ...s using Windows Explorer and click on OK Some users may find two removable disks appear under My Computer that is because the OS detects two storage media in the camera the internal memory and the SD...

Страница 48: ...47 2 Double click on the DCIM le folder 3 Double click on the 100MEDIA le folder 4 Drag the target le into My Documents or the destination folder Copying les to the PC continued...

Страница 49: ...8 Viewing Playing les on your PC 1 Double click on My Documents or any other folder that stores your les 2 Double click on the desired le and the le will be opened by the program matching the le s typ...

Страница 50: ...r connecting the camera to your computer a removable disk will appear in your computer Under the disk you can nd all les stored in your camera Refer to the gure on the right to see where the les are s...

Страница 51: ...My Computer Browse to the MP3 folder and copy MP3 les to this folder USING MP3 PLAYER Copying MP3 les to the camera Before playing MP3 music you need to copy MP3 les to the camera Be sure to copy MP3...

Страница 52: ...o highlight the AudioOut item and press the Menu OK button to con rm 3 In the subsequent menu use the Left Right Buttons to select your desired item and press the Menu OK Button to con rm The availabl...

Страница 53: ...ng MP3 music MP3 player mode LCD illustration 1 Playing time hh mm ss 2 Title of the song 3 Repeat type Repeat one Repeat all 4 Current Total tracks 5 Mode indicator 6 Play Pause Stop 7 Volume 8 SD ca...

Страница 54: ...To unlock and enable all button functions press the Menu OK Button again Playing MP3 music continued All buttons will be disabled if no actions are executed for 30 seconds Then the LCD panel will ente...

Страница 55: ...t Buttons to select Then press the Display Toggle Button to con rm 1 While in MP3 Player mode press the Menu OK Button to switch to the menu screen 2 In the menu use the Left Right Buttons to highligh...

Страница 56: ...con rm The available items are Repeat One repeat the selected song Repeat All repeat all songs Repeating playing continued Under the Repeat One mode after you exit the menu window use the Left Right B...

Страница 57: ...Buttons to highlight the Delete One or Delete All item and press the Menu OK Button to con rm 3 If you select Delete One use the Left Right Buttons to select the song you want to delete then press the...

Страница 58: ...4 If you select Delete All use the Left Right Buttons to select Yes or No in the subsequent menu Then press the Menu OK Button to con rm Deleting MP3 les continued Deleted les are gone forever and ca...

Страница 59: ...e package Starting the application 1 Turn off the camera 2 Press and hold down the Shutter Record Button fully and connect the camera to your PC If you want to use the Video Conferencing function plea...

Страница 60: ...eeded files 4 Follow the on screen instructions to finish the installation Notice for Windows 2000 users When using the PC Camera function for the first time the Digital signature warning message may...

Страница 61: ...an alternate option go to the Work Temp folder to find files taken by the program The full path is as following C Program Files PocketCam 5200 Work Temp Start recording a video clip Stop recording Sna...

Страница 62: ...snapshot Click on the icon to take a snapshot Format options Color Space Select one of the following functions according to your needs RGB 24 This item is for retaining better quality I420 This item...

Страница 63: ...tom setting You can use the default settings or change the settings such as brightness contrast saturation and sharpness on your own Properties options If you take your camera abroad and nd the screen...

Страница 64: ...nd video clips but can not nd them in the memory A 1 Check if you take pictures and video clips and then insert a SD MMC card The camera will use the card as the main storage media and les previously...

Страница 65: ...ore plugging in the USB cable Q3 The TV screen does not display after connecting the camera to the TV A 1 Please use the accessory cable If you use your own cable make sure the cable has three connect...

Страница 66: ...shut down abnormally such as opening the battery cover while power on the revised settings will not be recorded 2 Certain settings will automatically switch back to default value after the camera is t...

Страница 67: ...0 5 00 19 08 486 28 SD MMC card 256MB 194 320 544 2560 10 00 38 16 972 56 SD MMC card 512MB 389 640 1088 5120 20 00 76 32 1945 52 Size picture average 1200K 730K 400K 102K Storage Capacity Table This...

Страница 68: ...ory space Card Error The inserted card is not compatible with the camera Please change the card or try formatting the card Memory Error The camera can not access data in the internal memory Please for...

Страница 69: ...80 pixels up to 20 fps ASF 320x240 pixels up to 30 fps Digital voice recorder WAVE WAV format with 12MB memory Recording time approximately 50 minutes PC Camera VGA 640x480 pixels up to 30 fps QVGA 32...

Отзывы: