background image

3.

 A sub-menu as illustrated on 

the right will appear. The 

information of the selected 

file will be displayed on the 

screen. You can also press 

the 

Right

 or 

Left

 (      ) button 

to shift between files. When 

you want to exit, press the 

Menu/OK

 (        ) button.

MP3 menu (continued)

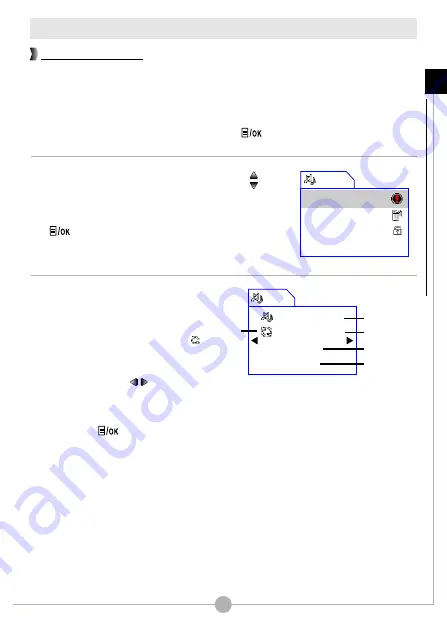
Viewing MP3 info

This item enables you to view the MP3 file information.

To enable the bass effect:

1.

 While in MP3 mode, press the 

Menu/OK

 (        ) button.

45

Menu

Info
Delete
Hold

2.

 A menu will appear. Press the 

Up

 or 

Down

 (    ) 

button to scroll page and highlight the Info item. 

Once the Info item is selected, press the 

Menu/OK


(        ) button.

A

d

v

a

n

c

e

d

 O

p

e

ra

tio

n

s

 -

 M

P

3

 m

e

n

u

 (

c

o

n

tin

u

e

d

)

Info

0001

00:03:50
3858 KB

Track index

File name

Length

File size

Filename.MP3

Status icon:
     : repeat
none: no repeat

Содержание Pocket DV4500

Страница 1: ......

Страница 2: ...t in direct sunlight Doing so may damage the camera 4 Use the camera with care Avoid pressing hard on the camera body 5 For your own safety avoid using the camera when there is a storm or lightning 6...

Страница 3: ...a Setting the language Recording a video clip 14 13 12 12 Turning on your camera 12 How to record a video clip Setting the focus Selecting metering modes 16 15 14 Taking a still picture 17 How to take...

Страница 4: ...files 38 37 36 Sorting files 39 Adjusting the white balance Adjusting exposure compensation Applying special effects to still pictures 34 33 32 Using the date stamp 35 Playing MP3 music 40 Copying MP...

Страница 5: ...Using PC Camera Starting the application Using the DV 4500 PC Camera 63 60 60 Installing DV 4500 software 60 Recording an AVI movie Taking a snapshot 64 64 Configuring Format options Configuring Prope...

Страница 6: ...EX button Battery compartment cover Memory card slot Battery compartment Strap hook 1 Status LED Microphone Flash strobe Focus switch Lens Self timer LED A V out connector Earphone connector USB conne...

Страница 7: ...formance Loading the batteries 1 Slide the battery compartment cover open in the direction as indicated 2 Place the batteries into the compartment Note that the positive and negative ends cannot be re...

Страница 8: ...r the card pops up pull the card out of the slot The SD card comes with a write protect switch When the write protect switch is set to the Lock position the card will become non writable To ensure tha...

Страница 9: ...on the back side of the camera 3 Thread the other part of the strap into the hook 2 on the front side of the camera Getting Started Attaching the wrist strap optional 08 4 Fasten the wrist strap as in...

Страница 10: ...illustrated below How to hold your camera Please put your hand through the wrist strap and firmly hold the camera as illustrated While taking still pictures or recording video clips avoid blocking the...

Страница 11: ...ripod to minimize camera movement and ensure optimal image quality especially while shooting self portraits or video conferencing Tight Loose Using the tripod optional Getting Started Using the tripod...

Страница 12: ...Basic Operations...

Страница 13: ...please check 1 There are two AA batteries installed in the camera 2 The batteries have enough power left 3 The polar directions of the installed batteries are correct Turning off your camera Press an...

Страница 14: ...gs menu will display as illustrated 2 Use the Up or Down button to highlight the Language item 3 When the Language item is highlighted press the Menu OK button to enter the sub menu In the sub menu us...

Страница 15: ...ecord Shutter button to start recording Basic Operations Recording a video clip 14 How to record a video clip 1 0X 10 00 00 10 Storage media internal memory SD MMC card Battery life Recording time Num...

Страница 16: ...ly you should set the focus to for most shooting conditions Select only for close ups The focus is adjustable during recording While recording you can press the Up or Down button to zoom in or zoom ou...

Страница 17: ...g g g g Auto mode no indicator When the camera is in Auto mode the camera will automatically select the best metering method for the overall conditions Average mode When in Average mode the camera wi...

Страница 18: ...How to take a still picture 1 Set the Mode Dial to Digital Still Camera mode The LCD display will show the screen below LCD Display 1 0X 10 Battery life Self timer status White Balance Number of reco...

Страница 19: ...Right button to select a metering mode The metering mode changes in the following order Auto g Average g Center g Center low g Auto For a detailed description of each metering mode please see page 16...

Страница 20: ...een below 2 Press the Record Shutter button to start recording 3 Press the Record Shutter button again to stop recording 19 LCD Display 10 00 00 10 Battery life Recording time Number of recordings Mod...

Страница 21: ...ast recorded file will be automatically played 20 Full screen view 3 If you want to view other files stored in the camera you can use the Right and Left buttons to shift between files LCD Display Stor...

Страница 22: ...hed to thumbnail view Then There are three file types that you can identify by the icons on the thumbnails JPG format pictures ASF format video clips WAV format audio clips For detailed operations on...

Страница 23: ...button again 22 Reviewing a still picture 1 20 1 0X Full Screen Zoom lock Screen 1 20 2 0X While viewing the picture in full screen mode you can use the Up or Down button to zoom in or zoom out the pi...

Страница 24: ...ideo or audio clip Playing back your recordings continued 1 20 00 00 56 Playing a video clip 1 20 00 00 56 Adjusting volume While playing a video or audio clip the available function buttons are as fo...

Страница 25: ...n off the OSD display When playing back a video clip or reviewing a still picture you can press the LCD display switch to disable the OSD display thus gaining a clearer view for your display Press the...

Страница 26: ...lips still pictures audio recordings as well as the MP3 files you uploaded directly on your TV screen to share them with friends and family members Turn on your TV and switch to AV mode Connect the au...

Страница 27: ...confirm the selection 3 If you want to exit a menu screen you can select the Exit item and press the Menu OK button or you can press the Record Shutter button to quick exit the menu In several modes y...

Страница 28: ...hted press the Menu OK button 3 A sub menu as illustrated on the right will appear Press the Up or Down button to select a resolution setting and then press the Menu OK button to apply The three items...

Страница 29: ...ghted press the Menu OK button 3 A sub menu as illustrated on the right will appear Press the Up or Down button to select an item and then press the Menu OK button to apply The applicable value ranges...

Страница 30: ...s the Up or Down button to highlight an item and then press the Menu OK button to apply The three effects you can choose from are Normal This option allows you to record the movie in natural color It...

Страница 31: ...Press the Up or Down button to select an item and then press the Menu OK button to apply The three items you can choose from are 2304X1728 the most memory demanding option This resolution is ideal fo...

Страница 32: ...K button 3 A sub menu as illustrated on the right will appear Press the Up or Down button to select On and press the Menu OK button to apply After the self timer is turned on the camera will have ten...

Страница 33: ...effects you can choose from Auto The camera will determine the best white balance setting for your shooting environment Sunny suitable for normal outdoor shooting in sunny weather Cloudy suitable for...

Страница 34: ...Once the Exposure item is highlighted press the Menu OK button Adjusting exposure compensation 3 A sub menu as illustrated on the right will appear Press the Up or Down button to select an item and th...

Страница 35: ...ctures 3 A sub menu as illustrated on the right will appear Press the Up or Down button to select an item and then press the Menu OK button to apply The three effects you can choose from are Normal Th...

Страница 36: ...n Digital Still Camera mode press the Menu OK button 2 A menu as illustrated on the right will appear Press the Up or Down button to highlight the Date Stamp item Once the Date Stamp item is highlight...

Страница 37: ...ng files 3 Depending on the item you select the corresponding sub menu will appear If you select Delete to delete one file you can use the Left or Right button to shift between files in the sub menu P...

Страница 38: ...on Viewing file information 3 An info page of the file will then appear Note that the actual display shown depends on the file type You can also press the Right or Left button to shift between files W...

Страница 39: ...is selected press the Menu OK button Locking files 3 Depending on the item you select the corresponding sub menu will appear If you select Lock to lock one file you can use the Left or Right button t...

Страница 40: ...oll page and highlight the Index item Once the Index item is selected press the Menu OK button Sorting files 3 A sub menu as illustrated on the right will appear Press the Up or Down button to select...

Страница 41: ...My Computer and you will find a removable disk Inside the removable disk you can locate a MP3 folder Then you can copy the desired MP3 files into the folder for playing 40 For MP3 files Before you can...

Страница 42: ...as illustrated on the right 41 LCD Display 1 3 00 00 56 0001 track01 MP3 00 04 30 Current Total tracks Storage media internal memory SD MMC card Mode icon Playing time Play Pause Stop Advanced Operati...

Страница 43: ...to select Repeat item Once the Repeat item is selected press the Menu Ok button 3 A sub menu as illustrated on the right will appear Press the Up or Down button to select Yes and then press the Menu...

Страница 44: ...n button to select 3D Enhance item Once the 3D Enhance item is selected press the Menu Ok button 3 A sub menu as illustrated on the right will appear Press the Up or Down button to select a desired it...

Страница 45: ...the Bass item Once the Bass item is selected press the Menu OK button 3 A sub menu as illustrated on the right will appear Press the Up or Down button to select a desired item and then press the Menu...

Страница 46: ...g MP3 info This item enables you to view the MP3 file information To enable the bass effect 1 While in MP3 mode press the Menu OK button 45 Menu Info Delete Hold 2 A menu will appear Press the Up or D...

Страница 47: ...appear Press the Up or Down button to scroll page and highlight the Delete item Once the Delete item is selected press the Menu OK button 3 A sub menu as illustrated on the right will appear Press th...

Страница 48: ...light the Hold item Once the Hold item is selected press the Menu OK button 3 A sub menu as illustrated on the right will appear Press the Up or Down button to select Yes and then press the Menu OK bu...

Страница 49: ...e corresponding page Setting the date and time 1 While in Settings mode use the Up and Down buttons to highlight the Time item and then press the Menu Ok button to enter the sub menu 2 Use the Right a...

Страница 50: ...u OK button to confirm Setting the flicker 1 While in Settings mode use the Up and Down buttons to highlight the Flicker item and then press the Menu Ok button to enter the sub menu 2 Use the Up and D...

Страница 51: ...is selected press the Menu OK button to confirm Camera Settings Setting the language Setting the auto off Language Exit English German Setting auto off 1 While in Settings mode use the Up and Down but...

Страница 52: ...s stored in the SD MMC card or internal memory Note that locked files will also be erased Camera Settings Formatting media Restoring default settings Restoring default settings 1 While in Settings mod...

Страница 53: ...er now Shut down all other applications running on your computer If the title screen does not appear automatically please double click on My Computer and then the CD ROM drive Then browse to the folde...

Страница 54: ...please click Yes to continue Windows Media Player Codecs and Direct X 8 0 or above are necessary for viewing the video clips recorded by the camera 6 After the installation is completed you may need...

Страница 55: ...ort are correctly aligned 54 Notice for Windows 2000 XP ME users If you select DISK mode and then want to disconnect the camera from your computer please follow these steps 1 Double click on the syste...

Страница 56: ...rer and click OK For Windows 2000 ME 98SE users Double click on My Computer Then double click on the icon of the removable disk that has just appeared Copying Files to Your PC Copying files to the PC...

Страница 57: ...C continued 56 2 Double click on the DCIM file folder 3 Double click on the 100MEDIA file folder 4 Drag the target file into My Documents or the destination folder Copying Files to Your PC Copying fil...

Страница 58: ...ny other folder that stores your files Viewing Playing files on your PC 2 Double click on the desired file and the file will be opened by the program matching the file s type 57 Copying Files to Your...

Страница 59: ...a removable disk will appear in your computer Under the disk you can find all files stored in your camera See the figure in the right to see where different types of files are located Note that MP3 fo...

Страница 60: ...Using PC Camera...

Страница 61: ...o page 52 for details on installing the package Installing DV 4500 software Starting the application 1 Set the Mode Dial to Live mode 2 Connect the camera to your computer If you want to use the Video...

Страница 62: ...some users might be asked to insert a licensed 98SE CD into the CD ROM drive to copy the needed files 4 Follow the on screen instructions to finish the installation 61 Using PC Camera Starting the ap...

Страница 63: ...on on the Desktop to start the program After the program is started you can begin to use the PC camera function If you cannot find the program shortcut on the desktop you can start the program from th...

Страница 64: ...on go to the Work Temp folder to find files taken by the program The full path is as following C Program Files DV 4500 Work Temp Sub menu is available Start recording a video clip Stop recording Snaps...

Страница 65: ...a snapshot Recording an AVI movie Color Space Select one of the following functions according to your needs RGB 24 This item is for retaining better quality I420 This item indicates the AVI movie will...

Страница 66: ...ue that suits the country you are staying Configuring Flicker options 65 Video setting Banding Filter If the screen of your computer flickers when using PC Camera function change this setting to avoid...

Страница 67: ...een Red Green Red Meanings Ready waiting for command Busy storage or capture Ready waiting for command Charging flash Ready waiting for command Data transformation Self Timer Self Timer LED Red regula...

Страница 68: ...s Memory Flash memory 16MB SD MMC card 32MB SD MMC card 64MB SD MMC card 128MB SD MMC card 256MB 2048x1536 1600x1200 640x480 Still picture Video Clip 3 7 min 6 14 min 12 28 min 24 56 min 48 112 min SD...

Страница 69: ...ips continuous recording mins 1 Shooting interval 30 seconds 2 The flash strobe is used for every other image 1 Shooting interval 4 seconds 2 Flash strobe is disabled Battery indicator status Note The...

Страница 70: ...le Is Locked Locking Unlocking The camera can not access data in the internal memory Please format the media to solve this problem The flash strobe is charging The file being played is not compatible...

Страница 71: ...D display Digital zoom Lens Self Timer Interface Power saving Battery Dimension 1 5 Color TFT LCD 4X real time F 3 5 8 5mm 10 seconds USB 2 0 USB 1 1 compatible 1min 3min 5min auto power off if idle f...

Страница 72: ...space from the SD MMC card or the internal memory 2 Check if the camera is recharging the flash strobe 3 If you are using a SD card check if the card is set to protected 4 If the LCD screen displays...

Страница 73: ...nvironment of shooting or recording has adequate light Or you may consider using flash strobe when taking pictures Q8 Noises occur when viewing images on the LCD screen or on the computer A Check if t...

Страница 74: ...ver 2 Make sure you install the driver before plugging in the USB cable Q3 The TV screen does not display after connecting the camera to the TV A 1 Check if the camera is correctly connected to the TV...

Страница 75: ...re not found message it is probably because your current operation system does not fully support USB 2 0 port Please consider using another port for connection or follow step 1 to install the necessar...

Страница 76: ...controller Billionton USB 2 0 Host Controller in this case and right click the mouse a menu should pop up a Click on Properties and a sub menu as the following should show up b Click on the Driver tab...

Страница 77: ...n USB 3 When the following dialogue window appears click on Next to continue 4 When the following dialogue window appears a Check the item Search for a suitable driver for my device b Click on Next to...

Страница 78: ...hen the following dialogue window appears select none of the items and click on Next to continue 6 When the following dialogue window appears a Check the item Install one of the other drivers b Click...

Страница 79: ...t USB driver In this case you should select the USB 2 0 driver provided by Microsoft to replace the original driver b Click on Next to continue 8 When the following dialogue window appears click on Fi...

Страница 80: ...r again If the old driver has been replaced by the new one the installation is successfully completed 10 After all the above steps are completed reconnect the camera to the USB 2 0 port Make sure that...

Страница 81: ...container 2 Highlight the USB 2 0 controller NEC PCI to USB Enhanced Host Controller B1 in this case and right click the mouse a menu should pop up Select the Update Driver item and the following wind...

Страница 82: ...ubleshooting on USB 81 3 Check the item Don t search I will choose the driver to install Then click on Next to continue 4 Select Standard Enhanced PCI to USB Host Controller and click on Next to conti...

Страница 83: ...g on USB 82 5 The driver installation process is complete Click on Finish to continue 6 Launch Device Manager and unfold the Universal Serial Bus controllers container Make sure the USB 2 0 driver has...

Страница 84: ...o load the file If you encounter problems related to taking a long time loading video clips we recommend you 1 Copy the video clips to your computer and then view them on the computer 2 Upgrade your m...

Страница 85: ...ted in the United States AIPTEK Inc 51 Discovery Suite 100 Irvine CA 92618 USA TEL 949 585 9600 FAX 949 585 9345 http www aiptek com Online registration website Http www aiptek com registration regist...

Страница 86: ...82 143 91041v1 0...

Отзывы: