Aiphone JK-1MED Скачать руководство пользователя страница 7

- 7 -

English

Fr

ançais

Neder

lands

  6 

OPERATING METHOD

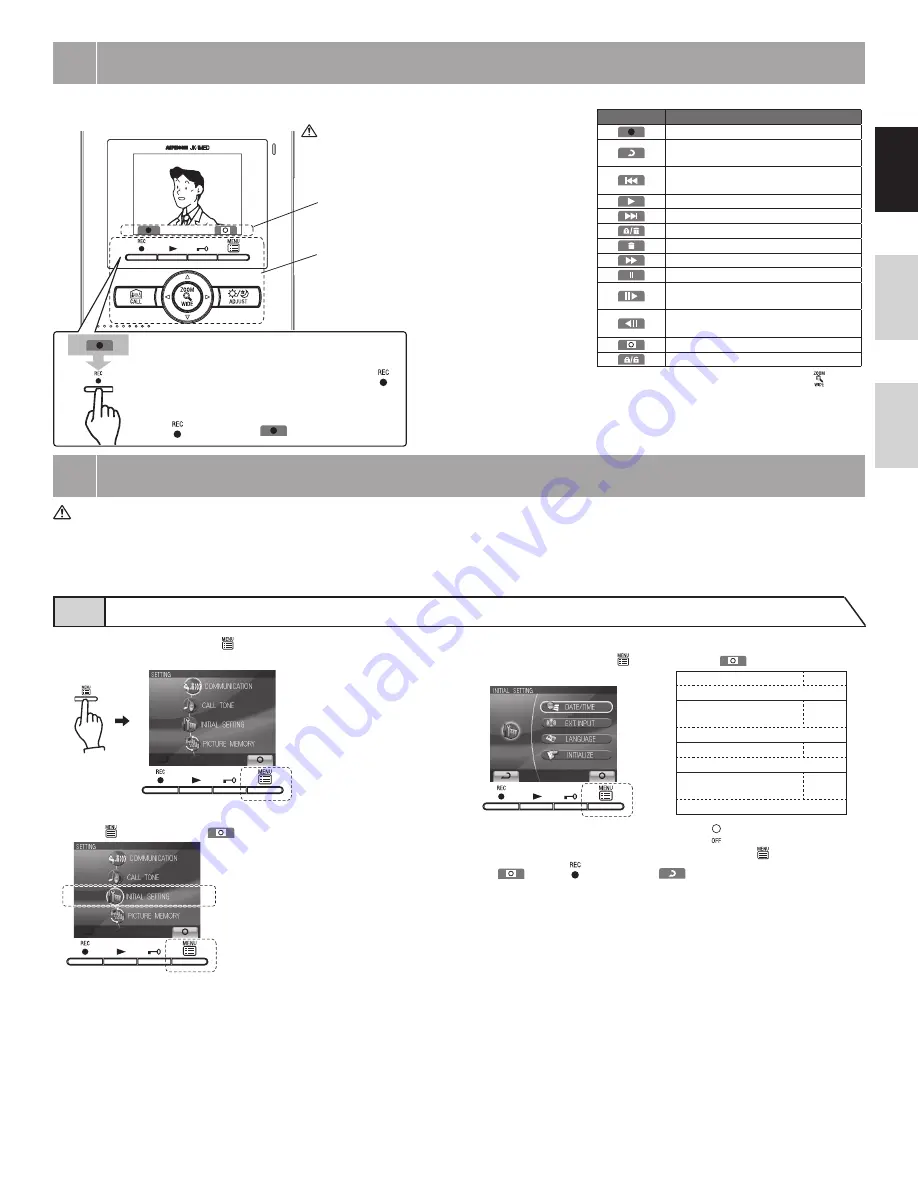
To operate this unit, check the symbol and then press the appropriate operation button 
This is not a touch-panel operation.

Do not press on the LCD or subject it to high 
impact. 
The LCD glass could break which could 
result in an injury.

Symbol
The symbols differ according to the symbol 
screen.

Operation buttons:
Press to select the symbol that is displayed 
on the screen.
*  The name of the operation button may 

differ from the name of the symbol.

To operate a symbol, press the operation 
button that is below the symbol.
Example:  To activate manual recording, press   

RECORD button below the symbol

*  In the manual, an explanation is given using 

the  REC button (

). 

  7 

SETTING UP

  Upon initial installation, set the time first. If the unit is used without setting the time, the menu LED (red) will light up as notification.

When power has not been supplied for at least 3 hours, the time setting will return to the initial setting and the menu LED may flash. Reset the 
time again.
If there are no operations for approximately 1 minute during the setup mode, the setting will end automatically. If the settings are incomplete, start 
again from the beginning.

Symbol

Function description

To manually record.
To return to the screen of the previous 
operation.
To display the previous (more recent 
date) picture. 
To play the recorded pictures.
To display the next (older date) picture.
To save or erase an image.
To erase a recorded image.
To fast forward the play screen.
To pause the play screen.
To advance the play screen frame by 
frame.
To reverse the play screen frame by 
frame.
To erase the display. 
To save recorded pictures.

 Setting can also be done by pressing 
ZOOM/WIDE button.

Main symbols and function descriptions

1

  In the standby mode, press  MENU button until the setting screen 

is displayed (approximately 1 second).

> 1Sec.

2

  Press 

 button or 

 button to select "INITIAL SETTING", and 

press  MENU button (

).

3

  Press 

 button or 

 button to select the item you want to set or 

check, and set with the  MENU button (

).

SET THE DATE/TIME
To set the year, date, and time.
SET EXTERNAL INPUT 
SETTING
To set the external input.
SELECT THE LANGUAGE
To select the language used.
RESTORE DEFAULT 
SETTING
To initialize the settings.

4

  When completing the time setting, press   OFF button to return to 

the standby mode. In other cases, set by pressing   MENU button 
(

). Press   REC button (

) to cancel the setting and return 

to the previous screen.

7-1 Setting screens and display methods

Содержание JK-1MED

Страница 1: ...ION INTERPHONEVIDEO COULEUR MAINS LIBRES MONITEUR MA TRE HANDENVRIJE KLEURENVIDEOFONIE MONITOR HOOFDPOST JK 1MED Master monitor station Moniteur ma tre Monitor hoofdpost INSTALLATION OPERATION MANUAL...

Страница 2: ...is for indoor use only Do not use outdoors 3 In areas where broadcasting station antennas are close by the intercom system may be affected by radio frequency interference 4 As to other manufacturer s...

Страница 3: ...n 5 cm 2 5 cm 2 JK 1MED 2 3 15 cm 6 2 2 Wiring method wiring distance Wire the units from station to station daisy chained 0 65 mm 22 AWG 1 0 mm 18 AWG A 50 m 165 100 m 330 B 5 m 16 10 m 33 C 75 m 245...

Страница 4: ...EL 12S AC 12 V 0 125 A DC 12 V 0 2 A or equivalent part and a separate AC transformer are required Run separate cables for audio video and door release Door release contact AC DC 24 V 0 5 A Minimum C...

Страница 5: ...master monitor station Audio only sub master station Optional long distance adaptor JKW BA Use the long distance adaptor JKW BA within the distance ranges shown in the table when the wiring distance b...

Страница 6: ...1 gang box Din rail 83 5 mm 3 5 16 To pass the cable through the back of the unit cut out the cable inlet Wood mounting screws x 2 Mounting bracket 83 5 mm 3 5 16 5 NAMES JK 1MED Play LED red PLAY but...

Страница 7: ...ettings are incomplete start again from the beginning Symbol Function description To manually record To return to the screen of the previous operation To display the previous more recent date picture...

Страница 8: ...The date time increases by one button press once The date time decreases by one button press once The cursor moves to the left button pressed once The cursor moves to the right button press and hold f...

Страница 9: ...creen 7 5 1 Setting the optional units detection method Initial setting 1 After performing steps 1 and 2 in section 7 1 select EXT INPUT and press MENU button 2 In the EXTERNAL INPUT SETTING screen pr...

Страница 10: ...pictures are erased and settings are reset 2 Pre set functions section 8 7 are not reset Settings reset with RESTORE DEFAULT SETTING Setting name Available setting Time JAN 01 2009 00 00 Language ENG...

Страница 11: ...pictures at a pre set position and the next three pictures are wide pictures Pictures are automatically recorded First three pictures are wide pictures and the next three pictures are zoom pictures at...

Страница 12: ...play changes ZOOM WIDE button section 8 5 can be used to change the display 3 When TALK button is pressed momentarily and communication starts the screen display will be held as is regardless of the p...

Страница 13: ...ton to talk with the other person A call in is sent to the sub master station The reply of the other person is not heard 2 If the other person presses TALK button hands free communication is possible...

Страница 14: ...ng again The previous setting will be overwritten 2 The zoom picture position set with the master monitor station will also be displayed at the sub monitor station 2 Press ZOOM WIDE button for at leas...

Страница 15: ...utomatic recording function cannot be cancelled 2 The recorded pictures are recorded using the method section 7 10 that has been set However if switching between zoom and wide is performed during auto...

Страница 16: ...age Refer to sections 8 13 and 8 14 1 When there are multiple unread images all images enter the read condition even if only one image is played and the play LED goes off 2 The recorded pictures are d...

Страница 17: ...dysfonctionnement d un de ses produits La zone d application de est l UE Garantie Aiphone garandeert dat zijn producten onder normale gebruiksomstandigheden gedurende twee jaar na levering aan de eind...

Отзывы: