background image


Aimetis A10D Thin Client  

The Aimetis A10D Thin Client

 is a secure, reliable, and cost-effective PC alternative designed to 

display 1080p video from network video quickly and easily. View a single camera on demand as 
well as set up camera views, which are collections of camera layouts, for quick retrieval. 

Get Started 

Access the Web Interface 

To install the Thin Client, see the Quick Start Guide supplied with the product. 

Note:

 Make sure that overscan is turned off on the TVs or monitors being used. By default most 

TVs and monitors are set to use overscan, which crops the edges of the displayed video images. 
For details, see Aimetis Knowledge Base Article 

10340

. 

The Thin Client web interface can be used with most standard operating systems and browsers.  

1.


Start a web browser. 

2.


Enter the 

IP address

 of the Thin Client


device in a supported browser. Recommended 

browsers include: Microsoft

®

 Internet Explorer

®

, Mozilla

®

 Firefox

®

, and Google Chrome

3.


The first time the device is powered on, you are prompted to configure the device by 
running the Setup Wizard. 

4.


When initial setup is complete, create a camera view on the 

Remote Control

 page. 

Note:

 After initial setup, the device password configured during setup is required to access the 

device through a web browser or a mobile device. 


Содержание A10D

Страница 1: ...Aimetis A10D Thin Client 2 0 ...

Страница 2: ......

Страница 3: ...y means electronic mechanical photocopying recording or otherwise or for any purpose without the express written permission of Aimetis Corp Aimetis may have patents patent applications trademarks copyrights or other intellectual property rights covering subject matter in this document Except as expressly provided in any written license agreement from Aimetis the furnishing of this document does no...

Страница 4: ...No Compatible Streams Detected 2 Knowledge Base Articles 2 Perform a Factory Restore 3 Hardware Reset 3 Access the Thin Client Unit Interface 3 Connect to the Thin Client Unit Interface 3 Activate Buttons 4 Touch Screen Controls 4 Configure the Device 5 Manage Device Settings Manually 5 Run Setup Wizard 6 Setup Video Source 6 Connect via Mobile Bridge 7 Connect Directly to Cameras 7 Connect to AEM...

Страница 5: ...iews using a Browser 9 Create Camera View 9 View Different Camera Layouts 9 Rename Camera Views 9 Delete Camera Views 9 Change Cameras 9 View Camera Full Screen 9 View Stream Profile 10 Clear Cameras 10 Select Carousels 10 ...

Страница 6: ......

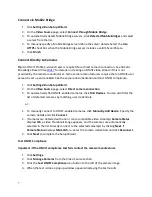
Страница 7: ...set to use overscan which crops the edges of the displayed video images For details see Aimetis Knowledge Base Article 10340 The Thin Client web interface can be used with most standard operating systems and browsers 1 Start a web browser 2 Enter the IP address of the Thin Clientdevice in a supported browser Recommended browsers include Microsoft Internet Explorer Mozilla Firefox and Google Chrome...

Страница 8: ...ace Click Log Out in the top right corner to exit the web interface You are redirected to the Log In page Troubleshooting No Compatible Streams Detected Thin Client can decode up to 1920 x 1080 at 30 fps in H 264 MJPEG or MPEG4 Please ensure you have at least 1 camera stream configured at this resolution or lower Camera streams above 1920 x 1080 resolution cannot be decoded to the camera It is rec...

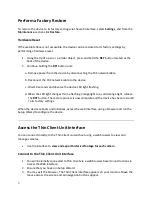
Страница 9: ...om a flashing orange light to a solid orange light release the RST button The restore process is now complete and the device has been restored to its factory settings When the device reboots and initializes access the web interface using a browser and run the Setup Wizard to configure the device Access the Thin Client Unit Interface You can connect directly to the Thin Client unit without using a ...

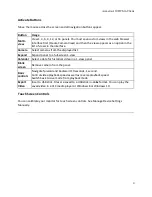
Страница 10: ...and panel to a full screen 1 view Calendar Select a date for historical video in a 1 view panel Blank screen Remove camera from the panel Basic controls Navigate forward and backward 10 seconds 1 second Control video playback speed as well as reverse playback speed Switch back to Live mode from playback mode Export Video Insert a USB stick Files are saved to a USB stick in mkv format You can play ...

Страница 11: ...browser or mobile device Video Source Displays Aimetis Symphony Mobile Bridge server connection details including secure SSL via HTTPS when the Mobile Bridge server includes a valid SSL certificate If directly connecting to cameras click Direct camera connection Video Decorations Displays date time and camera name Server Time Displays time zone and NTP synchronization configuration details Set man...

Страница 12: ...ser or mobile device Confirm the password to continue configuration Video Source The Thin Client can either connect to an Aimetis Symphony Mobile Bridge server or directly to cameras via an IP address and user credentials Optional recommended setup Device Name Assign a name to identify the device on the network Register Register the device with Aimetis by clicking Register Now An internet connecti...

Страница 13: ...tup Wizard 2 On the Video Source page select Direct camera connection 3 To automatically find ONVIF enabled cameras click Find Devices You can also filter the list of detected cameras by matching user credentials or 1 To manually connect to ONVIF enabled cameras click Manually Add Device Specify the camera details and click Connect 2 If cameras are detected with one or more compatible video stream...

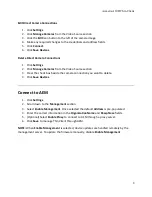
Страница 14: ...3 Clear the check box beside the camera connection you want to delete 4 Click Save Devices Connect to AEM 1 Click Settings 2 Scroll down to the Management section 3 Select Enable Management Once selected the default Address is pre populated 4 Enter the correct information in the Organization Name and Passphrase fields 5 Optional Select Enable Proxy to connect to AEM through a proxy server 6 Click ...

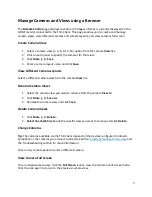
Страница 15: ...ew from the camera View list Rename Camera Views 1 Select the camera view you want to rename from the camera View list 2 Click More Save As 3 Rename the camera view and click Save Delete Camera Views 1 Click More Delete 2 Select the check box beside the specific view you want to remove and click Delete Change Cameras Tip The cameras available via the Thin Client depend on the devices configured in...

Страница 16: ... camera panel click the Clear Camera icon Select Carousels The carousels that have been setup and defined in Aimetis Symphony will appear in the Thin Client Carousel tab when connecting through Mobile Bridge For details see the Aimetis Symphony Online Help 1 Click on a camera panel to open the Select Camera or Carousels window 2 Select the Carousel tab 3 Select the specific carousel from the list ...

Отзывы: