background image


15 

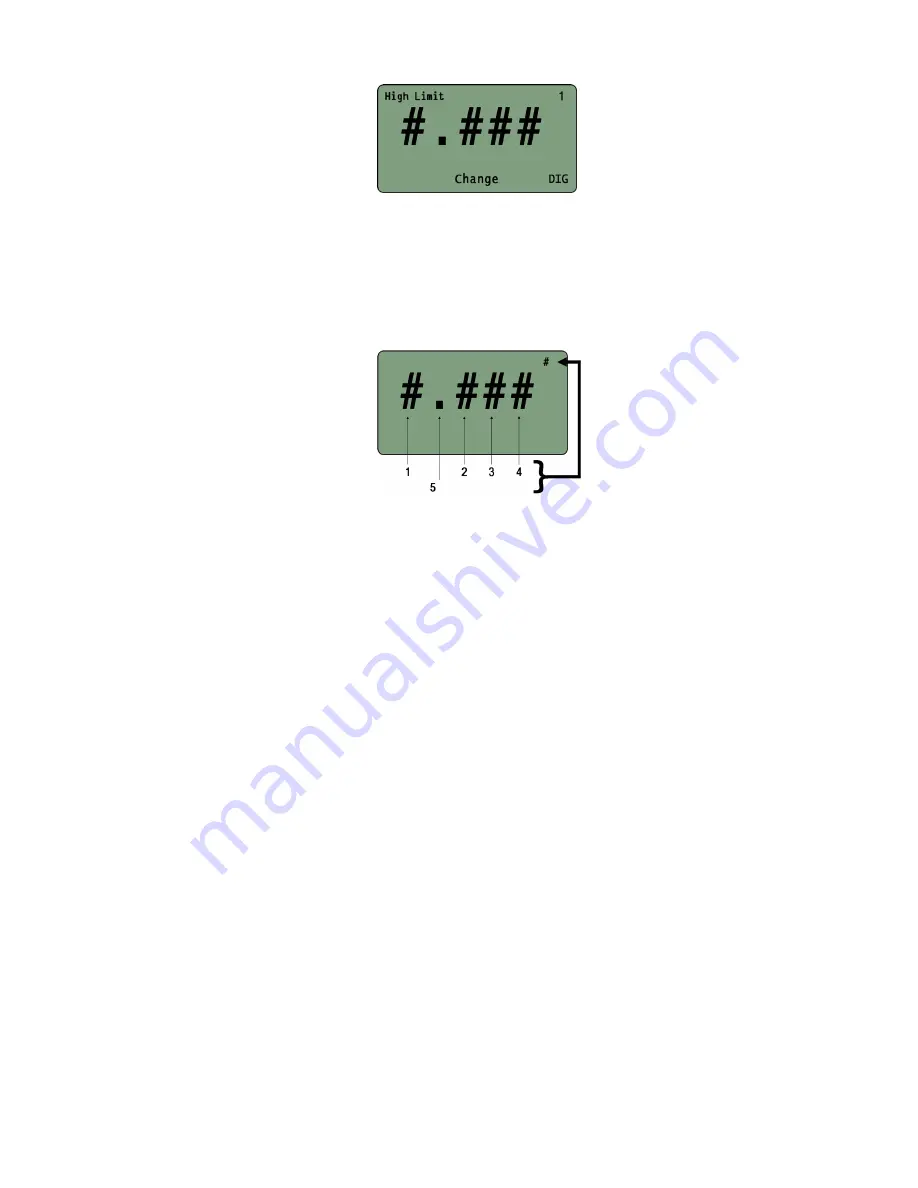
5.  If, as an example, the High Limit is being set, the following screen will be displayed: 


6.  Press the 

Right Selection (DIG)

 button to select one of the three available options. 

  One of the four numeric position (1 – 4) 

  The decimal point (5) 

  OFF 


The number in the top-right corner of the display indicates which option is selected.  The number displayed 

will correspond to the following numeric position or decimal place: 


7.  If OFF is selected with the Right Selection button, the corresponding LIMIT will be disabled. 


  If HIGH is disabled, then only readings below the LOW LIMIT will generate a red LED signal.  Any 

reading above the LOW LIMIT will generate a green LED signal. 


  If LOW is disabled, only values above the HIGH LIMIT will generate a red LED signal.  Any value 

below the HIGH LIMIT will generate a green LED signal. 


8.  Once the selected limit is set, press 

ENTER

 to return to the EDIT LIMITS screen. 

9.  To select and edit the other limit, proceed as above 

10.  If both limits have been set, press 

ENTER

 to return to the PEAK OPTIONS MENU screen 

Содержание Auditor ATDA-DC

Страница 1: ...ATDA DC Torque Data Analyzer Collector User Guide ...

Страница 2: ...Menu Functions Accessing Menu Functions 11 Peak Options Menu Accessing the Peak Options Menu 12 Auto Clear 12 Setting Auto Clear 13 Clearing a Torque Value Run Mode 13 Clear Enter Torque Value Measure Mode 13 Clearing Previous Torque Values 13 Filter 13 Setting the Filter Value 14 Peak Blanking 14 Setting the Peak Blanking Value 14 Sign Lock 14 Turning Sign Lock On Off 14 Resetting Sign Lock 14 Ed...

Страница 3: ...d use common sense when operating a power tool Do not use a power tool while you are tired or under the influence of drugs alcohol or medication A moment of inattention while operating power tools may result in serious personal injury b Use safety equipment Always wear eye protection Safety equipment such as dust mask non skid safety shoes hard hat or hearing protection used for appropriate condit...

Страница 4: ...tus Reduce Parameter Value 15 Engineering Unit Status Select Parameter 16 All Clear Status Indicator Absent when A C turned OFF 6 NOK Value Indicator LED RED 17 Menu Screen Indicator Stored Rundown Number 7 Clear Data Display Value Manually ZERO Display 18 Angle Pulse Value Display 8 Power On 19 External Power Supply Indicator 9 Power Off Charging Mode 20 Cursor Arrows 10 Enter 21 Audit Button Set...

Страница 5: ...t 1 Lb Power Requirements Main power 100 240VAC 50 60hz from supplied charger or internal NiMH battery pack Operating Temperature Range 0o to 50o C Data Communication RS 232 C Accuracy 5 of indicated reading for top 90 of transducer full scale Top of Unit orientation of connectors may be slightly different than illustration ...

Страница 6: ...can be accessed by using the button directly below the associated text on the display screen For example if the following screen were displayed the LEFT SELECTION BUTTON which is directly below the MENU text field would allow the user to access the MENU features At anytime during use pressing the ENTER button Figure 1 will allow the user to back up by one screen Pressing the ENTER button enough ti...

Страница 7: ...revious setup will be shown 4 Units of measure for use in setting up the transducer may be changed in this screen by pressing the UP OR DOWN SELECTION ARROW to scroll through the available units Pressing ENT will select the displayed unit of measure for use in setup and then display the SELECT FULL SCALE screen 5 To change the number displayed to match the transducer being setup press the RIGHT SE...

Страница 8: ...e if an ABRT 50S 100 transducer is connected the text on the Auditor screen should read TD 100 NM or the mathematical equivalent such as TD 73 8 FtLb Transducer Calibration Schedule Information With Intellect enabled transducers the ATDA can display information regarding the connected transducer s serial number type previous calibration date and next due date for calibration From the System Inform...

Страница 9: ...er Track mode is used primarily for calibration of the unit Selecting the Proper OPERATING MODE The ATDA must be in RUN MODE in order to change the Operating Mode If torque values have been stored in the ATDA while in MEMORY MODE then the memory must be cleared in order to change the Operating Mode While in the Main Display screen press the Selection Arrow Down button to cycle through the availabl...

Страница 10: ...UN then the ATDA is in RUN MODE and will not store any of the following rundown values To switch the unit to MEMORY MODE from RUN MODE press the RIGHT SELECTION BUTON Figure 1 and verify that MEM is displayed in the DATA STORAGE MODE field Storing Rundown Torque Values 1 Enter MEMORY MODE 2 Press the SELECTION ARROW UP button to scroll to memory position 1 which will be indicated by a 001 in the S...

Страница 11: ...ndard deviation of the stored torque values 2 If the ATDA is in MEMORY MODE when the statistical values are viewed pressing the SELECTION ARROW buttons will allow the user to scroll through individual rundown values 3 If the ATDA is in RUN MODE when the statistical values are viewed pressing the SELECTION ARROW buttons will return the user to the main display screen Once MEMORY MODE has been enabl...

Страница 12: ...ester and the PC Peak Options Menu 2 Accessing the PEAK OPTIONS menu To access the PEAK OPTIONS menu 1 From the Main Display screen press MENU 2 PEAK OPTIONS MENU should be displayed If it is not use the SELECTION ARROW buttons to display 3 Press the Right Selection button for SELECT SEL 4 The user can then use the SELECTION ARROW buttons to scroll through the following options in the order shown ...

Страница 13: ... zero the next Stored Rundown Number will be displayed and the system will be ready to record another torque value 5 If the rundown is determined to be invalid statistical outlier operator error during rundown tool error during rundown etc press CLEAR to delete the value The Main Display will convert back to zero the Stored Rundown Number will remain the same and the system will be ready to record...

Страница 14: ...in the non selected direction will be measured but not captured displayed as a peak value With SIGN LOCK turned off peak values in both the clockwise and counter clockwise directions will be captured and displayed Since most torque rundowns are conducted and readings are taken in the clockwise direction the user may find it beneficial to turn this feature on Turning Sign Lock On Off 1 From the mai...

Страница 15: ... OFF is selected with the Right Selection button the corresponding LIMIT will be disabled If HIGH is disabled then only readings below the LOW LIMIT will generate a red LED signal Any reading above the LOW LIMIT will generate a green LED signal If LOW is disabled only values above the HIGH LIMIT will generate a red LED signal Any value below the HIGH LIMIT will generate a green LED signal 8 Once t...

Страница 16: ...nu 2 2 The LOCKOUT MENU provides various levels of protection against unauthorized or accidental adjustment of basic settings to the ATDA By turning the lockout mode on or off for various functions the user can allow or prevent adjustment to these functions The functions that can be locked out are Mode Measurement mode of Peak 1st Peak Pulse or Track Units Engineering units of FtLb InLb InOz KgFM ...

Страница 17: ...ection button to view information regarding the connected transducer 6 Use the Right Selection button to view information about the ATDA 7 To return to the SYSTEM MENU screen press ENTER Data Menu 4 The Data Menu options allow the user to print and clear the stored rundown data and associated statistical information Accessing the DATA MENU To access the DATA menu 1 From the Main Display screen pre...

Страница 18: ...u 4 Press the Right Selection button for SELECT SEL 5 Use the Selection Arrow buttons to scroll to Print Mem with SPC 6 Press the Right Selection button for SEND to transmit the data 7 When printing is complete press ENTER to return to the Data Menu screen Clear Memory 3 3 To erase all stored rundown data From the Main Display screen press MENU Use the Selection Arrow buttons to scroll to Data Men...

Страница 19: ...4 User must select Link to PC from main menu 5 Instrument will generate a message Waiting User will send Tools or Route files to tester or wrench Tool Manager or Jobs Manager will inform user if transfer was successful and instrument will have a dialog bar illustrating status of download 6 User presses the CLR key to return to Menu 7 User presses the AUDIT key to start data collection After initia...

Страница 20: ... selected job Route Info lists all Routes and the Jobs in a Route You can select New Copy Edit or Delete for Routes When you highlight the Route and the Job in the Route the Job details are listed in the window on the far right The large button on the center bottom of this screen sends the selected Route to the wrench After collecting the data the button on the bottom right allows you to upload da...

Страница 21: ...que time graph and allows the user to supersede the move on reading selected by the wrench by visually discerning via the trace where the fastener started to rotate When selecting a single job the average range sigma Cp and CpK values are listed ...

Страница 22: ...__________________________________ ______________________________________________________________________ ______________________________________________________________________ ______________________________________________________________________ ______________________________________________________________________ ______________________________________________________________________ __________...

Страница 23: ...__________________________________ ______________________________________________________________________ ______________________________________________________________________ ______________________________________________________________________ ______________________________________________________________________ ______________________________________________________________________ __________...

Страница 24: ... Pine Street Ave Cristóbal Colon 14529 Portland OR 97216 Chihuahua Chihuahua 31125 800 852 1368 Mexico FAX 800 582 9015 011 52 614 380 1010 www aimco global com FAX 011 52 614 380 1019 LIT MAN871 Rev 07 2020 Printed in USA 2020 AIMCO ...

Отзывы: