Fixing and Maintenance Instructions
3
ASSEMBLY
Assembling the frame
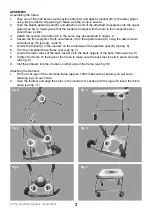
1. Take one of the side frames (with castors fitted) (A) and attach crossbar (B) to the lower spigot
using the provided e-clip (see fig.2) Make sure the e-clip is secure
2.
Take the plastic aperture seat (E) and attach one end of the attached crosspiece onto the upper
spigot (see fig. 3) making sure that the locator pin aligns with the hole in the crosspiece (you
should hear a click)
3.
Attach the second side frame (A) in the same way as explained in steps 1-2.
4.
Secure the front spigots of both side frames (A) to the aperture seat (E) using the allen screws
and allen key (H) (see fig. 4 and 5)
5. Locate the bucket (I) in the runners on the underside of the aperture seat (E) (see fig. 6)
6. Turn the completed base frame over (see fig. 7)
7. Locate the lower tubes of the back rest (G) into the back spigots of the base frame (see fig. 8)
8.
Tighten the knobs on the back of the frame to make sure the back rest is held in place securely
(see fig. 9)
9. Slot the armrests into the 2 tubes on either side of the frame (see fig. 10)
Attaching the footrests
1. On the front legs of the commode frame (approx. 150mm above the castors) you will see 2
retaining lugs on each side.
2. Take the footrest and align the holes in the inverted ‘U’ section with the lugs and lower them into
place (see fig. 11)
fig. 2
fig. 3
fig. 4
fig. 5
fig. 6
fig. 7


