


7-2
K65E/K75D/K95D/K95i
7-2
K65E/K75D/K95D/K95i
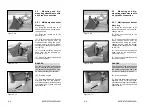
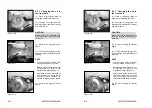
Figure 7-1
7.1.1.1 Towing the articu-
lated loader if the engine has
failed
(1)
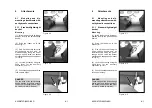
Press the toggle switch for the
hazard flasher (4-13/10).
(2)
Set the drive switch (4-12/6) to
position "0".
(3)
Apply the parking brake
(4-12/3).
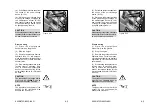
CAUTION
If the rescue location is on a slope,
wheel chocks must be placed on
the sloping side of both front axle
wheels in addition to applying the
parking brake.
NOTE
The preparations described in steps
(4) and (5) are only necessary if the
rescue location is not on a public
road:
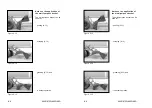
(4)
Cover the bucket cutting edge
and teeth with the bucket protector
(5-3/arrow).
(5)
Insert the plug of the bucket
protector into the socket (5-4/arrow).
(6)
Only for AL 70e:
With the ignition turned on, unlock
and actuate the toggle switch for
the floating position (4-13/14).
Refer to illustration 7-7 and the
pertaining text if the loader has no
floating position.
(6)
For AL85t / AL100t / AL100ti:
Push the valve lever for the working
hydraulics (4-12/5) beyond its
pressure point into the forward
position.
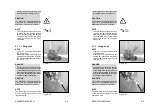
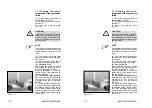
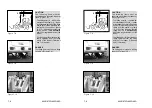
(7)
Using a suitable lifting device,
e.g. a second articulated loader with
an attached bucket, lift the bucket
arm of the articulated loader to be
towed until the bucket arm support
can be inserted into the loader to be
towed (7-1).
Figure 7-1
7.1.1.1 Towing the articu-
lated loader if the engine has
failed
(1)
Press the toggle switch for the
hazard flasher (4-13/10).
(2)
Set the drive switch (4-12/6) to
position "0".
(3)
Apply the parking brake
(4-12/3).
CAUTION
If the rescue location is on a slope,
wheel chocks must be placed on
the sloping side of both front axle
wheels in addition to applying the
parking brake.
NOTE
The preparations described in steps
(4) and (5) are only necessary if the
rescue location is not on a public
road:
(4)
Cover the bucket cutting edge
and teeth with the bucket protector
(5-3/arrow).
(5)
Insert the plug of the bucket
protector into the socket (5-4/arrow).
(6)
Only for AL 70e:
With the ignition turned on, unlock
and actuate the toggle switch for
the floating position (4-13/14).
Refer to illustration 7-7 and the
pertaining text if the loader has no
floating position.
(6)
For AL85t / AL100t / AL100ti:
Push the valve lever for the working
hydraulics (4-12/5) beyond its
pressure point into the forward
position.
(7)
Using a suitable lifting device,
e.g. a second articulated loader with
an attached bucket, lift the bucket
arm of the articulated loader to be
towed until the bucket arm support
can be inserted into the loader to be
towed (7-1).
Содержание AL 100t
Страница 9: ...Safety regulations...
Страница 30: ...Signs...
Страница 39: ...Technical data...
Страница 70: ...Description...
Страница 82: ...Operation...
Страница 93: ...Attachments...
Страница 101: ...Rescue towing lashing lifting by crane...
Страница 110: ...Maintenance...
Страница 130: ...Malfunctions causes and remedies...
Страница 133: ...Protection against theft...
Страница 136: ...Appendices...