background image

AWR250 User Manual


13/02/20 


Page 12 of 45 

4.3  Using the keyboard 

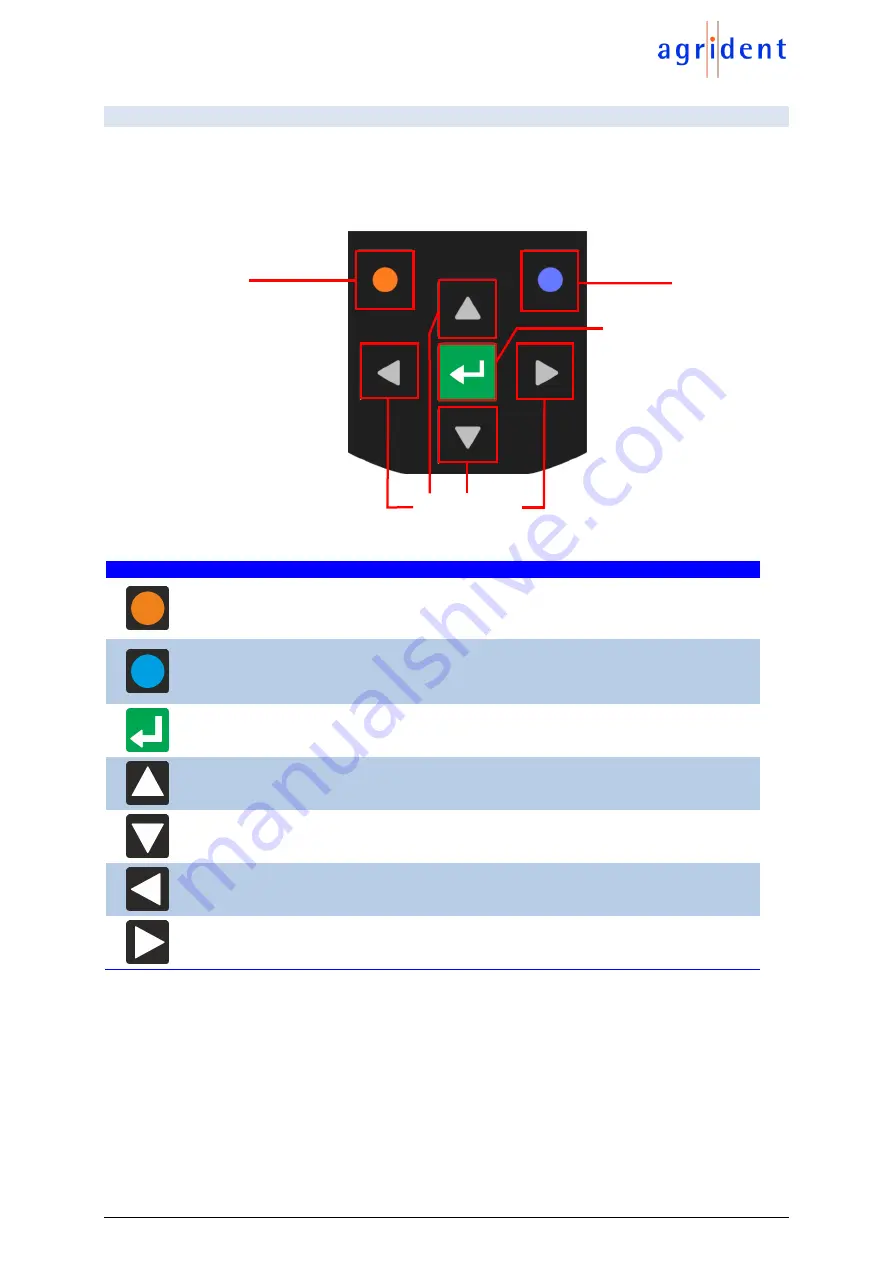
The AWR250 has 7 keys in order to allow the easy and convenient operation of the reader. There 
is a directional pad with an ENTER key in the middle and there are two additional soft-keys below 
the display which change their function depending on the current action. 


Key 

Operation 


Enters  the  menu  in  the  home  screen.  M

oves  up  one  menu  level  (‘Back’),  other 

functions depend on current operation 

– the current function is always displayed on 

the left side in the last display line (above the key). 


When in the home screen, 

the configured ‘quick action’ will be executed. Exits the 

menu completely and moves back to the  home screen. Other functions depending 
on the actual operation are shown in the display  on the lower right side. 


Switches on the  AWR250.  Starts a reading  attempt from the home screen. Enters 
menu items and confirms selections there. Moves to the next field in 

Task-Mode


No function in home screen * 


Switches off the AWR250 on a long press (>2 seconds) * 


No function in home screen * 


No function in home screen * 

 
*  The  directional  keys  are  also  used  to  navigate  within  menus  (up,  down,  left  and  right),  for 
scrolling through selection lists and for selecting characters in numeric or text input fields. 


Left soft-key 


Right soft-key 


ENTER key 


Direction keys 


Содержание AWR250

Страница 1: ...Agrident GmbH Steinklippenstr 10 D 30890 Barsinghausen Phone 49 5105 582573 10 Fax 49 5105 582573 17 AWR250 User Manual F i r m w a r e v 1 1 2 a n d h i g h e r V13 02 20 ...

Страница 2: ...c mechanical photocopying recording or otherwise without prior written permission of Agrident GmbH Agrident GmbH reserves the right to make changes to any and all parts of this documentation without obligation to notify any person or entity of such changes February 2020 Agrident GmbH Steinklippenstr 10 30890 Barsinghausen Germany Phone 49 0 51 05 582573 10 Fax 49 0 51 05 582573 17 E Mail mail agri...

Страница 3: ...Bluetooth status 10 4 1 2 3 USB status 10 4 2 The status LEDs above the display 11 4 3 Using the keyboard 12 5 Operating states 13 6 Reading Transponders 14 7 Menu items 17 7 1 Menu structure 18 7 2 New Group 20 7 3 Tasks 21 7 4 Data 23 7 4 1 Show Data 23 7 4 2 Clear data 24 7 4 2 1 Clear Groups 25 7 4 2 2 Clear Task Data 25 7 4 3 Memory Info 25 7 5 Print 26 7 5 1 Print Last Group 26 7 5 2 Select ...

Страница 4: ... 7 6 2 3 Set Display Colors 33 7 6 2 4 Set Language 34 7 6 3 Interface Setup 34 7 6 3 1 Setup Scale 34 7 6 3 2 Setup Printer 35 7 6 3 3 Bluetooth 35 7 6 4 Configuration 39 7 6 4 1 Set Factory Configuration 39 7 6 5 Device Info 39 7 6 5 1 Show Battery Info 40 7 6 5 2 Show Firmware Info 40 7 6 5 3 Show Hardware Info 40 8 Battery precautions 41 9 Safety and care 42 10 Warranty 43 11 International app...

Страница 5: ...ow many information at one glance Together with the seven keys it allows the easy and convenient navigation through menus and data In addition the device has status LEDs above the display for indicating charging and interface status plus the reading status The integrated speaker provides acoustical feedback to the user and the vibrating handle is very useful in noisy environments 2 Before you star...

Страница 6: ...e handle It is not replaceable in the field The battery can be exchanged by authorized technical staff only in case it has reached its end of life 3 2 Accessories The AWR250 comes with a USB A to Magnetic Connector cable The USB A plug can be connected to any USB port of a computer Please note that the appropriate USB driver has to be installed first When it is necessary to use a USB extension thi...

Страница 7: ... charger ACC500 allows charging of the AWR250 from a cigarette lighter socket APS500 p n 3011 ACC500 p n 4043 3 3 Connecting the USB cable The AWR250 uses a Magnetic USB connector Because the magnets are polarized the connectors find the correct orientation almost automatically When the magnetic connector of the cable is moved towards the plug at the bottom of the reader 1 the magnets will attract...

Страница 8: ...faults concerning the battery in case charging is not possible In the screenshot above the only active connection is USB The reader would also indicate a Bluetooth connection in this area The soft keys have different meanings depending on the current operation In the home screen the left soft key is used for entering the menu and the right one for creating a new group separator The new group funct...

Страница 9: ...capacity is lower than 11 percent Capacity is between 20 and 40 percent only green when charging Capacity is between 10 and 20 percent only green when charging General charging error There is a condition that prevents charging Please check the external power supply If this error is shown repeatedly the battery might not work correctly any longer and should be replaced This error also occurs when t...

Страница 10: ...rently booting being configured or a Firmware update is in progress 4 1 2 3 USB status The USB status is shown in the middle at the top of the display When the AWR250 is connected to the USB port of a computer or to a standard USB power supply the white USB symbol is shown Charging the battery takes longer here compared to using the Agrident USB power supply In case the AWR250 is connected to an A...

Страница 11: ...ed Solid Battery is fully charged The multicolor LEDs are only used when the AWR250 is in Suspend Mode display is switched off but the device is connected to USB and hence is being charged When switched on the battery symbol in the display indicates the charging status With activated RFID engine the multicolor LED shows the reading status as follows Farbe Intervall Bedeutung Flashing slowly RF is ...

Страница 12: ... When in the home screen the configured quick action will be executed Exits the menu completely and moves back to the home screen Other functions depending on the actual operation are shown in the display on the lower right side Switches on the AWR250 Starts a reading attempt from the home screen Enters menu items and confirms selections there Moves to the next field in Task Mode No function in ho...

Страница 13: ...ut communication is still possible In this state the blue LED on the right above the display is flashing in cycles of one second The device will not enter sleep mode as long as USB is connected and the battery is still charging The red LED flashes in intervals of one second indicating that the battery is being charged After the battery has been charged completely the reader enters sleep mode after...

Страница 14: ...AWR250 User Manual 13 02 20 Page 14 of 45 6 Reading Transponders ...

Страница 15: ...AWR250 User Manual 13 02 20 Page 15 of 45 ...

Страница 16: ...and the Alert text if there is one for this tag If or is pressed the screen on the right side is shown It indicates the tag type FDX or HDX and displays the so called advanced ISO information You can move from one screen to the other by pressing any of these keys If an alert is present for the transponder just read the alert text is displayed continuously inverting and an alert sound is played The...

Страница 17: ...e Task Mode is another operating mode of the AWR250 that allows the collection of comprehensive data For further information about this operating mode please contact your local distributor For the navigation through the AWR250 menus all seven keys might be used The directional keys have the following functions here Key Operation Enters the next submenu or performs particular actions in the lowest ...

Страница 18: ...o Print Print Last Group Select Group Print All Groups Print Barcode Setup Printer Set Printer Type 1 Generic Line Printer 2 Able Systems AP 1300 3 Extech APEX 2 4 Extech APEX 3 5 Extech APEX 4 6 Zebra QL220 7 Zebra QL320 8 Zebra QL420 9 Zebra QLn220 10 Zebra QLn320 11 Zebra QLn420 12 Martel MCP 1880 7880 13 MTP 3 Search BT printer Setup Reader Settings Animal Counter On Off Animal Counter ON Anim...

Страница 19: ... Display Colors Black White Set language depends on uploaded languages Interface Setup Setup Scale Set Scale Type 1 Tell 2 Iconix FX15 3 TruTest XR3000 4 BWT BW S JD II 5 Gallagher 6 Dini Argeo DFWLB 7 Te Pari Scale Setup Printer same as setup printer on the previous page Bluetooth Set Bluetooth Mode Master Mode Slave Mode Bluetooth OFF Start BT Inquiry BT Device History Set BT Profile SPP HID BLE...

Страница 20: ...ers numbers or symbols and paste the desired character into the group name by using the key By pressing the left soft key the keyboard content can be switched capitals special characters After the new group name has been entered completely press the right soft key here close in order to exit the soft keyboard Now the name can be checked again and it will be confirmed by pressing All transponders r...

Страница 21: ...f records for the currently selected Task and the number of possible remaining records maximum 10 000 per Task Choose another Task Select a different Task definition If Choose Another Task was selected the reader is listing all available Tasks plus the amount of records in brackets for each Task Navigate to the desired Task by using the keys and select the Task to use by pressing A new Task is sta...

Страница 22: ...he right soft key DELETE and the reading process can be started again This example shows a Speed Loop In this case there is nothing to enter but the RFID reader is activated and tags are read continuously until the right soft key Cancel is pressed twice then the device will ask for another confirmation If the left soft key here YES is pressed the records made until now will be saved and the Contro...

Страница 23: ...ond line shows the record number within the current group plus date and time of reading for the selected record A scroll bar on the right side shows the approximate position of the selected record in this group here it is the last record One record down One record up Scroll down 50 records Scroll up 50 records Select record Switch between EID and VID view If you press simultaneously the reader wil...

Страница 24: ... is possible to delete collected data on the AWR250 There are different options for erasing data also depending on the way they have been collected in As already explained earlier in this manual the standard records are saved in groups These are the records which have been saved upon transponder reading started from the home screen If Task Mode is used on the device it is also possible to delete c...

Страница 25: ...he data of one particular Task will be erased Clear All Task Data erases the Task data of ALL Tasks which are present on the device 7 4 3 Memory Info This menu item shows information concerning the amount of collected data how many records in how many groups the number of entries in the currently uploaded Linklist and how many Task definitions have been uploaded It does not show how many records a...

Страница 26: ...er does not need to select a different Bluetooth device just for printing 7 5 1 Print Last Group Once selected the AWR250 tries to connect to the configured printer If connected this connection remains active until the Print menu was left The reader is trying to connect to the Bluetooth printer When the connection was established printing will be started immediately If lots of data have to be prin...

Страница 27: ...all the additional options are only software configurable For example AgriLink can be used for configuring all possible printer options 7 5 5 1 Set Printer Type The AWR250 Firmware supports several different printer types like the Able Systems AP1300 the Datamax O Neil Apex series former Extech Apex the Zebra QL series and QLn series the Martel MCP 1880 7880 and the MTP 3 GOOJPRT The type Generic ...

Страница 28: ...s is unique it can quickly help to identify the correct device Choose a device from the list and select it by pressing The AWR250 will store this device as the Bluetooth printer and will try to connect to it for all coming print jobs until a different device has been selected 7 6 Setup The AWR250 is very flexible concerning its configuration Several settings can be adjusted directly in the device ...

Страница 29: ...not activated the current group and the number of records in this group is shown but the records can also include duplicate EIDs When the Animal Counter is activated the displays shows Animals instead of Records duplicates are not possible here 7 6 1 2 Set Read Mode Per factory defaults the AWR250 is configured to Single Read This means that RFID is activated until a transponder has been detected ...

Страница 30: ...t unless absolutely required Select the desired setting using the keys and confirm with Select the correct output format via or and confirm with The default output format is Short ASCII 15 This is sending the 3 digit country code directly followed by the 12 digit national ID no space in between terminated with CR LF This format is quite common and also accepted by most weighing indicators on the m...

Страница 31: ...on This function was mainly invented in order to allow mobile devices the operation close to stationary readers without interfering with them But also several mobile readers can synchronize wirelessly If you have other ISO11784 11785 readers operating close to the AWR250 it is highly recommended to activate this function Select the desired setting using the keys and confirm with If stationary read...

Страница 32: ...enu item allows to set the speaker volume the second is used to activate the vibrating motor in the handle or to deactivate it Select the desired volume by using the keys Each time a key is pressed a sound is played in order to indicate the currently selected volume Confirm the selected volume with Select the desired setting via or and confirm with 7 6 2 Display The Display menu contains the items...

Страница 33: ...WR250 enters Suspend Mode Any action like a key press will reset this timer Please also see chapter 5 for further details The maximum possible time is 60 minutes but please keep in mind that this reduces the operating time Modify the Switch Off Time Apply the new setting 7 6 2 3 Set Display Colors Depending on the light conditions it can make sense to invert the background color It can also be a q...

Страница 34: ... settings can be configured here as well 7 6 3 1 Setup Scale The AWR250 is able to receive the weight from indicators which can send it via Bluetooth There are different scale types supported also from the major brands on the market This function can only be used for Task Mode where the so called Weight from Scale field is available There is only one menu item where the correct scale model needs t...

Страница 35: ...n BT Inquiry The Bluetooth Mode determines if the AWR250 should initiate the connection to another device Master Mode or if other devices should be able to connect to the AWR250 Per default Bluetooth is not activated OFF so it must be switched on first Then you have to decide whether the AWR250 should be the device initiating the connection Master or the other device Slave Select the desired Bluet...

Страница 36: ...help to identify the correct device quickly Choose a device from the list and select it by pressing The AWR250 will store this device as the Bluetooth partner and will try to connect to it automatically and permanently if the reader is configured to Master Mode Usually there should not be too many Bluetooth devices in use with the AWR250 In order to prevent unnecessary scans when switching from on...

Страница 37: ...y established after a transponder has been read This is required for the use with Apple devices because as long as a Bluetooth device is connected as HID keyboard the on screen keyboard will not be available at all BLE is reserved for special applications at the moment Choose the desired Profile using the keys and confirm with The AWR250 itself does not need a passkey However if other Bluetooth de...

Страница 38: ...us Connection Status here tries to connect to remote device In this case the AWR250 is connected to the remote device When the connection would drop the reader would try to reconnect to the configured Bluetooth partner until successful This is done automatically Here the AWR250 is configured to be the Bluetooth Slave It is discoverable by other devices and it is connectable The reader will not try...

Страница 39: ...tory default values This might be useful if particular settings have been changed and the AWR250 is not operating as intended anymore Please note that this action cannot be undone Settings different from the factory defaults have to be made again confirm reset abort reset 7 6 5 Device Info The menu Device Info includes items showing information about the current battery status the AWR250 firmware ...

Страница 40: ...ted in this example this is also included in the calculations So the shown expected battery life considers all electric consumers that are currently active Details concerning the battery symbol in status bar are explained in chapter 4 1 2 1 7 6 5 2 Show Firmware Info The item Show Firmware Info displays the readers firmware version plus some additional information like build date and bootloader ve...

Страница 41: ... or otherwise subject it to strong impacts or shocks Do not solder directly onto the battery Do not expose the battery to water or salt water or allow the battery to get wet Do not disassemble or modify the battery The battery contains safety and protection devices which if damaged may cause the battery to generate heat explode or ignite Do not place the battery on or near fires stoves or other hi...

Страница 42: ...ng the battery Do not discharge the battery using any device except for the specified device When the battery is used in devices aside from the specified device it may damage the performance of the battery or reduce its life expectancy and if the device causes an abnormal current to flow it may cause the battery to become hot explode or ignite and cause serious injury The temperature range over wh...

Страница 43: ... exist in particular when 1 Damage is attributable to improper use of the device to an incorrect connection or incorrect operator action 2 The device was not cared for and maintained in accordance with the manufacturer s recommendations and this is the cause of the damage 3 The damage is due to any modification to the device The damage is due to force majeure for example lightning strike The damag...

Страница 44: ...e the separation between the equipment and receiver Connect the equipment into an outlet on a circuit different from that to which the receiver is connected Consult the dealer or an experienced radio TV technician for help FCC Part 15 Clause 15 21 Changes or modifications not expressly approved by the party responsible for compliance could void the user s authority to operate the equipment This de...

Страница 45: ...ual 13 02 20 Page 45 of 45 12 Trouble shooting For any problem please contact us Agrident GmbH Steinklippenstr 10 30890 Barsinghausen Germany Telephone 49 5105 582573 10 FAX 49 5105 582573 17 Mail support agrident com ...

Отзывы: