background image

50

APPENDIX

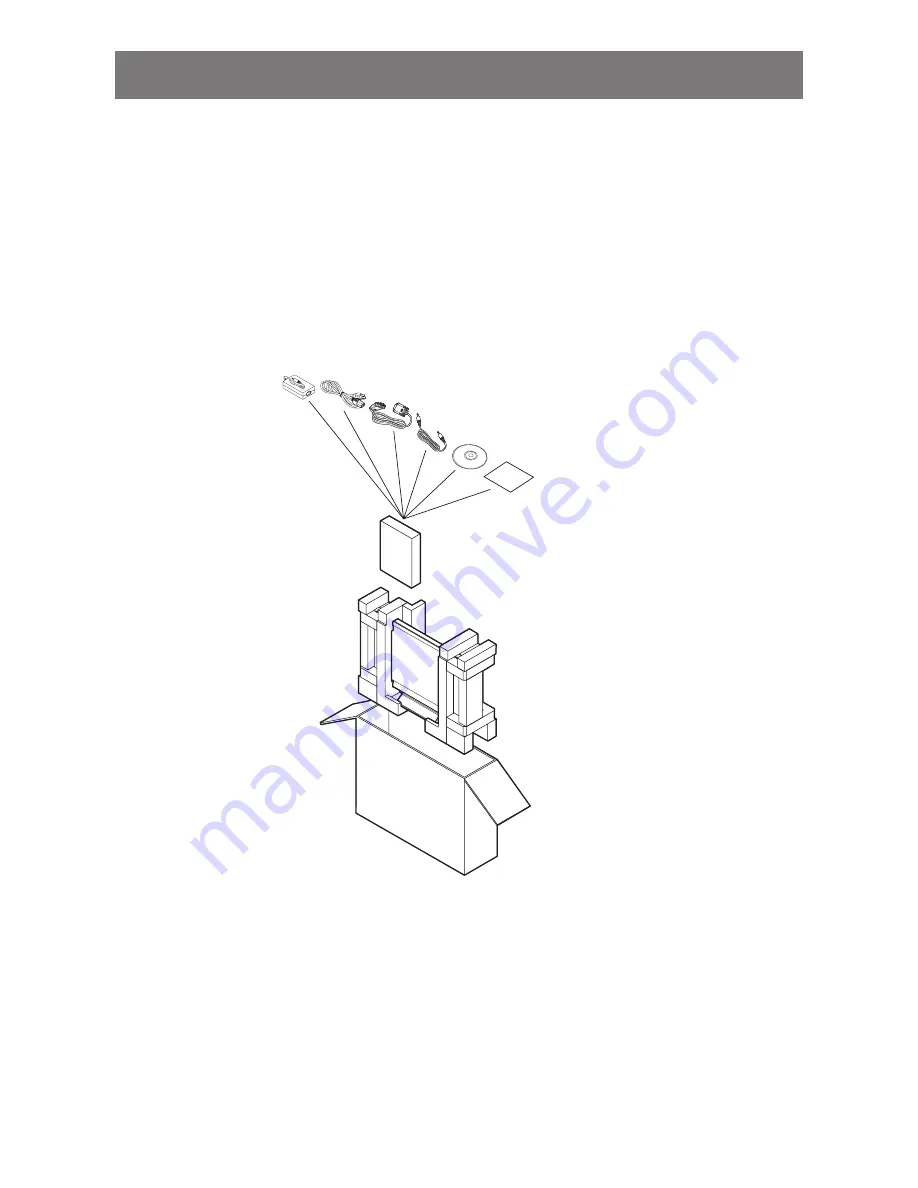
6.3 Transporting the LCD Display

To transport the LCD display for repair or shipment, place the display in its original packaging carton.

Put all the accessories in the box (if necessary). Place the two foam cushions on 

each side of the LCD display for protection.

2

  Place the LCD display down in the box.

Place the accessories box on the designated area (if necessary).

4

  Close and tape the box.

Содержание RX-Series

Страница 1: ...RX Series Widescreen LED Backlit Display User Manual...

Страница 2: ...Input Source Signals 14 2 2 1 Connecting a Computer 14 Using VGA Cables 14 Using DVI Cables 14 Connecting an Audio Device 15 2 2 2 Connecting a Camera or Video Device 15 Using CVBS Cables 15 Using S...

Страница 3: ...gnals 33 5 5 Aspect Ratio Setting 36 5 6 PIP Setting 38 5 7 Anti Burn In 40 5 8 OSD Setting 41 5 9 Audio Setting 42 5 10 Other Setting 43 5 11 Auto Brightness 45 5 11 1 EcoSmart Sensor 45 5 12 Input S...

Страница 4: ...me use This device will produce use and emit radio frequency energy therefore installation or use without following the instructions given may cause damaging interference to radio communication Noneth...

Страница 5: ...y be aware that this is your responsibility to dispose electronic equipment at recycling centers so as to help conserve natural resources Each country in the European Union should have its collection...

Страница 6: ...register online go to http www agneovo com To protect your rights as a consumer do not remove any stickers from the LCD display Doing so may affect the determination of the warranty period Cautions W...

Страница 7: ...fire or electric shock Do not unplug or touch the power cord with wet hands Cleaning and Maintenance The LCD display comes with NeoVTM Optical Glass Use a soft cloth lightly moistened with a mild det...

Страница 8: ...ttings Turn off the LCD display when the system is not in use Things to do when the LCD display shows image retention Turn off the LCD display for extended periods of time It can be several hours or s...

Страница 9: ...age If any of them is missing or damaged contact your dealer User Manual Power cord Note The pictures are for reference only Actual items may vary upon shipment VGA cable Power adapter LCD Display Aud...

Страница 10: ...2 Remove the four screws securing the base stand from the LCD display 3 Detach the base stand 100mm 75mm 100mm 75mm Note Take measures to prevent the LCD display from falling down and lessen possible...

Страница 11: ...crease the volume During OSD menu selection press to adjust the settings RIGHT Press repeatedly to select the aspect ratio In volume screen press to increase the volume During OSD menu selection press...

Страница 12: ...osite cables for CVBS input output signal DVI connector Use to connect a PC using DVI cable for digital input signal 1 4 3 2 9 8 7 COMPOSITE Audio input connectors Use to connect RCA cables for CVBS S...

Страница 13: ...LCD display 3 Connect the power cord plug to a power outlet or a power supply DC IN Caution Make sure that the LCD display is not connected to the power outlet before making any connections Connecting...

Страница 14: ...VGA Cables Connect one end of a D sub cable to the VGA connector of the LCD display and the other end to the D sub connector of the computer VGA Using DVI Cables Connect one end of a DVI cable to the...

Страница 15: ...computer AUDIO IN 2 2 2 Connecting a Camera or Video Device CVBS 1 AUDIO IN L R IN CVBS 2 IN or Using CVBS Cables Connect one end of a CVBS cable to the COMPOSITE connectors of the LCD display and the...

Страница 16: ...d the other end to the S VIDEO connector of your device For audio input connect an RCA cable to the audio in connector of the LCD display and the audio out connector of your device Using HDMI Cables C...

Страница 17: ...output connect a stereo amplifier to the LCD display Connect an RCA cable to the audio out connector of the LCD display and to the audio in connector of a stereo amplifier AUDIO OUT L R Warning Ensure...

Страница 18: ...example CVBS1 is selected the following message is displayed C V B S 1 I N P U T If the selected input source signal is not connected to the LCD display or is turned off the no signal message is disp...

Страница 19: ...unauthorised users or from accidentally pressing the keypad To lock the OSD press and hold the keypad buttons listed below for at least 5 seconds or until the O S D L O C K O U T message appears When...

Страница 20: ...een while retaining the original aspect ratio This results in a zoomed image and some part of the picture may appear cut off Normal The picture is displayed based on the current monitor resolution Nat...

Страница 21: ...ollows PIP On The sub source signal is displayed within the main source signal PAP Picture and Picture The main source and the sub source signals are displayed side by side with equal display size PIP...

Страница 22: ...Sub source 3 7 Using ROTATE Function The ROTATE function allows you to rotate the screen image at 180 Original screen image Touch the button to rotate the picture 180 See illustration below After ROT...

Страница 23: ...Adjustment function is available only during VGA input signals It is recommended to use the auto adjustment function when using the LCD display for the first time or after a resolution or frequency c...

Страница 24: ...R I G H T N E S S I N P U T S E L E C T L A N G U A G E I N F O R M A T I O N C O N T R A S T 5 0 Touch 2 Select the menu E X I T E N T E R S E L E C T N T S C 6 0 H z B R I G H T N E S S 5 0 B A C K...

Страница 25: ...C K L I G H T 5 0 5 0 C O N T R A S T A D J U S T The highlighted item with an orange arrow indicates the active submenu Touch the or buttons 4 Adjust the settings Touch the or buttons 5 Exit the sub...

Страница 26: ...t Mode Video Mode See page 32 E X I T E N T E R S E L E C T N T S C 6 0 H z B R I G H T N E S S 5 0 B A C K L I G H T 5 0 B R I G H T N E S S C O L O U R S E T T I N G I M A G E S E T T I N G A S P E...

Страница 27: ...Aspect Ratio Aspect Ratio H Zoom V Zoom See page 36 5 PIP Setting PIP Main Source Sub Source Sub Picture Size Sub Pic Pos Swap See page 38 6 Anti Burn In Enable Interval Mode See page 40 7 OSD Settin...

Страница 28: ...put Select VGA DVI HDMI CVBS1 CVBS2 S Video See page 46 12 Language Select the OSD language EN FR DE ES IT PY RO PL CS NL 13 Information Displays settings information such as Input Resolution Horizont...

Страница 29: ...T A D J U S T 1 Touch to call out the OSD window 2 Select BRIGHTNESS menu then touch the button 3 Touch the or buttons to select an option Item Function Operation Range Brightness Adjusts the black le...

Страница 30: ...30 ADJUSTING THE LCD DISPLAY Original Setting High Setting Low Setting Brightness Contrast Backlight...

Страница 31: ...00K 5400K 9300K sRGB USER Colour temperature can be set to 6500K This is the default colour temperature commonly used for normal lighting conditions 5400K Applies a reddish tint for warmer colours 930...

Страница 32: ...2 Select IMAGE SETTING menu then touch the button 3 Touch the or buttons to select an option Item Function Operation Range Sharpness Adjusts the clarity and focus of the screen image Touch the or butt...

Страница 33: ...T T I N G O T H E R S E T T I N G A U T O B R I G H T N E S S I N P U T S E L E C T L A N G U A G E I N F O R M A T I O N A D J U S T 1 Touch to call out the OSD window 2 Select IMAGE SETTING menu th...

Страница 34: ...t the value Off Low High Noise Reduction Off Noise Reduction On 3D De Interlace Enables the 3D De interlace feature which prevents blurring and flickering of images Touch the or buttons to select the...

Страница 35: ...our PC select the video mode for better display Touch the or buttons to select the value Standard Text Movie Graphic H Position Horizontal Position Moves the screen image to the left or right Touch th...

Страница 36: ...the OSD window 2 Select ASPECT RATIO menu then touch the button 3 Touch the or buttons to select an option Item Function Operation Range Value Aspect Ratio Adjusts the aspect ratio of the screen imag...

Страница 37: ...USTING THE LCD DISPLAY Item Function Operation Range Value H Zoom Horizontal Zoom Adjusts the horizontal zoom Touch the or buttons to adjust the value 0 to 100 V Zoom Vertical Zoom Adjusts the vertica...

Страница 38: ...P U T S E L E C T L A N G U A G E I N F O R M A T I O N A D J U S T 1 Touch to call out the OSD window 2 Select PIP SETTING menu then touch the button 3 Touch the or buttons to select an option Item F...

Страница 39: ...eft corner of the screen R U Sets the image on the upper right corner of the screen L D Sets the image on the lower left corner of the screen R D Sets the image on the lower right corner of the screen...

Страница 40: ...N G U A G E I N F O R M A T I O N A D J U S T 1 Touch to call out the OSD window 2 Select ANTI BURN IN menu then touch the button 3 Touch the or buttons to select an option Item Function Operation Va...

Страница 41: ...L A N G U A G E I N F O R M A T I O N A D J U S T 1 Touch to call out the OSD window 2 Select OSD SETTING menu then touch the button 3 Touch the or buttons to select an option Item Function Operation...

Страница 42: ...G H T N E S S I N P U T S E L E C T L A N G U A G E I N F O R M A T I O N A D J U S T 1 Touch to call out the OSD window 2 Select AUDIO SETTING menu then touch the button 3 Touch the or buttons to se...

Страница 43: ...black and the LED indicator lights AMBER Note The amount of time for the display to enter power saving varies depending on the Source Detect setting If Source Detect is Auto the display checks all inp...

Страница 44: ...tivates the DDC CI protocol to allow users to configure the monitor by a software using two wires on the VGA or DVI cables Touch the or buttons to select the value On Off Recall Use to recall all to d...

Страница 45: ...G O T H E R S E T T I N G A U T O B R I G H T N E S S I N P U T S E L E C T L A N G U A G E I N F O R M A T I O N A D J U S T 1 Touch to call out the OSD window 2 Select AUTO BRIGHTNESS menu then touc...

Страница 46: ...H E R S E T T I N G A U T O B R I G H T N E S S I N P U T S E L E C T L A N G U A G E I N F O R M A T I O N H D M I P R E S S 1 Touch to call out the OSD window 2 Select INPUT SELECT menu then touch t...

Страница 47: ...ned ON Check if the signal cable is properly connected Check if any pin inside the cable connector is twisted or broken O S D L O C K O U T The OSD has been locked by the user Unlock the OSD Refer to...

Страница 48: ...cro transistors inside the LCD display It is normal for a few transistors to be damaged and to produce spots This is acceptable and is not considered a failure No audio output Check if the volume is s...

Страница 49: ...her conditions This is a normal occurrence The mist will disappear after a few days or as soon as the weather stabilizes Faint shadows from a static image appear on the screen Turn off the LCD display...

Страница 50: ...e the display in its original packaging carton 1 Put all the accessories in the box if necessary Place the two foam cushions on each side of the LCD display for protection 2 Place the LCD display down...

Страница 51: ...i DIN HDMI HDMI x 1 HDMI x 1 Output CVBS BNC x 2 BNC x 2 DC Output 12V 50mA DC jack 2 5 Audio Audio Input 1 x stereo audio in for PC audio jack 3 5 1 x stereo audio in for CVBS and S VIDEO Audio Outpu...

Страница 52: ...play Dimensions 7 2 1 RX 22 Dimensions 324 3mm 282 4mm 227 4mm 155mm 513 2mm 53 5mm 100mm 32 6mm 75mm 100mm 75mm 368 5mm 7 2 2 RX 24 Dimensions 352 6mm 396 8mm 282 4mm 227 4mm 155mm 562 4mm 53 5mm 100...

Отзывы: