


Installation Note E8801-90024
7
Overview of the Installation Procedure
The following steps comprise the installation of the Option 014 upgrade kit.
1. Remove the outer cover.
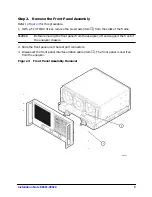
2. Remove the front panel assembly.
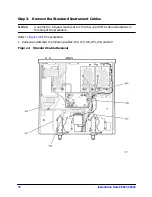
3. Remove the standard instrument cables.
4. Install the Option 014 cables and front panel connectors.
5. Replace the lower front panel overlay.
6. Reinstall the front panel assembly.
7. Reinstall the outer cover.
8. Enable Option 014.
9. Verify that Option 014 is enabled.
Tools and Equipment Required for the Installation
CAUTION
Use a 5/16-in torque wrench set to 10 in-lbs on all SMA cable connections except
the front-panel SMA feed-through connectors to which the front-panel jumpers
attach. Use a 5/16-in torque wrench set to 21 in-lbs for these connections.
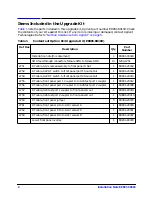
Description
Qty
Part Number
T-10 TORX driver (set to 9 in-lbs)
1
N/A
T-20 TORX driver (set to 21 in-lbs)
1
N/A
5/16 in torque wrench (set to 10 in-lbs)
1
N/A
5/16 in torque wrench (set to 21 in-lbs)
1
N/A
ESD grounding wrist strap
1
9300-1367
5 ft grounding cord for wrist strap
1
9300-0980
2 x 4 ft conductive table mat and 15 ft grounding wire
1
9300-0797
ESD heel strap (for use with conductive floors)
1
9300-1308


