background image

8

Agilent 16441A User’s Guide, Edition 4

User's Guide
Installation

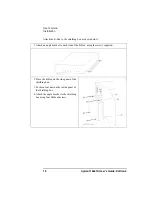
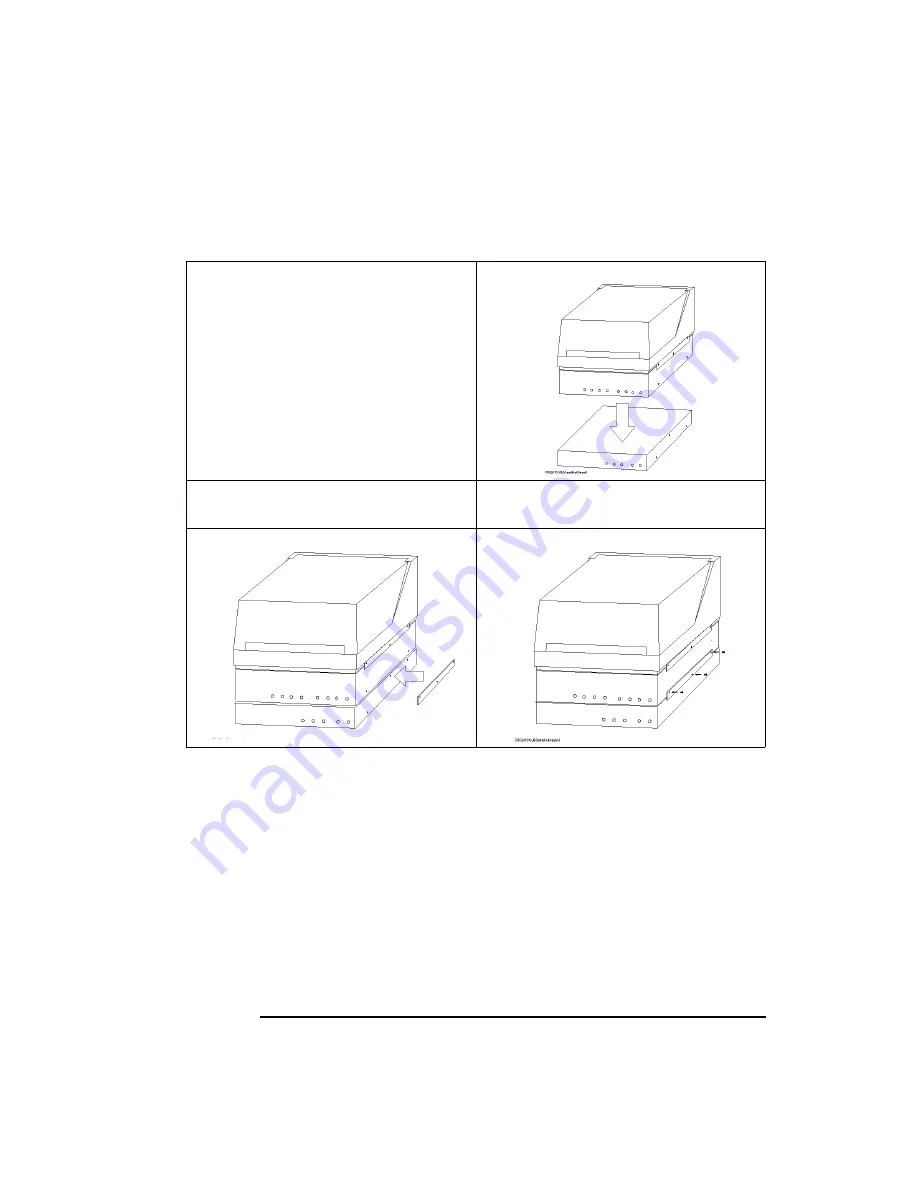
The following steps apply when using the 16440A selector:

To attach one more selector, repeat steps 5 to 7 again.

5. Place the selector on your workbench. 

Place the R-Box and the test fixture on top 
of the selector. 

6. Position a plate on both sides. 

7. Attach each plate using the three flathead 

screws supplied with the instrument. 

Содержание 16441-90000

Страница 1: ...User s Guide Agilent 16441A R Box Agilent Part No 16441 90000 Printed in Japan January 2000 Edition 4...

Страница 2: ...return the product to Buyer However Buyer shall pay all shipping charges duties and taxes for products returned to Agilent Technologies from another country Agilent Technologies do not warrant that t...

Страница 3: ...New Zealand the warranty terms contained in this statement except to the extent lawfully permitted do not exclude restrict or modify and are in addition to the mandatory statutory rights applicable to...

Страница 4: ...onditions dangerous voltages may exist even with the power cable removed To avoid injuries always disconnect power and discharge circuits before touching them DO NOT SERVICE OR ADJUST ALONE Do not att...

Страница 5: ...e connected to ground before operating equipment Frame or chassis terminal A connection to the frame chassis of the equipment which normally includes all exposed metal structures Indicates earth groun...

Страница 6: ...Lpa 70 dB am Arbeitsplatz normaler Betrieb nach DIN 45635 T 19 Manufacturer s Declaration ACOUSTIC NOISE EMISSION Lpa 70dB operator position normal operation per ISO 7779 Printing History Edition 1 F...

Страница 7: ...Agilent 16441A User s Guide Edition 4 User s Guide...

Страница 8: ...output and your test device DUT and is useful for the following measurements negative resistance measurement R Box is effective for the negative resistance measurement because SMUs cannot measure nega...

Страница 9: ...ntents See figure and table shown above If anything is missing or damaged contact your nearest Agilent Technologies sales office Description Agilent Part Number Quantity 1 R Box 16441A 1 2 40 cm triax...

Страница 10: ...urement Data Compensation The resistance value is automatically compensated for by the 4155 4156 So the data displayed on the GRAPH LIST screen of the 4155 4156 or data used for user function is the c...

Страница 11: ...where for the following SMUs select the 0 ohm softkey Else error occurs SMU defined as the standby channel If STBY field is ON the SMU is defined as the standby channel SMU set to the common mode If M...

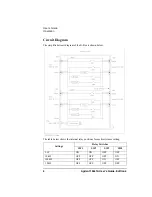
Страница 12: ...t Diagram The simplified circuit diagram of the R Box is shown below The table below shows the internal relay positions for each resistance setting Settings Relay Switches SW1 SW2 SW3 SW4 0 W ON ON OF...

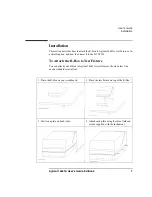
Страница 13: ...ox and how to connect it to the 4155 4156 To Attach the R Box to Test Fixture You can attach your R Box to Agilent 16442A test fixture as shown below You need a standard screwdriver 1 Place the R Box...

Страница 14: ...n using the 16440A selector To attach one more selector repeat steps 5 to 7 again 5 Place the selector on your workbench Place the R Box and the test fixture on top of the selector 6 Position a plate...

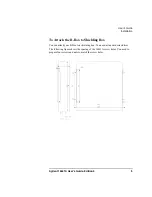
Страница 15: ...stallation To Attach the R Box to Shielding Box You can attach your R Box to a shielding box You need a standard screwdriver The following figure shows the spacing of the 16441A screw holes You need t...

Страница 16: ...ding box as shown below 1 Attach an angle bracket to each side of the R Box using the screws supplied 2 Place the R Box on the side panel of the shielding box 3 Position four nuts on the inside panel...

Страница 17: ...Agilent 16441A User s Guide Edition 4 11 User s Guide Installation If you use the 16440A selector attach the selector to the R Box as shown below...

Страница 18: ...w When you use the connector plate use a low noise coaxial cable Agilent part number 8120 3674 from the connector plate to DUT If you use insufficiently insulated cables leakage current may occur Inst...

Страница 19: ...Agilent 16441A User s Guide Edition 4 13 User s Guide Installation The following figure shows example connections with the 4156 The following figure shows example connections with the 4155...

Страница 20: ...R Box 3 Using lint free paper gently wipe the chassis For any area that will not come clean dip the lint free paper into alcohol and wipe the area gently Servicing the R Box This section provides inf...

Страница 21: ...Agilent 16441A User s Guide Edition 4 15 User s Guide Maintenance Circuit Block Diagram Circuit Block Diagram is shown below Control Circuit is shown below...

Страница 22: ...igital Multi Meter Agilent Technologies 3458A or equivalent Power Supply can force 20 V and 100 mA Connection Cables 04155 61650 2ea Test Condition Temperature 23 3 C DMM Condition 4 wire ohm measurem...

Страница 23: ...and DMM as follows 3 Change the setting of the SW1 on the circuit board of the R Box and verify the resistance value measured by the DMM as follows CH1 Path Test Test Path SW1 Setting Resistance Value...

Страница 24: ...circuit board of the R Box and measure the resistance value by the DMM to verify the resistor paths as follows CH2 Path Test Test Path SW1 Setting Resistance Value Test Limit W 1 2 3 5 6 7 10kW OFF OF...

Страница 25: ...paths as follows Sense Path Test 8 Change the connection between the R Box and DMM as follows 9 Change the setting of the SW1 on the circuit board of the R Box and measure the resistance value by the...

Страница 26: ...hloric acid solder Agilent part number 8090 0433 to prevent the flux in the solder from spreading unnecessarily When soldering make sure the terminals do not make contact with each other After solderi...

Страница 27: ...r 2 525KW 0 02 R14 0699 3702 Resistor 2 525KW 0 02 R15 0757 0180 Resistor 31W 6 1 R16 0757 0180 Resistor 31W 6 1 R17 0757 0442 Resistor 10KW 1 125 W R18 0757 0418 Resistor 619W 1 125 W R19 0757 0418 R...

Страница 28: ...Resistor 31 6KW 1 R41 0698 3160 Resistor 31 6KW 1 R42 0698 3160 Resistor 31 6KW 1 R43 0698 3162 Resistor 46 4KW 1 CR1 1901 0050 Diode CR2 1901 0050 Diode CR3 1901 0050 Diode CR4 1901 0050 Diode CR5 19...

Страница 29: ...W W6 8159 0005 Wire Resistor 0W W10 8159 0005 Wire Resistor 0W W11 8159 0005 Wire Resistor 0W W12 8159 0005 Wire Resistor 0W DS1 1990 0967 LED Green DS2 1990 0967 LED Green DS3 1990 0967 LED Green DS4...

Страница 30: ...resistor is automatically calculated There are the limitations on measurement with Agilent 4155 4156 Semiconductor Parameter Analyzers and R Box If you measure device characteristics including negativ...

Страница 31: ...Agilent part number 04155 61609 40 cm triaxial cable Agilent part number 04155 61605 Accessories optional 1 5 m Kelvin triaxial cable Agilent 16493K option 001 3 0 m Kelvin triaxial cable Agilent 164...

Страница 32: ...elative humidity Leakage current less than 100 fA at 100 V Residual resistance 0 3 W typical when 0 W is selected Output channel stray capacitance force to common 0 3 pF typical at DC without cable fo...

Отзывы: