background image

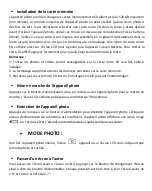
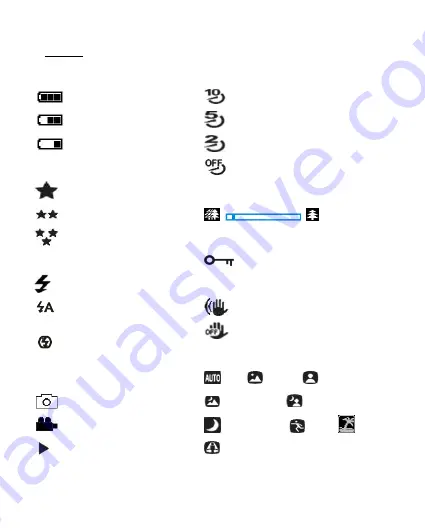
Icônes :

Chargement de la batterie

Batterie complètement chargée

Batterie moyennement chargée

Batterie faible

Qualité

Normale

Fine

Super Fine

Flash

Flash manuel

Flash automatique

Flash désactivé

Mode

Photo

Vidéo

Lecture

Retardateur

Retardateur 10 secondes

Retardateur 5 secondes

Retardateur 2 secondes

Retardateur désactivé

Zoom digital

Protection

Protection activée

Stabilisateur

Stabilisateur activé

Stabilisateur désactivé

Scènes

Auto

Paysage

Portrait

Paysage de nuit

Portrait de nuit

Haute sensibilité

Sport

Plage

Fêtes

Содержание Realishot WP8000

Страница 1: ......

Страница 2: ...ion 2 7K 2688x1520 FHD 1920x1080 HD 1280x720P Maximum image resolution 48 MP Dual screens a 1 8 front screen and a 2 7 TFT rear screen Built in LED flash 16X digital zoom High speed continuous shooting face detection image stabilization multiple scene modes Micro SD support up to 128 GB not included ...

Страница 3: ... it in place Note Please remove the battery if you are not going to use the camera for a while Lithium battery charging To recharge the lithium battery simply connect the camera without removing the battery to your computer using the USB cable provided in the box The red LED on the back of the camera will light up to indicate that the battery is being charged and will turn off when fully charged Y...

Страница 4: ...indows Vista If you want to transfer photos and videos to a Windows Vista computer the computer must be set up as follows 800 MHz processor and 512 MB RAM 20 GB hard disk with at least 16 GB available space Super VGA Graphics Array Support Compatible USB interface Computer system requirements Macintosh If you want to transfer photos and videos to a Mac computer the computer must be set up as follo...

Страница 5: ... Camera description ...

Страница 6: ... Fine Flash Flash on Auto flash Flash off Mode Photo Video Playback Self timer Self timer 10s Self timer 5s Self timer 2s Self timer off Digitalzoom Protection Protection on Anti shake Anti shake on Anti Shake off Scenes Auto Scenery Portrait Night scenery Night portrait High sensitivity Sport Beach Party ...

Страница 7: ...he memory card 3 Do not remove the micro SD card during formatting as this may damage the card Turning on the camera Press the power key on the top of the camera to turn it on The LCD screen will then turn on to confirm that it is working Turning off the camera Press the power key again to turn off the camera When the battery power level is insufficient the camera will display a red icon on LCD sc...

Страница 8: ...lance Sharpness Quality Effects auto power off Sound Date Time Frequency Memory card formatting 1 Press the SET key 2 Press the Up Down keys to select the setting to be changed Built in flash Press the Flash key on the back of the camera to activate the three flash modes To activate Auto Flash select the icon it should turn on automatically if the shooting brightness is low If you select the icon ...

Страница 9: ...y 2 Press the Left Right keys to select Image quality 3 Press the Up Down keys to select Normal Fine Super fine 4 Press the SET key again to confirm your selection 5 The icon corresponding to the selected quality will then be displayed on the LCD screen Self timer When the self timer is on the picture is taken a few seconds after the shutter key is pressed Ideal for group shots we recommend you to...

Страница 10: ...uick succession VGA image size only after pressing the shutter key once 1 Press the SET key 2 Press the Left Right keys to select the icon 3 Press the Up Down keys to choose On Off 4 Press the SET key again to confirm Note When you activate this setting the image resolution automatically switches to VGA If it has been changed the message Continue without continuous shooting will be displayed on th...

Страница 11: ...again to confirm your selection Exposure This setting allows you to adjust the brightness of your photos 1 Press the SET key 2 Press the Left Right keys to select Exposure EV 3 Press the Up Down keys to select an exposure value from 3 to 3 4 Press the SET key again to confirm your selection 5 The exposure icon will then be displayed on the LCD screen ISO It is better to activate this setting if th...

Страница 12: ...ft Right keys to select Date Time 3 Press the Up Down keys to select On to display the date on the photo when you download it to your computer Off no date on the photos Date Setup to set the system date 4 If you select Date Setup Press SET key to enter the Date Setup menu Press Left Right keys to select the highlighted Year Month Date Hour Minute Second AM Press Up Down keys to set up the precise ...

Страница 13: ...ard and erase all photos and videos stored on it including protected files 1 Press the SET key 2 Press the Left Right keys to select Format memory card 3 Press the Up Down keys to select Yes No 4 If you select No press the SET key to confirm The camera will return to photo mode 5 Otherwise select Yes and then press the SET key to confirm the start of formatting Note Please be careful with formatti...

Страница 14: ... recording time of 29 minutes the camera will turn off automatically In this case just restart it by pressing the power key again PLAYBACK MODE With the playback mode you can view the photos and videos stored on the memory card You can also rotate protect delete print and start a slideshow of your photos To switch on it press the MODE key and an icon will appear on the LCD screen to indicate that ...

Страница 15: ...f you select No press the SET key to confirm and the camera will return to playback mode 8 Otherwise select Yes and then press the SET key to confirm the deletion Rotate This function allows you to rotate photos 1 Press the Left Right keys to select a file 2 Press the SET key 3 Press the Left Right keys to select a photo and press the SET key 4 Press the Left Right keys to select a rotation angle ...

Страница 16: ...to select the photo you want to print 2 Press the SET key 3 Press the Left Right keys to select the print icon 4 Press the Up Down keys to select Print Cancel 5 Press the SET key again to confirm your choice 6 If wireless printing fails please connect the camera to your printer via the USB cable Video files playing Select the AVI video file you want to play back and press the shutter key to play i...

Страница 17: ...omputer with the supplied USB cable 4 The actions window of the removable disk corresponding to the camera will appear on your computer screen 5 Click on Open folder to view files the pictures will be stored in the DCIM subfolder 6 Finally you can copy and paste the photos you want into the folder of your choice on your computer ...

Страница 18: ...8 front screen Intern memory Micro SD card max up to 128 GB not included Digital zoom 16X EV 3 3 White balance Auto Sunny Cloudy Fluorescent Incandescent Scenes Auto Scenery Portrait Night Scenery Night Portrait High Sensitivity Sport Beach Party ISO Auto 100 200 400 Self timer 2s 5s 10s File format JPEG photo AVI video Anti shake YES Flash Auto Flash on Flash off Print support YES Face detection ...

Страница 19: ... can be connected to your computer USB port Also check that your computer has the minimum requirements as indicated at the beginning of this instruction manual Q How to be sure that I haven t missed any important photos A As all photos are stored on the micro SD card inserted in your camera make sure there is always enough space on the card for you to take pictures It is recommended that you regul...

Страница 20: ...7K 2688x1520 FHD 1920x1080 HD 1280x720P Résolution d image maximale 48 MP Double écrans un écran avant de 1 8 et un écran arrière TFT de 2 7 Flash LED intégré Zoom numérique 16X Prise de vue continue à grande vitesse détection visage stabilisation image multiple mode de scènes Prise en charge micro SD jusqu à 128 GB non incluse ...

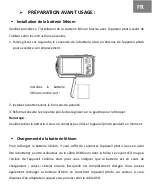
Страница 21: ...z retirer la batterie si vous ne comptez pas utiliser l appareil photo pendant un moment Chargement de la batterie lithium Pour recharger la batterie lithium il vous suffit de connecter l appareil photo sans en avoir ôté la batterie à votre ordinateur via le câble USB fourni dans la boîte Le voyant LED rouge à l arrière de l appareil s allume alors pour vous indiquer que la batterie est en cours d...

Страница 22: ... Si vous souhaitez transférer des photos et des vidéos sur ordinateur Windows Vista celui ci doit être configuré comme suit Processeur de 800 MHz et 512 MB de RAM Disque dur de 20 GB avec au moins 16 GB d espace disque disponible Prise en charge Super VGA Graphics Array Interface USB compatible Configuration requise pour système d exploitation Macintosh Si vous souhaitez transférer des photos et d...

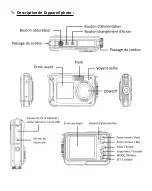
Страница 23: ... Description de l appareil photo ...

Страница 24: ...Flash automatique Flash désactivé Mode Photo Vidéo Lecture Retardateur Retardateur 10 secondes Retardateur 5 secondes Retardateur 2 secondes Retardateur désactivé Zoomdigital Protection Protection activée Stabilisateur Stabilisateur activé Stabilisateur désactivé Scènes Auto Paysage Portrait Paysage de nuit Portrait de nuit Haute sensibilité Sport Plage Fêtes ...

Страница 25: ...icro SD une fois celle ci installée 2 Le formatage supprimera toutes les données présentes sur la carte mémoire 3 Ne retirez pas la carte micro SD lors du formatage car cela pourrait l endommager Mise en marche de l appareil photo Appuyez sur le bouton d alimentation situé sur le dessus de l appareil photo pour le mettre en marche L écran LCD s allume ensuite pour confirmer qu il fonctionne Extinc...

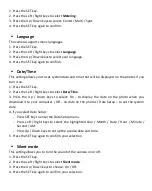
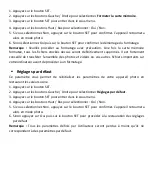
Страница 26: ...du mode photo L appareil photo dispose de 18 paramètres à ajuster pour améliorer la prise de vue Flash Scènes Résolution d image Anti Shake Détection visage Prise de vue continue Retardateur Exposition ISO Balance des blancs Netteté Qualité Effets Arrêt automatique Son Date Heure Fréquence Formatage de la carte mémoire 1 Appuyez sur le bouton SET 2 Appuyez sur les boutons Haut Bas pour sélectionne...

Страница 27: ...tre sélection 5 La résolution choisie apparaîtra sous forme d icône sur l écran LCD Qualité de l image Cette fonction permet d ajuster la qualité globale de votre photo 1 Appuyez sur le bouton SET 2 Appuyez sur les boutons Gauche Droite pour sélectionner Qualité de l image 3 Appuyez sur le bouton Haut Bas pour sélectionner Normale Bien Super fine 4 Appuyez de nouveau sur le bouton SET pour confirm...

Страница 28: ...Appuyez sur le bouton SET 2 Appuyez sur les boutons Gauche Droite pour sélectionner l icône 3 Appuyez sur les boutons Haut Bas pour choisir Activer Désactiver 4 Appuyez de nouveau sur le bouton SET pour confirmer Prise de vue continue Grâce à ce paramètre vous pouvez prendre jusqu à 6 photos en succession rapide uniquement en taille d image VGA après avoir appuyé une seule fois sur le bouton d obt...

Страница 29: ...z de nouveau sur le bouton SET pour confirmer votre sélection Netteté de l image Ce paramètre permet d ajuster la netteté de la photo afin que les bords de l image soient plus clairs ou plus précis 1 Appuyez sur le bouton SET 2 Appuyez sur les boutons Gauche Droite pour sélectionner Netteté de l image 3 Appuyez sur le bouton Haut Bas pour sélectionner Doux Normal Tranchant 4 Appuyez de nouveau sur...

Страница 30: ...lection Langue L appareil photo dispose de plusieurs langues 1 Appuyez sur le bouton SET 2 Appuyez sur les boutons Gauche Droite pour sélectionner Langue 3 Appuyez sur les boutons Haut Bas pour choisir votre langue 4 Appuyez de nouveau sur le bouton SET pour confirmer votre sélection Heure Date Ce paramètre vous permet de régler la date et l heure du système qui seront d ailleurs affichées sur les...

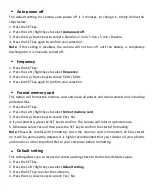
Страница 31: ... le bouton SET 2 Appuyez sur les boutons Gauche Droite pour sélectionner Arrêt automatique 3 Appuyez sur le bouton SET pour entrer dans le sous menu 4 Appuyez sur les boutons Haut Bas pour sélectionner une durée 1 min 3 min 5 min Désactiver 5 Appuyez de nouveau sur le bouton SET pour confirmer votre sélection Remarque Si ce paramètre est désactivé l appareil photo ne s éteindra pas tant que la bat...

Страница 32: ...érer l ensemble des photos et vidéos ou vos autres fichiers importants sur votre ordinateur avant de procéder à un formatage Réglages par défaut Ce paramètre vous permet de réinitialiser les paramètres de votre appareil photo en restaurant les valeurs usine 1 Appuyez sur le bouton SET 2 Appuyez sur les boutons Gauche Droite pour sélectionner Réglages par défaut 3 Appuyez sur le bouton SET pour ent...

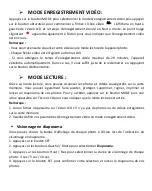
Страница 33: ...vous pouvez visualiser les photos et vidéos sauvegardés sur la carte mémoire Vous pouvez également faire pivoter protéger supprimer rogner imprimer et lancer un diaporama de vos photos Pour y accéder appuyez sur le bouton MODE puis une icône apparaîtra sur l écran LCD pour vous indiquer que le mode lecture est activé Remarque 1 Aucun fichier n apparaîtra sur l écran LCD s il n y a pas de photos ou...

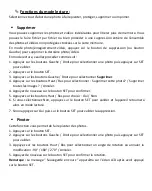
Страница 34: ...r sélectionner Supprimer 4 Appuyez sur les boutons Haut Bas pour sélectionner Supprimer cette photo Supprimer toutes les images Annuler 4 Appuyez de nouveau sur le bouton SET pour confirmer 5 Appuyez sur les boutons Haut Bas pour choisir Oui Non 6 Si vous sélectionnez Non appuyez sur le bouton SET pour valider et l appareil retournera alors en mode lecture 7 Sinon appuyez sur Oui puis sur le bouto...

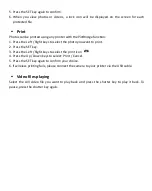
Страница 35: ...s une icône de verrouillage des fichiers protégés s affichera à l écran Imprimer Les photos peuvent être imprimées via n importe quelle imprimante disposant de la fonction PictBridge 1 Sélectionnez la photo à imprimer 2 Appuyez sur le bouton SET 3 Appuyez sur les boutons Gauche Droite pour sélectionner l icône d impression 4 Appuyez sur les boutons Haut Bas pour sélectionner Imprimer Annuler 5 App...

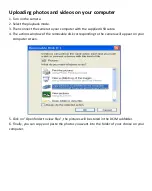
Страница 36: ...e au câble USB fourni 4 La fenêtre d actions associées au disque amovible correspondant à l appareil photo apparaît alors sur l écran de votre ordinateur 5 Cliquez sur Ouvrir le dossier pour consulter les fichiers les photos seront stockées dans le sous dossier DCIM 6 Vous pouvez enfin copier puis coller les photos que vous désirez dans le dossier de votre choix sur votre ordinateur ...

Страница 37: ...émoire externe Carte micro SD de 128 GB maximum non incluse Zoom digital 16X EV 3 3 Balance des blancs Auto Ensoleillé Nuageux Fluorescent Incandescent Scènes Auto Paysage Portrait Paysage de nuit Portrait de nuit Haute sensibilité Sport Plage Fêtes ISO Auto 100 200 400 Retardateur 2s 5s 10s Format fichier JPEG photo AVI vidéo Anti Shake OUI Flash Auto Flash on Flash off Impression directe OUI Dét...

Страница 38: ...USB d ordinateur Vérifiez également que votre ordinateur dispose des exigences minimales comme indiquées au début de ce manuel d instructions Q Comment puis je m assurer que je n ai pas omis de photos importantes A Comme toutes les photos sont stockées sur la carte micro SD insérée dans votre appareil photo assurez vous qu il y a toujours assez d espace disponible sur la carte pour vous permettre ...

Страница 39: ...0 HD 1280x720P Fotó felbontás 48 MP Kényelmes kettős képernyő 1 8 hüvelykes elülső képernyő 2 7 hüvelykes TFT hátsó képernyő Beépített LED vaku 16X digitális zoom Nagy sebességű folyamatos felvétel arcfelismerés képstabilizálás különféle jelenet módok A Micro SD kártya támogatja a 128 GB nem tartozék HU ...

Страница 40: ...ja hogy a kamerát hosszú ideig nem használja vegye ki az akkumulátort Lítium akkumulátor töltése A lítium akkumulátort újratöltéséhez egyszerűen csatlakoztassa a fényképezőgépet az elem eltávolítása nélkül a számítógéphez a dobozban található USB kábel segítségével A fényképezőgép hátulján lévő piros LED kigyullad jelezve hogy az akkumulátor töltött és teljesen feltöltve kialszik A lítium akkumulá...

Страница 41: ...ista Ha fényképeket és videókat át szeretne vinni egy Windows Vista számítógépre a számítógépet az alábbiak szerint kell beállítani 800 MHz es processzor és 512 MB RAM 20 GB os merevlemez legalább 16 GB szabad területtel Támogassa az SVGA grafikát Kompatibilis USB interfész Számítógépes követelmények Macintosh Ha fényképeket és videókat át szeretne vinni egy Mac számítógépre a számítógépet az aláb...

Страница 42: ... Kamera leírása ...

Страница 43: ...szta Vaku Kézi vaku Auto vaku Ki vaku Mód Fotó Videó Visszajátszás Önkioldő Önkioldó 10s Önkioldó 5s Önkioldó 2s Önkioldó ki Digitális zoom Véd Véd Rázásgátló Rázásgátló be Rázásgátló ki Színhely Auto Tájkép Portré Éjszakai tájkép Éjszakai portré Nagy érzékenység Sportok Strand Párt ...

Страница 44: ...ázás a memóriakártyán lévő összes adatot törli 3 Ne távolítsa el a Micro SD kártyát formázáskor különben a kártya megsérülhet Kapcsolja be a kamerát A kamera bekapcsolásához nyomja meg a fényképezőgép tetején található bekapcsoló gombot Az LCD képernyő bekapcsol hogy megerősítse hogy működik Kapcsolja ki a kamerát A fényképezőgép kikapcsolásához nyomja meg a bekapcsológombot Ha az akkumulátor leme...

Страница 45: ...ásai A kamera 18 különböző beállítási opcióval rendelkezik Vaku fény Színhely Fotó felbontás Rázásgátló Arcfelismerés Folyamatos felvétel Önkioldó EV ISO Fehéregyensúly Élesség Minőség Effektusok Automatikus Kikapcsolás Csendes mód Nap Óra Frekvencia Formázza a memóriakártyát 1 A menübe való belépéshez nyomja meg a SET gombot 2 Nyomja meg a Fel Le gombot a módosítandó beállítás kiválasztásához Vak...

Страница 46: ...iválasztott felbontás ikonként jelenik meg az LCD képernyőn Képminőség Ez a funkció lehetővé teszi a fénykép általános minőségének beállítását 1 Nyomja meg a SET gombot 2 Nyomja meg a Bal Jobb gombbal válassza az Képminőség 3 Nyomja meg a Fel Le gombbal válassza ki Szupertiszta Tiszta Normál 4 Nyomja meg ismét a SET gombot a választás megerősítéséhez 5 A kiválasztott minőségnek minőség ikon ezután...

Страница 47: ...SET gombot 2 Nyomja meg a Bal Jobb gombot a ikon 3 Nyomja meg a Fel Le gombbal válassza Be Ki arcfelismerés 4 Nyomja meg ismét a SET gombot Sorozatfelvétel Ezzel a beállítással legfeljebb 6 képet készíthet egymás után csak VGA képméretnél miután egyszer megnyomta az exponáló gombot 1 Nyomja meg a SET gombot 2 Nyomja meg a Bal Jobb gombot a ikon 3 Nyomja meg a Fel Le gombbal válassza ki a Be Ki 4 N...

Страница 48: ...élesség Ez a beállítás lehetővé teszi a fénykép élességének beállítását hogy a kép élei tisztábbak vagy pontosabbak legyenek 1 Nyomja meg a SET gombot 2 Nyomja meg a Bal Jobb gombbal válassza az Kepélesség 3 Nyomja meg a Fel Le gombbal válassza ki Lágy Éles Normál 3 Nyomja meg ismét a SET gombot a választás megerősítéséhez Fényexpozíció Ez a beállítás lehetővé teszi a fényképek fényerejének beállí...

Страница 49: ...omja meg a Fel Le gombbal a nyelv kiválasztásához 4 Nyomja meg ismét a SET gombot Dátum Idő Ez a beállítás lehetővé teszi hogy beállítsa a rendszer dátumát és időpontját amely a fényképeken megjelenik ha bekapcsolja 1 Nyomja meg a SET gombot 2 Nyomja meg a Bal Jobb gombbal válassza az Dátum Idő 3 Nyomja meg a Fel Le gombot a kiválasztáshoz Be jelenítse meg a dátumot a fényképeken amikor letöltötte...

Страница 50: ...z Megjegyzés Ha ezt a beállítást letiltja a fényképezőgép nem kapcsol ki amíg az akkumulátor teljesen lemerül vagy manuálisan nem kapcsolja ki Frekvencia 1 Nyomja meg a SET gombot 2 Nyomja meg a Bal Jobb gombbal válassza az Frekvencia 3 Nyomja meg a Fel Le gombbal válassza ki 50Hz 60Hz 4 Nyomja meg ismét a SET gombot a választás megerősítéséhez Memóriakártya formázása Ez az opció formázza a memóri...

Страница 51: ...ódba 5 Egyébként nyomja meg az Igen gombot majd nyomja meg a SET gombot az alapértelmezett beállítások visszaállításához Megjegyzés Az összes korábban meghatározott beállítás elveszik kivéve ha alapértelmezett beállítások VIDEÓ FELVÉTELI ÜZEMMÓD Nyomja meg a MODE gombot a videofelvétel mód kiválasztásához majd nyomja meg az exponáló gombot a videofelvétel indításához A videó ikon megjelenik az LCD...

Страница 52: ...avetítés 3 Nyomja meg a Fel Le gombbal válassza ki az egyes fényképek megtekintési idejét 3 mp 5 mp 10 mp 4 Nyomja meg a SET gombot a választás megerősítéséhez és a képek diavetítésének elindításához Lejátszási mód funkciói Először válassza ki a forgatni megvédeni törölni vagy nyomtatni kívánt fényképet Törlés Törölheti a nem kívánt fényképeket és videókat hogy több memóriát szerezzen Törölheti ők...

Страница 53: ...jegyzés Miután megerősítette a SET gombot az LCD kijelzőn megjelenik a Mentés Védelem Zárolás Védheti fényképeit videóit a véletlen törlés ellen 1 Nyomja meg a SET gombot 2 A Bal Jobb gombokkal válassza ki a fényképet majd nyomja meg a SET gombot a megerősítéshez 3 Nyomja meg a Bal Jobb gombbal válassza az Védelem Zárolás 4 Nyomja meg a Fel Le gombbal válassza ki Fénykép zárolása Fénykép zárolásán...

Страница 54: ...száshoz A szüneteltetéshez nyomja meg ismét az exponáló gombot Kézi átadás foot és videófiles számítógépre 1 Kapcsolja be a kamerát 2 Válassza ki a lejátszási módot 3 Csatlakoztassa a fényképezőgépet és a számítógéphez USB kábellel 4 A számítógép képernyőjén megjelenik a cserélhető lemez műveleti ablaka 5 Kattintson a Mappa megnyitása a fájlok megtekintésére lehetőségre a képek a DCIM almappába ke...

Страница 55: ...ria Micro SD kártyák legfeljebb 128 GB nem tartozék Digitális zoom 16X EV 3 3 Fehér egyensúly Automatikus Napos Felhős Fluoreszkáló Izzólámpa Színhely Automatikus Tájkép Portré Éjszakai tájkép Éjszakai portré Nagy érzékenység Sport Strand Párt ISO Auto 100 200 400 Önkioldó 2s 5s 10s Fájlformátum JPEG formátum állókép AVI formátum videó Rázásgátló Igen Vaku fény Auto Vaku be Vaku ki Nyomtatási támo...

Страница 56: ...portjához Kérjük ellenőrizze hogy számítógépe megfelel e a felhasználói kézikönyvben részletezett minimumkövetelményeknek Q Hogyan lehet megbizonyosodni arról hogy ne maradjon le egyetlen fontos fotóról sem A Mivel az összes fényképet a fényképezőgépbe helyezett micro SD kártyán tárolja kérjük ellenőrizze hogy mindig van e elegendő hely a fényképezéshez Javasoljuk hogy rendszeresen töltse fel a ká...

Страница 57: ......

Страница 58: ......

Отзывы: