background image


18


2. 

Insert battery according to the illustration. 


3. 

Close battery cover. 


Содержание Microflex 100

Страница 1: ...Microflex 100 User manual ...

Страница 2: ...n the European Union 9 Precautions 10 1 General Introduction 12 1 1 System Requirements 12 1 2 Features 12 1 3 Accessories 13 1 4 Camera View 14 1 5 Adjusting the LCD Display 15 2 Getting Started 16 2 1 Inserting an SD Card 16 2 2 Loading the Battery 17 2 3 Charging the Battery 19 2 4 Using the Touchscreen 19 2 4 1 Single touch 19 2 4 2 Slide 20 2 4 3 Rotate 20 2 5 Buttons Functions 21 ...

Страница 3: ... 2 Capturing a Still Image from a Movie 31 4 3 Capturing a Still Image in Video Mode 32 4 4 Voice Recording 33 4 5 Movie Clip Voice Clip Playback 34 4 6 Taking Playing Back Images 37 4 6 1 Taking a Picture 37 4 6 2 Playing Back Photos 38 5 LCD Display Information 40 5 1 Movie Clip Recording Mode 40 5 2 Voice Recording Mode 42 5 3 DSC Playback Mode 43 6 Menu Mode 45 6 1 Menu Options in Movie Clip M...

Страница 4: ...k Menus 54 6 2 1 Delete 54 6 2 2 Protect 56 6 3 Camera Mode Menu Options 57 6 3 1 Still Image Resolution 57 6 3 2 White Balance 58 6 3 3 Effect 59 6 3 4 Metering 60 6 3 5 Backlight 61 6 3 6 Night Mode 62 6 3 7 Self timer 63 6 3 8 Continuous Shot 64 6 3 9 EV Compensation 65 6 4 Playback Menus 66 6 4 1 Delete 66 6 4 2 Protect 68 6 4 3 Autoplay 69 6 4 4 Rotate 70 6 4 5 DPOF 71 ...

Страница 5: ... 5 9 Language 80 6 5 10 Format 81 6 5 11 File Number Default Series 82 6 5 12 LCD Brightness 83 6 5 13 Instant Review 84 6 5 14 Volume 85 6 5 15 Start up Logo 86 7 PC and TV Connection 87 7 1 Connecting to a Computer 87 7 2 Connecting to a Standard TV 87 7 3 Connecting to an HD TV 88 8 Installing the Software 89 9 Editing Software 90 10 Appendix 91 10 1 Specifications 91 ...

Страница 6: ...6 10 2 Troubleshooting 93 10 3 Customer Care 95 ...

Страница 7: ...ndows Operating System YouTube is a brand of Google Inc and YouTube LLC Mountain View California US All other companies or product names are trademarks or registered trademarks of their respective companies Federal Communications Commission FCC Compliance This equipment has been tested and found to comply with the limits for a Class B digital device pursuant to Part 15 of the FCC Rules These limit...

Страница 8: ...TV technician for help Warning A shielded type power cord is required in order to meet FCC emission limits and to prevent interference to radio and television reception Use only a shielded cable to connect I O devices to this equipment Any changes or modifications not expressly approved by the manufacturer may void your warranty and service agreement Declaration of Conformity This device complies ...

Страница 9: ...signated collection point for the recycling of waste electrical and electronic equipment The separate collection and recycling of your waste equipment at the time of disposal will help to conserve natural resources and ensure that it is recycled in a manner that protects human health and the environment For more information about where you can drop off your waste equipment for recycling please con...

Страница 10: ... may be damaged in a high temperature environment This Digital Video Camera is designed for use in a temperature range of between 0 C and 40 C 32 F and 104 F Do not use or store the product in a dusty dirty or sandy place or in an area that is close to air conditioning or heaters It is normal that the temperature of the Digital Video Camera body rises if it is in operation for a long period of tim...

Страница 11: ...ent and render the guarantee void Make sure the battery is inserted in the correct position Error in the orientation of the battery may damage this product and result in fire Remove the battery to avoid leakage of battery fluid when the camera is not to be used for a long period of time Remove a dropped or damaged battery immediately to avoid leakage of battery fluid or abnormal expansion ...

Страница 12: ... Mac OS 10 3 10 4 Intel Pentium 4 2 8 GHz CPU or equivalent Memory at least 512 MB RAM Standard USB 1 1 connection port or higher Display adapter with min 64MB Note USB 1 1 allows you to transmit files to the host but using a USB 2 0 connection port will increase transmission speed greatly 1 2 Features This AgfaPhoto camera has many features and functions including High resolution camera maximum 1...

Страница 13: ...13 1 3 Accessories Please check the contents of your camera package It should contain ...

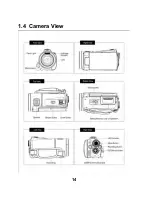
Страница 14: ...14 1 4 Camera View ...

Страница 15: ...15 1 5 Adjusting the LCD Display Before starting to take pictures or record movie clips rotate the LCD display according to the illustrations below ...

Страница 16: ...arted 2 1 Inserting an SD Card 1 Open the LCD panel and the battery cover 2 Insert an SD card with the label facing downwards Note Do not remove or insert SD cards when the camera is powered on to avoid damaging files ...

Страница 17: ...ding to this description Inserting the battery wrongly may result in non repairable damage to this Digital Video Camera 1 Open the LCD panel and the battery cover Battery Status Indicator Battery full Battery half full Battery empty The device power is supplied by DC input Battery charging a new battery should be charged for at least 2 hours ...

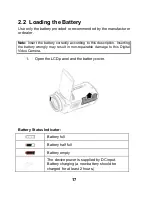
Страница 18: ...18 2 Insert battery according to the illustration 3 Close battery cover ...

Страница 19: ... in the package is not charged Insert the lithium battery and connect the camera to the adaptor cable 2 4 Using the Touchscreen 2 4 1 Single touch This single touch function acts as a hotkey menu to adjust basic settings directly on the display 1 Resolution changes to FULL HD HD WVGA WEB or 12M 8M 5M 3M ...

Страница 20: ...20 2 4 2 Slide Scroll right or left to view the previous file or next file in Playback Mode 2 4 3 Rotate In Playback Mode you can rotate the image in 90 steps as shown below ...

Страница 21: ... camera DV Mode DSC Mode and Voice Recording Mode Press the Mode button to switch to the different Modes 4 Way Direction Button Press the 4 Way Direction button UP to turn the flash on off Off Auto Fill in Press DOWN to delete the file when it is in Playback Mode Zoom Button This camera is equipped with a 4X Digital zoom for 720p below and a 5X Optical Zoom Press the Zoom button Right T to zoom in...

Страница 22: ...top recording Playback Button Press the Playback button to enter Playback Mode and play back the last file 2 6 About LED Indicators The following table describes the meaning of the camera s LED indicators Indicator Color Definition Green Powering on Power Red blinking Flash charging Recording Red blinking Recording Self timer Red blinking Start of Self timer ...

Страница 23: ... the screen to select 2 Press the 4 Way Direction button left right to highlight each column Then press up down or touch the screen to select the column 3 Press the 4 Way Direction button up down to adjust the value Press the SET Menu button to save the value you have changed or touch the screen to adjust the Year Date and Time before pressing the Return button to save the value and exit the setti...

Страница 24: ... Movie Clip Mode The following illustration shows the LCD display layout and icon description in the DV Mode 1 Movie Clip recording icon 2 Motion Detection 3 Night Mode 4 Exposure compensation 5 Color effect settings 6 Metering settings ...

Страница 25: ...ing recording time 11 Current resolution 12 Compensation indicator 13 Histogram indicator graphical brightness distribution 14 Playback Mode 15 Zoom 16 Menu button 17 Current memory for recording SD card Internal memory appears when there is no SD card inserted 18 Multi shot function ...

Страница 26: ...s the LCD display layout and icon description in the Voice Recording Mode 1 Voice Recording Mode 2 Battery level 3 Recording time left 4 Playback button 5 Menu button 6 Current memory for recording SD card Internal memory appears when there is no SD card inserted ...

Страница 27: ...ows the LCD display layout and icon description in the DSC Mode 1 DSC Mode indicator 2 Night Mode captures images with night scenery background 3 EV compensation 4 Color Effect 5 Metering settings 6 White balance settings 7 Indicates Macro is enabled ...

Страница 28: ...cator 11 Backlight compensation 12 Histogram graphical brightness distribution 13 Playback button 14 Zoom 15 Menu button 16 Current memory for recording SD card Internal memory appears when there is no SD card inserted 17 Continuous Shot Mode 18 Self timer indicator ...

Страница 29: ...setting after you power on the camera 2 Press the Recording button to start and stop Movie recording 3 The camera will store the Movie clip automatically 4 The LCD screen ratio will be different depending on the video clip resolution setting Please refer to the table shown below DV Mode Indicator ...

Страница 30: ...30 Video Resolution Preview Full HD 1920 x 1080 HD 1280 x 720 WVGA 848 x 480 16 9 ratio WEB 320 x 240 4 3 ratio ...

Страница 31: ...op video recording 3 While recording videos still images can be taken by pressing the Shutter button 4 The camera will store the image automatically Image resolution Full HD 1920 x 1080 HD 1280 x 720 WVGA 848 x 480 WEB 320 x 240 Note the image size is fixed depending on the image quality of the video clip 1 When setting to FHD HD or WVGA resolution the LCD display aspect ratio is 16 9 2 When setti...

Страница 32: ...p 1 Press the Shutter button in the movie clip during playback 2 The camera will store the image automatically Image resolution Full HD 1920 x 1080 HD 1280 x 720 WVGA 848 x 480 WEB 320 x 240 Note the image size is fixed depending on the image quality of the video clip 1 When setting to FHD HD or WVGA resolution the LCD display aspect ratio is 16 9 2 When setting to WEB video resolution the LCD dis...

Страница 33: ...33 4 4Voice Recording 1 Power on the camera 2 Press the MODE button to enter the Voice Recording Mode 3 Press the Recording button to start or stop Voice recording Voice Recording Mode ...

Страница 34: ...34 4 5Movie Clip Voice Clip Playback 1 In Movie Voice Recording Mode press the Playback button to display recently stored files on the LCD screen Playback Playback Mode indicator Playback Mode indicator ...

Страница 35: ...t to view the stored file Press the SET Menu button to play back or touch the screen to select Playback of the file 3 To pause file Playback press the Recording button or touch the screen icon 4 Press the Playback button to return to Movie Voice Recording Mode ...

Страница 36: ...FF Playback speed is as below when Slow Motion is OFF Playback speed is as below when Slow Motion is ON Rewind 2X play Forward Rewind 4X play Forward Rewind 8X play Forward Rewind 16X play Forward Rewind 1 2X play Forward Rewind 1 4X play Forward Rewind 1 8X play Forward Rewind 1 16X play Forward ...

Страница 37: ...37 4 6 Taking Playing Back Images 4 6 1 Taking a Picture 1 Set the camera to the DSC Mode 2 Press the Shutter button to capture images DSC Mode indicator ...

Страница 38: ... Mode and press the Playback button to display the images on the LCD screen 2 Press the 4 Way Direction button up down or left right to view the saved files Press the SET Menu button to replay or touch the screen to play back Playback Mode Indicator Playback ...

Страница 39: ... or touch the screen to return to the full screen to view images 4 Touch the or panel icon to enlarge or shrink the image You can then move the image up down or left right 5 Press the Playback button again to return to the DSC Mode ...

Страница 40: ...se refer to the following table showing a description of each icon and symbol 1 Indicates protected file 2 Battery level 3 Playback Mode icon 4 Length of each Movie Clip 5 Resolution indicator 6 Return button 7 Fast forward Playback button 8 Playback Pause button ...

Страница 41: ...41 9 Fast rewind Playback button 10 Menu button 11 Current memory for recording SD card Internal memory appears when there is no SD card inserted 12 Slow motion Playback ...

Страница 42: ...description of each icon and symbol 1 Indicates protected file 2 Battery level 3 Playback Mode icon 4 Length of each voice recording 5 Return 6 Playback Pause button 7 Menu button 8 Current memory for recording SD card Internal memory appears when there is no SD card inserted ...

Страница 43: ...ion to familiarize yourself with icons and symbols of the DSC Playback Mode 1 DPOF Digital Print Order Format indicator 2 Indicates protected file 3 Exposure compensation indicator 4 White balance 5 Battery level 6 Image Playback Mode icon 7 Number of pictures left ...

Страница 44: ...44 8 Resolution indicator 9 Return button 10 Menu button 11 Zoom Out indicator 12 Zoom In indicator 13 Current memory for recording SD card Internal memory appears when there is no SD card inserted ...

Страница 45: ...e options menu 6 1 1 Movie Clip Resolution 1 Set the camera to the DV Mode 2 Press the SET Menu button and move the 4 Way Direction button to highlight the White Balance item Press the SET Menu button to display the submenu or touch the screen to select the item 3 Press the 4 Way Direction button to select FHD HD WVGA or WEB Press the SET Menu button to confirm or touch the screen to select the it...

Страница 46: ...hite Balance item Press the SET Menu button to display the submenu or touch the screen to select the item 3 Press the 4 Way Direction button to select Auto Daylight Cloudy Fluorescent or Tungsten Press the SET Menu button to confirm or touch the screen to select the item Auto The Digital Video Camera automatically adjusts white balance Daylight The setting is suitable for outdoor recording in dayl...

Страница 47: ... camera 2 Press the SET Menu button and press the 4 Way Direction button to highlight the Effect item Press the SET Menu button to display the submenu or touch the screen to select the item 3 Press the 4 Way Direction button to select Normal B W or Sepia Press the SET Menu button to confirm or touch the screen to select the item Normal Make recordings in natural colors B W Make recordings in B W B...

Страница 48: ...ay the submenu or touch the screen to select the item 3 Press the 4 Way Direction button to select Spot Center or Touch AE Press the SET Menu button to confirm or touch the screen to select the item Spot This setting is to ensure correct exposure for the object even if the background is very bright or very dark Center Use this setting to preserve background details whilst letting the lighting cond...

Страница 49: ... the 4 Way Direction button to highlight the Backlight item Press the SET Menu button to display the submenu or touch the screen to select the item 3 Press the 4 Way Direction button to select On or Off Press the SET Menu button to confirm or touch the screen to select the item ...

Страница 50: ... Press the SET Menu button and press the 4 Way Direction button to highlight the Night Mode item Press the SET Menu button to display the submenu or touch the screen to select the item 3 Press the 4 Way Direction button to select On or Off Press the SET Menu button to confirm or touch the screen to select the item ...

Страница 51: ... detected recording will start immediately 1 Turn on the camera 2 Press the SET Menu button and move the 4 Way Direction button to highlight the Motion Detection item Press the SET Menu button to display the submenu or touch the screen to select the item 3 Press the 4 Way Direction button to select On or Off Press the SET Menu button to confirm or touch the screen to select the item ...

Страница 52: ... 0EV in 0 5EV increments The higher the EV value the brighter the image will be 1 Turn on the camera and switch to DV Mode 2 Press the SET Menu button and move the 4 Way Direction button to highlight the EV Compensation item Press SET Menu button to display the submenu or touch the screen to select the item 3 Press the 4 Way Direction button to adjust the Exposure value 2 0 2 0 Press the SET Menu ...

Страница 53: ...em 3 Press the 4 Way Direction button to select On or Off Press the SET Menu button to confirm or touch the screen to select the item Image resolution Full HD 1920 x 1080 HD 1280 x 720 WVGA 848 x 480 WEB 320 x 240 Note the image size is fixed depending on the image quality of the video clip 1 When setting to FHD HD or WVGA resolution the LCD display aspect ratio is 16 9 2 When setting to WEB video...

Страница 54: ...on the Digital Video Camera and switch to Movie Clip Voice Playback Mode 2 Press the SET Menu button and move the 4 Way Direction button to highlight the Delete item Press the SET Menu button to display the submenu or touch the screen to select the item 3 Use the 4 Way Direction button to select Delete One or Delete All Press the SET Menu button to confirm or touch the screen to select the item ...

Страница 55: ...he screen to select the item Delete One Delete the current file Delete All Delete all files stored in the camera Note Files cannot be retrieved once deleted Therefore please make sure you have backed up your files before deleting Protected files cannot be deleted To delete these you must first unlock the file ...

Страница 56: ...ighlight the Protect item Press the SET Menu button to display the submenu or touch the screen to select the item 3 Use the 4 Way Direction button to select Lock One Local All Unlock One or Unlock All Press the SET Menu button to confirm or touch the screen to select the item Protect Lock Note To unlock a protected file repeat the above steps When the file is no longer protected the Locked icon wi...

Страница 57: ...utton and move the 4 Way Direction button to highlight the Resolution item Press the SET Menu button to display the submenu or touch the screen to select the item 3 Press the 4 Way Direction button to select 12M 8M 5M or 3M Press the SET Menu button to confirm or touch the screen to select the item 12M 4000 x 3000 pixels Interpolation 8M 3200 x 2400 pixels Interpolation 5M 2592 x 1944 pixels 3M 20...

Страница 58: ...o the DSC Mode 2 Press the SET Menu button and move the 4 Way Direction button to highlight the White Balance item Press the SET Menu button to display the submenu or touch the screen to select the item 3 Use the 4 Way Direction button to select Auto Daylight Cloudy Fluorescent or Tungsten Press the SET Menu button to confirm or touch the screen to select the item ...

Страница 59: ...the DSC Mode 2 Press the SET Menu button and move the 4 Way Direction button to highlight the Effect item Press the SET Menu button to display the submenu or touch the screen to select the item 3 Use the 4 Way Direction button to select Normal B W or Sepia Press the SET Menu button to confirm or touch the screen to select the item ...

Страница 60: ... camera to the DSC Mode 2 Press the SET Menu button and move the 4 Way Direction button to highlight the Metering item Press the SET Menu button to display the submenu or touch the screen to select the item 3 Press the 4 Way Direction button to select Spot Center or Touch AE Press the SET Menu button to confirm or touch the screen to select the item ...

Страница 61: ...tton and move the 4 Way Direction button to highlight the Backlight item Press SET Menu button to display the submenu or touch the screen to select the item 3 Press the 4 Way Direction button to select On or Off Press the SET Menu button to confirm or touch the screen to select the item ...

Страница 62: ...d move the 4 Way Direction button to highlight the Night Mode item Press the SET Menu button to display the submenu or touch the screen to select the item 3 Press the 4 Way Direction button to select On or Off Press the SET Menu button to confirm or touch the screen to select the item ...

Страница 63: ...tton to display the submenu or touch the screen to select the item 3 Press the 4 Way Direction button to select Off 2 Sec or 10 sec Press the SET Menu button to confirm or touch the screen to select the item 2 sec Self timer The image will be taken 2 seconds after the shutter is released 10 sec Self timer The image will be taken 10 seconds after the shutter is released ...

Страница 64: ...ng the third picture 1 Set the camera to the DSC Mode 2 Press the SET Menu button and press the 4 Way Direction button to highlight the Continuous Shot item Press the SET Menu button to display the submenu or touch the screen to select the item 3 Press the 4 Way Direction button to select Off or On Press the SET Menu button to confirm or touch the screen to select the item ...

Страница 65: ... will be 1 Set the camera to the DSC Mode 2 Press the SET Menu button and press the 4 Way Direction button to highlight the EV Compensation item Press the SET Menu button to display the submenu or touch the screen to select the item 3 Press the 4 Way Direction button to adjust the exposure value 2 0 2 0 Press the SET Menu button to confirm or touch the screen to select the item ...

Страница 66: ...era to the Playback Mode 2 Press the SET Menu button and press the 4 Way Direction button Down or touch the screen to select the file to be deleted or to delete all files 3 Press the 4 Way Direction button or touch the screen to select Delete One or Delete All to display the submenu ...

Страница 67: ...elect O Yes or X No and press the SET Menu button to delete file s Note Files cannot be retrieved once deleted Therefore please make sure you have backed up your files before deleting Protected files cannot be deleted To delete these you must first unlock the file ...

Страница 68: ...ess the SET Menu button to display the submenu or touch the screen to select the item 4 Press the 4 Way Direction button or touch the screen to select the item Press the SET Menu button or touch the screen to confirm The Locked icon will be displayed to indicate the file is protected Note Repeat the above steps to unlock the file When the file is unlocked the Locked icon will disappear Protect Loc...

Страница 69: ...e camera to the Playback Mode 2 Press the SET Menu button and move the 4 Way Direction button to highlight the Autoplay item Press the SET Menu button to display the submenu or touch the screen to select the item 3 Press the 4 Way Direction button or touch the screen to select Off 1sec or 3 sec The images will be displayed automatically ...

Страница 70: ...70 6 4 4 Rotate 1 Set the camera to the Playback Mode 2 Use the 4 Way Direction button to highlight the Rotate item and press the SET Menu button or touch the screen to select Left 90º or Right 90º ...

Страница 71: ...e Playback button and press the SET Menu button to display the Image Playback Menu or touch the screen to select the item 2 Use the 4 Way Direction button to highlight the DPOF item Press the SET Menu button or touch the screen to display the submenu 3 Use the 4 Way Direction button and press the SET Menu button or touch the screen to select the item The DPOF icon will be shown to indicate the fil...

Страница 72: ...72 DPOF 4 Press the Playback button or touch the screen to exit the image Note 1 A memory card is required for the DPOF function 2 If DPOF is set the pictures to be printed are ordered to print ...

Страница 73: ... clips 1 Turn the camera power on and switch to SET Mode 2 Press the 4 Way Direction button to highlight the Information item Press the SET Menu button to display the submenu or touch the screen to select the item 3 Press the 4 Way Direction button to select Normal Histogram or Off Press the SET Menu button to confirm or touch the screen to select the item 6 5 2 Date Time Please refer to 2 7 1 Set...

Страница 74: ...wer on and switch to SET Mode Press the 4 Way Direction button up or down to highlight Beep and press the SET Menu button to confirm or touch the screen to select 2 Use the 4 Way Direction button or touch the screen to select On or Off ...

Страница 75: ...switch to SET Mode 2 Press the 4 Way Direction button to highlight the Default item Press the SET Menu button to display the submenu or touch the screen to select the item 3 Use the 4 Way Direction button or touch the screen to select O Yes or X No Press the SET Menu button to confirm or touch the screen to select the item ...

Страница 76: ...n to display the submenu or touch the screen to select the item 3 Use the 4 Way Direction button to select NTSC or PAL Press the SET Menu button to confirm or touch the screen to select the item TV out standard setting reference NTSC USA Canada Japan Korea Taiwan Mexico PAL Australia Austria Belgium China Denmark Finland Germany UK Italy Kuwait Malaysia New Zealand Singapore Spain Sweden Switzerla...

Страница 77: ...ed USB cable 1 Turn on the camera and switch to SET Mode 2 Press the 4 Way Direction button to highlight the USB item Press the SET Menu button to display the submenu or touch the screen to select the item 3 Use the 4 Way Direction button to select PC Camera or Mass Storage Press the SET Menu button to confirm or touch the screen to select the item ...

Страница 78: ...eriod of time 1 Turn the camera power on and switch to SET Mode 2 Press the 4 Way Direction button to highlight the Auto Power Off item Press the SET Menu button to display the submenu or touch the screen to select the item 3 Press the 4 Way Direction button to select OFF 3 mins or 5 mins or touch the screen to select the item ...

Страница 79: ...ghlight the Frequency selection item Press the SET Menu button to display the submenu or touch the screen to select the item 3 Use the 4 Way Direction button to select 50 Hz or 60 Hz Press the SET Menu button to confirm or touch the screen to select the item Frequency setting reference 50HZ UK Germany Spain Italy France Netherlands Portugal Russia China Japan 60HZ USA Taiwan Korea Japan ...

Страница 80: ...ighlight the Language item and press the SET Menu button to confirm or touch the screen to select 2 Press the 4 Way Direction button or touch the screen to select the following languages English German French Italian Japanese Spanish Portuguese Traditional Chinese Simplified Chinese Turkish Russian Thai or Arabic ...

Страница 81: ...rmat item Press the SET Menu button or touch the screen to display the submenu 3 Press the 4 Way Direction button to select O Yes or X No Press the SET Menu button to confirm or touch the screen to select the item 4 The formatting of the current storage media memory card or internal memory is now completed Note All data stored on the memory card or flash memory will be deleted after formatting ...

Страница 82: ...rt from 0001 even after formatting deleting or inserting a new memory card 1 Turn the camera power on and switch to SET Mode 2 Press the 4 Way Direction button to highlight the File Number item Press the SET Menu button to display the submenu or touch the screen to select the item 3 Use the 4 Way Direction button to select Series or Reset Press the SET Menu button to confirm or touch the screen to...

Страница 83: ...switch to SET Mode 2 Use the 4 Way Direction button to highlight the LCD brightness item Press the SET Menu button to display the submenu or touch the screen to select the item 3 Press the 4 Way Direction button to select High Medium or Low Press the SET Menu button to confirm or touch the screen to select the item ...

Страница 84: ...on and switch to SET Mode 2 Press the 4 Way Direction button to highlight the Instant Review item Press the SET Menu button to display the submenu or touch the screen to select the item 3 Press the 4 Way Direction button to select 1 sec 3 sec or 5 sec Press the SET Menu button to confirm or touch the screen to select the item ...

Страница 85: ...o SET Mode 2 Press the 4 Way Direction button to highlight the Volume item Press the SET Menu button to display the submenu or touch the screen to select the item 3 Press the 4 Way Direction button to select High Medium or Low Press the SET Menu button to confirm or touch the screen to select the item ...

Страница 86: ... 1 Turn on the camera and switch to Setup Menu 2 Press the 4 Way Direction button to highlight the Start up Logo item Press the SET Menu button or touch the icon on the screen to display the submenu 3 Press the 4 Way Direction button to select Default or User Setting Press the SET Menu button or touch the screen to select the item ...

Страница 87: ... the USB cable provided to connect the Digital Video Camera to a PC for file transfer or use the Digital Video Camera as a webcam for conferencing purposes 7 2 Connecting to a Standard TV As shown in the illustration use the video cable to connect the Digital Video Camera to a standard TV ...

Страница 88: ...88 7 3 Connecting to an HD TV As shown in the illustration use the HDMI cable provided to connect the Digital Video Camera to an HD TV for high resolution picture display ...

Страница 89: ...CD player 2 If the CD does not execute automatically please use Windows File Manager to execute the Install_CD exe file on the CD The following screen will be displayed 3 Tap the desired menu item to start the installation process and follow the on screen instructions ...

Страница 90: ...re projects featuring your photo video and music files Edit enhance and add creative effects to your photos You can Create your own movies or photo slide shows complete with soundtrack Upload your files easily to YouTube Share them through simple email attachments or popular photo printing Go to http www arcsoft com for more information ...

Страница 91: ...uto Color effect Normal BW Sepia Lens 5x zoom lens Focus range Normal 80cm Macro 10 80cm Still image Format JPEG DPOF EXIF Resolution 3MP 5MP 8MP 12MP Firmware interpolation Scene Mode Auto Movie Clip Format H 264 MOV Resolution FHD 1920 x 1080 30fps HD 1280 x 720 30 fps WVGA 848 x 480 60 fps WEB 320 x 240 30 fps Digital zoom Still Image Mode 4X 720P Play Mode 8X depends on image size Audio Audio ...

Страница 92: ...0 EV 2 0 EV Self Timer Off 2 seconds 10 seconds Interface Digital output connector USB 2 0 high speed 480Mbps Max MIC Input Speaker HDMI USB DC IN TV output NTSC PAL Shutter Electronic shutter 2 1 4000 second Auto Power Off Off 3 minutes 5 minutes Power Source CNP 40 Lithium battery Dimensions 121 L x 64 H x 54 W mm Weight Approx 300g without battery ...

Страница 93: ...battery correctly 2 Replace battery Camera shuts down suddenly 1 Power Saving Mode is activated 2 Battery exhausted 1 Power on again 2 Replace battery Pictures are not stored in the memory Powers off before storing the images Replace battery when the battery indicator turns red Camera shuts down when using Self timer Camera battery is exhausted Replace battery ...

Страница 94: ...d 1 Memory card is protected 2 Memory card contains non DCF images taken by other cameras 1 Unlock the memory card 2 Reformat the memory card Make sure you backup the files before reformatting the memory card Buttons do not work or camera hangs A short circuit has occurred when connecting the camera to another device Remove battery from the camera and reinsert again ...

Страница 95: ...nufactured by plawa feinwerktechnik GmbH Co KG Bleichereistraße 18 73066 Uhingen Germany Allmonde Group Limited 218 Fairbourne Drive Atterbury Milton Keynes MK10 9RG United Kingdom AgfaPhoto is used under license of Agfa Gevaert NV Co KG or Agfa Gevaert NV Neither Agfa Gevaert NV Co KG nor Agfa Gevaert NV manufacture this product or provide any product warranty or support For service support and w...

Страница 96: ...rt and warranty information contact the distributor or manufacturer For service support and warranty information contact the distributor or manufacturer All other brands and product names are registered trademarks of their respective owners Product design and technical features can be changed without notice AgfaPhoto Holding GmbH www agfaphoto com Manufactured by plawa feinwerktechnik GmbH Co KG w...

Отзывы: