background image


- 13 - 

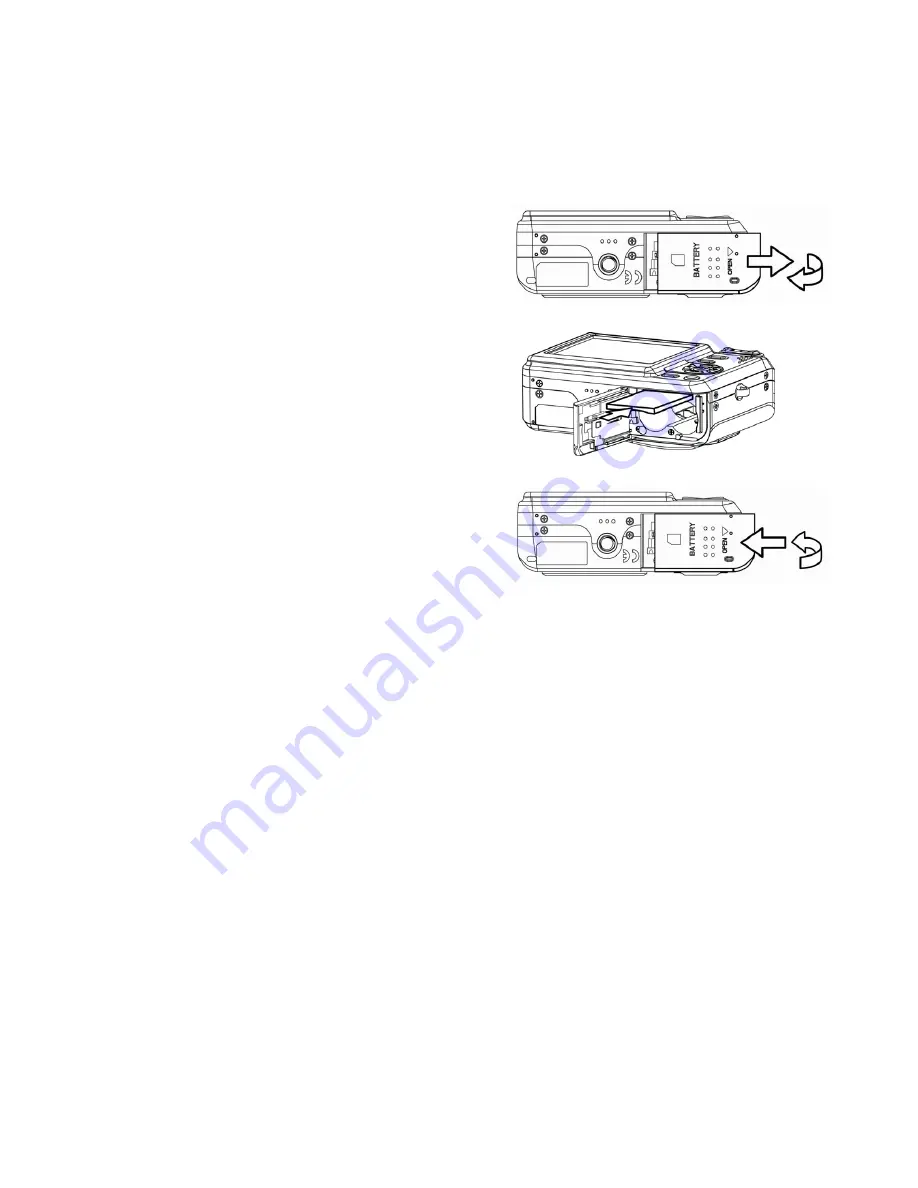
Inserting a Memory Card 

You can use SD Card or MMC Card with this digital camera. The memory card slot is located 

beneath the battery cover, adjacent to the battery compartment. 


1.  Be sure that the camera is turned off. 

2.  Slide the battery cover and open it. 

3.  Insert the card with the label facing up and 

the arrow pointing in. 

4.  Close the battery cover. 

To remove the memory card, gently press on the 

edge of the card and release it.    Pull the card 

out and close the battery cover. 


About Camera Memory 

The digital camera is equipped with internal memory. If the memory card is not inserted in 

the camera, all images and movie clips recorded by the camera will be stored in the internal 

memory. If the memory card is inserted, images and movie clips are stored on the memory 

card.


DCF Protocol 

The DCF protocol defines the format for image file data as well as the directory structure for 

the memory card. Images that are taken by a DCF camera can be viewed on DCF-compatible 

cameras from other manufacturers. 


Содержание DC-630

Страница 1: ...DC 630 User manual ...

Страница 2: ... will invalidate all guarantee claims Using Your Batteries For best performance and prolonged battery life we recommend the use of AA lithium or rechargeable Ni MH batteries Extending battery life The following functions use up a great deal of battery power and should therefore only be used occasionally Excessive use of flash Editing images on the camera display Using the camera display as a view ...

Страница 3: ... for recycling please contact your local city office your household waste disposal service or the shop where you purchased the product Declaration of Conformity We herewith confirm the following designated product DC 630 has been tested and found to comply with the requirements set up in the council directive on the approximation of the low of members states relating to the EMC Directive 89 336 EE...

Страница 4: ...erence will not occur in a particular installation If this equipment does cause harmful interference to radio or television reception which can be determined by turning the equipment off and on the user is encouraged to try to correct the interference by one or more of the following measures Reorient or relocate the receiving antenna Increase the separation between the equipment and receiver Conne...

Страница 5: ...ung children Eye damage may result In particular remain at least one meter away from infants when using flash Keep the camera away from water and other liquids Do not use the camera with wet hands Never use the camera in the rain or snow Moisture creates the danger of fire and electric shock Keep the camera and its accessories out of the reach of children and animals to prevent accidents or damage...

Страница 6: ...OPERATIONS 15 TURNING THE POWER ON AND OFF 15 Power Saving Function 15 SWITCHING BETWEEN RECORD AND PLAYBACK 16 In Record mode 16 In Playback mode 16 USING THE MENUS 17 Recording Menu Playback Menu 17 ADJ Menu 17 Setup Menu 17 USING THE LCD MONITOR 18 LCD Screen Indicator 18 Switching the Screen Display 19 RECORDING 20 RECORDING STILL IMAGES 20 Using the Zoom Function 21 Using the Flash 22 Using t...

Страница 7: ...e Clips 32 PLAYING BACK SOUNDS 33 Recording a Voice Memo 33 Playing Back a Voice Memo 33 DELETING FILES 34 Deleting a Single File 34 Deleting All Files 34 Protecting Files 35 EDITING IMAGES 36 Rotating Still Images 36 Changing the Image Size 36 PLAYING A SLIDE SHOW 38 COPYING THE FILES 38 SETUP SETTINGS 39 ADJUSTING SOUNDS 39 SETTING AUTO REVIEW 39 SETTING THE POWER SAVE 39 SETTING THE LANGUAGE 40...

Страница 8: ...C 44 Using the Card Reader 44 Connecting the Camera to a Computer with a USB Cable 44 SOFTWARE INSTALLATION 45 SYSTEM REQUIREMENTS 45 INSTALLING THE SOFTWARE 46 INSTALLING THE SOFTWARE DRIVER 47 INSTALLING ULEAD PHOTO EXPLORER 8 SE BASIC 47 INSTALLING VIDEOSTUDIO 7 SE VCD 47 USING THE SOFTWARE 48 APPENDIX 49 TROUBLESHOOTING 49 SPECIFICATIONS 50 ...

Страница 9: ... 8 Getting Started Standard Accessories Camera USB cable Video out cable Soft case Strap 2 x AA batteries Software Installation CD ROM User s manual ...

Страница 10: ...e Wrist Strap Attach the wrist strap to your camera as shown Using the Soft Case When not using the digital camera keep it in the soft case for protection NOTE Do not swing the camera when carrying by the wrist strap ...

Страница 11: ... 10 Names of Parts Top Front Bottom ...

Страница 12: ... 11 Back Side 5 function button ...

Страница 13: ... LCD screen when the batteries are nearly exhausted Batteries should be replaced promptly when the low batteries indicator appears CAUTION Risk of explosion if battery is replaced by an incorrect type dispose of used batteries according to the instructions NOTE Do not use manganese batteries Manganese batteries cannot supply sufficient power to support camera operation Replace all batteries at the...

Страница 14: ... edge of the card and release it Pull the card out and close the battery cover About Camera Memory The digital camera is equipped with internal memory If the memory card is not inserted in the camera all images and movie clips recorded by the camera will be stored in the internal memory If the memory card is inserted images and movie clips are stored on the memory card DCF Protocol The DCF protoco...

Страница 15: ... TIME then press or the SET button to launch the Date Time screen 3 Press or to change the value of the highlighted field Press or to highlight another field 4 After adjusting the settings press the SET or the MENU button to apply the setting NOTE If you hold down or you can change the value quickly For printing images with Date Time If the batteries are removed for about two days the Date Time se...

Страница 16: ...wer Saving Function If the camera is turned off by Power Save feature press the POWER or the button to turn it on again The Power Save feature does not work in the following situation Connecting the camera to a computer or printer with the USB cable Connecting the camera with the AC adapter sold separate Hint You can turn on the camera without the start up and operating sound by pressing and holdi...

Страница 17: ...rd mode Press the MODE button to cycle through the still image shooting voice recording and movie recording Press the button to switch to the Playback mode In Playback mode Press the MODE or the button switch to the previous used Record mode NOTE If you switch to Playback mode the lens will retract after approximately 10 seconds ...

Страница 18: ... Menu You can quickly adjust the White Balance ISO Exposure in Record mode 1 Press the SET button to display the menu When movie recording only White Balance can be adjusted 2 Press or to select a menu item 3 Press or to select an option 4 Press the SET button to confirm the settings and close the menu Setup Menu You can change the basic settings of the camera in Record mode and Playback mode 1 Pr...

Страница 19: ...replay images LCD Screen Indicator In Recording 1 Mode icon 11 Shutter speed 2 Flash 12 Aperture value 3 Macro 13 Metering 4 Self timer Burst 14 Exposure 5 Zoom indicator 15 ISO 6 Battery 16 White balance 7 Storage media 17 Sharpness 8 Focus area 18 Quality 9 Shake warning 19 Resolution 10 Shots remaining ...

Страница 20: ...ress the DISP button changes the next display mode of the LCD monitor as shown below In Record mode In Playback mode 1 OSD on 2 Guide line 3 OSD off 4 OSD on 5 OSD off NOTE When the LCD display is not in OSD on press Macro Self timer Flash will change the display mode to OSD on automatically Hint Use the Guide line mode to compose images easily before shooting images ...

Страница 21: ...in focus If the shutter speed is slow or the possibility that image may be blurred the shake warning icon may appear on the LCD monitor To avoid it use a tripod to stabilize the camera when recording images 4 Fully press the shutter release button to take an image NOTE Make sure that your fingers or the wrist strap does not block the lens When the shutter release button is pressed halfway down che...

Страница 22: ...m lever is pressed the zoom bar ap pears on the LCD monitor Press W to zoom out for a wide angle shot Press T to zoom in for a telephoto shot When the optical zoom factor is at maximum zooming stops temporarily Press the T again the camera switches to the digital zoom automatically and zooming continues Digital zoom works by enlarging the center portion of an image through a software interpolation...

Страница 23: ...to flash Flash fires automatically when shooting conditions require extra lighting Red eye reduction Flash strobes to let the subject s eyes adjust to the flash then fires again to take the actual image The digital camera will detect the subject brightness and use the flash only when required Always on Flash fires every time you take a photo regardless of lighting conditions Slow sync Flash fires ...

Страница 24: ...le shot Record a single image 2 SEC The shutter release will be delay for 2 seconds 10 SEC The shutter release will be delay for 10 seconds Double Record two images in a shot after pressing the shutter release button 10 and 12 seconds Burst For capturing 4 images in succession 3 Shoot the image Each option automatically switches to single shot in the following situation After each shot When the mo...

Страница 25: ...oomed out setting and 25 cm in the maximum telephoto zoomed in setting 1 Set the camera to the Record mode You can use the macro mode in still image shooting or movie recording 2 Press the button to enter the macro mode The macro mode icon appears on the LCD monitor 3 To leave the macro mode press the button again NOTE Distances referred to measure the distance between the camera lens surface and ...

Страница 26: ...Set the camera to the Record mode The LCD monitor displays the available recording time 2 Press the shutter to start recording 3 Press the shutter again to end recording The camera will stop recording automatically when the memory capacity has been reached NOTE The voices are recorded from the microphone of the camera Be careful to avoid touching the microphone while recording NOTE The voices of t...

Страница 27: ...ngs can be changed in this mode Portrait Blurring the background to focus on the subject Landscape Used for the wide scenic views Night Scene Shooting the subject while keeping the background night scenery Kids Take a still image to capture moving kids Beach Snow Used for the beach or snow scenes Backlight Shooting the image of backlight object by changing metering Sunset Enhance the red hue for r...

Страница 28: ...56 Printing in 3 2 ratio 2304x1728 Suitable for printing on A4 paper 1600x1200 Suitable for printing on A5 paper 640x480 Suitable for attaching to e mails or using in websites Quality Option Description Stores the image with an extremely low compression Stores the image with a low compression Stores the image with normal compression Setting the Movie Size Movie clips can be shot with different siz...

Страница 29: ...djusts for fluorescent lighting Corrects the green hue of fluorescent lighting Ideal for indoor photos under fluorescent lighting without a flash For more accurate adjustment or when the light source cannot be specified Setting the ISO With the initial settings the ISO sensitivity is automatically set according to the brightness of the subject Option Description Auto Sets the ISO sensitivity autom...

Страница 30: ...e based on readings from multiple points in the subject area Selects an exposure based on a single reading taken from the center of your picture Setting the Sharpness You can select whether you want the image to have sharp or soft outlines Option Description The edges of the image are emphasized The edges will become sharp but noise may occur in the recording image The edges of the image are sharp...

Страница 31: ...pia tone Neg Art Opposite what they were in the original image Mosaic Add mosaic tiles to the images Setting Date Stamp The Date Stamp function can be used to add a date to your pictures as you take them Option Description Off Do not add the recorded date time to printed images Date Only add the recorded date to printed images Date Time Add the recorded date time to printed images NOTE The mosaic ...

Страница 32: ... image in full screen Magnifying Still Images 1 Set the camera to the Playback mode see page 14 2 Press or to select the image that you want to magnify or trimming 3 Press T to magnify the image and the central portion of the image is displayed You can use the arrow button to view different parts of the magnified image Press the MENU button to return to the normal size 4 Press the SET button to se...

Страница 33: ...t the movie The movie clip will play on the LCD monitor 4 Press the MENU button to stop the movie or press the SET button to pause the movie When movie clip paused press the SET button again to resume Hint During movie playing back press to fast forward or press to rewind it Press the shutter to capture the still image from the movie clip while it had paused ...

Страница 34: ...ton using or to select VOICE MEMO and press the SET button If the image already has the voice memo recorded the appears on the LCD monitor The new recording will replace the previous one 4 Press the SET button to start recording for 30 seconds or press the MENU button to cancel it 5 Press the SET button again to end recording Playing Back a Voice Memo 1 Set the camera to the Playback mode 2 Press ...

Страница 35: ...Press the SET button to delete the image or press the MENU button to cancel 5 Repeat step 4 5 to delete images Deleting All Files You can use the Playback Menu to delete multiple files 1 Set the camera to the playback mode 2 Press the MENU button then press or to select DELETE 3 Press or to select ALL and then press the SET button 4 Press the SET button to delete all images or press the MENU butto...

Страница 36: ...he file or press the MENU button to cancel When the file is locked the displays on the LCD monitor 5 Repeat step 4 5 to protect images Hint To unlock the file press the SET button again in step 5 The will disappear and the file is unlocked To lock unlock all files at a time 1 Set the camera to the Playback mode 2 Press the MENU button then press or to select PROTECT 3 Press or to select LOCK ALL o...

Страница 37: ...o confirm the change or press the MENU button to cancel The rotated image will be saved as a new file name Changing the Image Size The resolution of still images that had already been recorded can be changed 1 Set the camera to the Playback mode 2 Press or to select the image you want to resize 3 Press the MENU button then press or to select RESIZE 4 Press or to select an option and then press the...

Страница 38: ...on 4 Press or to select the image you want to print out and the SET button 5 Press or to specify the number of copies The number of copies can be set from 0 to 30 To cancel this image DPOF setting set the number of copies to 0 6 Press and then press or to set or cancel the date stamp of current image 7 Press the SET button to apply the setting or press the MENU button to cancel 8 Repeat step 4 7 t...

Страница 39: ... the Files You may want to copy the data from the camera s internal memory to the memory card for convenience 1 Be sure you had inserted a memory card to your digital camera 2 Set the camera to the Playback mode 3 Press the MENU button using or to select COPY TO CARD and press the SET button 4 Press or to select SINGLE then press the SET button 5 Press or to select the image you want to copy to a ...

Страница 40: ...eview When Auto Review is enabled you can view an image for a few seconds after you have taken it Option Description Off The captured image will not automatically display after shooing 3 sec The captured image will display for 3 seconds after shooting 5 sec The captured image will display for 5 seconds after shooting Setting the Power Save For power consumption you can set your camera to turn off ...

Страница 41: ...all files Resetting the file number is useful for avoiding the file name duplication when images are downloaded to a computer Option Description Series Store the latest used file number no matter deleting files or inserting a new memory card Reset Reset file numbering each time the memory card is changed About the Folder File Name The digital camera automatically creates a directory of folders in ...

Страница 42: ...lized and renumbered from 100 and 0001 respectively Setting the TV Out Your camera can be connected to a TV allowing you to preview images and movie clips on the television screen TV Out should be set to either NTSC or PAL depending on your region Option Description NTSC America Japan Taiwan Korea PAL All of Europe Setting USB Port You can set USB mode to connect the camera with a printer or compu...

Страница 43: ...e the menu Formatting the Memory To erase all data stored in the memory card if you are using a card or all data stored in the internal memory if there is no card inserted 1 Set the camera to the Setup Menu 2 Press or to select FORMAT then press or the SET button 3 Press the SET button to start format or press the MENU button to cancel it A BUSY PLEASE WAIT message displays and the memory card is ...

Страница 44: ...a s monitor screen can also be displayed on a television 1 Use the included audio video cable to connect the camera to the TV set 2 Set the TV input signal to Video In Refer to the documentation included with your TV for more information 3 Everything that would normally appear on the camera s LCD screen such as photo and video clip playback slide shows and image or video capture appears on the TV ...

Страница 45: ...our choice on the computer s hard disk Connecting the Camera to a Computer with a USB Cable 1 Install the USB software driver included with the bundled CD ROM 2 Connect the supplied USB cable to the computer s USB port 3 Turn on the camera 4 The LCD screen turns off when the connection to the computer has been successfully completed 5 Open My Computer or Windows Explorer A Removable Disk appears i...

Страница 46: ...ixels 16 bit color display compatible monitor Specifications are subject to change without prior notice NOTE You don t have to turn off the computer or camera when making this connection Refer to your computer s manual for information regarding the USB port location The camera will turn off automatically if the USB cable is disconnected Windows 98 98SE If this is the first time the camera has been...

Страница 47: ...dia and installs the Adobe Acrobat Reader which enables you to read documents in PDF format User Manual Opens this user manual Drivers Installs camera drivers for Windows 98 98SE ME 2000 XP Browse CD Opens Windows Explorer and enables you to view the contents of the driver and software CD Click the items in the autorun menu to install the software NOTE If the autorun menu does not appear automatic...

Страница 48: ...er 1 Install the included software installation CD Rom in you computer s CD ROM drive The autorun menu appears 2 Click Installing Ulead Photo Explorer 8 SE Basic 3 Select a language and follow the on screen instructions to install the drivers Installing VideoStudio 7 SE VCD VideoStudio 7 SE VCD is a video editing application hat is included on the software installation CD ROM This software require...

Страница 49: ...media through e mail print photos create slideshow presentations burn your images onto CD or DVD To start the program click Start Programs Ulead Photo Explorer 8 0 SE Basic Ulead Photo Explorer 8 0 SE Basic VideoStudio 7 SE VCD Ulead VideoStudio enables you to quickly and easily produce home videos complete with attractive titles video filters transitions and sound Ulead VideoStudio features an in...

Страница 50: ...the flash to any mode except off The camera was moving when the image was captured Hold the camera steady when shooting picture Image is blurry or out of focus The subject was beyond the range within which the camera can focus Turn the Macro mode on it the subject is within 5 cm zoom out or 25 cm zoom in Do not use Macro mode when shooting distant subjects Image is not displayed on the LCD monitor...

Страница 51: ...ensitivity Auto ISO 50 ISO 100 ISO 200 White Balance Auto Daylight Cloudy Tungsten Fluorescent H Fluorescent L Custom Exposure Control 2EV to 2EV in 1 3 step Metering Center weighted Multi Spot Burst 4 images at one shot 6M 3 2 4M 2M VGA Self timer 2 sec 10 sec Double Flash Auto Red eye reduction Always on Slow sync Always off Photo Effect Black White Sepia Negative Art Mosaic Storage 16 MB intern...

Страница 52: ...plawa com Service Repair Hotline Europe 00800 75292100 Service Support Hotline Germany 0900 1000 042 1 49 Euro min Deutsche Telekom Online Service support apdc plawa com Manufactured by plawa feinwerktechnik GmbH Co KG plawa feinwerktechnik GmbH Co KG Bleichereistr 18 73066 Uhingen Germany ...

Отзывы: