background image

AgfaPhoto Compact 104 


45 


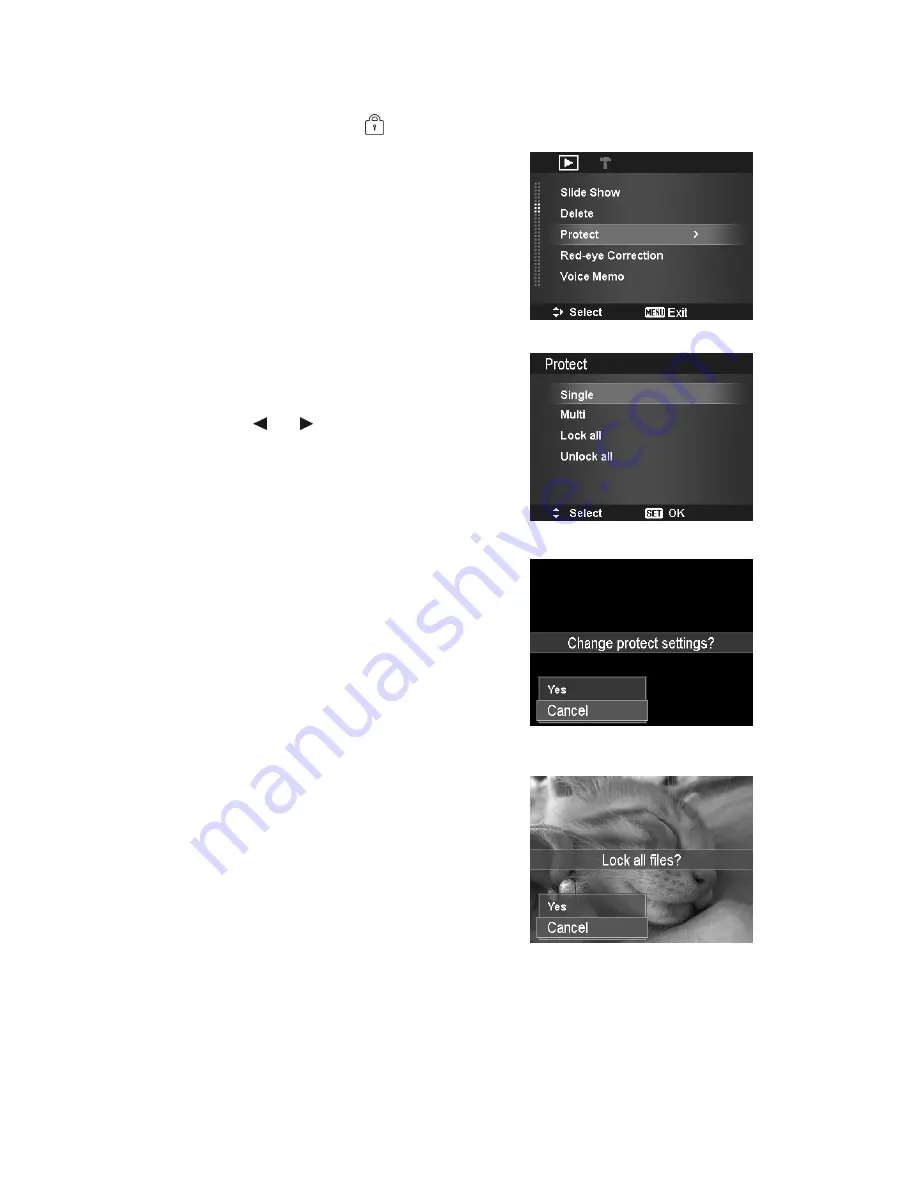
Protect 

Set the data to read-only to prevent images from being erased by mistake.   

A protected file has a lock icon 

  when viewed on Playback mode. 


To protect files: 

1.


From the Playback Menu, select 

Protect

.


2.


The Protect submenu is displayed on the LCD 
monitor.


Available select settings: 

• 

Single.

 Select one file to lock/unlock. 

• 

Multi.

 Select multiple files from the thumbnail 

view to lock/unlock. 

• 

Lock All. 

Lock all files 

• 

Unlock All. 

Unlock all files. 


To protect/unprotect a single file: 

1.


Select 

Single 

in the Protect submenu, the images are 

displayed on the LCD monitor in single navigation 
mode. 

2.


Use   

  or 


keys to scroll the display. 

3.


When the desired file is displayed on the LCD 
monitor, Press the 

SET

 button to select 

Lock/Unlock

4.


To close the protect/unprotect function and go back 
Playback Menu , select 

Exit


To protect/unprotect multiple files: 

1.


Select Multi in the Protect submenu, the images are 
displayed in thumbnail view on the LCD monitor.   

2.


Use the navigation control to move through the files.   

3.


When the desired file is highlighted, press the 

SET 

button to mark/unmark the file clip for protection. 

4.


Repeat step 3 until all desired files to protect are 
marked.   

5.


Press the 

MENU 

button. A confirmation selection 

appears. 

6.


Select 

Yes

7.


Press the 

SET 

button to lock files and go back to 

Playback mode. 


To protect all files: 

1.


Select 

Lock all 

in the Protect submenu. A 

confirmation message appears. 
 

2.


Select 

Yes

.


3.


Press the 

SET 

button to lock all files.   


Содержание Compact 104

Страница 1: ...Compact 104 User manual ...

Страница 2: ... and Off 12 Initial Settings 12 Modes 12 Using the LCD monitor 13 LCD Monitor Layout 13 Changing the LCD Monitor Display 18 Recording Images Videos and Voices 18 Taking Images 18 Using the Stabilizer 19 Setting the Zoom Control 19 Using Flash 20 Setting the Focus Mode 20 Using the Function Menu 21 Using the Record Menu 25 Setting the Scene Mode 25 Using Voices Recording 33 Recording Videos 37 Play...

Страница 3: ...ng LCD Brightness 53 Setting Battery Type 53 Setting Memory Kit 53 Reset All 54 Making Connections 54 Connecting the Camera to a TV 54 Connecting the Camera to a PC 54 Setting the Print Mode Menu 56 Appendix 57 About Folder and File Names 57 Troubleshooting 57 Specifications 58 Customer care 59 ...

Страница 4: ...en the equipment and the receiver Connect the equipment to an outlet on a circuit different from that to which the receiver is connected Consult the dealer or an experienced radio TV technician for help Warning A shielded type power cord is required in order to meet FCC emission limits and to prevent interference to radio and television reception Use only shielded cable to connect I O devices to t...

Страница 5: ... Waste Equipment by Users in Private Households in the European Union This symbol on the product or on its packaging indicates that this product must not be disposed of with your other household waste Instead it is your responsibility to dispose of your waste equipment by handing it over to a designated collection point for the recycling of waste electrical and electronic equipment The separate co...

Страница 6: ...it color display monitor Microsoft DirectX 9 0C USB port and CD ROM drive For Macintosh Power Mac G3 or later Mac OS 10 3X 10 6 Mass storage Memory 512MB or above Q Time player ver 6 0 3 or above USB port and CD ROM drive Main Features 14 mega pixels resolution Up to 3x optical zoom and 5x digital zoom 2 7 inch color LCD monitor 64MB internal flash memory with optional external SD SDHC card Suppor...

Страница 7: ...mpact 104 6 Package Contents Please check the contents of your AgfaPhoto camera package It should contain AgfaPhoto Compact 104 AA battery x 2 pcs CD Rom Wrist strap USB cable Quick Start Guide User Manual optional ...

Страница 8: ...er LED AF Assist Lamp 3 Lens 4 Microphone Back View 5 LCD monitor 6 Zoom buttons 7 Playback button 8 LED indicator 9 SET button 4 way navigation control 10 Function Delete button 11 Menu button Top View 12 Power button 13 Speaker 14 Stabilizer button 15 Shutter button ...

Страница 9: ...cording to light levels to compensate for camera shake Press to set stabilizer on off Shutter Press to capture an image or start stop recording video or audio clip Zoom In Record mode press the W button to zoom out or T button to zoom in In Playback mode press to zoom in to magnify image or zoom out enter 9 image calendar thumbnails Menu Press to enter or exit menu submenu Function Delete In Recor...

Страница 10: ...Menu press to enter the submenu or to navigate through the menu selections Macro Left 1 In Photo Mode press to scroll through Macro options Macro Pan Focus Infinity and normal 2 In Playback mode press to view the previous image video or audio clip 3 In Playback movie mode press to Rewind video playback 4 In Menu press to exit a submenu or to navigate through the menu selections Up Face Tracking Ro...

Страница 11: ...io clips in the external storage card The icon indicates the camera is using SD card Not all cards may be compatible with your camera When purchasing a card please check the card s specifications and take the camera with you Getting Started Attach the Camera Strap Inserting the Battery Follow these instructions to insert the battery into the battery compartment Please read Battery Information on p...

Страница 12: ...s that came with the camera are not rechargeable Please replace new batteries when they are exhausted When charging the batteries do not use batteries of different capacities or brands Failure to do so may damage the batteries 1 Place the battery in the charger as shown 2 Plug it into a power outlet The light of the LED on the charger is orange when charging is started and lights green when chargi...

Страница 13: ... to be displayed on the LCD monitor Setting the Language 1 Press or to move through the selection 2 Select a language and then press SET to apply Setting the Date Time 1 Press or to move through the selection 2 Press or keys to change the value for the date and time 3 Press SET to apply 4 If necessary press to close the menu Now you are ready to start taking images and videos Holding down the or k...

Страница 14: ... stamp is enabled 9 AEB Indicates AEB function is enabled 10 Stabilizer Indicates stabilizer function is enabled 11 Saturation Displays saturation settings 12 Contrast Displays contrast settings 13 Histogram Graphic display of Brightness 14 ISO Displays ISO settings 15 Focus area Use to frame subject to capture 16 Shutter speed Displays shutter speed settings 17 Aperture value Displays aperture se...

Страница 15: ...dia in use 6 Focus area Use to frame subject to record 7 Macro Indicates macro is enabled 8 White balance Displays white balance settings 9 Metering Displays metering settings 10 Movie size Displays movie size settings 11 Key indicator Displays the commands on 4 way Navigation Control button 12 Recorded time Displays recorded time 13 Recording status Indicates recording status 14 Pre record Indica...

Страница 16: ...oice memo Indicates voice memo is attached 4 Button intro Indicates the button to press on the camera to play a video or audio file 5 File no Total no Indicates the file number over the total number of files in the storage card 6 Battery Indicates battery level 7 Storage media Indicates used storage memory 8 Recording information Displays recording information of the file 9 DPOF Indicates the file...

Страница 17: ...he file number over the total number of files in the storage card 6 Battery Indicates battery level 7 Storage media Indicates used storage memory 8 Recording date time Displays the date and time of the video clip 9 Video size Indicates the size of the video clip 10 Volume Indicates the volume while playing 11 Video length Display the total length of the video clip 12 Played time Indicates the play...

Страница 18: ...or audio file 4 File no Total no Indicates the file number over the total number of files in the storage card 5 Battery Indicates battery level 6 Storage media Indicates used storage memory 7 Recording information Displays recording information of the file 8 Volume Indicates volume settings 9 Audio length Display the total length of the audio clip 10 Played time Indicates played time 11 Playing st...

Страница 19: ...hanged into any of the following Basic Full None Help screen LCD display cannot be changed in the following situations Manual exposure mode Recording video or audio clips Playing video or audio clips Playing slideshow Recording Images Videos and Voices Taking Images Now that you are familiar with your camera you are now ready to take your images Taking images with your camera is very simple 1 Turn...

Страница 20: ...e details Setting the Zoom Control Using a combination of 3 times optical zoom and 5 times digital zoom permits zoom photography at up to 15 times magnification While the digital zoom can be a useful feature the more an image is enlarged zoomed the more pixelated grainier the image will appear Please refer to Setting the Digital Zoom on page 36 on how to setup digital zoom To adjusts the optical z...

Страница 21: ...vailable in shooting still images but not available in Burst and AEB modes Do not charge the flash while pressing the zoom button Charge the flash after releasing the zoom button if necessary Setting the Focus Mode This function allows users to define the type focus when recording a still image or a video clip To set the Focus mode Press the Macro Left button repeatedly until the desired focus mod...

Страница 22: ...en press the SET button to save and apply changes Menu bar My Mode The My Mode function displays the 5 most recent modes used in order When you move through the different modes in the menu options the items on the menu bar changes synchronously to the corresponding available settings Photo Size The Photo Size function is used to set the resolution before you capture the image Changing the Photo Si...

Страница 23: ...with the overall scene intentionally made brighter or darker These settings are used when a suitable brightness exposure cannot otherwise be obtained in circumstances where the difference in brightness between the subject and the background the contrast is large or when the subject that you wish to capture is very small within the scene Available for still images only To adjust EV settings press t...

Страница 24: ...eally used for indoor images with reddish fluorescent lighting conditions Fluorescent 2 Ideally used for indoor images with bluish fluorescent lighting conditions Custom Used when light source cannot be specified Press the Shutter button for the camera to automatically adjust the appropriate white balance setting according to the environment ISO This sets the sensitivity for capturing images When ...

Страница 25: ...ll images or videos As you move through the selection the preview on the LCD monitor changes synchronously Icon Item Description Normal The camera records normally Vivid The camera captures the image with more contrast and saturation emphasizing on the bold colors Sepia Images are captured in sepia tones B W Images are captured in black and white Vivid Red Captured image becomes reddish Ideally us...

Страница 26: ...r button 1 Press to launch the Record Menu 2 Use the or keys to move through the menu 3 To select an item press or SET button 4 Change the submenu settings using the 4 way navigation control 5 Press the SET button to save and apply settings Setting the Scene Mode By simply selecting one of the following 33 modes you can capture the image with the most appropriate settings 1 From the Record Menu pr...

Страница 27: ...e the image of a backlight object by changing the metering Kids This feature is used to capture still images of moving kids Night Scene This feature is used to capture images with night scenery background Fireworks This feature slows shutter speed to capture fireworks explosions Snow This feature is used for beach and snow scenes Sports This feature captures still images in high speed motions Part...

Страница 28: ...atically activated The camera starts count down and captures a picture in two seconds Self Portrait This feature set zoom to wide end When one face is detected AF automatically activated and plays the sound Bi for notice Then camera starts count down and captures a picture in two seconds HDR This feature applies digital processing only to the necessary portion s of the image and preserves details ...

Страница 29: ...ke the shot Using Kids Mode Tactically kids are the most difficult to photograph They tend to be highly animated and can be a real challenge to make them pay attention for more than just a second or two To capture a great moment for your kids just keep the camera in kid mode The mode provides higher shutter speed and always focuses on moving subject Using Sports Mode When you need a series of spor...

Страница 30: ...h are enabled by using Food mode Using Foliage Mode A scenic image such as a garden or forest scene that full of doll green colors is boring In foliage mode the greens blues are brilliantly enhanced making scenic pictures pop out with bright color Using Auction Mode It s hard and wastes a lot of time to combine several images by software Select Auction mode and choose a pattern then take a few sho...

Страница 31: ...tern as follow The image is set to low quality and VGA 640x480 size only Using Smile Capture Mode When facing camera especially kids smiles are always short and hard to seize by manual shutter Smile capture mode detects every smile all the time and performs Automatic Focus AF to capture an image without pressing Shutter button Follow the instructions to get a Happy image by Smile Capture Mode 1 Se...

Страница 32: ... even if you need to ask someone else to record the image for you Basically Pre composition is a two step process 1 Compose the background you want and press the Shutter button full press which causes a semi transparent image of the background to remain on the LCD monitor Press Menu button to cancel the semi transparent temporarily image 2 Ask someone else to record a shot of you against your orig...

Страница 33: ...value by user and let camera decide the shatter speed The main impact that aperture had on images was with regards to Depth of Field DOF Choose lager aperture only one subject in focus but the background nice and blurred Shallow DOF Choose smaller aperture an image with everything in focus Great DOF To set Aperture values 1 Select Aperture Priority Mode from the Scene Mode submenu 2 Press SET butt...

Страница 34: ...ces Recording 1 From the Scene menu select Voice REC The Voice Recording screen layout is displayed on the LCD monitor 2 Press the Shutter button to start recording 3 Press the Shutter button again to stop recording Setting the Drive Mode Your camera features a Self timer and Burst which can be set in the Drive mode function in the Record Menu The Self timer allows you to take images after a pre d...

Страница 35: ...Image size to VGA only Off Captures an image without time delay Setting the AEB AEB stands for Automatic Exposure Bracketing It permits 3 consecutive images in the order of standard exposure under exposure and overexposure compensation To set AEB 1 From the Record menu select AEB 2 Use the or keys to go through the selection 3 Press the SET button to save and apply changes Setting the AF Area AF s...

Страница 36: ... Record menu select Sharpness 2 Use the or keys to go through the selection 3 Press the SET button to save and apply changes The table below shows the available Sharpness settings Icon Item Description High Sharpens the image Normal Normal sharpness Low Softens the image Setting Saturation The Saturation function lets you adjust the color saturation in your images Use a higher saturation setting f...

Страница 37: ... scale exceeds 3x the camera uses digital zoom To set Digital Zoom 1 From the Record menu select Digital Zoom 2 Use the or keys to go through the selection 3 Press the SET button to save and apply changes The table below shows the available Digital Zoom settings Icon Item Description Intelligent Zoom Enlarges the image digitally with almost no distortion This feature is available for still images ...

Страница 38: ...e selection 3 Press the SET button to save and apply changes Recording Videos You can record videos with the camera the available recording time depends on the capacity of the memory card Videos can be recorded until the maximum memory capacity has been reached However the length of a single video may be limited the limitation depends on the camera model 1 Turn on the camera and press Menu button ...

Страница 39: ...elow Internet Mode The Internet Mode allows you to record videos with predefined video settings for easy upload to the Internet website The Internet supports two file upload standards Single File Uploader The maximum video file size is up to 100 MB Internet Uploader The maximum video file size is up to 1 GB Most uploaded video length ranges within 5 minutes Therefore when you record using the YouT...

Страница 40: ...age one by one on the LCD monitor To view images videos audio clips follow the steps below 1 Press the Playback button on the camera 2 The LCD monitor displays an image To understand the icons and other information on the screen please see Photo Mode Screen Layout on page 13 Still Image Video Audio Clip 3 Use the or keys to view next previous image video audio 4 To play a video or audio clip press...

Страница 41: ...s the T button would back to 9 images mode Thumbnail icons When you view the thumbnails some images may contain icons These icons indicate the type of file or recording Icon Type Description Voice Record Indicates a voice recording file File Error Indicates an error file Zooming images The zoom view function works with still images only In normal view press the T button repeatedly until the desire...

Страница 42: ...e cannot be adjusted when paused or during REW FF modes To capture screenshot image from a video clip 1 During playback of video press the key to pause playback on your desired video frame to capture 2 Press the Shutter button to capture a screenshot 3 The camera will automatically stop playback The LCD monitor displays the captured image in Single navigation mode This feature does not function wh...

Страница 43: ...be adjusted when you pause the voice memo Deleting an Image Video Audio There are two ways to delete an image video audio Using the Delete button or Using Playback Menu Delete settings See Delete on page 43 Using the Delete Button Use the Func Delete button on your camera to delete or mark an image video audio clip for deletion 1 Set the camera to Playback mode 2 View images videos audio clips in ...

Страница 44: ...ct whether to Continue or Exit the slideshow 6 Press the SET button to apply selected option To change slideshow settings 1 From the Slideshow menu use the or keys t to move through the selections 2 Select Interval setting Press the or keys to adjust Choose among the available interval settings 1 sec 3 sec 5 sec and 10 sec 3 Select Transition setting Press the or keys to adjust Choose among the av...

Страница 45: ...r keys to move through the Playback Menu selections then select Delete 6 From the Delete submenu select Voice only 7 A confirmation selection appears select Yes 8 Press the SET button to delete the attached voice memo and go back to Playback mode The Voice Only submenu is disabled if the current image displayed at the time you access the Delete menu does not have any attached voice memo To delete ...

Страница 46: ... the display 3 When the desired file is displayed on the LCD monitor Press the SET button to select Lock Unlock 4 To close the protect unprotect function and go back Playback Menu select Exit To protect unprotect multiple files 1 Select Multi in the Protect submenu the images are displayed in thumbnail view on the LCD monitor 2 Use the navigation control to move through the files 3 When the desire...

Страница 47: ...ss the SET button to start correction 7 After completing Red eye correction a menu selection appears Select whether to Overwrite Save and replace old file with a new one Save As Save the new file as a new one Cancel Cancel red eye correction 8 Press the SET button to save cancel changes Voice Memo A maximum of 30 seconds of audio can be recorded as a memo for captured still images To record voice ...

Страница 48: ...ode The Color Mode submenu appears 5 Press the or keys to scroll and select an option As you move through the selection the preview on the LCD monitor changes synchronously The succeeding table shows the available settings Icon Item Description Normal No effect is added to the image Sepia Image is saved with a sepia tone B W Image is saved in black and white Negative Image appears to be the opposi...

Страница 49: ...ons to change size as zoom in out No Description 1 Enlarged image 2 4 way indicator 3 Trimmed size 4 The approx location of the trimmed area 5 Image area 6 Use the navigation controls to move the image 7 Press the SET button to apply changes A menu selection appears 8 Select whether to Overwrite Save and replace the old file with the new one Save As Save the new file as a new one Cancel Cancel Tri...

Страница 50: ...ize a menu selection appears Select whether to Overwrite Save and replace old file with a new one Save As Save the new file as a new one Cancel Cancel resize 7 Press the SET button to save cancel changes Resize function is not available for images with image size set to VGA Startup Image You can specify the startup image from the captured images for camera 1 Press the MENU button to launch the Pla...

Страница 51: ...OF on a single image all images 1 Select Single or All on the DPOF submenu 2 For single image use the or keys to scroll and select an image to mark for printing 3 Specify the number of copies Use the or to increase decrease number 4 Press the FUNC button to toggle between turning on off the date stamp 5 Press the SET button to save DPOF settings To reset DPOF 1 Select Reset on the DPOF submenu A c...

Страница 52: ...oduced by the camera 1 From the Setup menu select Sounds 2 Adjusts sound settings 3 Press the SET button to apply changes Item Available Settings Description Startup Sound 1 Sound 2 Sound 3 Off Selects the startup sound when camera is turned on Shutter On Off Enables or disables shutter sound when Shutter button is pressed Shutter sound is not available when recording videos or voice clips Beep vo...

Страница 53: ...ion controls to adjust date and time value By holding down the or keys the numeric values changes continuously 2 Press the SET button to apply changes Setting Language Specify in which language menus and messages are to be displayed on the LCD monitor 1 Use the navigation control to scroll through the list and select the desired language 2 Press the SET button to confirm and apply settings Setting...

Страница 54: ...battery to ensure the camera shows the correct battery level on screen Available settings are Alkaline NiMH Lithium Setting Memory Kit This utility formats the internal memory or memory card and erases all stored images and data Available settings are Format Select to format currently used memory Copy to Card Select to copy all files stored in the internal memory to the memory card If the images w...

Страница 55: ...mera To connect your camera to a TV 1 Turn on the camera 2 Set the TV out to match the TV s video out format See Setting TV Out on page 53 3 Connect the USB AV 3 in 1 cable to the USB port on the bottom of your camera 4 Connect the other end of the cable to the TV s AV input port 5 The LCD monitor turns black and all images and video clips are displayed on the TV Connecting the Camera to a PC You ...

Страница 56: ...onitor appears Connecting 6 Connection established after PC MODE appeared on the LCD monitor 7 Access the files in the camera by your PC The camera s internal memory and memory card would display as removable drives in PC After the connection no image is displayed on the LCD monitor ...

Страница 57: ...umber of copies Use the or key to increase decrease number 3 Press the FUNC button to toggle between turning on off the date stamp 4 Press the SET button to enter printer settings To set Print All and Print Index Repeat the same steps 2 to 4 then enter printer settings To set Printer Settings 1 Use the or key to specify a print option 2 Modify paper size and quality by the or keys Available settin...

Страница 58: ...hen the camera turns off Batteries are exhausted please replace or recharge LCD monitor displays No image There is no image file in the memory card Image file format may not be supported LCD monitor displays Not available for this file Function is only available for specific file types File format is not supported LCD monitor displays Memory full Memory card is full Replace the memory card with a ...

Страница 59: ...t Landscape Sunset Backlight Kids Night Scene Fireworks Snow Sports Party Candlelight Night Portrait Soft Skin Flowing Water Food Building Text Foliage Auction Smile Capture Blink Detection Pre Composition Love Portrait Self Portrait HDR Aperture Priority Shutter Priority Manual Exposure Voice Recording ISO Equivalent Auto 100 200 400 800 1600 3200 3M 16 9 2M VGA 6400 3M 16 9 2M VGA White Balance ...

Страница 60: ... found at www agfaphoto com www plawa com Service Repair Hotline EU 00800 752 921 00 from a landline only Service Support Hotline Germany 0900 1000 042 1 49 euro min from a German landline only Online Service International contact support apdc plawa com Manufactured by plawa feinwerktechnik GmbH Co KG Bleichereistraße 18 73066 Uhingen Germany AgfaPhoto is used under license of Agfa Gevaert NV Co K...

Страница 61: ...rt and warranty information contact the distributor or manufacturer For service support and warranty information contact the distributor or manufacturer All other brands and product names are registered trademarks of their respective owners Product design and technical features can be changed without notice AgfaPhoto Holding GmbH www agfaphoto com Manufactured by plawa feinwerktechnik GmbH Co KG w...

Отзывы: