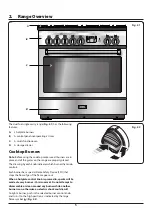
AGA Professional AMPRO36DF-SS Скачать руководство пользователя страница 5

3

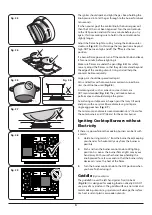
If the flame is distorted, check that the burner head is 

correctly placed over the burner.

MAKE SURE THE FLOW OF COMBUSTION AND 

VENTILATION AIR TO THE RANGE IS UNOBSTRUCTED.

Use the Right Size Pan

This appliance is equipped with burners of different sizes.  

Use utensils with flat bottoms. Do not use unstable pans and 

position the handles away from the edge of the cooktop. 

Make sure the flames are under the pans. It is not safe to let 

the flames burn up the sides of the pan; the handle may get 

too hot. 
Proper relationship of utensil to burner will also improve 

efficiency.

n

n

NEVER leave cooktop burners unattended at high 

settings. Pans boiling over can cause smoking and 

greasy spills may catch on fire.

n

n

Protective liners – DO NOT use aluminum foil to 

line cooktop bowls or oven bottoms. Foil liners 

may result in a risk of electric shock, or fire and will 

damage the enamel finish. Never allow aluminum 

foil to contact the heating elements.

n

n

DO NOT use hotplate protectors, foil or hotplate 

covers of any description. These may affect the safe 

use of your hotplate burners and are potentially 

hazardous to health.

n

n

Glazed cooking utensils – Only certain types of glass, 

glass/ceramic, ceramic, earthenware, or other glazed 

utensils are suitable for range-top use without 

breaking due to the sudden change in temperature.

n

n

Utensil handles should be turned inward and not 

over adjacent burners. If handles are left over 

adjacent burners they will get hot and may burn.

n

n

Use of aluminum pans may cause metallic marking 

of the grates. This does not affect the durability of 

the enamel and may be cleaned off with a metal 

polish.

Ovens

n

n

Take care when opening the door.

n

n

Let hot air and steam escape before removing or 

replacing food.

n

n

DO NOT drop or rest objects on the door glass. 

Although the glass is very strong, a sharp blow or a 

falling object might cause the glass surface to crack 

or break.

n

n

Never heat unopened food containers. Pressure 

build up may make container burst and cause injury. 

n

n

Keep oven vent ducts unobstructed.

n

n

DO NOT place aluminum foil on bottom of oven 

cavity. This will cause the oven bottom to overheat 

and void warranty.

n

n

DO NOT clean the door gasket: the door gasket is 

essential for a good seal. Care should be taken not to 

rub, damage or move the gasket.

n

n

DO NOT use oven cleaners: no commercial oven 

cleaner or oven liner protective coating of any kind 

should be used in or around any part of the oven.

n

n

Clean only parts listed in this User Guide.

n

n

Before self-cleaning the oven: remove the broiler 

pans, side racks, sliding rack, divider and all other 

utensils.

Placement of Oven Racks

n

n

Always place oven racks in desired location while 

oven is cool. If rack must be moved while oven is hot, 

do not let potholder contact hot heating element in 

oven.

n

n

CAUTION!  

DO NOT store items of interest to children in 

cabinets above a range or on the backguard of a 

range – children climbing on the range to reach 

items could be seriously injured.

n

n

WARNING!  

THIS APPLIANCE IS PROVIDED WITH ROLLERS TO 

FACILITATE MOVEMENT DURING INSTALLATION. 

THE RANGE SHOULD NOT BE MOVED AFTER 

INSTALLATION.

General Safety Instructions

This appliance must be installed by a competent person in 

accordance with the installation instructions. The installation 

must comply with the relevant regulations and also the local 

electricity supply company requirements.
This appliance is designed for domestic cooking only. Use for 

any other purpose could invalidate any warranty or liability 

claim.
The use of a gas cooking appliance results in the production 

of heat and moisture in the room in which it is installed. 

Ensure that the kitchen is well ventilated: keep natural 

ventilation holes open or install a mechanical ventilation 

device, (mechanical extractor hood). 
Prolonged intensive use of the appliance may call for 

additional ventilation, for example opening a window, or 

more effective ventilation, for example increasing the level of 

mechanical ventilation where present.

n

n

This appliance should not be installed with any 

ventilation system that blows air downward toward 

the gas cooking appliance. This type of ventilation 

system may cause ignition and combustion 

problems with the gas cooking appliance resulting 

in personal injury or unintended operation. 

Ventilating systems that direct the air upwards can 

be used.

The range should be serviced by a qualified service engineer 

and only approved parts used. Have the installer show you 

Содержание Professional AMPRO36DF-SS

Страница 1: ...90 Dual Fuel User Guide Installation Service Instructions U110246 05 Professional...

Страница 2: ...20 Griddle Optional Extra 21 Control Panel and Oven Doors 21 Self clean Oven 21 Cleaning Table Table 7 2 23 8 Installation 25 Regulations 25 Installation Safety Instructions 25 Converting to Propane G...

Страница 3: ...t Many plastics will burn and most are damaged by heat Keep plastic items away from parts of the range that may become warm or hot Do not leave plastic items on the cooktop as they may burn melt or so...

Страница 4: ...ls which can cause death or serious illness and which are known to the state of California to cause cancer birth defects or other reproductive harm Users of this appliance are hereby warned that the b...

Страница 5: ...tom to overheat and void warranty n n DO NOT clean the door gasket the door gasket is essential for a good seal Care should be taken not to rub damage or move the gasket n n DO NOT use oven cleaners n...

Страница 6: ...fry pan unattended Always heat fat slowly and watch as it heats Deep fry pans should be only a maximum of one third full of fat Filling the pan too full of fat can cause spill over when food is added...

Страница 7: ...urner has a special Flame Safety Device FSD that stops the flow of gas if the flame goes out When a hotplate control knob is pressed in sparks will be made at every burner this is normal Do not attemp...

Страница 8: ...burner performance and could damage the grates Avoid using unstable or misshapen pans that may tilt easily and pans with a very small base diameter e g milk pans single egg poachers Fig 2 7 The minimu...

Страница 9: ...fit the cradle check that it is supported properly on a pan support and that the wok is sitting level in the cradle Fig 2 11 n n The wok cradle will get very hot in use allow plenty of time for it to...

Страница 10: ...ng as the oven maintains the selected temperature Fig 2 15 Multi function Oven Modes Fig 2 16 Thaw and Serve This function operates the fan s to circulate cold air only Fig 2 17 Make sure the temperat...

Страница 11: ...closed while cooking is in progress so saving energy You will also find that the food needs to be watched and turned less than for normal broiling Rack levels 5 and 6 should be used depending on the s...

Страница 12: ...g of pasta dishes vegetables in sauce and lasagne the item to be browned being already hot before switching to the top element Warming This function uses the base element only Fig 2 23 It will crisp u...

Страница 13: ...he Telescopic Shelf Runners Slide the telescopic runners forward until they stop Holding the shelf above the runners tilt the front downward and locate into the front of the runners Lay the shelf flat...

Страница 14: ...ircuit breaker before you change the bulb See the Troubleshooting section for details on how to change an oven light bulb Storage The bottom drawer is for storing oven trays and other cooking utensils...

Страница 15: ...has elapsed 1 Turn the Timer A knob to the Minute Minder E setting it should click into position Fig 3 2 2 Turn the Adjusting B knob to set the amount of time required Minimum time 1 minute Fig 3 3 3...

Страница 16: ...rrent time plus the additional cooking time you have set Fig 3 6 3 Turn the Timer A knob to the Auto H setting The display will show the current time the cooking symbol and the word AUTO Fig 3 7 4 Onc...

Страница 17: ...ime has elapsed it will emit an alarm and the Multifunction Oven will stop working The Cooking symbol on the display will disappear and the word AUTO will flash Fig 3 13 7 Once the specified time has...

Страница 18: ...ultry must be thoroughly defrosted before being placed in the oven Check that meat and poultry are fully cooked before serving 4 Cooking Tips General Oven Tips The wire racks should always be pushed f...

Страница 19: ...the cooking time 50 60 minutes 25 30 minutes interchange after 15 minutes 25 30 minutes interchange after 15 minutes 10 15 minutes interchange after 15 minutes 40 60 minutes 20 30 minutes Temperature...

Страница 20: ...en and heating them up Do not leave the oven door open 6 Troubleshooting If there is an installation problem and I don t get my original installer to come back to fix it who pays You do Service organi...

Страница 21: ...a replacement bulb which is not covered under the warranty from a good electrical shop Ask for a 15W 125 130V lamp FOR OVENS Fig 6 1 Turn off the power at the circuit breaker Make sure the oven is co...

Страница 22: ...f the burner and allow it to cool Do not clean until the area is completely cooled down Wipe up spills as soon as possible Do not allow surplus water to seep into the range Cooktop Burners The burner...

Страница 23: ...rews 2 each side in the door Fig 7 4 Open the door slightly and using the handle carefully lift the door outer upwards Refit in reverse Self clean Oven n n WARNING Remove all cookware racks and the ra...

Страница 24: ...trol to self clean Fig 7 7 The timer display will now show a P Fig 7 8 The Timer knob and Adjusting knob are shown in Fig 7 9 Turn the Timer knob to the position Fig 7 10 to set the default cleaning t...

Страница 25: ...lly To Cancel the Automatic Self cleaning Cycle To return to manual operation the Cleaning period must be cancelled Turn the Timer knob to the E position and rotate the Adjustment knob counter clockwi...

Страница 26: ...om a neighbor s phone Follow the gas supplier s instructions If you cannot reach your gas supplier call the fire department Installation and service must be performed by a qualified installer service...

Страница 27: ...Remove all packing material and literature from oven before connecting gas and electrical supply to range Have your range installed by a qualified installer Your range must be electrically grounded i...

Страница 28: ...f valve Pipe joint sealant or UL approved pipe thread tape with Teflon that resists action of natural and LP gases Flexible metal appliance connector I D A 5 foot length is recommended for ease of ins...

Страница 29: ...e met for safe use of your range The location of the electrical outlet and pipe opening see Gas Pipe and Electric Outlet Locations may be adjusted to meet specific requirements A gap of at least 3 7 5...

Страница 30: ...he upper oven door and fix it in place by tightening the grub screws Fig 8 3 Moving the Range n n The range is very heavy Take great care We recommend two people maneuver the range Ensure that the flo...

Страница 31: ...lue Grille The flue grille is packed separately Locate the grille onto the flue and secure to the cooktop with the 5 screws supplied Fig 8 8 Leveling It is recommended that you use a spirit level on a...

Страница 32: ...Fig 8 10 Wall Fixing Where floor fixing is impractical and provided that the outer anti tip bracket can be attached to a solid wall the anti tip device may be attached to a wall Fig 8 11 Make sure to...

Страница 33: ...not accessible after range is in position flexible service conduit or cord must be used Provide Proper Electrical Supply This range must be supplied with 240 V 60 Hz and connected to an individual pr...

Страница 34: ...the ground post and terminal block Fig 8 19 Note Make sure the wires are completely inserted into the terminals and secure connections are made Secure the squeeze connector in place in the bracket by...

Страница 35: ...rough the reducer plates on the mounting bracket Allow enough slack to easily attach the wires to the terminal block Fig 8 23 Note Do not install the conduit without a squeeze connector Attach the gro...

Страница 36: ...ssure of 10 of water column 2 49 kPa is required n n Make sure you are supplying your range with the correct type of gas If the range is to be used on LP gas a qualified LP installer MUST convert it W...

Страница 37: ...ge from the front remove the 90 elbow for easier installation C Install a male or flare union adapter to the NPT internal thread of the manual shut off valve taking care to backup the shut off valve t...

Страница 38: ...If using a spirit level take two readings with the level placed diagonally first in one direction and then the other The front feet and rear rollers can be adjusted to level the range To adjust the h...

Страница 39: ...heck each burner in turn There is a flame safety device that stops the flow of gas to the burner if the flame goes out There is also a spark ignition system that works when the knob is pressed in For...

Страница 40: ...INSTALLATION Check the appliance is electrically safe and gas sound when you have finished 38 DO NOT use the levers to remove the drawer To remove the drawer To fit the drawer...

Страница 41: ...e appliance is to be converted this must be done before installation The conversion must be performed by a qualified LP gas installer After conversion the installation must comply with the relevant re...

Страница 42: ...for example rest it on the open oven door Turn the bypass screw on each control clockwise to the stop Fig 9 3 Connect the electrical connectors to the rear of the control panel and locate it over the...

Страница 43: ...an be measured at the pressure test point on the appliance side of the pressure regulator Fig 9 10 For proper operation the pressure of LP supplied to the regulator must be between 10 and 13 of water...

Страница 44: ...Oven front switch C1 Right hand oven base element C2 Right hand oven top outer element C3 Right hand oven top inner element C4 Right hand oven fan element C5 Right hand oven fan D Cooling fan 2 speed...

Страница 45: ...f the plastic clips Fig 11 1 and Fig 11 2 to release the catches holding the drawer to the side runners At the same time pull the drawer forward and away from the side runners Fitting the Drawer To fi...

Страница 46: ...each Gas Hob Bypass Screw Natural gas 4 WC Propane gas 10 WC Input Orifice Input Orifice Large burner 49 17 000btu hr 205 17 000btu hr 118 Medium burner 38 12 000btu hr 150 12 000btu hr 99 Small burn...

Страница 47: ...se and alteration or the removal or defacing of the serial plate cancels all obligations of this warranty Service during this warranty must be performed by a factory Authorized Service Person 2 Warran...

Страница 48: ...www aga ranges com AGA Marvel 1260 E VanDeinse St Greenville MI 48838 Business 616 754 5601 Fax 616 754 9690 Toll Free Telephone 800 223 3900...

Отзывы: