When servicing or replacing gas carrying components
disconnect from the gas supply before commencing
operation.
Check the appliance is gas sound after completion of
service. When checking for gas leaks do not use washing
up liquid - this can corrode. Use a product specifically
manufactured for leak detection.
CAUTION: DO NOT USE A FLAME TO CHECK FOR
GAS LEAKS.
Do not use re-conditioned or un-authorised gas controls.
Disconnect from the electricity supply before commencing
servicing, particularly before removing any of the
following:- control panel, side panels, hotplate tray or any
electrical components or covers.
Before electrical re-connection, check that the appliance
is electrically safe.
NOTE: References to LH and RH oven apply as viewed
from the front.
BEFORE SERVICING ANY
GAS CARRYING
COMPONENTS, TURN OFF THE GAS SUPPLY.
A. To Remove Hotplate
1. Isolate from electric supply.
2. Remove pan supports and burner caps.
3. Remove burner fixing screws (14) and hotplate fixing
screws (4).
4. Lift off hotplate taking care to lift clear of burner
electrodes.
5. Re-assemble in reverse order.
B. To Remove Side Panels
1. Isolate from electric supply.
2. Lower front mobility wheels see section ‘MOBILITY
WHEELS’ in the users instructions.
NOTE: It may be necessary to disconnect the flexible
gas connection to allow the cooker to be withdrawn
from between the kitchen units.
3. Remove fixing screws and lift off side panel.
4. Re-assemble in reverse order.
C. To Remove Facia Castings
1. Isolate from electric supply.
2. Proceed as ‘TO REMOVE HOTPLATE’.
3. Proceed as ‘TO REMOVE SIDE PANELS’.
4. Pull off control knobs.
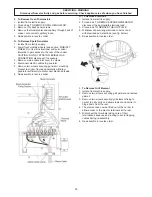
5. Remove control panel fixing screws (see fig. below).
Support facia when removing screws.
NOTE:
When removing facia, the oven indicator neons
and timer require disconnecting from the facia, hold the
cables at their entry into the neon twist and pull, this
will disengage the neon assembly.
D. To Remove Gas Taps/Ignition Switches
1. Isolate from electric supply.
2. Proceed as ‘TO REMOVE HOTPLATE’.
3. Proceed as ‘TO REMOVE SIDE PANEL’.
4. Undo burner gas pipe to tap (15mm nuts).
5. Remove two screws securing tap to gas rail.
6. Withdraw gas tap from gas rail taking care not to
strain ignition switch cables.
7. Disconnect ignition switch cables and slide off switch
activating collar from spindle of tap.
8. Re-assemble in reverse order.
NOTE: Always fit new ‘O’ ring seal and check for gas
soundness.
E. To Remove Grill Regulator/Light Switch
1. Isolate from electric supply.
2. Proceed as ‘TO REMOVE FACIA CASTINGS’.
3. Remove two screws securing control to control
mounting panel.
4. Withdraw control and cables taking care not to strain
the cables.
5. Disconnect cables from the control.
NOTE: Take care to identify terminations.
6. Re-assemble in reverse order.
35
SERVICING - WARNING
Disconnect from electricity and gas before servicing. Check appliance is safe when you have finished
Servicing
Содержание Masterchef II Deluxe
Страница 43: ...43...


