background image

If  you  are  not  familiar  with  how  a  helmet  should  fit  and  feel,  be  sure 
to ask for assistance from a more experienced rider, or the retail store 
where you purchased your helmet. As a rule, the helmet should not be 
able to move around on your head without pulling on your skin. A loose 
fitting  helmet  is  not  only  dangerous,  but  may  also  be  noisy  and  tiring 
to wear. Most people make the mistake of buying a helmet that’s too 
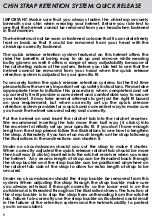
large.  IMPORTANT:  Make  sure  that  you  fasten  the  chinstrap  securely 
beneath your chin when trying-on a helmet and then test to see that 
the helmet cannot be removed from your head when fastened in that 
manner. The helmet must not be so loose that it can rotate freely front or 
back so that it could be removed with the chinstrap fastened

No helmet can protect the wearer against all possible or foreseeable 
impacts.  A  helmet  can  only  protect  the  portion  of  the  head  that  is 
covered by the helmet. For maximum protection, the helmet must be 
well fitted with the chinstrap securely fastened. Failure to follow these 
instructions, the instructions printed on the helmet, and those contained 
in  the  owner’s  manual  may  result  in  the  possibility  of  the  helmet 
coming off during an accident - possibly resulting in a severe head 
injury  or  even  death.  While  riding  motorcycles,  scooters,  ATVs  and 
snowmobiles  is  fun,  it  can  also  be  a  dangerous  pastime.  At  AFX,  we 
encourage you to enjoy riding responsibly, and to always ride within the 
limits of your abilities.

5

Содержание FX-120

Страница 1: ...nte che tu legga interamente ed attentamente questo manuale d uso ACHTUNG Im lnteresse lhrer eigenen Sicherheit empfehlen wir lhnen diese Benutzerhinweise und alle Sicherheitsetketten sorgfältig und vollständig zu lesen ATT ENTION Pour votre sécurité íl est important que vous lisiez intégralement le manuel du propriétaire ainsi que tous les points d avertissements AFX FX 120 INTERNATIONAL OWNER S ...

Страница 2: ...u get the maximum benefit and protection from your helmet 1 To protect you as it is designed to do your helmet must be the correct fitted size too big or too small may not be safe A properly fitted helmet with the chinstrap fastened securely will have a snug but comfortable fit You will feel an even pressure all over your head with no gaps The helmet must not be so loose that it can rotate freely ...

Страница 3: ...e your self with specific names and terms used on this helmet before attempting to request replacement parts or to replace owner serviceable parts on the helmet MAKE NO MODIFICATIONS TO THE HELMET To maintain the full effectiveness of this helmet there should be no alteration to any parts of the internal or external structure of this helmet or any it s associated component parts Many types of Pain...

Страница 4: ... must fit snugly but not painfully tight While holding the chinstraps outside of the helmet pull it down over your head taking care that the chinstraps do not go up inside the helmet A proper fitting helmet will feel snug with fairly even pressure around the sides and top of your head On most modern helmets the liner is designed to be a little extra snug at first but will break in after several ho...

Страница 5: ... helmet must not be so loose that it can rotate freely front or back so that it could be removed with the chinstrap fastened No helmet can protect the wearer against all possible or foreseeable impacts A helmet can only protect the portion of the head that is covered by the helmet For maximum protection the helmet must be well fitted with the chinstrap securely fastened Failure to follow these ins...

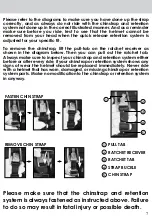
Страница 6: ...way to make sure you have the helmet secured safely and correctly Put the helmet on and insert the ratchet tab into the ratchet receiver We recommend inserting the tab more then half way 5 clicks into the receiver to initially set up your specific fit If you don t have enough length on the strap please follow the illustrations to see how to lengthen the strap Alternately if you have too much lengt...

Страница 7: ...your specific fit To remove the chinstrap lift the pull tab on the ratchet receiver as shown in the diagram below Then you can pull out the ratchet tab Always make sure to inspect your chinstrap and retention system either before or after every ride if your chinstrap or retention system shows any signs of wear the helmet should be replaced immediately Never ride with a helmet that has worn damaged...

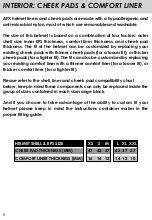
Страница 8: ...k pads for a tighter fit The fit can also be customized by replacing your existing comfort liner with a thinner comfort liner for a looser fit or thicker comfort liner for a tighter fit Please refer to the shell liner and cheek pad compatibility chart below keep in mind these components can only be replaced inside the group of sizes contained in each size range block And if you choose to take advanta...

Страница 9: ...CHEEK PAD 9 COMFORT LINER CHEEK PAD ...

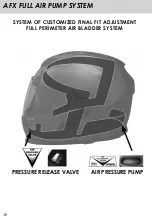
Страница 10: ...AFX FULL AIR PUMP SYSTEM 10 SYSTEM OF CUSTOMIZED FINAL FIT ADJUSTMENT FULL PERIMETER AIR BLADDER SYSTEM AIR PRESSURE PUMP PRESSURE RELEASE VALVE ...

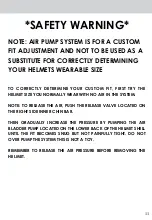
Страница 11: ... INCREASE THE PRESSURE BY PUMPING THE AIR BLADDER PUMP LOCATED ON THE LOWER BACK OF THE HELMET SHELL UNTIL THE FIT BECOMES SNUG BUT NOT PAINFULLY TIGHT DO NOT OVER PUMP THE SYSTEM THIS IS NOT A TOY REMEMBER TO RELEASE THE AIR PRESSURE BEFORE REMOVING THE HELMET SAFETY WARNING NOTE AIR PUMP SYSTEM IS FOR A CUSTOM FIT ADJUSTMENT AND NOT TO BE USED AS A SUBSTITUTE FOR CORRECTLY DETERMINING YOUR HELME...

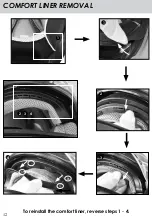
Страница 12: ...COMFORT LINER REMOVAL 12 1 2 3 4 1 2 3 To reinstall the comfort liner reverse steps 1 4 4 ...

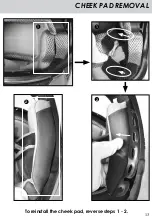
Страница 13: ...CHEEK PAD REMOVAL 13 1 2 1 2 To reinstall the cheek pad reverse steps 1 2 ...

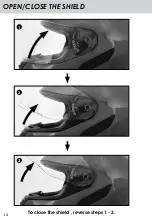
Страница 14: ...14 OPEN CLOSE THE SHIELD To close the shield reverse steps 1 3 2 3 1 ...

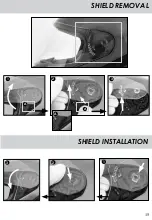
Страница 15: ...SHIELD REMOVAL 1 2 3 15 SHIELD INSTALLATION 1 2 3 A A A ...

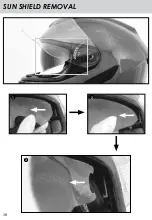
Страница 16: ...SUN SHIELD REMOVAL 1 2 3 16 ...

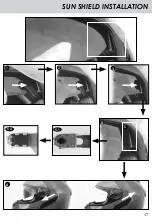
Страница 17: ...SUN SHIELD INSTALLATION 1 2 3 4 5 5 1 5 2 17 6 ...

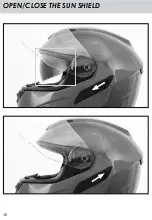
Страница 18: ...18 OPEN CLOSE THE SUN SHIELD ...

Страница 19: ...19 VENTILATION 2 3 1 2 3 1 ...

Страница 20: ...appen so feed your pet s food not helmets Clean your helmet liner only with mild soap and water We recommend a mild liquid soap solution with warm but not hot water After cleaning helmet interior rinse with cold water and allow it to air dry at room temperature High heat and strong cleaning solvents will damage the liner Your helmet can be damaged without the damage being visible by any of the fol...

Страница 21: ...ot make you indestructible so we encourage you to enjoy riding responsibly and to always ride within the limits of your abilities HELMET REPLACEMENT RECOMMENDATION The expected lifespan of an AFX helmet is 4 5 years of seasonal use and decreases accordingly as the frequency of use increases As you would expect helmets used for competition such as road racing and off road tend to have a much shorte...

Страница 22: ...irer le meilleur parti de votre casque pour bénéficier d une protection optimale 1 Afin d assurer la protection pour laquelle il est conçu le casque doit être à la bonne taille Pour être efficace il ne doit être ni trop grand ni trop petit Correctement ajusté avec la jugulaire bien serrée le casque sera à la fois sûr et confortable Vous devez ressentir une pression uniforme sur toute la tête sans ...

Страница 23: ...miliariser avec la terminologie utilisée sur ce casque avant de demander des pièces de rechange ou de remplacer des éléments du casque N EFFECTUEZ AUCUNE MODIFICATION SUR LE CASQUE Afin de garantir l efficacité optimale de ce casque ne modifiez aucun élément de sa structure interne ou externe ni aucun des composants associés De nom breux types de peintures et d adhésifs sont susceptibles d endomma...

Страница 24: ...er Les casques doivent s ajuster parfaitement mais sans faire mal Tout en maintenant les jugulaires à l extérieur du casque mettez le sur votre tête en faisant attention à ne pas coincer les jugulaires à l intérieur du casque Un casque bien ajusté procure une sensation de confort avec une pression relativement uniforme sur les côtés et le haut de la tête Sur la plupart des casques modernes la doub...

Страница 25: ...le casque soit lâche au point de pouvoir pivoter librement vers l avant ou vers l arrière et d être retiré avec la jugulaire attachée Aucun casque ne peut protéger complètement son utilisateur contre un éventuel impact Le casque ne peut protéger que la partie de la tête qu il recouvre Pour assurer une protection optimale le casque doit être parfaitement ajusté avec la jugulaire bien attachée Si vo...

Страница 26: ...ectement configuré le système de fixation à retrait rapide s avère très pratique pour être sûr que le casque est correctement attaché pour une sécurité optimale Mettez le casque sur la tête et insérez la languette du cliquet dans le récepteur à cliquet Nous vous conseillons d insérer la languette à plus de la moitié 5 clics dans son récepteur pour le réglage initial de votre ajustage spécifique Si...

Страница 27: ...ous Pour retirer la jugulaire soulevez la languette sur le récepteur à cliquet comme indiqué sur le schéma ci dessous Vous pouvez ensuite retirer la languette du cliquet N oubliez pas d inspecter systématiquement la jugulaire et le système de fixation avant ou après chaque utilisation Si l un ou l autre montre des signes d usure quelconques il convient de remplacer immédiatement le casque Ne roule...

Страница 28: ...s épaisses pour un ajustage plus serré Vous pouvez également remplacer la doublure de confort par une doublure plus mince pour un ajustage plus lâche ou plus épaisse pour un ajustage plus serré Veuillez vous reporter au tableau de compatibilité des coques doublures et mousses de joue ci dessous N oubliez pas que le remplacement de ces composants doit s effectuer exclusivement dans le groupe de tai...

Страница 29: ...29 MOUSSE DE JOUE MOUSSE DE JOUE DOUBLURE CONFORT ...

Страница 30: ...AFX FULL AIR PUMP SYSTEM 30 SYSTEME D AJUSTEMENT COMPLET D AIR ZONE INTEGRALE D AIR STRUCTURE POMPE À AIR VALVE D ÉCHAPPEMENT D AIR ...

Страница 31: ...AU DU MENTON THEN GRADUALLY INCREASE THE PRESSURE BY PUMPING THE AIR BLADDER PUMP LOCATED ON THE LOWER BACK OF THE HELMET SHELL UNTIL THE FIT BECOMES SNUG BUT NOT PAINFULLY TIGHT DO NOT OVER PUMP THE SYSTEM THIS IS NOT A TOY N OUBLIEZ PAS DE DEGONFLER AVANT D ENLEVER LE CASQUE AVERTISSEMENT DE SÉCURITE REMARQUE LE SYSTEME DE POMPE A AIR PERMET UN AJUSTEMENT ET NE DOIT PAS ETRE UTILISE COMME UN SUB...

Страница 32: ...RETRAIT DE LA DOUBLURE DE CONFORT Pour remettre la doublure de confort en place procédez en inversant les étapes 1 à 4 32 1 2 3 4 1 2 3 4 ...

Страница 33: ...RETRAIT DES MOUSSES DE JOUE Pour remettre les mousses de joue en place procédez en inversant les étapes 1 à 2 33 1 2 1 2 ...

Страница 34: ...OUVERTURE FERMETURE DE L ECRAN 34 2 3 1 Pour fermer l écran voir point 1 3 ...

Страница 35: ...INSTALLATION DU VISIÈRE RETRAIT DE L ECRAN 35 1 2 3 1 2 3 A A A ...

Страница 36: ...RETRAIT DE L ECRAN SOLAIRE 1 2 3 36 ...

Страница 37: ...MISE EN PLACE DE L ECRAN SOLAIRE 1 2 3 4 5 5 1 5 2 37 6 ...

Страница 38: ...38 OUVERTURE FERMETURE DE L ECRAN SOLAIRE ...

Страница 39: ...39 VENTILATION 2 3 1 2 3 1 ...

Страница 40: ... votre casque Nettoyez la doublure de votre casque exclusivement au savon doux et à l eau Nous recommandons d utiliser un savon liquide doux avec de l eau tiède jamais chaude Après avoir nettoyé l intérieur du casque rincez à l eau froide et laissez sécher à l air à température ambiante Une forte chaleur et des produits de nettoyage puissants abîmeront la doublure Il est possible que votre casque ...

Страница 41: ...vitons donc à profiter de votre engin de manière responsable et à toujours conduire dans les limites de vos capacités RECOMMANDATIONS RELATIVES AU REMPLACEMENT DU CASQUE La durée de vie prévue pour un casque AFX est de 4 à 5 ans d utilisation saisonnière Elle diminue en conséquence si la fréquence d utilisation augmente Bien sûr les casques utilisés pour la compétition course automobile et rallye ...

Страница 42: ...rößtmögliche Schutzwirkung erzielt 1 Damit Ihr Helm optimalen Schutz bietet müssen Sie unbedingt die passende Größe auswählen Er darf weder zu groß noch zu klein sein Ob der Helm passt erkennen Sie daran dass er bei angezogenem Kinnriemen fest aber komfortabel sitzt Sie sollten gleichmäßigen Druck auf dem Kopf verspüren Wenn sich der Helm vorne oder hinten drehen oder mit festgezogenem Kinnriemen ...

Страница 43: ...dieses Helms vertraut bevor Sie Ersatzteile anfordern oder versuchen Teile des Helms zu ersetzen NEHMEN SIE KEINE ÄNDERUNGEN AM HELM VOR Um die volle Wirksam keit dieses Helms zu gewährleisten dürfen an der inneren oder äußeren Struktur oder den Komponenten des Helms keinerlei Änderungen vorgenommen werden Viele Farb und Klebstoffe können den Helm beschädigen und seine Effektivität erheblich einsc...

Страница 44: ...kann auch das beste Produkt keinen Schutz bieten Helme müssen fest sitzen dürfen aber nicht drücken Halten Sie die Kinnriemen beim Aufsetzen des Helms nach außen damit sie sich nicht im Helminneren verfangen Ein passender korrekt sitzender Helm liegt fest aber komfortabel an und übt gleichmäßigen Druck auf den Kopf aus Das Innenfutter ist bei den meisten modernen Helmen so konzipiert dass es zuers...

Страница 45: ...sich der Helm vorne oder hinten drehen oder mit festgezogenem Kinnriemen abnehmen lässt ist er zu groß Kein Helm kann den Träger vor jedem v o r h e r s e h b a r e n Aufprall schützen Ein Helm bietet nur der Kopfpartie Schutz die davon bedeckt ist Um ein Maximum an Schutz zu bieten muss der Helm passgenau sitzen und der Kinnriemen fest angezogen sein Die Nichtbeachtung dieser A n w e i s u n g e ...

Страница 46: ...assform abgestimmt ist können Sie ganz rasch feststellen ob Ihr Helm sicher sitzt Setzen Sie den Helm auf und führen Sie den Zahnsteg in die dafür vorgesehene Aussparung ein Wir empfehlen den Steg bei der erstmaligen Anpassung etwas über die Hälfte 5 Klicks einzuführen Reicht die Länge des Riementeils dazu nicht aus können Sie es wie in den Abbildungen dargestellt verlängern Dort wird auch gezeigt...

Страница 47: ... Kopf gezogen werden kann Zum Öffnen des Kinnriemens heben Sie den Steg an der Aussparung gemäß der unteren Abbildung an Nun können Sie den Zahnsteg herausziehen Überprüfen Sie den Kinnriemen und das Rückhaltesystem entweder vor oder nach jeder Fahrt Sobald Verschleißerscheinungen erkennbar sind muss der Helm sofort ersetzt werden Fahren Sie niemals mit einem Helm der abgenutzt aussieht beschädigt...

Страница 48: ... Wangenpolster für einen festeren Sitz ersetzen Um die Passform noch weiter zu verändern können Sie das vorhandene Komfortpolster durch ein dünneres Komfortpolster für einen gelockerten Sitz bzw ein dickeres Komfortpolster für einen festeren Sitz ersetzen In der Tabelle unten sehen Sie inwieweit Außenschalen Polster und Wangenpolster miteinander kompatibel sind Beachten Sie bitte dass sämtliche Ko...

Страница 49: ...49 WANGENPOLSTER WANGENPOLSTER KOMFORT KOPFPOLSTER ...

Страница 50: ...AFX KOMPLETTES AUFPUMPBARES LUFTPOLSTER SYSTEM 50 SYSTEM FÜR EINE INDIVIDUELLE HELM ANPASSUNG KOMPLETTES LUFTPOLSTER SYSTEM PUMPE LUFTABLASS VENTIL ...

Страница 51: ...RUCK INDEM SIE AUF DIE PUMPE DES LUFTPOLSTERS AM HINTEREN UNTEREN RAND DES HELMS DRÜCKEN BIS DER HELM FEST JEDOCH NICHT ZU ENG SITZT PUMPEN SIE NICHT ZU VIEL LUFT IN DAS POLSTER DAS IST KEIN SPIELZEUG DENKEN SIE DARAN DIE LUFT VOR ABNEHMEN DES HELMS WIEDER ENTWEICHEN ZU LASSEN SICHERHEITS WARNUNG HINWEIS DAS LUFTPOLSTERSYSTEM IST FÜR EINE INDIVIDUELLE ANPASSUNG DES HELMS BESTIMMT ES IST DENNOCH IM...

Страница 52: ...HERAUSNEHMEN DES KOMFORTPOLSTERS Führen Sie zum Einbauen des Komfortpolsters die Schritte 1 bis 4 in umgekehrter Reihenfolge durch 52 1 2 3 4 1 2 3 4 ...

Страница 53: ...HERAUSNEHMEN DER WANGENPOLSTER Führen Sie zum Einbauen der Wangenpolster die Schritte 1 bis 2 in umgekehrter Reihenfolge durch 53 1 2 1 2 ...

Страница 54: ...ÖFFNEN SCHLIESSEN DES VISIERS 54 2 3 1 Zum Schliessen des Visiers führen Sie die Punkte 1 bis 3 in umgekehrter Reihenfolge aus ...

Страница 55: ...VISIER MONTAGE ENTFERNEN DES VISIERS 55 1 2 3 1 2 3 A A A ...

Страница 56: ...ENTFERNEN DES SONNENVISIERS 1 2 3 56 ...

Страница 57: ...BEFESTIGUNG DES VISIERS 1 2 3 4 5 5 1 5 2 57 6 ...

Страница 58: ...58 ÖFFNEN SCHLIESSEN DES SONNENVISIERS ...

Страница 59: ...59 BELÜFTUNG 2 3 1 2 3 1 ...

Страница 60: ...er des Helms ausschließlich mit Wasser und milder Seife Wir empfehlen dazu eine milde Seifenlauge mit warmem aber nicht heißem Wasser Spülen Sie das Innere des Helms anschließend mit kaltem Wasser aus und lassen Sie es bei Zimmertemperatur trocknen Starke Hitze und chemische Reinigungsmittel schädigen das Innenfutter Die Verwendung der folgenden Mittel kann zu Schäden am Helm führen die äußerlich ...

Страница 61: ...Fahren Sie stets verantwortungsbewusst und überschätzen Sie sich nicht ERSATZEMPFEHLUNG FÜR DEN HELM Ein Helm von AFX hält bei saisonalem Gebrauch vier bis fünf Jahre lang Diese Lebensdauer verringert sich wenn er häufiger genutzt wird Helme die im Rennsport verwendet werden sollten aufgrund der stärkeren Beanspruchung in kürzeren Intervallen ausgetauscht werden Je häufiger ein Helm den Natureleme...

Страница 62: ...casco 1 Para que el casco pueda protegerlo correctamente su talla debe poder ajustarse correctamente si le queda demasiado pequeño o demasiado grande podría no ser seguro Un casco correctamente ajustado con la mentonera firmemente fijada debe quedar ceñido cómodamente Sentirá una presión uniforme en toda la cabeza sin espacios Respecto a la holgura el casco no debe poder girar libremente hacia atr...

Страница 63: ... consulte el diagrama inferior para familiarizarse con los nombres y términos específicos con que se designan las distintas partes del casco NO REALICE NINGUNA MODIFICACIÓN EN EL CASCO Para que el casco pueda ofrecerle una protección óptima no debe realizar ninguna modificación en las piezas de su estructura externa o interna ni en las piezas adicionales que lo componen Muchos tipos de pinturas y ...

Страница 64: ...do Los cascos deben quedar bien ceñidos pero sin apretar de forma dolorosa Mientras sujeta las mentoneras fuera del casco tire de este hacia abajo sobre la cabeza con cuidado de que las mentoneras no se queden dentro del casco Si el casco está ajustado correctamente deberá estar sujeto y ejercer una presión uniforme alrededor de la cabeza y en la parte superior de esta En la mayoría de los cascos ...

Страница 65: ...e poder girar libremente hacia atrás o hacia delante es decir debe ser impo sible de quitar con la mentonera abrochada No existe ningún casco capaz de proteger al usuario frente a todos los impactos posibles Los cascos solamente pueden proteger la parte de la cabeza cubierta por el casco Para conseguir la máxima protección el casco debe estar bien ajustado con la mentonera firmemente sujeta Si no ...

Страница 66: ...urado correctamente le ofrecerá una manera rápida y cómoda de asegurarse de que el casco está fijado correctamente y de forma segura Colóquese el casco e inserte la lengüeta de trinquete en el receptor de trinquete Le recomendamos que introduzca más de la mitad de la lengüeta 5 chasquidos en el receptor para establecer el ajuste específico de forma inicial Si la correa no es suficientemente larga ...

Страница 67: ...illa de apertura del receptor de trinquete como se muestra en el siguiente diagrama A continuación puede tirar de la lengüeta de trinquete para extraerla Asegúrese siempre de inspeccionar la mentonera y el sistema de retención antes o después de conducir Si la mentonera o el sistema de retención presentan algún signo de desgaste debe reemplazar el casco de inmediato Nunca conduzca con un casco des...

Страница 68: ...ara que queden más apretadas Asimismo también puede adaptarse sustituyendo el forro de confort existente por otro más fino para que quede menos apretado o por otro más grueso para que quede más apretado Consulte el cuadro de compatibilidad de la carcasa el forro y las carrilleras y recuerde que estos componentes solamente pueden reemplazarse por otros comprendidos dentro del grupo de tallas de cad...

Страница 69: ...69 ALMOHADILLA ALMOHADILLA FORRO INTERIOR ...

Страница 70: ...SISTEMA AFX DE AJUSTE POR PRESIÓN DE AIRE 70 SISTEMA DE AJUSTE FINAL DE LA TALLA DEL CASCO MEDIANTE CÁMARA DE AIRE BOMBA DE PRESIÓN DE AIRE VÁLVULA LIBERADOREA DE PRESIÓN ...

Страница 71: ...TE DE MANERA GRADUAL LA PRE SIÓN EN LA CÁMARA DE AIRE POR MEDIO DE LA BOMBA SITUA DA EN LA PARTE BAJA TRASERA DE LA CARCASA DEL CASCO HASTA QUE SIENTA QUE EL CASCO QUEDA AJUSTADO PERO SIN LLEGAR A MOLESTAR NO INFLE EN EXCESO NO SE TRATA DE UN JUGUETE RECUERDE LIBERAR SIEMPRE LA PRESIÓN ANTES DE QUITARSE EL CASCO AVISO DE SEGURIDAD NOTA SISTEMA DE PRESIÓN DE AIRE PARA UN AJUSTE PERSONALIZADO NO APT...

Страница 72: ...RETIRADA DEL FORRO DE CONFORT Para volver a colocar el forro de confort invierta los pasos del 1 al 4 72 1 2 3 4 1 2 3 4 ...

Страница 73: ...RETIRADA DE LA CARRILLERA Para volver a colocar la carrillera invierta los pasos del 1 al 2 73 1 2 1 2 ...

Страница 74: ...ABRIR CERRAR LA PANTALLA 74 2 3 1 Para cerrar la pantalla invierta los pasos 1 3 ...

Страница 75: ...INSTALACIÓN DE LA PANTALLA DESMONTAJE DE LA PANTALLA 75 1 2 3 1 2 3 A A A ...

Страница 76: ...DESMONTAJE DE LA PANTALLA INTERIOR 1 2 3 76 ...

Страница 77: ...INSTALACIÓN DE LA PANTALLA INTERIOR 1 2 3 4 5 5 1 5 2 77 6 ...

Страница 78: ...78 SUBIR BAJAR LA PANTALLA INTERIOR ...

Страница 79: ...79 VENTILACIÓN 2 3 1 2 3 1 ...

Страница 80: ...comida y no con cascos Limpie el forro del casco únicamente con jabón suave y agua Le recomendamos que utilice una solución de jabón líquido suave y agua tibia no caliente Tras limpiar el interior del casco enjuáguelo con agua fría y deje que se seque al aire libre a temperatura ambiente Las altas temperaturas y el uso de disolventes de limpieza fuertes pueden dañar el forro Los siguientes product...

Страница 81: ...uctible por lo que le animamos a disfrutar de la conducción de forma responsable así como a hacerlo siempre dentro de los límites de su capacidad RECOMENDACIÓN DE SUSTITUCIÓN DEL CASCO La vida útil esperada de los cascos AFX es de 4 a 5 años con un uso regular y disminuye a medida que aumenta la frecuencia de uso Como es lógico los cascos de competición por ejemplo para carreras en carretera o en ...

Страница 82: ...tuo casco in termini di potenzialità e protezione 1 Per proteggerti nel modo previsto il casco deve essere della misura corretta un casco troppo grande o troppo piccolo potrebbe non essere sicuro Invece un casco della misura corretta e con il cinturino del sottomento ben allacciato risulterà aderente ma al tempo stesso comodo Avvertirai una pressione omogenea su tutta la testa Il casco deve essere...

Страница 83: ...guito per prendere confidenza con i nomi e i termini specifici utilizzati su questo casco prima di tentare di riparare o sostituire sue parti NON MODIFICARE IL CASCO Per preservare la completa efficacia di questo casco ti sconsigliamo di alterarne la struttura interna o esterna o i relativi componenti Molti adesivi e vernici possono danneggiare il casco e renderlo inefficace anche se il danno non ...

Страница 84: ...odo I caschi devono essere stretti ma non devono fare male Indossa il casco tenendo il cinturino del sottomento al di fuori tira il casco verso il basso sulla testa facendo attenzione che il cinturino non finisca all interno Un casco della misura corretta risulterà aderente con una pressione alquanto omogenea nelle aree laterali e superiore della testa Sui caschi più moderni la protezione è realiz...

Страница 85: ...a poter ruotare liberamente in avanti o all indietro e quindi da poter essere tolto con il cinturino del sottomento allacciato Nessun casco può proteggere chi lo indossa da tutti gli impatti possibili o prevedibili Un casco può proteggere solo la parte di testa da esso coperta Per ottenere la massima protezione il casco deve essere sempre indossato con il cinturino del sottomento allacciato corret...

Страница 86: ...pida e comoda per essere certo che il casco sia allacciato in modo sicuro e corretto Indossa il casco e inserisci l aletta di arresto nel dispositivo di arresto Ti consigliamo di inserire la linguetta più di metà della sua lunghezza avvertendo 5 clic nel dispositivo di arresto per impostare inizialmente la vestibilità in base alle tue esigenze Se la cinghia non presenta una lunghezza sufficiente a...

Страница 87: ...tta sul dispositivo di aggancio come illustrato nella figura riportata di seguito Ora puoi fare uscire la linguetta del dispositivo di arresto Accertati sempre di aver controllato il cinturino del sottomento e il sistema di ritenuta prima e dopo aver guidato se il cinturino o il sistema di ritenuta presenta segni di usura ti consigliamo di sostituire immediatamente il casco Non guidare mai con un ...

Страница 88: ...giore comfort o con cuscinetti più spessi per una maggiore aderenza La vestibilità del casco può essere personalizzata sostituendo l imbottitura esistente con una più sottile per un maggiore comfort o con una più spessa per una maggiore aderenza Ti consigliamo di consultare la scheda di compatibilità per i cuscinetti per le guance l imbottitura e la calotta e ricordati che queste parti possono ess...

Страница 89: ...89 IMBOTTITURA PER LA GUANCIA IMBOTTITURA PER LA GUANCIA FODERA INTERNA ...

Страница 90: ...SISTEMA AFX DI REGOLAZIONE CON PRESSIONE D ARIA 90 SISTEMA DI AGGIUSTAMENTO FINALE DELLA TAGLIA DEL CASCO CON CAMERA D ARIA PERIMETRALE POMPA DI PRESSIONE D ARIA VALVOLA LIMITATRICE DI PRESSIONE ...

Страница 91: ...TE LA PRESSIONE NELLA CAMERA D ARIA CON LA POMPA SITUATA NELLA PARTE BASSA POSTERI ORE DELLA CALOTTA DEL CASCO FINCHE SENTI CHE IL CASCO RIMANE PIÙ ADERENTE MA SENZA DIVENTARE TROPPO STRETTO NON GONFIARE POMPARE IN ECCESSO NON È UN GIOCAT TOLO NON DIMENCARE DI LIBERARE SEMPRE LA PRESSIONE PRIMA DI TOGLIERE IL CASCO AVVISO DI SICUREZZA NOTA SISTEMA DI PRESSIONE D ARIA PER UN AGGIUSTAMENTO PERSONALI...

Страница 92: ...ESTRAZIONE DELL IMBOTTITURA Per montare nuovamente l imbottitura devi invertire i passaggi da 1 a 4 92 1 2 3 4 1 2 3 4 ...

Страница 93: ...RIMOZIONE DEI CUSCINETTI PER LE GUANCE Per installare nuovamente i cuscinetti per le guance devi invertire i passaggi da 1 a 2 93 1 2 1 2 ...

Страница 94: ...94 APRIRE CHIUDERE LO SCHERMO 2 3 1 Per chiudere lo schermo inverti i punti 1 3 ...

Страница 95: ...95 INSTALLAZIONE DELLA VISIERA SMONTAGGIO DELLO SCHERMO 1 2 3 1 2 3 A A A ...

Страница 96: ...SMONTAGGIO DELLO SCHERMO INTERNO 1 2 3 96 ...

Страница 97: ...INSTALLAZIONE DELLO SCHERMO INTERNO 1 2 3 4 5 5 1 5 2 97 6 ...

Страница 98: ...98 APRIRE CHIUDERE LO SCHERMO INTERNO ...

Страница 99: ...99 VENTILAZIONE 2 3 1 2 3 1 ...

Страница 100: ...a e sapone delicato Ti invitiamo a utilizzare una soluzione di sapone liquido delicato e acqua calda ma non bollente Dopo aver pulito l interno del casco risciacqualo con acqua fredda e lascialo asciugare all aria a temperatura ambiente Temperature elevate e detergenti per la pulizia possono danneggiare il rivestimento Il casco subirà danni seppur non visibili in caso di utilizzo dei seguenti prod...

Страница 101: ... ti invitiamo pertanto di guidare in modo responsabile e mai al di sopra delle tue capacità SOSTITUZIONE RACCOMANDATA DEL CASCO La durata prevista di un casco AFX è pari a 4 5 anni di uso stagionale e diminuisce all aumentare del suo utilizzo Come forse immagini i caschi utilizzati in gara ad esempio per le competizioni su strada e in fuoristrada tendono ad avere una vita molto più breve Più un ca...

Страница 102: ...NOTES 102 ...

Страница 103: ...NOTES 103 ...

Страница 104: ...AFXHELMETS COM PRINTED IN CHINA ...

Отзывы: