


STORAGE OF YOUR AFX HELMET
IMPORTANT SAFETY WARNING
We at AFX recommend that any helmet suffering any kind of impact
to the shell be removed from use immediately, whether there is visible
physical damage or not. A helmet is designed to deform in an
accident in order to absorb the energy of the impact, and should never
be reused afterwards for its ability to protect the rider further could
be compromised. Even a helmet dropped accidently on the ground or
any other hard surface could result in hidden unseen damage not
visible to the rider.
If you suspect the integrity of the helmet has been compromised in any
way please immediately discontinue its use and seek a suitable
replacement. If you are not sure what to do please contact AFX through
our website. Afxhelmets.com
Also its important to realize that wearing a helmet does not make you
indestructible, so we encourage you to enjoy riding responsibly, and to
always ride within the limits of your abilities.
HELMET REPLACEMENT RECOMMENDATION
The expected lifespan of an AFX helmet is 4-5 years of seasonal use,
and decreases accordingly as the frequency of use increases. As you
would expect, helmets used for competition such, as road racing and
off-road tend to have a much shorter life span. The more exposure a
helmet endures to the elements, body oils, and perspiration, the faster it
will wear out. In most cases the helmet liner will be the first component
to wear out and, as such, functions as a good indicator that a helmet
should be replaced. If you are not sure if your helmet should be replaced
please contact AFX through our website. Afxhelmets.com
Thank you for purchasing an AFX helmet and taking the time to read this
owners manual. Copies of this manual and other valuable information
may be downloaded from our website, afxhelmets.com
MADE IN CHINA FOR AFX NORTH AMERICA INC.
19
Содержание FX-105
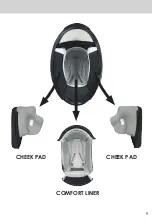
Страница 9: ...CHEEK PAD 9 COMFORT LINER CHEEK PAD ...
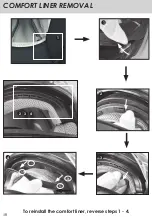
Страница 10: ...COMFORT LINER REMOVAL 10 1 2 3 4 1 2 3 To reinstall the comfort liner reverse steps 1 4 4 ...
Страница 11: ...CHEEK PAD REMOVAL 11 1 2 1 2 To reinstall the cheek pad reverse steps 1 2 ...
Страница 12: ...12 OPEN CLOSE THE SHIELD To close the shield reverse steps 1 3 2 3 1 ...
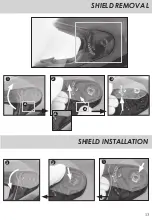
Страница 13: ...SHIELD REMOVAL 1 2 3 13 SHIELD INSTALLATION 1 2 3 A A A ...
Страница 14: ...SUN SHIELD REMOVAL 1 2 3 14 ...
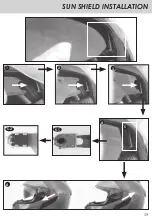
Страница 15: ...SUN SHIELD INSTALLATION 1 2 3 4 5 5 1 5 2 15 6 ...
Страница 16: ...16 OPEN CLOSE THE SUN SHIELD ...
Страница 17: ...17 VENTILATION 2 3 1 2 3 1 ...
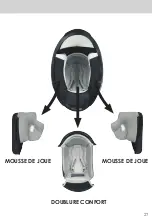
Страница 27: ...27 MOUSSE DE JOUE MOUSSE DE JOUE DOUBLURE CONFORT ...
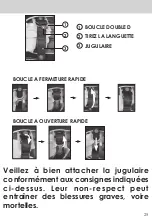
Страница 30: ...OUVERTURE FERMETURE DE L ECRAN 30 2 3 1 Pour fermer l écran voir point 1 3 ...
Страница 31: ...INSTALLATION DU VISIÈRE RETRAIT DE L ECRAN 31 1 2 3 1 2 3 A A A ...
Страница 32: ...RETRAIT DE L ECRAN SOLAIRE 1 2 3 32 ...
Страница 33: ...MISE EN PLACE DE L ECRAN SOLAIRE 1 2 3 4 5 5 1 5 2 33 6 ...
Страница 34: ...34 OUVERTURE FERMETURE DE L ECRAN SOLAIRE ...
Страница 35: ...35 VENTILATION 2 3 1 2 3 1 ...
Страница 45: ...45 WANGENPOLSTER WANGENPOLSTER KOMFORT KOPFPOLSTER ...
Страница 49: ...VISIER MONTAGE ENTFERNEN DES VISIERS 49 1 2 3 1 2 3 A A A ...
Страница 50: ...ENTFERNEN DES SONNENVISIERS 1 2 3 50 ...
Страница 51: ...BEFESTIGUNG DES VISIERS 1 2 3 4 5 5 1 5 2 51 6 ...
Страница 52: ...52 ÖFFNEN SCHLIESSEN DES SONNENVISIERS ...
Страница 53: ...53 BELÜFTUNG 2 3 1 2 3 1 ...
Страница 63: ...63 ALMOHADILLA ALMOHADILLA FORRO INTERIOR ...
Страница 65: ...RETIRADA DE LA CARRILLERA Para volver a colocar la carrillera invierta los pasos del 1 al 2 65 1 2 1 2 ...
Страница 66: ...ABRIR CERRAR LA PANTALLA 66 2 3 1 Para cerrar la pantalla invierta los pasos 1 3 ...
Страница 67: ...INSTALACIÓN DE LA PANTALLA DESMONTAJE DE LA PANTALLA 67 1 2 3 1 2 3 A A A ...
Страница 68: ...DESMONTAJE DE LA PANTALLA INTERIOR 1 2 3 68 ...
Страница 69: ...INSTALACIÓN DE LA PANTALLA INTERIOR 1 2 3 4 5 5 1 5 2 69 6 ...
Страница 70: ...70 SUBIR BAJAR LA PANTALLA INTERIOR ...
Страница 71: ...71 VENTILACIÓN 2 3 1 2 3 1 ...
Страница 81: ...81 IMBOTTITURA PER LA GUANCIA IMBOTTITURA PER LA GUANCIA FODERA INTERNA ...
Страница 84: ...84 APRIRE CHIUDERE LO SCHERMO 2 3 1 Per chiudere lo schermo inverti i punti 1 3 ...
Страница 85: ...85 INSTALLAZIONE DELLA VISIERA SMONTAGGIO DELLO SCHERMO 1 2 3 1 2 3 A A A ...
Страница 86: ...SMONTAGGIO DELLO SCHERMO INTERNO 1 2 3 86 ...
Страница 87: ...INSTALLAZIONE DELLO SCHERMO INTERNO 1 2 3 4 5 5 1 5 2 87 6 ...
Страница 88: ...88 APRIRE CHIUDERE LO SCHERMO INTERNO ...
Страница 89: ...89 VENTILAZIONE 2 3 1 2 3 1 ...
Страница 92: ...AFXHELMETS COM PRINTED IN CHINA ...


