background image

-Dati tecnici e caratteristiche soggetti a cambiamenti senza preavviso                                            -Technische Daten und Eigenschaften mit Änderungen ohne Anzeige 
-All specifi cation subject to change without notice 


                                               - Données techniques et caracteristiques suiettes à des changements sans avis

35

You will then gain access to the SERVICE functions.

Press "SCANNER"

This function is used to check that the components are enabled and properly connected.
To run the test on the single components, press "PLAY" and wait for the related "Ux" value to change to a red color, which 
indicates "ON" status, and for the consumption in W for the tested component to appear.
Then, press the "PLAY" key again to move to the next component test.
After you have tested all the outputs, press the "HOME" icon.

The output acronym/component pairing are:

U1 Compressor

U6 Heated 

probe 

(optional)

U2 Heating 

(optional)

U7 Hot 

Gas

U3 

Door frame heater

U8 

 Internal lighting (optional)

U4 Pump-Down

EV Evaporator 

fans

U5 Sterilizer 

(optional)

Содержание Infinity Series

Страница 1: ...INSTALLAZIONE E SERVICE INFINITY CARELLABILI INSTALLATION AND SERVICE MANUAL INFINITY TROLLEYS INSTALLATION INFINITY À CHARIOT INSTALLATION INFINITY MIT ROLLWAGEN INSTALLATION INFINITY CARRO cod 75970260 rev 00 ...

Страница 2: ......

Страница 3: ......

Страница 4: ...e soggetti a cambiamenti senza preavviso Technische Daten und Eigenschaften mit Änderungen ohne Anzeige All specification subject to change without notice Données techniques et caracteristiques suiettes à des changements sans avis 4 ...

Страница 5: ...charge 33 5 First installation 34 6 Troubleshooting and solutions 36 Français Installation INFINITY à chariot 40 1 Éléments nécessaires pour l assemblage de la chambre 41 2 Relier les tuyaux de la cellule de refroidissement à l unité 49 3 Installation électrique 50 4 Raccordement de l évacuateur de la condensation 50 5 Première installation 51 6 Analyses des pannes et solutions 53 Deutsch Installa...

Страница 6: ...i senza preavviso Technische Daten und Eigenschaften mit Änderungen ohne Anzeige All specification subject to change without notice Données techniques et caracteristiques suiettes à des changements sans avis 6 ITALIANO Installazione INFINITY carrellabili ...

Страница 7: ...tes à des changements sans avis 7 1 Componenti necessari assemblaggio cella ANGOLARI VERTICALI 4 PZ PANNELLO LATERALE PANNELLO LATERALE SCARICO PANNELLO POSTERIORE TETTO PANNELLO PORTA FONDO ASSIEME EVAPORATORE BASE PORTA COPERTURA EVAPORATORE DEFLETTORE 2 PZ AGGANCIO A STELLA 16 AGGANCIO AD ANGOLO 16 TAPPI RAMPA PARACOLPI PROLUNGA TUBO RITORNO 22MM PROLUNGA TUBO MANDATA 16MM QUADRO ELETTRICO LAMI...

Страница 8: ...viso Technische Daten und Eigenschaften mit Änderungen ohne Anzeige All specification subject to change without notice Données techniques et caracteristiques suiettes à des changements sans avis 8 BOLLA AVVITATORE SILICONE CHIAVE A L CANNELLO PER SALDATURE KIT VALVOLA ...

Страница 9: ...s changements sans avis 9 1 ISTRUZIONI ASSEMBLAGGIO CELLA NB SILICONARE TUTTE LE GIUNZIONI TRA PANNELLI Preparare i pannelli laterali inserendo le stelle e gli ango lari Per il pannello sinistro con predisposizione per lo scarico applicare i 2 montanti e fissarli con la relativa chiave Per il pannello destro applicare il solo montante posteriore e non quello frontale Posizionare il fondo e metterl...

Страница 10: ...to change without notice Données techniques et caracteristiques suiettes à des changements sans avis 10 Fissare il pannello sinistro al fondo Fissare la schiena al fondo ed al fianco e poi fissare il fianco destro privo di montante frontale Fissare il pannello porta e chiudere con il montante frontale Per ultimo fissare il tetto ed applicare i tappi copri foro ...

Страница 11: ...ohne Anzeige All specification subject to change without notice Données techniques et caracteristiques suiettes à des changements sans avis 11 Aprire al porta e fissare la soglia della porta con silicone e viti e quindi la pedana Fissare i deflettori Predisporre l evaporatore avvitando completamente i supporti avvitabili ...

Страница 12: ...tes à des changements sans avis 12 Inserire l evaporatore con i piedini completamente chiusi attraverso la porta Quindi saldare i tubi della prolunga Ora che le tubature fuori escono dal tetto forato svitare i piedini così da alzare l evaporatore ed eseguire la saldatura della valvola termostatica quindi fissarlo con le viti Far uscire al temine delle saldature il cavo multipolare della scatola ca...

Страница 13: ...hne Anzeige All specification subject to change without notice Données techniques et caracteristiques suiettes à des changements sans avis 13 Quindi posizionare la copertura superiore Fissare il quadro elettrico sopra la porta Sonde Sonda spillone Luce Valvola sfiato Motore Comandi motore Alimentazione Quota sensore 21 mm ...

Страница 14: ...to change without notice Données techniques et caracteristiques suiettes à des changements sans avis 14 Far passare il cavo alimentazione display all interno del foro posto sul frontale della porta Quindi applicare il display Quindi terminare i cablaggi elettrici come previsto dallo schema elettrico vedere allegato 2 Alla fine applicare la lamiera di copertura ...

Страница 15: ...vaporatore unità fino a 10 metri Il diametro del la mandata è di 16 mm Il diametro del ritorno è di 22 mm Il diametro del gas caldo di 16 mm Per lunghezze maggiori dimensionare i diametri in modo da garantire la corretta velocità del gas Isolare sempre la linea di aspirazione e gas caldo con tubo anti condensa con uno spessore di almeno 13 mm D importanza fondamentale per il buon funzionamento del...

Страница 16: ...anto elettrico a cui ci si allaccia non sia realizzato secondo le norme vigenti Nelle macchine con alimentazione trifase è necessario assistere alla partenza dei ventilatori per controllarne il senso di rota zione se non dovesse corrispondere a quello indicato dalla freccia riportata sull etichetta posta vicino ai ventilatori si deve spegnere la macchina e si devono invertire tra loro due fasi del...

Страница 17: ...y visualizza l indicazione STAND BY con 3 quadrati rossi In questa condizione la macchina è completamente ferma Premendo in sequenza i quadrati da sinistra verso destra si accede alla home page All accensione della macchina deve comparire subito la schermata dello Screen Saver unitamente ad una barra di carica mento software Al termine del caricamento si passerà automaticamente alla home page che ...

Страница 18: ...ettamente Per eseguire il test sui singoli componenti premere il tasto PLAY ed attendere che il valore Ux relativo cambi diventando di colore rosso ed indichi lo stato ON e venga visualizzato il consumo in W relativo al componente testato Quindi premere nuovamente il tasto PLAY per passare al controllo successivo Dopo aver testato tutte le uscite premere l icona HOME Le uscite corrispondono a U1 C...

Страница 19: ...alta condensazione Condensatore ostruito sporco Non ostruire le prese d aria del condensatore e o pulirlo Triangolo rosso e blocco macchina Allarme alta condensazione Sonda condensatore Chiamare tecnico qualifica to e comunicare allarme e matricola prodotto Sostituire sonda S3 Triangolo rosso e blocco macchina Allarme alta condensazione Ventilatore condensatore non funzionante Chiamare tecnico qua...

Страница 20: ...prodotto Sostituire sonda S1 Triangolo rosso Allarme sonda evaporatore S2 Sonda evaporatore dan neggiata rotta Chiamare tecnico qualifi cato e comunicare l errore letto e matricola prodotto Sostituire sonda S2 Triangolo rosso Allarme sonda condensa tore S3 Sonda condensatore Chiamare tecnico qualifi cato e comunicare l errore letto e matricola prodotto Sostituire sonda S3 Triangolo rosso e blocco ...

Страница 21: ...qualifi cato e comunicare l errore letto e matricola prodotto Controllare la tensione di linea individuare ed elimina re la causa della caduta di tensione Compressore non Funziona Il compressore non fun ziona Avaria del motore del com pressore Chiamare tecnico qualifi cato e comunicare l errore letto e matricola prodotto Controllare se gli awolgi menti del motore sono aperti o in corto Se necessar...

Страница 22: ...cessivamente rumorosa Sibilo della valvola d espan sione Chiamare tecnico qualifi cato e comunicare l errore letto e matricola prodotto Rabboccare la carica di refrigerante Controllare che il filtro del liquido non sia intasato Compressore non Funziona L unità è eccessivamente rumorosa Rumorosità del compres sore Chiamare tecnico qualifi cato e comunicare l errore letto e matricola prodotto Contro...

Страница 23: ...enti senza preavviso Technische Daten und Eigenschaften mit Änderungen ohne Anzeige All specification subject to change without notice Données techniques et caracteristiques suiettes à des changements sans avis 23 ENGLISH Installation INFINITY Trolleys ...

Страница 24: ...caracteristiques suiettes à des changements sans avis 24 1 Components required for cell assembly VERTICAL ANGLE BARS 4 PCS LATERAL PANEL LATERAL PANEL EXHAUST REAR PANEL HOOD DOOR PANEL BOTTOM EVAPORATOR ASSEMBLY DOOR BASE EVAPORATOR COVER DEFLECTOR 2 PCS STAR CONNECTION 16 ANGLE CONNECTION 16 CAPS RAMP BUMPER HOT GAS EXTENSION INLET PIPE EXTENSION ELECTRICAL BOARD SHEET METAL FOR ELECTRICAL BOARD...

Страница 25: ...vviso Technische Daten und Eigenschaften mit Änderungen ohne Anzeige All specification subject to change without notice Données techniques et caracteristiques suiettes à des changements sans avis 25 LEVEL SCREWDRIVER SILICON L SHAPED WRENCH WELDING TORCH KIT VALVOLA ...

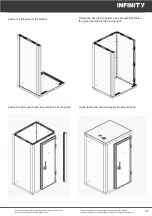
Страница 26: ... avis 26 1 CELL ASSEMBLY INSTRUCTIONS PLEASE NOTE APPLY SILICON TO ALL JUNCTIONS IN BETWEEN PANELS Prepare the lateral panels for assembly fitting the star connections and angle bars To assemble the left panel arranged for the exhaust apply the 2 uprights and fasten them with the help of the wrench To assemble the right panel apply only the rear upright and not the front one Position the bottom so...

Страница 27: ... subject to change without notice Données techniques et caracteristiques suiettes à des changements sans avis 27 Fasten the left panel to the bottom Fasten the back to the bottom and side and then fasten the right side without the front upright Fasten the door panel and close it with the front upright Lastly fasten the hood and apply the hole lid caps ...

Страница 28: ...ll specification subject to change without notice Données techniques et caracteristiques suiettes à des changements sans avis 28 Open the door and fasten the door threshold with silicon and the tightened screws and then the platform Fasten the deflectors Arrange the evaporator for assembly completely screwing on the adjustable supports ...

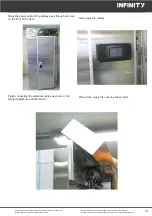
Страница 29: ...s et caracteristiques suiettes à des changements sans avis 29 Insert the evaporator its feet fully closed through the door Now weld the extension pipes With the piping now sticking out of the drilled hood loosen the feet so as to lift the evaporator and weld on the thermostatic valve then fasten it firmly with the screws Make the multi polar cable of the evaporator s wiring box thread out of the c...

Страница 30: ...derungen ohne Anzeige All specification subject to change without notice Données techniques et caracteristiques suiettes à des changements sans avis 30 Then position the upper cover Fasten the electrical board atop the door Probes Needle probe Light Air valve Motor Motor controls Power supply Sensor measure 21 mm ...

Страница 31: ...ion subject to change without notice Données techniques et caracteristiques suiettes à des changements sans avis 31 Make the power cable of the display pass through the hole on the front of the door Next apply the display Finish connecting the electrical cables as shown in the wiring diagram see attachment 2 When done apply the covering sheet metal ...

Страница 32: ... is up to 10 meters The inlet pipe diameter is 16 mm The outlet pipe diameter is 22 mm The hot gas pipe diameter is 16 mm For greater lengths size the diameters so that the right gas speed is guaranteed Always insulate the hot gas suction line with an anti condensate pipe at least 13 mm thick It is crucial for the system to properly work and for compressor durability to correctly perform a vacuum ...

Страница 33: ...rrently enforced stan dards In machines with a three phase power supply it is necessary to assist to fan start up in order to check that they are rotat ing in the right direction if the direction is different from the one pointed to by the arrow on the label next to the fans turn the machine off and invert the two power line phases Once this operation has been completed the unit can be restarted I...

Страница 34: ...the display will read the wording STAND BY with 3 red squares In this condition the machine is at a full stop By pressing the squares in sequence from left to right you will access the home page When the machine is switched on the Screen Saver must immediately appear on the monitor along with the software loading bar Once loading is complete the home page will automatically be displayed with the 3...

Страница 35: ...ts are enabled and properly connected To run the test on the single components press PLAY and wait for the related Ux value to change to a red color which indicates ON status and for the consumption in W for the tested component to appear Then press the PLAY key again to move to the next component test After you have tested all the outputs press the HOME icon The output acronym component pairing a...

Страница 36: ...ot obstruct the air in takes of the condenser and or clean it Red triangle and machine in lock mode High condensation alarm Condenser probe Call a qualified engineer and inform him of the alarm and product serial number Replace probe S3 Red triangle and machine in lock mode High condensation alarm Condenser fan is not work ing Call a qualified engineer and inform him of the alarm and product seria...

Страница 37: ...programmed param eters Check that air probe and evaporator are working properly Red triangle Air probe S1 alarm Cell probe damaged broken Call a qualified engineer and inform him of the read error and product serial number Replace probe S1 Red triangle Evaporator probe S2 alarm Evaporator probe dam aged broken Call a qualified engineer and inform him of the read error and product serial number Rep...

Страница 38: ... compressor is not working Terminals are loose Call a qualified engineer and inform him of the read error and product serial number Check terminal fastening Compressor not working The compressor is not working Control connection error Call a qualified engineer and inform him of the read error and product serial number Check and if need be adjust the connections Compressor not working The compresso...

Страница 39: ...Compressor not working The unit is excessively loud Vibration in pipes Call a qualified engineer and inform him of the read error and product serial number Secure the pipelines better Check fastening of pipe con nectors Compressor not working The unit is excessively loud Expansion valve hisses Call a qualified engineer and inform him of the read error and product serial number Top up refrigerant g...

Страница 40: ...nti senza preavviso Technische Daten und Eigenschaften mit Änderungen ohne Anzeige All specification subject to change without notice Données techniques et caracteristiques suiettes à des changements sans avis 40 FRANÇAIS Installation INFINITY à chariot ...

Страница 41: ...s sans avis 41 1 Éléments nécessaires pour l assemblage de la chambre CORNIÈRES VERTICALES 4 PCS PANNEAU LATÉRAL PANNEAU LATÉRAL ÉVACUA TEUR PANNEAU ARRIÈRE TOIT PANNEAU PORTE BASE BLOC ÉVAPORATEUR BASE DE LA PORTE COUVERTURE DE L ÉVAPORATEUR DÉFLECTEUR 2 PCS ÉTOILE D ACCROCHAGE 16 ANGLE D ACCROCHAGE 16 CACHE TROUS RAMPE BUTOIR RALLONGE POUR GAZ CHAUD RALLONGE TU YAU DE REFOULEMENT TABLEAU ÉLECTRI...

Страница 42: ...so Technische Daten und Eigenschaften mit Änderungen ohne Anzeige All specification subject to change without notice Données techniques et caracteristiques suiettes à des changements sans avis 42 NIVEAU À BULLE VISSEUSE SILICONE CLÉ EN L CHALUMEAU DE SOUDAGE KIT VALVOLA ...

Страница 43: ...avis 43 1 INSTRUCTIONS POUR L ASSEMBLAGE DE LA CHAMBRE N B SILICONER TOUTES LES JONCTIONS ENTRE LES PANNEAUX Préparer les panneaux latéraux en introduisant les étoiles et les cornières Pour le panneau de gauche prévu pour l évacuation ap pliquer les 2 montants et les fixer avec la clé respective Pour le panneau de droite appliquer seulement le montant arrière et pas celui frontal Positionner la ba...

Страница 44: ...change without notice Données techniques et caracteristiques suiettes à des changements sans avis 44 Fixer le panneau de gauche à la base Fixer la partie arrière à la base et à la partie latérale puis fixer la partie latérale droite sans le montant frontal Fixer le panneau de la porte et fermer avec le montant frontal Enfin fixer le toit et mettre les cache trous ...

Страница 45: ...n ohne Anzeige All specification subject to change without notice Données techniques et caracteristiques suiettes à des changements sans avis 45 Ouvrir la porte fixer le seuil de la porte avec le silicone et les vis puis poser la plate forme Fixer les déflecteurs Placer l évaporateur en vissant complètement les supports ...

Страница 46: ...es suiettes à des changements sans avis 46 Insérer l évaporateur avec les pieds complètement fermés à travers la porte Puis souder les tubes de la rallonge Maintenant que les tuyaux sortent du toit dévisser les pieds de façon à soulever l évaporateur et souder la vanne thermostatique puis fixer ce dernier avec les vis Faire sortir à l extrémité des soudures le câble multipolaire du boîtier de l év...

Страница 47: ... All specification subject to change without notice Données techniques et caracteristiques suiettes à des changements sans avis 47 Positionner ensuite la couverture supérieure Fixer le tableau électrique sur la porte Sondes Sonde à aiguille Éclairage Soupape de dégagement Moteur Commandes du moteur Alimentation Longueur capteur 21 mm ...

Страница 48: ... change without notice Données techniques et caracteristiques suiettes à des changements sans avis 48 Faire passer le câble d alimentation de l afficheur à l intérieur de l orifice sur la partie frontale de la porte Puis appliquer l afficheur Terminer les câblages électriques selon les indications du schéma voir annexe 2 Appliquer à la fin la tôle de couverture ...

Страница 49: ... pour les distances évaporateur unité jusqu à 10 mètres Le diamètre de refoulement est de 16 mm Le diamètre de retour est de 22 mm Le diamètre du gaz chaud de 16 mm Pour des longueurs supérieures dimensionner les diamètres de façon à garantir la bonne vitesse du gaz Isoler toujours les lignes d aspiration et de gaz chaud avec tuyau anti condensation d au moins 13 mm d épaisseur Le bon fonctionneme...

Страница 50: ...mes en vigueur Pour les machines à alimentation triphasée il faut assister à la mise en marche des ventilateurs pour en contrôler le sens de rotation si ce dernier ne correspond pas à celui indiqué par la flèche indiquée sur l étiquette située près des ventilateurs il faut arrêter la machine et inverser entre elles les deux phases de la ligne d alimentation Seulement après l unité peut être remise...

Страница 51: ...lise l indication STAND BY avec 3 carrés rouges Dans cette condition la machine est complètement arrêtée En appuyant dans l ordre les carrés de gauche à droite on peut accéder à la page d accueil La page écran de l économiseur d écran doit apparaître à la mise en marche de la machine en même temps qu une barre de chargement logiciel À la fin du chargement on passera automatiquement à la page d acc...

Страница 52: ...ectement Pour effectuer l essai sur chaque composant appuyer sur la touche PLAY et attendre que la valeur Ux relative change en devenant rouge et qu elle indique le mode ON et que la consomation en W relative au composant testé soit visualisée Appuyer à nouveau sur la touche PLAY pour passer au contrôle successif Après avoir testé toutes les sorties appuyer sur l icône HOME Les sorties corresponde...

Страница 53: ...ruer les prises d air du condensateur et ou le nettoyer Triangle rouge et blocage machine Alarme condensation élevée Sonde condensateur Appeler un technicien qualifié et communiquer l alarme et la nº de série du produit Substituer la sonde S3 Triangle rouge et blocage machine Alarme condensation élevée Ventilateur condensateur en panne Appeler un technicien qualifié et communiquer l alarme et la n...

Страница 54: ... nº de série du produit Substituer la sonde S1 Triangle rouge Alarme sonde évaporateur S2 Sonde évaporateur endom magée ou cassée Appeler un technicien qualifié et communiquer l erreur lue et le nº de série du produit Substituer la sonde S2 Triangle rouge Alarme sonde condensa teur S3 Sonde condensateur Appeler un technicien qualifié et communiquer l erreur lue et le nº de série du produit Substit...

Страница 55: ...lifié et communiquer l erreur lue et le nº de série du produit Contrôler la tension de ligne localiser et éliminer la cause de la chute de tension Le compresseur ne fon ctionne pas Le compresseur ne fon ctionne pas Panne du moteur du com presseur Appeler un technicien qualifié et communiquer l erreur lue et le nº de série du produit Contrôler si les bobinages du moteur sont ouverts ou en court cir...

Страница 56: ... bruyante Sifflement de la soupape d expansion Appeler un technicien qualifié et communiquer l erreur lue et le nº de série du produit Remettre à niveau le réfri gérant Contrôler que le filtre du liquide ne soit pas obstrué Le compresseur ne fon ctionne pas L unité est excessivement bruyante Compresseur bruyant Appeler un technicien qualifié et communiquer l erreur lue et le nº de série du produit...

Страница 57: ...i senza preavviso Technische Daten und Eigenschaften mit Änderungen ohne Anzeige All specification subject to change without notice Données techniques et caracteristiques suiettes à des changements sans avis 57 DEUTSCH Installation INFINITY Mit Rollwagen ...

Страница 58: ...cteristiques suiettes à des changements sans avis 58 1 Zur Montage der Zelle benötigte Komponenten VERTIKALWINKEL 4 TEILE SEITENPLATTE SEITENPLATTE ABLAUF RÜCKPLATTE DACH TÜRPLATTE BODEN MIT VERDAMPFER TÜRBASIS ABDECKUNG VERDAMPFER LUFTLEITBLECH 2 TEILIG STERNFÖRMIGE VERBINDUNG 16 VERBINDUNGSWINKEL 16 ZAPFEN RAMPE PUFFER VERLÄNGERUNG WARMGAS VERLÄNGERUNG DES ZULAUFROHRS SCHALTSCHRANK ABDECKPLATTE ...

Страница 59: ...echnische Daten und Eigenschaften mit Änderungen ohne Anzeige All specification subject to change without notice Données techniques et caracteristiques suiettes à des changements sans avis 59 WASSERWAAGE SCHRAUBER SILIKON INNENSECHSKANTSCHLÜSSEL SCHWEISSBRENNER KIT VALVOLA ...

Страница 60: ...TAGEANLEITUNG DER ZELLE HINWEIS ALLE ÜBERGANGSVERBINDUNGEN ZWISCHEN DEN PLATTEN MÜSSEN SILIKONISIERT WERDEN Bereiten Sie die Seitenplatten vor indem Sie die Sterne und Winkel einfügen Auf der linken Platte mit Aussparung für den Ablauf brin gen Sie die 2 Träger an und schrauben diese fest Auf der rechten Platte bringen Sie nur den hinteren Träger und nicht den vorderen Träger an Legen Sie die Bode...

Страница 61: ...echniques et caracteristiques suiettes à des changements sans avis 61 Befestigen Sie die linke Seite am Boden Befestigen Sie das Rückteil am Boden und am Seitenteil Befestigen Sie nun die rechte Seitenplatte ohne Träger auf der Frontseite Befestigen Sie die Türplatte Schließen Sie die Tür mit dem vorderen Träger Im letzten Schritt befestigen Sie das Dach und bringen die Bohrungsabdeckungen an ...

Страница 62: ...specification subject to change without notice Données techniques et caracteristiques suiettes à des changements sans avis 62 Öffnen Sie die Tür und befestigen Sie die Türschwelle mit Silikon und Schrauben und danach das Gestell Befestigen Sie die Luftleitbleche Bringen Sie den Verdampfer an indem Sie die Verschraubungen komplett anziehen ...

Страница 63: ...vis 63 Führen Sie den Verdampfer mit komplett geschlossenen Füßen bis zur Tür ein Danach schweißen Sie die Verlängerungsrohre an Sobald die Rohre aus den Bohrungen im Dach herauskommen drehen Sie die Gerätefüße so weit raus dass sich der Verdampfer anhebt Verschweißen Sie das Thermostatventil und befestigen Sie den Verdampfer mit den Schrauben Nach der Verschweißung lassen Sie das mehradrige Kabel...

Страница 64: ...All specification subject to change without notice Données techniques et caracteristiques suiettes à des changements sans avis 64 Bringen Sie nun die obere Abdeckung an Befestigen Sie den Schaltschrank über der Tür Fühler Kerntemperaturfühler Beleuchtung Entlüftungsventil Motor Motorsteuerung Stromversorgung Maßzahl des Sensors 21 mm ...

Страница 65: ...n subject to change without notice Données techniques et caracteristiques suiettes à des changements sans avis 65 Führen Sie das Stromkabel des Displays in die Bohrung auf der Frontseite der Tür Bringen Sie danach das Display an Schließen Sie nun die elektrischen Kabel gemäß des Schaltplans an siehe Anhang 2 Bringen Sie zum Schluss die Verkleidung an ...

Страница 66: ...ät von bis zu 10 Metern betragen Der Durchmesser des Zulaufs beträgt 16 mm Der Durchmesser des Rücklaufs beträgt 22 mm Der Durchmesser der Warmgasleitung beträgt 16 mm Für größere Längen sind die Durchmesser entsprechend anzupassen um einen korrekten Gasdurchlauf zu garantieren Isolieren Sie alle Saug und Warmgasrohre mit einem Anti Kondensationsrohr mit einer Dicke von mindestens 13 mm Für die ko...

Страница 67: ...et wird und wenn die Elektroinstallation nicht entsprechend der gesetzlichen Vorschriften erfolgt Bei Geräten mit dreiphasiger Stromversorgung ist bei Start die Rotationsrichtung der Lüfter zu beobachten Wenn diese nicht mit der Richtung der Pfeile auf dem Schild neben den Lüftern übereinstimmt schalten Sie das Gerät aus und kehren Sie die beiden Phasen der Stromleitung um Danach kann die Anlage n...

Страница 68: ...D BY mit 3 roten Kästchen Unter diesen Bedingungen steht das Gerät komplett still Wenn Sie die Kästchen von links nach rechts antippen können Sie die Startseite aufrufen Bei Anschaltung des Geräts sollte sofort der Bildschirmschoner gemeinsam mit einer Ladestatusanzeige der Software er scheinen Nach Laden der Software wird automatisch die Startseite angezeigt Auf dieser sind 3 Symbole zu sehen Wäh...

Страница 69: ...ekt verbunden sind Zur Durchführung der Überprüfung der einzelnen Komponenten drücken Sie die Taste PLAY und warten Sie bis sich der dazugehörige Wert Ux Rot färbt der Status ON und der Verbrauch des geprüften Elements in Watt angezeigt wird Drücken Sie danach erneut die Taste PLAY um auf die nachfolgende Steuerung zuzugreifen Nach Überprüfung aller Ausgänge drücken Sie das Symbol HOME Die Ausgäng...

Страница 70: ...zw reinigen Sie ihn Rotes Dreieck und Maschinenverriegelung Alarm hohe Kondensation Fühler des Kondensators Wenden Sie sich an einen Fachtechniker und geben Sie den Alarm und die Seriennummer des Produkts an Fühler S3 auswechseln Rotes Dreieck und Maschinenverriegelung Alarm hohe Kondensation Lüfter des Kondensators funktioniert nicht Wenden Sie sich an einen Fachtechniker und geben Sie den Alarm ...

Страница 71: ...d geben Sie die Fehlermeldung und Seriennummer des Produkts an Fühler S1 auswechseln Rotes Dreieck Alarm Fühler des Verdampfers S2 Der Fühler des Verdampfers ist beschädigt oder gebrochen Wenden Sie sich an den Fachtechniker und geben Sie die Fehlermeldung und Seriennummer des Produkts an Fühler S2 auswechseln Rotes Dreieck Alarm Fühler des Kondensators S3 Fühler des Kondensators Wenden Sie sich a...

Страница 72: ...an Kontrollieren Sie den festen Sitz der Klemmen Der Verdichter funktio niert nicht Der Verdichter funktio niert nicht Anschlussfehler Steuerele mente Wenden Sie sich an den Fachtechniker und geben Sie die Fehlermeldung und Seriennummer des Produkts an Anschluss prüfen und eventu ell korrigieren Der Verdichter funktio niert nicht Der Verdichter funktio niert nicht Zu niedrige Netzspannung Wenden S...

Страница 73: ... nicht Das Gerät ist zu laut Vibration der Rohrleitungen Wenden Sie sich an den Fachtechniker und geben Sie die Fehlermeldung und Seriennummer des Produkts an Die Rohrleitungen besser verbinden Kontrollieren Sie den festen Sitz der Rohrver bindungen Der Verdichter funktio niert nicht Das Gerät ist zu laut Das Expansionsventil zischt Wenden Sie sich an den Fachtechniker und geben Sie die Fehlermeld...

Страница 74: ...amenti senza preavviso Technische Daten und Eigenschaften mit Änderungen ohne Anzeige All specification subject to change without notice Données techniques et caracteristiques suiettes à des changements sans avis 74 ESPANOL Instalación INFINITY carro ...

Страница 75: ...uiettes à des changements sans avis 75 1 Componentes necesarios para el montaje de la cámara ANGULARES VERTICALES 4 PZAS PANEL LATERAL PANEL LATERAL DESAGÜE PANEL POSTERIOR TECHO PANEL PUERTA FONDO CON EVAPORADOR BASE PUERTA CUBIERTA EVAPORADOR DEFLECTOR 2 PZAS ACOPLAMIENTO EN ESTRELLA ACOPLAMIENTO ANGULAR TAPONES RAMPA PARAGOLPES EXTENSIÓN GAS CALIENTE EXTENSIÓN TUBO SALIDA CUADRO ELÉCTRICO CUBRE...

Страница 76: ...chnische Daten und Eigenschaften mit Änderungen ohne Anzeige All specification subject to change without notice Données techniques et caracteristiques suiettes à des changements sans avis 76 NIVEL DE BURBUJA DESTORNILLADOR SILICONA LLAVE A L ANTORCHA DE SOLDADURA KIT VALVOLA ...

Страница 77: ...ns avis 77 1 INSTRUCCIONES MONTAJE CÁMARA NB PONER SILICONA EN TODAS LAS JUNTAS DE LOS PANELES Preparar los paneles mediante la inserción de las estrellas y de los angulares Par el panel izquierdo con predisposición para el de sagüe poner los dos montantes y fijarlos con la llave correspondiente Para el panel derecho poner solo el montante posterior y no el frontal Colocar el fondo y ponerlo en pl...

Страница 78: ...o change without notice Données techniques et caracteristiques suiettes à des changements sans avis 78 Fijar el panel izquierdo a la parte inferior Fijar la parte posterior a la parte inferior y al costado luego fije el costado derecho sin el montante frontal Fijar el panel puerta y cerrar con el montante frontal Por último fijar el techo y aplicar los tapones ...

Страница 79: ...All specification subject to change without notice Données techniques et caracteristiques suiettes à des changements sans avis 79 Abrir la puerta y fijar el umbral de la puerta con silicona y tornillos y a continuación el travesaño Fijar los deflectores Predisponer el evaporador atornillando completamente los soportes para atornillar ...

Страница 80: ...stiques suiettes à des changements sans avis 80 Meter el evaporador con las patas completamente cerradas por la puerta Luego soldar los tubos de la extensión Ahora que los tubos salen por el techo perforado desatornillar las patas para elevar el evaporador Soldar la válvula termostática y fijarla con los tornillos Al terminar la soldadura sacar el cable multipolar de la caja de cableado del evapor...

Страница 81: ...ohne Anzeige All specification subject to change without notice Données techniques et caracteristiques suiettes à des changements sans avis 81 Luego colocar la cubierta superior Fijar el cuadro eléctrico sobre la puerta Sondas Sonda de aguja Luz Válvula de desagüe Motor Controles del motor Alimentación Valor sensor 21 mm ...

Страница 82: ...change without notice Données techniques et caracteristiques suiettes à des changements sans avis 82 Pase el cable de alimentación pantalla en el interior del agujero que se encuentra en la parte frontal de la puerta A continuación aplique la pantalla Terminar el cableado eléctrico como o prevé el diagrama eléctrico ver Anexo 2 Al final aplique el cubre gabinete ...

Страница 83: ...asta 10 metros El diámetro de la salida es de 16 mm El diámetro del regreso es de 22 mm El diámetro del gas caliente es de 16 mm Para longitudes mayores dimensionar los diámetros a fin de garantizar la correcta velocidad del gas Aislar siempre la línea de aspiración y gas caliente con tubo anticondensación con un espesor de al menos 13 mm De fundamental importancia para el funcionamiento adecuado ...

Страница 84: ...n eléctrica a la que se conecte no haya sido realizada de conformidad con las normas vigentes En las máquinas con alimentación trifásica es necesario estar presente al arranque de los ventiladores para comprobar el sentido de rotación si no corresponde al indicado por la flecha en la etiqueta cerca de los ventiladores se debe apagar la máquina e invertir dos fases de la línea de alimentación Tras ...

Страница 85: ...a la pantalla muestra STAND BY con 3 cuadrados rojos En esta condición la máquina se detiene completamente Pulsando en secuencia los cuadrados de la izquierda a la derecha se entra en la página de inicio Al encender la máquina se debe visualizar inmediatamente el protector de pantalla con una barra de carga de software Tras la descarga pasará automáticamente a la página de inicio que muestra tres ...

Страница 86: ...dos correctamente Para hacer la prueba de cada uno de los componentes pulse el botón PLAY y espere a que el valor Ux relativo cambie volvién dose de color rojo y muestre el estado de ON y se visualice el consumo en W para el componente al que se hace la prueba A continuación pulse el botón PLAY para pasar al siguiente control Después de probar todas las salidas pulse el botón INICO Las salidas cor...

Страница 87: ... obstruir las rejillas de ventilación del condensador y o limpiarlo Triángulo rojo y bloqueo máquina Alarma alta condensación Sonda condensador Llamar al técnico cualificado y comunicar la alarma y número de serie del producto Sustituir sonda S3 Triángulo rojo y bloqueo máquina Alarma alta condensación Ventilador condensador no funciona Llamar al técnico cualificado y comunicar la alarma y número ...

Страница 88: ...Sustituir sonda S1 Triángulo rojo Alarme sonda evaporador S2 Sonda evaporador dañada descompuesta Llamar al técnico cualificado y comunicar el error leído y el número de serie del producto Sustituir sonda S2 Triángulo rojo Alarme sonda condensador S3 Sonda condensador Llamar al técnico cualificado y comunicar el error leído y el número de serie del producto Sustituir sonda S3 Triángulo rojo y bloq...

Страница 89: ...icado y comunicar el error leído y el número de serie del producto Controlar la tensión de línea localizar y corregir la causa de la caída de tensión Compresor no funciona El compresor no funciona El motor del compresor no funciona Llamar al técnico cualificado y comunicar el error leído y el número de serie del producto Compruebe si las bobinas del motor están abiertas o en cortocircuito Si es ne...

Страница 90: ...emasiado ruidosa Silbido de la válvula de expansión Llamar al técnico cualificado y comunicar el error leído y el número de serie del producto Rellenar la carga de refrige rante Controlar que el filtro del líquido no esté obstruido Compresor no funciona La unidad es demasiado ruidosa Ruido del compresor Llamar al técnico cualificado y comunicar el error leído y el número de serie del producto Cont...

Страница 91: ......

Страница 92: ...AFINOX s r l via Venezia 4 35010 MARSANGO PD Italy Tel 39 0499638311 Fax 39 049552688 ...

Отзывы: