AFG 3.1AT Скачать руководство пользователя страница 38

38

5.1

AT

Содержание 3.1AT

Страница 1: ...APIS ROULANT MANUAL DEL PROPIETARIO DE LA CAMINADORA Read the treadmill guide before using this owner s manual Lire le GUIDE DU TAPIS ROULANT avant de se servir du présent MANUEL DU PROPRIÉTAIRE Lea la GUÍA DE LA CAMINADORA antes de usar este MANUAL DEL PROPIETARIO ...

Страница 2: ...2 3 ENGLISH 40 Français 78 Español ...

Страница 3: ...equately informed of all warnings and precautions If you have any questions after reading this manual contact Customer Tech Support at the number listed on the back panel This treadmill is intended for in home use only Do not use this treadmill in any commercial rental school or institutional setting Failure to comply will void the warranty This treadmill has a pre waxed belt and should never be l...

Страница 4: ...cified in the OWNER S MANUAL WARRANTY SECTION Failure to comply will void the warranty When lowering the treadmill deck wait until rear feet are firmly on the floor before stepping on the deck Disconnect all power before servicing or moving the equipment To clean wipe surfaces down with soap and slightly damp cloth only never use solvents See MAINTENANCE The treadmill should never be left unattend...

Страница 5: ...ing clean free of lint hair and the like To prevent electrical shock never drop or insert any object into any opening Do not operate where aerosol spray products are being used or when oxygen is being administered To disconnect turn all controls to the off position then remove plug from outlet Do not use treadmill in any location that is not temperature controlled such as but not limited to garage...

Страница 6: ...N WARNING DANGER Improper connection of the equipment grounding conductor can result in a risk of electric shock Check with a qualified electrician or serviceman if you are in doubt as to whether the product is properly grounded Do not modify the plug provided with the product If it will not fit the outlet have a proper outlet installed by a qualified electrician This product is for use on a nomin...

Страница 7: ... seem loose and may cause irritating noises To prevent damage to the treadmill the assembly instructions must be reviewed and corrective actions should be taken Before proceeding find your treadmill s serial number located on a white barcode sticker near the on off power switch and power cord and enter it in the space provided below ENTER YOUR SERIAL NUMBER AND MODEL NAME IN THE BOXES BELOW Refer ...

Страница 8: ... UNDERNEATH DECK RUNNING BELT RUNNING DECK CAUTION AVERTISSEMENT PRECAUCIÓN KEEP HANDS AND FEET AWAY FROM THIS AREA HIGH PRESSURE SHOCKS COULD CAUSE BODILY INJURY GARDER LES MAINS ET LES PIEDS LOIN DE CETTE REGION LES AMORTISSEURS À HAUTE PRESSION PEUVENT CAUSER DES BLESSURES MANTENGA LAS MANOS Y LOS PIES LEJOS DE ESTA AREA IMPACTOS DE ALTA PRESIÓN PUEDEN CAUSAR DAÑO CORPORAL CAUTION AVERTISSEMENT...

Страница 9: ...vel flat surface It is recommended that you place a protective covering on your floor Take CAUTION when handling and transporting this unit Never open box when it is on its side Once the banding straps have been removed do not lift or transport this unit unless it is fully assembled Unpack and assemble the unit where it will be used Never grab hold of any portion of the incline frame and attempt t...

Страница 10: ... D 5 1AT ASSEMBLY STEP 1 This step is for 5 1AT models only For 3 1AT models proceed to page 12 A Cut the yellow banding straps and lift the running deck upward to remove all contents from underneath the running deck B Open hardware for step 1 C Place main frame boots over main frame as shown D Attach main frame boots to main frame using 8 screws D from above and 2 screws L from the front ...

Страница 11: ...ire through the mast the top of the console cable should be located at the top of the mast Detach and discard lead wire F Place right console mast over main frame bracket G Attach console mast to main frame bracket using 3 bolts a 3 spring washers b and 3 arc washers c H Repeat steps F G on other side Note Do not tighten bolts until step 3 is complete Note Do not pinch console cable when placing t...

Страница 12: ...ad wire through right console mast After pulling the lead wire through the mast the top of the console cable should be located at the top of the mast Detach and discard lead wire D Place right console mast over main frame bracket E Attach console mast to main frame bracket using 3 bolts a 3 spring washers b and 3 arc washers c F Repeat steps D E to attach left console mast Note Do not pinch consol...

Страница 13: ...ide down attach the console mast caps to the console using 6 bolts E 6 spring washers B and 6 flat washers F BOLT E 20 mm Qty 6 FLAT WASHER F 8 2 mm Qty 6 SPRING WASHER B 8 2 mm Qty 6 HARDWARE for step 2 FLAT WASHERS F CONSOLE MAST CAP SPRING WASHERS B BOLTS E CONSOLE upside down ...

Страница 14: ...e It may be helpful to have a second person for this step C Gently place the console on top of the console masts Attach the left side first using 3 bolts G 3 spring washers B and 3 arc washers C D Attach the right side of the console using 3 bolts G 3 spring washers B and 3 arc washers C E Completely tighten all bolts from step 1 Note Be careful not to pinch any wires while attaching the console B...

Страница 15: ...FRAME BOOT 3 1AT ASSEMBLY STEP 4 This step is for 3 1AT models only A Open hardware for step 4 B Slide main frame boot down over main frame bracket C Attach main frame boots using 4 screws L SCREW L 20 mm Qty 4 HARDWARE for step 4 ...

Страница 16: ...ard the twist tie and slide the console cables into the center bar C Attach handlebars to center bar using 4 bolts H 4 spring washers I and 4 arc washers J BOLT H 12 mm Qty 4 SPRING WASHER I 6 2 mm Qty 4 ARC WASHER J 6 2 mm Qty 4 ASSEMBLY STEP 5 HARDWARE for step 5 Note Do not tighten bolts until step 6 is complete Do not pinch wires while assembling the handlebars ...

Страница 17: ...ars to console cables from console Gently tuck excess cable into console before sliding the handlebars onto console C Attach handlebars to console using 6 bolts K 6 spring washers B and 6 flat washers F D Completely tighten all bolts from step 5 Note Do not pinch wires while attaching the handlebars YOU ARE FINISHED This treadmill has a pre waxed belt and should never be lubricated Waxing the belt...

Страница 18: ...18 ...

Страница 19: ...ramming The BASIC OPERATION section in the treadmill guide has instructions for the following LOCATION OF THE TREADMILL Using the SAFETY KEY FOLDING the treadmill MOVING the treadmill LEVELING the treadmill TENSIONING THE RUNNING BELT CENTERING THE RUNNING BELT Using the HEART RATE function ...

Страница 20: ... Stamina Builder Weight Loss Golf Course Foot Hills Mountain Climb HR Intervals THR Zone Custom 1 Custom 2 P R O G R A M S 1 2 3 4 5 6 7 8 9 10 11 12 time incline distance speed clock date press to switch p e r f o r m a n c e f i l i n g s y s t e m change display pace calories heart rate A D C B E O H F S P L G K M J I N R R Q N ...

Страница 21: ...ypad used to reach desired speed or incline more quickly L Set incline key used to change incline to level entered into keypad M Set speed key used to change speed to level entered into keypad N Speakers music plays through speakers when your media player is connected to the console O Audio in jack USB port plug your media player into the console using the included audio adaptor cable USB port is ...

Страница 22: ...ou 10 minutes to complete a mile the treadmill will display 10 0 as your pace time incline distance speed clock date press to switch p e r f o r m a n c e f i l i n g s y s t e m change display pace calories heart rate clock date change display time incline distance speed calories heart rate 5 1AT DISPLAYS 3 1AT DISPLAYS CALORIES Total calories burned HEART RATE Shown as BPM beats per minute Used ...

Страница 23: ... using on the programming button and press enter to confirm 3 Complete the program setup using on the programming button and press enter to confirm 4 When setup is complete press start to begin your workout Date and clock setup 1 Enter Setup mode Press and hold the 1 and 2 buttons for 3 seconds 2 Use on the programming button to change settings and press enter to confirm 3 Settings include Month D...

Страница 24: ...5 3 5 7 5 2 6 1 8 Level 9 2 0 3 0 4 0 8 0 4 0 8 0 3 0 2 0 Level 10 2 0 3 0 4 0 8 5 4 0 8 5 3 0 2 0 Segment Warm Up 1 2 Segments are repeated until selected time is reached Cool Down Time 4 00 min 90 sec 30 sec 4 00 min Level 1 Incline 1 0 1 5 2 0 4 0 1 5 1 0 Speed 1 0 1 5 0 5 1 5 1 5 0 Level 2 Incline 1 0 1 5 2 0 4 5 1 5 1 0 Speed 1 5 2 5 3 0 6 5 2 5 1 5 Level 3 Incline 1 3 1 9 2 5 5 0 1 9 1 3 Spe...

Страница 25: ...3 0 6 0 2 0 3 0 7 0 3 0 2 0 Segment Warm Up 1 2 3 4 5 6 7 8 9 10 11 12 13 14 Cool Down Level 4 Seconds 60 60 30 30 30 30 120 120 120 60 60 60 120 60 60 60 60 60 60 60 4 00 min 35 00 Incline 2 0 2 0 3 0 3 0 3 0 3 0 5 0 6 0 6 0 1 0 4 0 4 0 3 0 4 0 7 0 2 0 5 0 1 0 6 0 1 0 1 0 1 0 Segment Warm Up 1 2 3 4 5 6 7 8 9 10 11 Cool Down Level 5 Seconds 60 60 30 30 30 30 60 60 60 120 120 60 60 60 60 60 120 4 ...

Страница 26: ... Speed 2 8 4 1 5 5 6 0 6 5 7 0 7 5 7 0 6 5 6 0 4 9 3 3 Level 9 Incline 2 0 2 5 3 5 3 5 3 0 2 5 2 5 2 5 3 0 3 5 2 5 2 0 Speed 3 0 4 5 6 0 6 5 7 0 7 5 8 0 7 5 7 0 6 5 5 3 3 5 Level 10 Incline 2 0 2 5 3 5 3 5 3 0 2 5 2 5 2 5 3 0 3 5 2 5 2 0 Speed 3 3 4 9 6 5 7 0 7 5 8 0 8 5 8 0 7 5 7 0 5 6 3 8 9 Hole Golf Course 18 Hole Golf Course Total Distance Segment 1 2 3 4 5 6 7 8 9 10 11 12 13 14 15 16 17 18 T...

Страница 27: ...2 0 2 0 4 0 3 0 4 0 3 0 4 0 4 0 5 0 4 0 4 0 3 0 4 0 3 0 4 0 2 0 2 0 1 0 2 0 1 0 Level 7 2 0 2 0 2 0 2 0 3 0 5 0 4 0 5 0 4 0 5 0 4 0 5 0 4 0 5 0 4 0 5 0 3 0 5 0 3 0 2 0 1 0 2 0 1 0 Level 8 2 0 2 0 2 0 2 0 3 0 5 0 4 0 5 0 4 0 5 0 4 0 5 0 4 0 5 0 4 0 5 0 4 0 5 0 3 0 2 0 2 0 2 0 2 0 Level 9 2 0 3 0 2 0 3 0 3 0 5 0 3 0 5 0 4 0 5 0 4 0 6 0 4 0 5 0 4 0 5 0 3 0 5 0 3 0 3 0 2 0 3 0 2 0 Level 10 2 0 3 0 2 0...

Страница 28: ...or a 30 year old exercising at 5 different heart rate zones For example a 30 year old s max HR is 220 30 190 bpm and 90 max HR is 190 0 9 171 bpm Target Heart Rate Zone Workout Duration Example THR Zone age 30 Your THR Zone Recommended For Very Hard 90 100 5 min 171 190 bpm Fit persons and for athletic training Hard 80 90 2 10 min 152 171 bpm Shorter workouts Moderate 70 80 10 40 min 133 152 bpm M...

Страница 29: ...and rest intervals Incline changes per definition 50 Current incline 0 CUSTOM Programs Lets you create and reuse a perfect workout for you with specific speed incline and time combination The ultimate in personal programming Time based goal 1 Select CUSTOM 1 or 2 using and press enter on the programming button 2 Select WEIGHT using and press enter on the programming button 3 Select TIME using and ...

Страница 30: ...d with AFG s exclusive PROFILE Performance Tracker you ve taken an important step towards achieving your fitness goals The integrated PROFILE software allows you to track your fitness progress over time without the need for paper journals or logs With PROFILE you can easily compare your current workout to your last average or lifetime workout totals With quick access to feedback like duration of w...

Страница 31: ... calories burned DISTANCE Total distance of workout SPEED Average speed of weekly workout NOTE If the date and clock are not set weekly total will default to the last workout data 4 LIFETIME TOTAL This option allows you to view the total accumulated data The following information will be shown in each display window INCLINE Average incline level TIME Total accumulated time NOTE If time is greater ...

Страница 32: ...peakers you can plug your headphones into the audio out jack at the bottom of the console Downloading a Software Update from AFGFitness com Occasionally a software update may be available for your console via the included USB port Please visit http www afgfitness com customer support software update to see if an update is available and get detailed instructions on how to download the latest softwa...

Страница 33: ...33 LIMITED HOME USE WARRANTY ...

Страница 34: ...f the device for the period specified above from the date of the original purchase so long as the device remains in the possession of the original owner EXCLUSIONS AND LIMITATIONS Who IS covered The original owner and is not transferable What IS covered Repair or replacement of a defective motor electronic component or defective part and is the sole remedy of the warranty What IS NOT covered Norma...

Страница 35: ... such repairs or replacement parts costs including but not limited to gym membership fees work time lost diagnostic visits maintenance visits or transportation Equipment used for commercial purposes or any use other than a single family or Household unless endorsed by the manufacturer for coverage Equipment owned or operated outside the US and Canada Delivery assembly installation setup for origin...

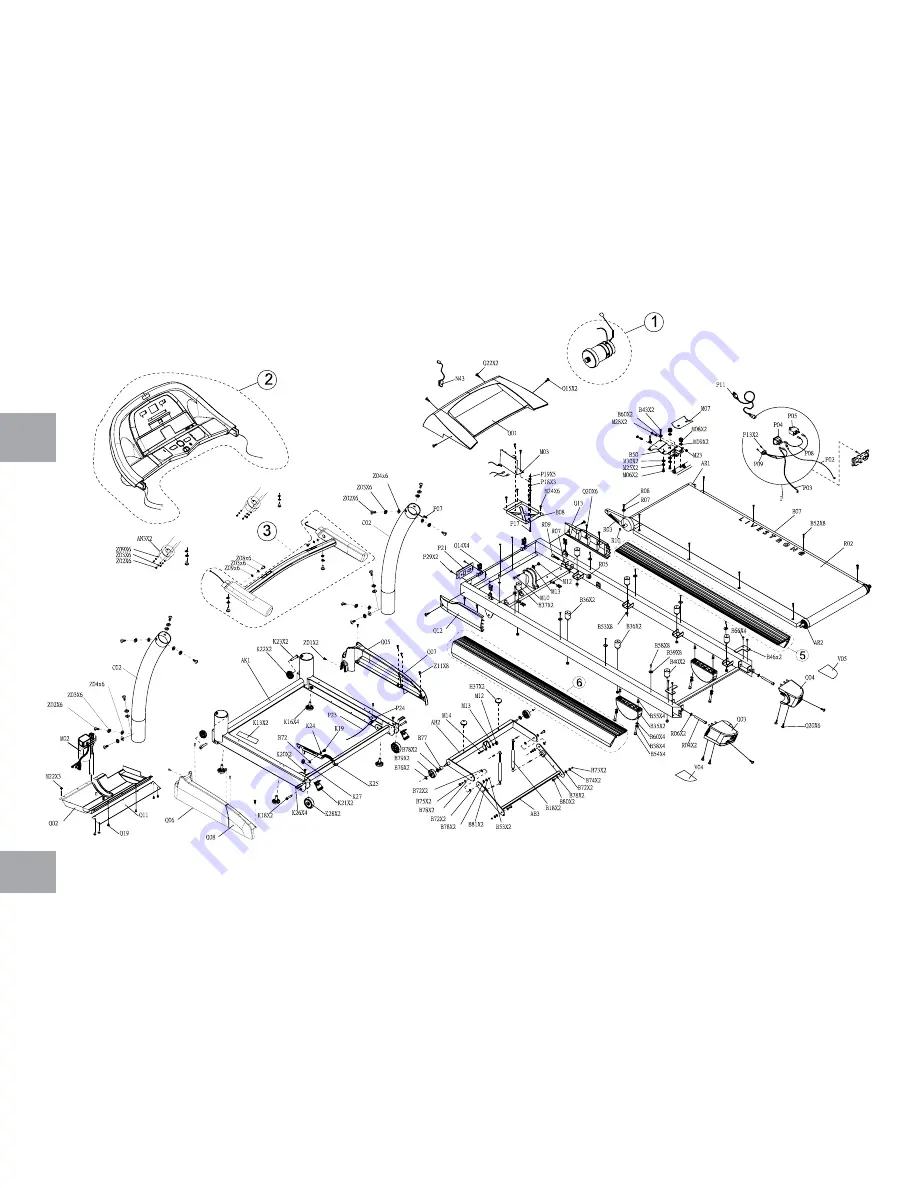
Страница 36: ...36 3 1AT ...

Страница 37: ...oller Nylon PA6 φ46xφ10 Screw BH M10X1 5PX50L HS ZN Washer FLT Φ10 5XΦ18 0X1 5T SPHC Location Hook BASE PAINTING DM328 TM Screw FH M4x0 7Px40L 10L MT 35K BAN P T Spring Ext Φ2 0XΦ16 0X50 0LX12N Rear Carriage Roller Nylon 30 G TM369 Wheel Nylon φ74 TM27 Motor AC Elevation 110V 80mm 225 JM14 Motor controller 110V MLH0910HFSABPC Screw SH 5 16 18UNCX16L HS BP Motor Elastomer Pad Rubber TM16 Nut NLK M8...

Страница 38: ...38 5 1AT ...

Страница 39: ...0L HS ZN Washer FLT Φ10 5XΦ18 0X1 5T SPHC Location Hook DM328 TM Screw FH M4x0 7Px40L 10L MT 35K BAN P T Spring EXT Φ2 0XΦ16 0X50 0LX12N Rear Carriage Roller Nylon 30 G TM369 Motor AC Elevation 110V 80mm 225 JM14 Motor controller 3 0HP 110V MLH0914 Screw SH 5 16 18UNCX16L HS BP Motor Elastomer Pad Rubber TM16 Nut NLK M8X1 25P BZN Washer FLT Φ8 3XΦ16 0X1 3T BZN Screw HH 3 8 16UNCX50L 14L HE G8 8 P ...

Страница 40: ...40 FRANÇAIS ...

Страница 41: ...toutes les précautions Pour toute question après la lecture du manuel communiquer avec le Service de soutien technique à la clientèle au numéro indiqué au verso du manuel Ce tapis roulant est destiné à un usage à domicile uniquement Ne pas utiliser ce tapis roulant dans un environnement commercial de location scolaire ou institutionnel Le non respect de cette consigne annule la garantie Ce tapis r...

Страница 42: ...ect de cette consigne est cause d annulation de la garantie Lorsque la plate forme du tapis roulant est rabaissée attendre jusqu à ce que les pattes arrière soient fermement sur le sol avant de monter sur la plate forme Mettre l appareil hors tension avant de l entretenir ou de le déplacer Pour le nettoyer en essuyer les surfaces avec du savon et un chiffon légèrement humide ne jamais utiliser de ...

Страница 43: ...our éviter toute décharge électrique ne jamais laisser tomber ni introduire un objet quelconque dans l une des ouvertures de l appareil Ne pas faire fonctionner l appareil près d un endroit où l on pulvérise des produits en aérosol ou l on administre de l oxygène Pour arrêter l appareil mettre toutes les commandes à OFF arrêt et le débrancher de la prise électrique Ne pas utiliser le tapis roulant...

Страница 44: ...re remplacer ou réparer PRISE MURALE À 3 FICHES ET MISE À LA TERRE BROCHE DE TERRE AVERTISSEMENT DANGER Un branchement incorrect du conducteur de mise à la terre de l appareil peut entraîner une décharge électrique Vérifier auprès d un électricien ou d un technicien compétent en cas de doute sur la mise à la terre de l appareil Ne pas altérer la fiche fournie avec l appareil Si elle ne s adapte pa...

Страница 45: ...rritants Pour éviter les dommages au tapis roulant relire les instructions d assemblage et prendre les mesures correctives qui s imposent Avant de continuer rechercher le numéro de série du tapis roulant qui figure sur un autocollant de code à barres blanc près de l interrupteur de marche arrêt et du cordon d alimentation et l inscrire dans l espace réservé ci dessous INSCRIRE LE NUMÉRO DE SÉRIE E...

Страница 46: ...DIO POIGNÉES COUVERCLE DU MOTEUR MONTANT DE CONSOLE INTERRUPTEUR MARCHE ARRÊT COUPE CIRCUIT CORDON D ALIMENTATION CAUTION AVERTISSEMENT PRECAUCIÓN KEEP HANDS AND FEET AWAY FROM THIS AREA HIGH PRESSURE SHOCKS COULD CAUSE BODILY INJURY GARDER LES MAINS ET LES PIEDS LOIN DE CETTE REGION LES AMORTISSEURS À HAUTE PRESSION PEUVENT CAUSER DES BLESSURES MANTENGA LAS MANOS Y LOS PIES LEJOS DE ESTA AREA IMP...

Страница 47: ...ersonne retire les pièces empilées sous la machine L INOBSERVATION DE CES INSTRUCTIONS PEUT ÊTRE CAUSE DE BLESSURES REMARQUE S assurer à chaque étape de l assemblage que TOUTES les vis et TOUS les écrous sont bien en place et partiellement serrés avant de les serrer à fond REMARQUE Une légère application de graisse peut faciliter l installation de la visserie Toute graisse comme la graisse au lith...

Страница 48: ...TAPE 1 DE L ASSEMBLAGE Cette étape ne concerne que le modèle 5 1AT Pour le modèle 3 1AT passer à la page 50 A Couper les bandes de cerclage jaunes et relever la plate forme Retirer toutes les pièces qui se trouvent sous la plate forme B Ouvrir le sachet de visserie À UTILISER LORS DE L ÉTAPE 1 C Placer les GAINES DU BÂTI sur le BÂTI voir la figure D Fixer les GAINES DU BÂTI au BÂTI avec 8 VIS D à ...

Страница 49: ...e de la console doit se trouver en haut du montant Détacher le fil de guidage et le mettre au rebut REMARQUE Ne pas pincer le câble de la console lorsqu on place le montant sur le support du bâti F Placer le MONTANT DE CONSOLE DROIT sur le SUPPORT DU BÂTI G Fixer le MONTANT DE CONSOLE au SUPPORT DU BÂTI avec 3 BOULONS A 3 RONDELLES ÉLASTIQUES B et 3 RONDELLES EN ARC C REMARQUE Ne pas serrer les bo...

Страница 50: ...s le montant de console droit Cela fait le bout du câble de la console doit se trouver en haut du montant Détacher le fil de guidage et le mettre au rebut REMARQUE Ne pas pincer le câble de la console lorsqu on place le montant sur le support du bâti D Placer le MONTANT DE CONSOLE DROIT sur le SUPPORT DU BÂTI E Fixer le MONTANT DE CONSOLE au SUPPORT DU BÂTI avec 3 BOULONS A 3 RONDELLES ÉLASTIQUES ...

Страница 51: ...UX DE MONTANT DE CONSOLE à la CONSOLE avec 6 BOULONS E 6 RONDELLES ÉLASTIQUES B et 6 RONDELLES PLATES F BOULON E 20 mm Quantité 6 RONDELLE PLATE F 8 2 mm Quantité 6 RONDELLE ÉLASTIQUE B 8 2 mm Quantité 6 VISSERIE À UTILISER LORS DE L ÉTAPE 2 RONDELLES PLATES F CHAPEAU DU MONTANT DE CONSOLE RONDELLES ÉLASTIQUES B BOULONS E CONSOLE sens dessus dessous ...

Страница 52: ... RONDELLES ÉLASTIQUES B et 3 rondelleS EN ARC C D Fixer le côté droit de la console avec 3 boulonS G 3 RONDELLES ÉLASTIQUES B et 3 rondelleS EN ARC C E Serrer complètement tous les boulons de l étape 1 de l assemblage BOULON G 20 mm Quantité 6 RONDELLE EN ARC C 8 2 mm Quantité 6 RONDELLE ÉLASTIQUE B 8 2 mm Quantité 6 VISSERIE À UTILISER LORS DE L ÉTAPE 3 BOULONS G RONDELLES ÉLASTIQUES B RONDELLES ...

Страница 53: ...rne que le modèle 3 1AT A Ouvrir le sachet de visserie À UTILISER LORS DE L ÉTAPE 4 B Faire glisser la GAINE DU BÂTI vers le bas sur le SUPPORT DU BÂTI C Fixer les GAINES DU BÂTI avec 4 VIS L VISSERIE À UTILISER LORS DE L ÉTAPE 4 VIS L 20 mm Quantité 4 VIS L GAINE DU BÂTI ...

Страница 54: ...ES DE LA CONSOLE POIGNÉES BARRE CENTRALE A Ouvrir le sachet de visserie À UTILISER LORS DE L ÉTAPE 5 B Connecter les câbles de la console jetez l attache et faites glisser les câbles de la console dans la barre centrale C Fixer les POIGNÉES à la BARRE CENTRALE avec 4 BOULONS H 4 RONDELLES ÉLASTIQUES I et 4 RONDELLES EN ARC J REMARQUE Ne pas serrer les boulons avant d avoir terminé l étape 6 de l a...

Страница 55: ...xer les POIGNÉES à la CONSOLE avec 6 BOULONS K 6 RONDELLES ÉLASTIQUES B et 6 RONDELLES PLATES F D Serrer complètement tous les boulons de l étape 5 de l assemblage REMARQUE Veiller à ne pincer aucun fil lors de la fixation des poignées BOULON K 15 mm Quantité 6 RONDELLE PLATE F 8 2 mm Quantité 6 RONDELLE ÉLASTIQUE B 8 2 mm Quantité 6 VISSERIE À UTILISER LORS DE L ÉTAPE 6 TRAVAIL TERMINÉ Ce tapis r...

Страница 56: ...56 ...

Страница 57: ...on FONCTIONNEMENT DE BASE du guide du tapis roulant comporte des instructions relatives à ce qui suit EMPLACEMENT DU TAPIS ROULANT Utilisation de la CLÉ DE SÉCURITÉ PLIAGE du tapis roulant DÉPLACEMENT du tapis roulant MISE À NIVEAU du tapis roulant TENSIONNEMENT DE LA BANDE CENTRAGE DE LA BANDE Utilisation du CARDIO FRÉQUENCEMÈTRE ...

Страница 58: ...ls Stamina Builder Weight Loss Golf Course Foot Hills Mountain Climb HR Intervals THR Zone Custom 1 Custom 2 P R O G R A M S 1 2 3 4 5 6 7 8 9 10 11 12 time incline distance speed clock date press to switch p e r f o r m a n c e f i l i n g s y s t e m change display pace calories heart rate A D C B E O H F S P L G K M J I N R R Q N ...

Страница 59: ...ndre les exercices après une pause G Stop ARRÊT Appuyer sur cette touche pour faire une pause terminer une séance d exercices La tenir pendant 3 secondes pour réinitialiser la console H touche de programmation Sert à choisir un programme un niveau une durée et les autres options I TOUCHES DE RÉGLAGE DE L INCLINAISON Servent à régler l inclinaison par petits incréments de 0 5 J TOUCHES DE RÉGLAGE D...

Страница 60: ...lock date press to switch p e r f o r m a n c e f i l i n g s y s t e m change display pace calories heart rate clock date change display time incline distance speed calories heart rate FENÊTRES D AFFICHAGE DU MODÈLE 5 1AT FENÊTRES D AFFICHAGE DU MODÈLE 3 1AT CALORIES Nombre total de calories brûlées HEART RATE FRÉQUENCE CARDIAQUE Indique les battements par minute b min Permet à l utilisateur de s...

Страница 61: ... l aide des touches de la touche de programmation Appuyer sur la touche ENTER pour confirmer 4 Lorsque le réglage est terminé appuyer sur la touche START pour commencer la séance d entraînement RÉGLAGE DE LA DATE ET DE L HORLOGE 1 Passage en mode de réglage Appuyer sur les touches et 1 et 2 et les tenir pendant 3 secondes 2 Utiliser les touches de la touche de programmation pour modifier les régla...

Страница 62: ... 6 3 5 7 5 3 5 7 5 2 6 1 8 Niveau 9 2 0 3 0 4 0 8 0 4 0 8 0 3 0 2 0 Niveau 10 2 0 3 0 4 0 8 5 4 0 8 5 3 0 2 0 Segment Échauffement 1 2 Les segments se répètent jusqu à ce que la durée choisie soit écoulée Récupération Durée 4 00 min 90 s 30 s 4 00 min Niveau 1 Inclinaison 1 0 1 5 2 0 4 0 1 5 1 0 Vitesse 1 0 1 5 0 5 1 5 1 5 0 Niveau 2 Inclinaison 1 0 1 5 2 0 4 5 1 5 1 0 Vitesse 1 5 2 5 3 0 6 5 2 5 ...

Страница 63: ... 0 2 0 5 0 1 0 2 0 6 0 2 0 3 0 6 0 2 0 3 0 7 0 3 0 2 0 Segment Échauffement 1 2 3 4 5 6 7 8 9 10 11 12 13 14 Récupération Niveau 4 Secondes 60 60 30 30 30 30 120 120 120 60 60 60 120 60 60 60 60 60 60 60 4 00 min 35 00 Inclinaison 2 0 2 0 3 0 3 0 3 0 3 0 5 0 6 0 6 0 1 0 4 0 4 0 3 0 4 0 7 0 2 0 5 0 1 0 6 0 1 0 1 0 1 0 Segment Échauffement 1 2 3 4 5 6 7 8 9 10 11 Récupération Niveau 5 Secondes 60 60...

Страница 64: ...0 1 5 Vitesse 2 8 4 1 5 5 6 0 6 5 7 0 7 5 7 0 6 5 6 0 4 9 3 3 Niveau 9 Inclinaison 2 0 2 5 3 5 3 5 3 0 2 5 2 5 2 5 3 0 3 5 2 5 2 0 Vitesse 3 0 4 5 6 0 6 5 7 0 7 5 8 0 7 5 7 0 6 5 5 3 3 5 Niveau 10 Inclinaison 2 0 2 5 3 5 3 5 3 0 2 5 2 5 2 5 3 0 3 5 2 5 2 0 Vitesse 3 3 4 9 6 5 7 0 7 5 8 0 8 5 8 0 7 5 7 0 5 6 3 8 Parcours de 9 trous Parcours de 18 trous Distance totale Segment 1 2 3 4 5 6 7 8 9 10 1...

Страница 65: ...0 3 0 5 0 3 0 4 0 3 0 4 0 2 0 4 0 2 0 2 0 1 0 2 0 1 0 Niveau 6 1 0 2 0 1 0 2 0 2 0 4 0 3 0 4 0 3 0 4 0 4 0 5 0 4 0 4 0 3 0 4 0 3 0 4 0 2 0 2 0 1 0 2 0 1 0 Niveau 7 2 0 2 0 2 0 2 0 3 0 5 0 4 0 5 0 4 0 5 0 4 0 5 0 4 0 5 0 4 0 5 0 3 0 5 0 3 0 2 0 1 0 2 0 1 0 Niveau 8 2 0 2 0 2 0 2 0 3 0 5 0 4 0 5 0 4 0 5 0 4 0 5 0 4 0 5 0 4 0 5 0 4 0 5 0 3 0 2 0 2 0 2 0 2 0 Niveau 9 2 0 3 0 2 0 3 0 3 0 5 0 3 0 5 0 4 ...

Страница 66: ...ent par un cardiologue ou un physiologiste de l exercice lors d une épreuve d effort maximal Si vous avez plus de 40 ans faites de l embonpoint êtes sédentaire depuis des années ou s il y a plusieurs cas de maladie du cœur dans votre famille un contrôle clinique est recommandé Ce tableau comporte des exemples de gammes d effort cardiovasculaire pour une personne âgée de 30 ans qui s exerce dans 5 ...

Страница 67: ...ur réinitialiser la mémoire appuyer sur la touche ENTER et la tenir pendant 5 secondes 10 HR intervals INTERVALLES DE TRAVAIL ET DE REPOS 5 1AT UNIQUEMENT Ajuste automatiquement les niveaux d inclinaison maximale et minimale au cours des intervalles de travail et de repos dans votre zone de fréquence cardiaque cible Parfait pour procurer un exercice intensif entrecoupé d intervalles de repos Objec...

Страница 68: ...isation de vos objectifs d entraînement Le logiciel PROFILE intégré permet de suivre les progrès vers la concrétisation d objectifs d entraînement au fil du temps et dispense d avoir à tenir manuellement un journal ou un registre Le PROFILE permet de comparer facilement les résultats obtenus pendant la séance d entraînement que l on vient d exécuter aux résultats obtenus au cours de la séance d en...

Страница 69: ... totale parcourue au cours des exercices SPEED VITESSE Vitesse moyenne lors des exercices hebdomadaires REMARQUE Si la date et l horloge ne sont pas réglées le total hebdomadaire passe implicitement aux données de la séance d exercices précédente 4 LIFETIME TOTAL TOTAL HISTORIQUE Cette option permet de visualiser l ensemble des données cumulées Les renseignements suivants s affichent dans la fenêt...

Страница 70: ...utiliser les haut parleurs on peut brancher le casque d écoute à la PRISE DE SORTIE AUDIO à la partie inférieure de la console TÉLÉCHARGEMENT D UNE MISE À JOUR DU LOGICIEL À PARTIR DE AFGFitness com Périodiquement une mise à jour du logiciel peut être disponible pour la console par le port USB fourni Consulter le site http www afgfitness com customer support software update pour voir si une mise à...

Страница 71: ...71 GARANTIE LIMITÉE USAGE DOMESTIQUE ...

Страница 72: ...l appareil pendant la période spécifiée ci dessus à compter de la date de l achat initial tant que le propriétaire initial possède l appareil EXCLUSIONS ET LIMITATIONS Qui EST couvert Le propriétaire initial la garantie n est pas transférable Qu est ce qui EST couvert La réparation ou le remplacement du moteur défectueux de composants électroniques défectueux ou de pièces défectueuses Ils constitu...

Страница 73: ...ations de jouissance ou d utilisation ou d autres dommages immatériels de quelque nature que ce soit en relation avec l achat l utilisation la réparation ou l entretien de l équipement Le fabricant ne consent aucune compensation monétaire ou autre pour de telles réparations ou le coût des pièces de rechange y compris notamment les cotisations d organismes sportifs pertes de temps de travail visite...

Страница 74: ...74 3 1AT ...

Страница 75: ...25x150x2 0 unique Vérin avant Vis à tête fraisée plate Vis Vis à tête ronde Frein de bâti Roulette de transport avant Vis à tête ronde Rondelle plate Étrier de positionnement base Vis à tête fraisée plate Ressort Roulette de transport arrière Roulette Moteur d inclinaison c a 110 V 80 mm Contrôleur de moteur 110 V Vis à tête creuse Coussinet de moteur élastomère Écrou Rondelle plate Vis à tête hex...

Страница 76: ...76 5 1AT ...

Страница 77: ... de bâti Roulette de transport avant Vis à tête ronde Rondelle plate Étrier de positionnement Vis à tête fraisée plate Ressort Roulette de transport arrière Moteur d inclinaison c a 110 V Contrôleur de moteur 3 0 HP 110 V Vis à tête creuse Coussinet de moteur élastomère Écrou Rondelle plate Vis à tête hexagonale Écrou Rondelle plate Vis à tête hexagonale Vis à tête ronde Écrou hexagonal Boulon à t...

Страница 78: ...78 español ...

Страница 79: ...ene alguna pregunta después de leer este manual póngase en contacto con el Servicio de asistencia técnica a clientes al número que aparece en la contraportada de este manual Esta caminadora está diseñada solamente para uso en el hogar No utilice esta caminadora en un comercio en alquiler escuela o institución Si no se cumple con esta advertencia se anula la garantía Esta caminadora tiene una corre...

Страница 80: ...L DEL PROPIETARIO Si no se cumple con esta advertencia se anula la garantía Cuando baje la plataforma de la caminadora antes de subirse a ella espere hasta que las patas traseras queden firmes en el piso Desconecte la corriente antes de darle servicio al equipo o moverlo Para limpiar el equipo sólo use un paño humedecido en agua con jabón nunca use solventes vea MANTENIMIENTO La caminadora nunca s...

Страница 81: ...s de aire limpia sin pelusa ni cabello Para evitar las descargas eléctricas nunca deje caer ni introduzca ningún objeto en ninguna abertura No use la caminadora donde se estén utilizando productos en aerosol sprays o si se está administrando oxígeno Para desconectar la caminadora coloque todos los controles en la posición de apagado OFF y desconecte el enchufe del tomacorriente No utilice la camin...

Страница 82: ...ORRIENTE DE 3 POLOS CON CONEXIÓN A TIERRA CLAVIJA DE PUESTA A TIERRA ADVERTENCIA PELIGRO Si el conductor de conexión a tierra no está bien conectado puede ocasionar el riesgo de que se produzca una descarga eléctrica Llame a un electricista o instalador capacitado si tiene dudas acerca de la conexión a tierra de este aparato No modifique la clavija original del aparato Si la clavija no entra en el...

Страница 83: ...s a la caminadora es necesario repasar las instrucciones de ensamblaje y hacer las correcciones necesarias Antes de seguir adelante busque el número de serie de su caminadora que está colocado en una etiqueta blanca con un código de barras cerca del interruptor de encendido y apagado y del cable de corriente y escríbalo en el espacio disponible a continuación ESCRIBA EL NÚMERO DE SERIE Y EL NOMBRE...

Страница 84: ... ENCENDIDO Y APAGADO CORTACIRCUITO CABLE DE CORRIENTE TAPA DEL EXTREMO DEL RODILLO TORNILLOS DE AJUSTE TENSIÓN DEL RODILLO POSTERIOR CAUTION AVERTISSEMENT PRECAUCIÓN KEEP HANDS AND FEET AWAY FROM THIS AREA HIGH PRESSURE SHOCKS COULD CAUSE BODILY INJURY GARDER LES MAINS ET LES PIEDS LOIN DE CETTE REGION LES AMORTISSEURS À HAUTE PRESSION PEUVENT CAUSER DES BLESSURES MANTENGA LAS MANOS Y LOS PIES LEJ...

Страница 85: ...a caja en que viene la caminadora sobre una superficie plana y nivelada Le recomendamos colocar una cubierta protectora sobre el piso bajo la maquina Tenga CUIDADO al transportar y mover esta unidad Una vez que haya retirado el enfajillado no transporte esta unidad a menos que ya este completamente ensamblada Desempaque y ensamble la unidad en el lugar en que la vaya a usar Nunca sostenga ninguna ...

Страница 86: ...T pase a la página 88 A Corte el enfajillado amarillo levante la plataforma hacia arriba y retire todo lo que haya debajo de la plataforma B Abra la bolsa de tornillería PARA EL PASO 1 C Meta los GUARDAPOLVOS DEL BASTIDOR PRINCIPAL sobre el BASTIDOR PRINCIPAL como se muestra D Fije los GUARDAPOLVOS DEL BASTIDOR PRINCIPAL al BASTIDOR PRINCIPAL con 8 TORNILLOS D desde arriba y 2 TORNILLOS L desde el...

Страница 87: ... del cable a través del poste la punta superior del cable de la consola debe quedar en la parte superior del poste Suelte y deseche el alambre de alimentación NOTA No pellizque el cable de la consola al colocar el poste sobre la ménsula del bastidor principal F Coloque el POSTE DERECHO DE LA CONSOLA sobre su MÉNSULA del BASTIDOR PRINCIPAL G Fije el POSTE DE LA CONSOLA en su MÉNSULA DEL BASTIDOR PR...

Страница 88: ... de la consola Una vez que haya pasado todo el alambre de alimentación del cable a través del poste la punta superior del cable de la consola debe quedar en la parte superior del poste Suelte y deseche el alambre de alimentación NOTA No pellizque el cable de la consola al colocar el poste sobre la ménsula del bastidor principal D Coloque el POSTE DERECHO DE LA CONSOLA sobre su MÉNSULA del BASTIDOR...

Страница 89: ...E LOS POSTES DE LA CONSOLA a la CONSOLA con 6 TORNILLOS E 6 ARANDELAS ELÁSTICAS B y 6 ARANDELAS PLANAS F TORNILLO E 20 mm Cantidad 6 ARANDELA PLANA F 8 2 mm Cantidad 6 ARANDELA ELÁSTICA B 8 2 mm Cantidad 6 TORNILLERÍA PARA EL PASO 2 ARANDELAS PLANAS F TAPA DEL POSTE DE LA CONSOLA ARANDELAS ELÁSTICAS B TORNILLOS E CONSOLA de cabeza ...

Страница 90: ...ARANDELAS DE ARCO C D Fije el LADO DERECHO de la CONSOLA con 3 TORNILLOS G 3 ARANDELAS ELÁSTICAS B y 3 ARANDELAS DE ARCO C E Apriete bien todos los tornillos mencionados en el paso 1 de ensamblaje PASO 3 DE ENSAMBLAJE TORNILLERÍA PARA EL PASO 3 TORNILLOS G ARANDELAS ELÁSTICAS B ARANDELAS DE ARCO C POSTE DE LA CONSOLA CABLES DE LA CONSOLA FIJE PRIMERO ESTE LADO TAPA DEL POSTE DE LA CONSOLA CONSOLA ...

Страница 91: ...LERÍA PARA EL PASO 4 Este paso es sólo para el modelo 3 1AT A Abra la bolsa de tornillería PARA EL PASO 4 B Meta el GUARDAPOLVO DEL BASTIDOR PRINCIPAL hacia abajo sobre la MÉNSULA DEL BASTIDOR PRINCIPAL C Fije los GUARDAPOLVOS DEL BASTIDOR PRINCIPAL con 4 TORNILLOS L TORNILLO L 20 mm Cantidad 4 ...

Страница 92: ...ILLOS H 4 ARANDELAS ELÁSTICAS I y 4 ARANDELAS DE ARCO J NOTA No apriete estos tornillos antes de completar el paso 6 de ensamblaje Tenga cuidado de no pellizcar los cables mientras fija las barras de sujeción TORNILLERÍA PARA EL PASO 5 CABLES DE LA CONSOLA BARRAS DE SUJECIÓN BARRA CENTRAL TORNILLOS H CABLES DE LA CONSOLA ARANDELAS ELÁSTICAS I ARANDELAS DE ARCO J TORNILLO H 12 mm Cantidad 4 ARANDEL...

Страница 93: ...LA C Fije las BARRAS DE SUJECIÓN a la CONSOLA con 6 TORNILLOS K 6 ARANDELAS ELÁSTICAS B y 6 ARANDELAS PLANAS F D Apriete bien todos los tornillos mencionados en el paso 5 de ensamblaje NOTA Tenga cuidado de no pellizcar los cables mientras fija las barras de sujeción TORNILLO K 15 mm Cantidad 6 ARANDELA PLANA F 8 2 mm Cantidad 6 ARANDELA ELÁSTICA B 8 2 mm Cantidad 6 TORNILLERÍA PARA EL PASO 6 FIN ...

Страница 94: ...94 ...

Страница 95: ...NAMIENTO BÁSICO en la guía de la caminadora contiene instrucciones para lo siguiente DÓNDE COLOCAR SU CAMINADORA USO DE LA LLAVE DE SEGURIDAD PARA LEVANTAR LA CAMINADORA PARA MOVER LA CAMINADORA PARA NIVELAR LA CAMINADORA PARA TENSAR LA BANDA PARA CORRER PARA CENTRAR LA BANDA PARA CORRER PARA USAR LA FUNCIÓN DE RITMO CARDÍACO ...

Страница 96: ...als Stamina Builder Weight Loss Golf Course Foot Hills Mountain Climb HR Intervals THR Zone Custom 1 Custom 2 P R O G R A M S 1 2 3 4 5 6 7 8 9 10 11 12 time incline distance speed clock date press to switch p e r f o r m a n c e f i l i n g s y s t e m change display pace calories heart rate A D C B E O H F S P L G K M J I N R R Q N ...

Страница 97: ...a pausa o terminar su sesión de ejercicio Sostenga oprimida esta tecla durante 3 segundos para poner en ceros la consola H TECLA DE PROGRAMACIÓN Se usa para seleccionar el programa el nivel y el tiempo además de otras variables I INCLINE Teclas de ajuste de inclinación Se usan para ajustar la inclinación en pequeños incrementos de 0 5 J SPEED Teclas de AJUSTE de velocidad Se usan para ajustar la v...

Страница 98: ...su paso CALORIES Calorías Indica el número total de calorías quemadas time incline distance speed clock date press to switch p e r f o r m a n c e f i l i n g s y s t e m change display pace calories heart rate clock date change display time incline distance speed calories heart rate VENTANILLAS DEL MODELO 5 1AT VENTANILLAS DEL MODELO 3 1AT HEART RATE Ritmo cardíaco Aparece como latidos minuto BPM...

Страница 99: ... medio de en la TECLA DE PROGRAMACIÓN y oprima ENTER para confirmar 4 Cuando termine de configurar su programa oprima la tecla de inicio START para comenzar su sesión de ejercicio PARA PONER LA FECHA Y LA HORA 1 Para ingresar al modo de configuración Oprima y sostenga oprimidas las teclas 1 y 2 durante 3 segundos 2 Cambie las variables por medio de en la TECLA DE PROGRAMACIÓN y oprima ENTER para c...

Страница 100: ...1 3 1 9 2 5 5 0 2 5 5 0 1 9 1 3 Nivel 4 1 3 1 9 2 5 5 5 2 5 5 5 1 9 1 3 Nivel 5 1 5 2 3 3 0 6 0 3 0 6 0 2 3 1 5 Nivel 6 1 5 2 3 3 0 6 5 3 0 6 5 2 3 1 5 Nivel 7 1 8 2 6 3 5 7 0 3 5 7 0 2 6 1 8 Nivel 8 1 8 2 6 3 5 7 5 3 5 7 5 2 6 1 8 Nivel 9 2 0 3 0 4 0 8 0 4 0 8 0 3 0 2 0 Nivel 10 2 0 3 0 4 0 8 5 4 0 8 5 3 0 2 0 Segmento Calentamiento 1 2 Los segmentos se repiten hasta que se llega al tiempo selecc...

Страница 101: ... 0 2 0 5 0 1 0 2 0 6 0 2 0 3 0 6 0 2 0 3 0 7 0 3 0 2 0 Segmento Calentamiento 1 2 3 4 5 6 7 8 9 10 11 12 13 14 Enfriamiento Nivel 4 Segundos 60 60 30 30 30 30 120 120 120 60 60 60 120 60 60 60 60 60 60 60 4 00 min 35 00 Inclinación 2 0 2 0 3 0 3 0 3 0 3 0 5 0 6 0 6 0 1 0 4 0 4 0 3 0 4 0 7 0 2 0 5 0 1 0 6 0 1 0 1 0 1 0 Segmento Calentamiento 1 2 3 4 5 6 7 8 9 10 11 Enfriamiento Nivel 5 Segundos 60 ...

Страница 102: ...nclinación 1 5 2 0 3 0 3 0 2 5 2 0 2 0 2 0 2 5 3 0 2 0 1 5 Velocidad 2 8 4 1 5 5 6 0 6 5 7 0 7 5 7 0 6 5 6 0 4 9 3 3 Nivel 9 Inclinación 2 0 2 5 3 5 3 5 3 0 2 5 2 5 2 5 3 0 3 5 2 5 2 0 Velocidad 3 0 4 5 6 0 6 5 7 0 7 5 8 0 7 5 7 0 6 5 5 3 3 5 Nivel 10 Inclinación 2 0 2 5 3 5 3 5 3 0 2 5 2 5 2 5 3 0 3 5 2 5 2 0 Velocidad 3 3 4 9 6 5 7 0 7 5 8 0 8 5 8 0 7 5 7 0 5 6 3 8 Campo de golf de 9 hoyos Campo...

Страница 103: ...5 0 3 0 4 0 3 0 4 0 2 0 4 0 2 0 2 0 1 0 2 0 1 0 Nivel 6 1 0 2 0 1 0 2 0 2 0 4 0 3 0 4 0 3 0 4 0 4 0 5 0 4 0 4 0 3 0 4 0 3 0 4 0 2 0 2 0 1 0 2 0 1 0 Nivel 7 2 0 2 0 2 0 2 0 3 0 5 0 4 0 5 0 4 0 5 0 4 0 5 0 4 0 5 0 4 0 5 0 3 0 5 0 3 0 2 0 1 0 2 0 1 0 Nivel 8 2 0 2 0 2 0 2 0 3 0 5 0 4 0 5 0 4 0 5 0 4 0 5 0 4 0 5 0 4 0 5 0 4 0 5 0 3 0 2 0 2 0 2 0 2 0 Nivel 9 2 0 3 0 2 0 3 0 3 0 5 0 3 0 5 0 4 0 5 0 4 0 ...

Страница 104: ...stá 25 latidos por encima de su zona meta el programa se detiene INFORMACIÓN DE LOS PROGRAMAS acondicionamiento BASADO EN EL RITMO CARDÍACO El primer paso para determinar la intensidad adecuada para su acondicionamiento es determinar su ritmo cardíaco máximo 220 su edad El método basado en la edad es una predicción estadística promedio de su ritmo cardíaco máximo y es un buen método para la mayorí...

Страница 105: ... THR establecida por el usuario para los intervalos de ejercicio y de descanso La inclinación cambia de acuerdo a lo que se haya establecido 50 de la inclinación actual 0 CUSTOM PROGRAMAS PERSONALIZADOS Le permite crear y volver a usar una sesión de ejercicio perfecta para usted con una combinación específica de velocidad inclinación y tiempo Lo mejor en programación personalizada La meta se basa ...

Страница 106: ...inadora está equipada con el exclusivo seguidor de resultados PROFILE de AFG usted ha tomado un paso importante en su propósito de alcanzar sus metas de salud física El software PROFILE integrado le permite dar seguimiento a su progreso en cuanto a salud física al paso del tiempo sin la necesidad de llevar diarios o registros en papel Con PROFILE usted puede fácilmente comparar su sesión de ejerci...

Страница 107: ...o quemadas DISTANCE DISTANCIA Distancia total de la sesión SPEED VELOCIDAD Velocidad promedio de las sesiones de la semana NOTA Si no se ponen la fecha y la hora los totales semanales son por diseño los datos de la última sesión 4 LIFETIME TOTAL TOTALES DE POR VIDA Esta opción le permite ver los datos totales acumulados La siguiente información aparece en las ventanillas de la pantalla INCLINE INC...

Страница 108: ...NAS puede conectar sus auriculares en el enchufe de salida de audio que está en la parte inferior de la consola PARA DESCARGAR ACTUALIZACIONES DE SOFTWARE DE AFGFITNESS COM Ocasionalmente puede haber actualizaciones de software disponibles para su consola que puede obtener por medio del puerto USB incluido Visite http www afgfitness com customer support software update para ver si hay actualizacio...

Страница 109: ...109 GARANTÍA LIMITADA PARA USO EN EL HOGAR ...

Страница 110: ...riodo especificado arriba a partir de la fecha de adquisición original siempre y cuando el aparato permanezca en posesión del propietario original EXCLUSIONES Y LIMITACIONES A quién protege esta garantía Al propietario original y la garantía no es transferible QUÉ protege esta garantía La reparación o el cambio de un motor defectuoso de componentes electrónicos defectuosos o de piezas defectuosas ...

Страница 111: ...s incluso pero sin limitarse a cuotas de membresía en gimnasios tiempo perdido de trabajo o labores servicio de diagnóstico servicio de mantenimiento o transporte El equipo al que se le dé uso con propósitos comerciales o cualquier otro propósito que no sea en el hogar de una sola familia a menos que el fabricante lo haya aprobado Equipo guardado o usado fuera de los EE UU o Canadá Entrega ensambl...

Страница 112: ...112 3 1AT ...

Страница 113: ...Nivelador delantero Tornillo cabeza plana Tornillo Tornillo cabeza de botón Freno para bastidor base Ruedita delantera de transporte Tornillo cabeza de botón Arandela plana Gancho de ubicación base Tornillo cabeza plana Resorte Ruedita posterior de transporte Ruedita Motor de elevación CA 110V 80mm Controlador de motor 110V Tornillo Allen Almohadilla de elastómero para motor hule Tuerca Arandela p...

Страница 114: ...114 5 1AT ...

Страница 115: ...e botón Freno para bastidor Ruedita delantera de transporte Tornillo cabeza de botón Arandela plana Gancho de ubicación Tornillo cabeza plana Resorte exterior Ruedita posterior de transporte Motor de elevación CA 110V Contolador de motor 3 0HP 110V Tornillo Allen Almohadilla de elastómero para motor hule Tuerca Arandela plana Tornillo cabeza hexagonal Tuerca Arandela plana Tornillo cabeza hexagona...

Страница 116: ... service rapide et amical communiquer avec un de nos techniciens qualifiés par téléphone courriel ou notre site Web Veuillez nous signaler tout problème afin que nous puissions vous aider à y remédier Remarque Lire la section Dépannage du GUIDE D UTILISATION DU TAPIS ROULANT avant de contacter le Service de soutien technique à la clientèle Pour plus ample information sur le produit visiter notre s...

Отзывы: