background image

INPUT SOURCE

TV

AV

Component

DVD

HDMI1

HDMI2

VGA

Installa

tion

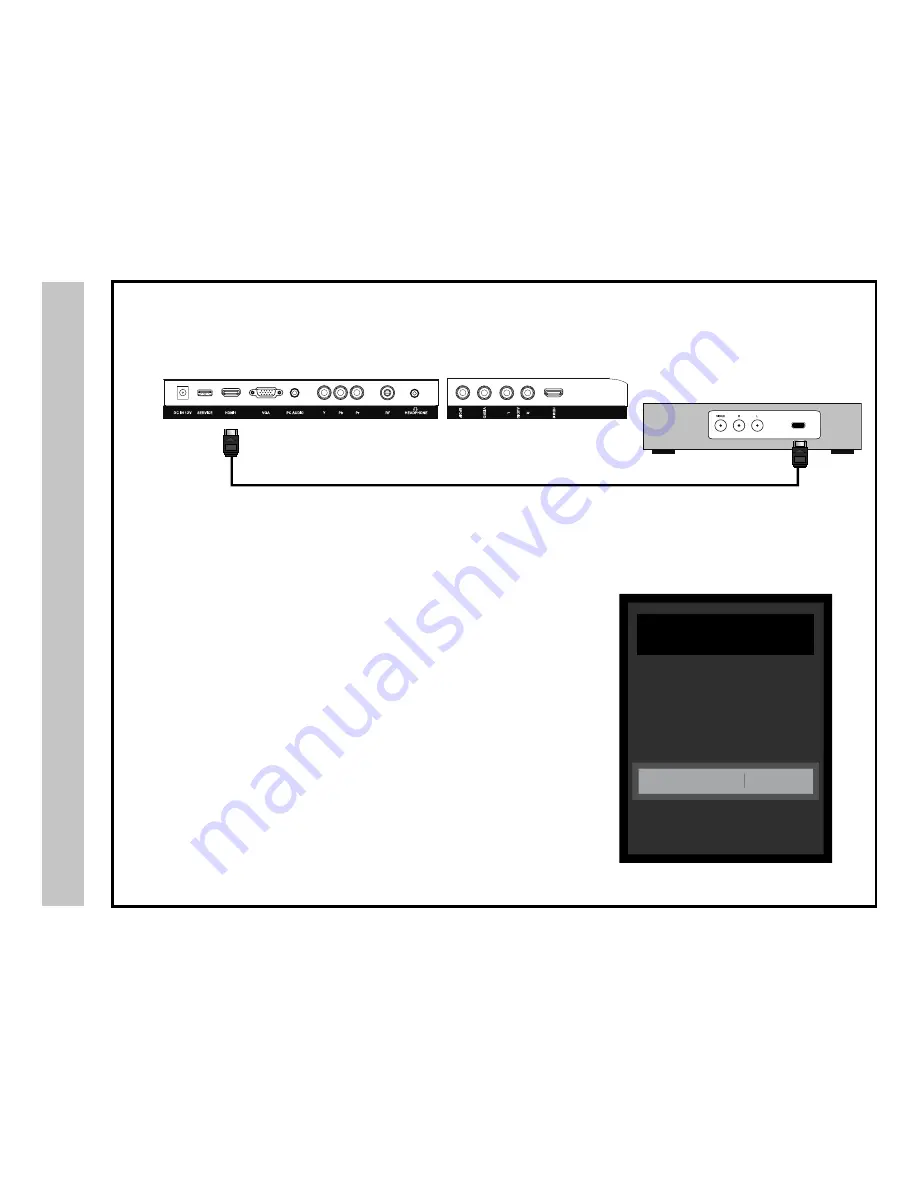
Connection to HDMI Inputs

11

TV REAR PANEL

HDMI

For BEST video performance

Connect to external devices that feature HDMI, an uncompressed, all digital 
video / audio interface found on today’s high definition devices. Use of this 
pure digital technology offers optimal high definition video and digital audio all 
via a single cable.
There are two (2) HDMI inputs available for use with HD set top boxes, gam-
ing consoles and blu-ray players.

How to Connect HDMI

•  From your external device, connect an HDMI cable from the HDMI OUT-

PUT to the HDMI INPUT on the TV’s rear panel.

How To Use

•  Press the SOURCE button on the remote control. Use 

qp

 arrow buttons 

to highlight the input to view (HDMI 1, 2) then press OK.

Connecting to an HD Set-Top Box, Game Console or Blu-ray Player Using HDMI

Digital set top box, gaming console,  

or blu-ray w/ HDMI interface

Optional HDMI cable

HDMI1

HDMI2

Содержание LE2459D

Страница 1: ...LE2459D USER S MANUAL V20224 24 LED DVD HDTV 24...

Страница 2: ...tal device pursuant to Part 15 of the FCC Rules These limits are designed to provide reasonable protection against harmful interference in a residential installation This television generates uses and...

Страница 3: ...Safety Instructions 2...

Страница 4: ...Safety Instructions 3 KCPI Affinity...

Страница 5: ...p Wizard TV Channel Setup Channel Auto Scan Picture Settings Contrast Brightness Color Tint AV mode only Sharpness Color Temperature Specifications Troubleshooting Index Warranty 1 3 4 5 6 7 8 9 9 10...

Страница 6: ...e and VGA terminal for connection to a computer A coaxial digital audio SPDIF jack is included to connect through your home amplifier re ceiver to provide a spectacular home theater sound experience Y...

Страница 7: ...f you do not plan to use the remote control handset for an extended period of time Do not mix bat teries of different age and or type Always discard used batteries safely Do not expose remote control...

Страница 8: ...Channel List Displays channel lists on the screen 17 Zoom Select viewable display options Normal Wide Zoom Cinema 18 Picture Mode Select from various preset picture modes Dynamic Standard Movie User...

Страница 9: ...ings Press Arrow buttons to select menu options available to you Press OK button to select a feature from the selected menu then press Arrow buttons to adjust settings 4 5 Volume VOL VOL Press the VOL...

Страница 10: ...jacks See 8 below to connect audio jacks 6 RF Input Connect antenna or cable for television reception Note Use an outdoor antenna cable or satellite for best reception 7 Earphone Jack Connect a stereo...

Страница 11: ...ect with Digital Cable Satellite Set Top Box Connect the RF coaxial 75 ohm cable from the video outlet of your cable Satellite box to the RF IN on the TV s rear panel Select Ch 3 or 4 on the TV and se...

Страница 12: ...io all via a single cable There are two 2 HDMI inputs available for use with HD set top boxes gam ing consoles and blu ray players How to Connect HDMI From your external device connect an HDMI cable f...

Страница 13: ...component video cables blue green red from the video output jacks Y Pb Pr on your external equipment to the Compo nent YPbPr input on the TV s rear panel Connect white red audio cables for sound from...

Страница 14: ...the connecting jacks Video Yellow Audio White Red Connect the yellow video cable from the video output jack on your external A V equipment ie DVD player set top box to AV input on the TV s rear panel...

Страница 15: ...omputer s mini audio output jack to the PC Audio jack on the TV s rear panel How to Use Press the SOURCE button on the remote control Use qp arrow buttons to highlight the input to view VGA then press...

Страница 16: ...stereo receiver amplifier or Dolby Pro Logic sound system when connected to your AV equipment Example Diagram illustrates the connection of audio cables from your AV equipment to a stereo receiver in...

Страница 17: ...ABLE or AIR based on your an tenna connection Press the q arrow button to select Auto Scan and press ENTER when Cable is selected AUTO is recommended Otherwise press the u arrow button to select STD I...

Страница 18: ...o Scan may take several minutes to complete Select CABLE if you subscribe to a pay television service without the use of a set top box Connect cable wire to the televi sion see page 10 Press the t u a...

Страница 19: ...Settings 18 Note When adjustments are complete you may select another menu by pressing the Menu button The POWER SAVING mode adjusts the brightness of the TV in order to save energy and reduce power c...

Страница 20: ...ency intensity Press down q arrow button to highlight Balance Navigate using the t u arrow buttons to adjust sound towards the left or right speaker Press down q arrow button to highlight Surround Nav...

Страница 21: ...Timer then press the u arrow button to select time to view before timer turns television off 5 Min 10 Min 15 Min 30 Min 45 Min 60 Min 90 Min 120 Min 180 Min 240 Min OFF Press down q arrow button to hi...

Страница 22: ...mode displayed Normal Wide Zoom Cinema This feature is also available on the remote control See page 27 Highlight Restore Default Press the u arrow button to automatically set all adjust ments back t...

Страница 23: ...ight Closed Caption then press the u arrow button to highlight CC Mode While CC Mode is on press down q arrow button to highlight Basic Selection Navigate using the t u ar row buttons to select CC 1 4...

Страница 24: ...tons to select SETUP Gain access to position adjustment options by pressing the down q arrow button to highlight Advanced then press u arrow button to select from the following options Highlight V Pos...

Страница 25: ...to highlight TV MPAA menu Highlight TV then press the u arrow button to enter the TV Ratings menu and select your preference TV Y Appropriate for all children TV Y7 Appropriate for all children over...

Страница 26: ...e u arrow button repeatedly to select your ratings preference shown on right side of illustration E Appropriate for everyone C Appropriate for all children C8 Appropriate for everyone 8 years old and...

Страница 27: ...Highlight CHANNEL LABEL to name or rename a broadcast channel Navigate using the u arrow button to enter the screen menu to re label a channel Use the qp arrow buttons to spell out each letter number...

Страница 28: ...tretches certain 4 3 content and may reduce the black bars Zooms in to fill the screen when viewing widescreen content The zoom effect will crop images somewhat When viewing 4 3 content Cinema mode wi...

Страница 29: ...DVD Player DVD Settings 28 l...

Страница 30: ...DVD Player DVD Settings 29 Resolution Set the output video resolution...

Страница 31: ...DVD Player 30 DVD Settings...

Страница 32: ...ption Power Supply Dimension with Pedestal Installed Weight with Pedestal Input Connections LED 23 6 Diagonal 16 9 480i 480p 720p 1080i 1080p 1 920 x 1 080 250 1 000 1 170 170 16 7M 48 Watts DC IN 12V...

Страница 33: ...See page 17 Check whether the channel is hidden See page 26 Check parental control settings See pages 24 25 Restore default settings See page 21 Check that connected audio cables are completely insert...

Страница 34: ...14 DVD Settings 28 30 E Exit 7 F Favorite Channels 7 26 G Guide 7 H HDMI Inputs 11 Headphone 9 Home Theater 15 I IR Receiver 6 8 Input 7 8 11 14 L Languages 19 21 Last 7 LED light 8 M Menu 7 8 16 26 M...

Страница 35: ...ty period or 45 days whichever is greater Your Responsibility Warranty service shall be provided when a return authorization number RMA is provided to you Warranty extends to defects in materials or w...

Страница 36: ......

Отзывы: