background image

Advanced On 

allows more precise tracking of battery energy consumption, including the type of batteries used 

and their estimated capacity. In Advanced mode, the battery icon indicates how much charge is left in the 
batteries. Initially this icon is green: 

. When the remaining charge is low this icon appears yellow: 

. When 

30 minutes of charge remains, this icon appears as 


To change mode, ensure the Advanced icon is selected. If not, use the arrow buttons to select it. Press 

 to edit 

the setting, and use the up and down buttons to change the setting to the desired option. Then press 

 to 

confirm the change. 
 

Type of batteries:

 The camera is delivered with low-self-discharge Ni-MH rechargeable batteries with a capacity of 

approximately 2500mAh. These are the default parameters. 


If you consistently use the same set of rechargeable batteries, we recommend operating the camera 
until it automatically switches off due to low batteries. This automatically recalculates and adjusts the 
estimated capacity of the batteries. The new capacity is displayed by default the next time the Battery 
management menu is displayed. 


1.3. Micro SD Memory Card Installation 


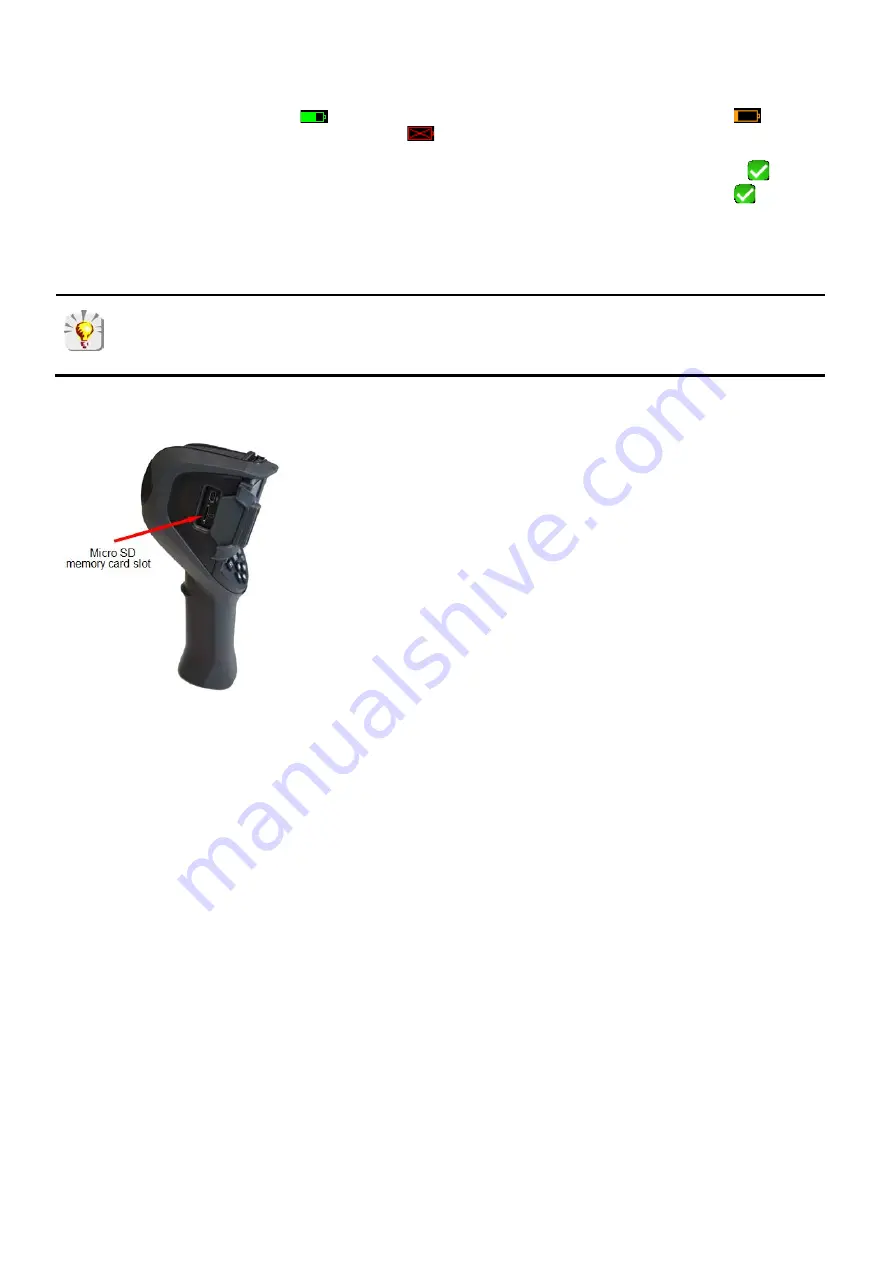
Camera files (images, audio, and setup) are stored in the micro SD 
memory card located on the left side of the head (see photo to the left). If 
this card is not installed, an error message appears when the camera 
attempts to access it. This card is provided with the camera. 
 
Before installation, the memory card must be formatted in one of the 
following formats: 


FAT16 


FAT32  

 
To insert the card, open the rubber flap and push the card into its slot. If the 
card cannot be inserted, ensure that: 


The card is facing in the correct direction 


The card slot is empty 


1.4. Camera Display 

In normal operation, the camera starts up: 


at the Main screen (see below) 


in continuous acquisition mode 


with the configuration setup loaded when it was last turned OFF 


1.4.1. Main Screen 

The Main screen is organized as shown in the following illustration: 


Содержание 2121.40

Страница 1: ...Model 1950 ENGLISH User Manual THERMAL CAMERA...

Страница 2: ...2...

Страница 3: ...ge Profile 16 2 1 6 Displaying Points at the Same Temperature in an Image Isotherm 16 2 2 Freezing Palette Colors 16 3 ADVANCED OPERATION WITH MORE PRECISE MEASUREMENTS 17 3 1 Best Practices 17 3 2 Co...

Страница 4: ...1 8 TROUBLESHOOTING 32 8 1 IR Image is a Single Solid Color 32 8 1 1 Color Palette Frozen 32 8 1 2 Inconsistent User Influencing Parameters 32 8 2 Contrast of IR Image is Incorrect 32 8 3 Unable to Sa...

Страница 5: ...propriate collection facility for recycling This product is designed to allow recovery and recycling of most of its constituents Receiving Your Shipment Upon receiving your shipment make sure that the...

Страница 6: ...sufficient power for 15 hours The batteries are inserted through the end of the handle Open the cover using a coin while pressing down on the locking tab 1 2 1 Battery Management After the batteries...

Страница 7: ...ically switches off due to low batteries This automatically recalculates and adjusts the estimated capacity of the batteries The new capacity is displayed by default the next time the Battery manageme...

Страница 8: ...atteries discharged Bluetooth 6 Bluetooth enabled no icon Bluetooth disabled Trigger function 1 5 4 TA TF TS Aim Freeze Save Micro SD Card 1 3 Micro SD Card detected Micro SD Card not detected Emissiv...

Страница 9: ...rmogram are defined by the selected palette see 1 5 8 By default temperature color assignment is performed automatically as a function of the minimum and maximum temperatures detected in the image In...

Страница 10: ...lette Restores automatic mode Displays the infrared image Displays the visible image Plays back the vocal message Records a new vocal message Stops playing or recording the vocal message Searches for...

Страница 11: ...and returns to the Main screen F2 either opens the corresponding sub menu for editable settings modifies the selected parameter F3 closes the current window without action and returns to the previous...

Страница 12: ...to save the settings 1 5 4 Trigger Function The camera trigger can be configured to perform different tasks when pressed 1 Open the Adjustments menu by pressing F1 in the Main screen and selecting Pa...

Страница 13: ...lecting Parameters Adjustments 2 Select to display the screen brightness setting Use the up and down buttons to change this setting Options are Automatic the camera automatically adjusts the screen br...

Страница 14: ...ilable in the root any combination of 256 files and directories The card will therefore very quickly be considered full even though its full capacity has not been reached 1 5 8 Color Palettes The came...

Страница 15: ...pe of cursor is selected 4 Save the cursor setting by pressing F2 2 1 1 Estimating Measurements Without a Cursor By default no measurement cursor is selected the icon in the Cursor menu is highlighted...

Страница 16: ...tolerance setting are displayed at the bottom of the screen In addition the palette graphically displays the temperature range All points in the image whose temperature falls within this defined range...

Страница 17: ...al tape has an emissivity of 0 95 and is suitable as a reference target The higher the relative humidity and the greater the distance the larger the effect relative humidity has on the measurement The...

Страница 18: ...you save the emissivity value it appears in the status bar Allowable emissivity values are from 1 00 to 0 05 Distance can be set from 1 6 to 3280ft 0 5 to 999 9m Default is 6 6ft 2m Humidity can be s...

Страница 19: ...all letters from a to z have been used the letter z is re used and the existing file with this name is overwritten Note that a visible image is not created for the derived file since the visible image...

Страница 20: ...isplaying the name of the new file if the headset is connected another message prompts you to record a vocal message as shown on the left Press F2 to display the Record vocal screen or F3 if you do no...

Страница 21: ...nerated by the camera with names in the form yyyymmdd_hhmmssX_IR BMP The menu also lists folders for browsing the SD card directory tree A preview of the selected image appears to the right of the fil...

Страница 22: ...the derived file since the visible image associated with the original file also applies to the derived file If a Bluetooth headset is connected 6 2 1 after you confirm the save a second message promp...

Страница 23: ...to store on the computer and paste them into the appropriate folder s on the computer Note the following If the Images menu on the camera is open and the computer modifies the content of the micro SD...

Страница 24: ...shown to the left 4 Select When you press F2 a full qwerty style keypad appears on the screen 5 Use the directional buttons to navigate to the first character in the filename and press F2 to save the...

Страница 25: ...To restore the factory defaults follow the steps below 1 Open the Setup menu select Factory and press F2 2 Select the Default setup file by pressing F2 3 All camera configuration parameters are reset...

Страница 26: ...peripherals are then disconnected Their identification data is stored in memory and upon the next activation the camera will attempt to reconnect them 6 2 Headset The camera comes with a headset for c...

Страница 27: ...ters are supported Metrix ASYC IV Multimeters Models MTX 3292 BT and 3293 BT 1 measurement read AEMC Power Clamp on Meter Model 607 3 measurements read AEMC Power Clamp on Meter 407 3 measurements rea...

Страница 28: ...erals screen displayed start a new search by pressing F1 This overwrites the list currently connected devices remain The new device should be included in this list 6 3 3 Device Polling Period The poll...

Страница 29: ...of measurements displayed at the bottom of the main screen Influence the measurement is added to the list of measurements displayed at the bottom of the main screen and is used in the compensation for...

Страница 30: ...the measurement is temperature humidity or distance you can select the option Influence by pressing the right button For other types of measurements this option is not available 3 Press F2 to save Onl...

Страница 31: ...the Soft version line To check whether a more recent version of the camera firmware is available go to the AEMC web site at http www aemc com and open the Software and Firmware Updates link This lists...

Страница 32: ...erature range of the image 8 3 Unable to Save Displayed Image Ensure that the micro SD card is correctly inserted in its slot and that the status bar indicates the card is present see 1 4 1 1 Check th...

Страница 33: ...ments are refreshed only when there is a new acquisition If a device is connected but acquisition has been stopped its measurements will not be displayed until there has been another acquisition Follo...

Страница 34: ...cloth 9 2 Infrared Optics Cleaning WARNING The infrared lens coating is very fragile Avoid leaving fingerprints on the lens Avoid rubbing the lens unnecessarily If there is dust on the lens if possib...

Страница 35: ...APPENDIX A MENU TREE Display Files and Setup Menus 35...

Страница 36: ...Target Parameters and About Menus 36...

Страница 37: ...Recall Menus 37...

Страница 38: ...spectrum 0 88 Lead Pure lead without oxidation 257 437 125 225 0 06 0 08 Slightly oxidized 77 572 25 300 0 20 0 45 Magnesium Magnesia 527 1517 275 825 0 55 0 20 1652 3038 900 1670 0 2 Mercury 32 212 0...

Страница 39: ...curacy 3 6 F 2 C or 2 Analysis functions Analysis tools Point cursor Area cursor Temperature profile Minimum maximum Isothermal Adjustment Automatic or manual adjustment of the minimum maximum palette...

Страница 40: ...u must obtain a CSA before returning any instrument TECHNICAL AND SALES ASSISTANCE If you are experiencing any technical problems or require any assistance with the proper operation or application of...

Страница 41: ...se write the CSA on the outside of the shipping container Return the instrument postage or shipment pre paid to Ship To Chauvin Arnoux Inc d b a AEMC Instruments 15 Faraday Drive Dover NH 03820 USA Ph...

Страница 42: ...NOTES 42...

Страница 43: ...NOTES 43...

Страница 44: ...99 MAN 100432 v2 08 17 Chauvin Arnoux Inc d b a AEMC Instruments 15 Faraday Drive Dover NH 03820 USA Phone 603 749 6434 Fax 603 742 2346 www aemc com...

Отзывы: