AEG T8DHC846B Скачать руководство пользователя страница 25

4. Repair or replace warranty:

 During

the Warranty Period, Electrolux or its

ASC will, at no extra charge if your

Appliance is readily accessible for

service, without special equipment

and subject to these terms and

conditions, repair or replace any

parts which it considers to be

defective. Electrolux may, in its

absolute discretion, choose whether

the remedy offered for a valid

warranty claim is repair or

replacement. Electrolux or its ASC

may use refurbished parts to repair

your Appliance. You agree that any

replaced Appliances or parts

become the property of Electrolux.

5. Travel and transportation costs:

Subject to clause 7, Electrolux will

bear the reasonable cost of

transportation, travel and delivery of

the Appliance to and from Electrolux

or its ASC. Travel and transportation

will be arranged by Electrolux as part

of any valid warranty claim.

6. Proof of purchase

 is required before

you can make a claim under this

warranty.

7. Exclusions:

 You may not make a

claim under this warranty unless the

defect claimed is due to faulty or

defective parts or workmanship. This

warranty does not cover:

a)

light globes, batteries, filters or

similar perishable parts;

b)

parts and Appliances not

supplied by Electrolux;

c)

cosmetic damage which does

not affect the operation of the

Appliance;

d)

damage to the Appliance caused

by:

– negligence or accident;

– misuse or abuse, including

failure to properly maintain or

service;

– improper, negligent or faulty

servicing or repair works done

by anyone other than an

Electrolux authorised repairer

or ASC;

– normal wear and tear;

– power surges, electrical storm

damage or incorrect power

supply;

– incomplete or improper

installation;

– incorrect, improper or

inappropriate operation;

– insect or vermin infestation;

– failure to comply with any

additional instructions

supplied with the Appliance;

In addition, Electrolux is not

liable under this warranty if:

– the Appliance has been, or

Electrolux reasonably believes

that the Appliance has been,

used for purposes other than

those for which the Appliance

was intended, including

where the Appliance has

been used for any non-

domestic purpose;

– the Appliance is modified

without authority from

Electrolux in writing;

– the Appliance’s serial number

or warranty seal has been

removed or defaced.

8. How to claim under this warranty:

To enquire about claiming under this

warranty, please follow these steps:

a.

carefully check the operating

instructions, user manual and the

terms of this warranty;

b.

have the model and serial

number of the Appliance

available;

c.

have the proof of purchase (e.g.

an invoice) available;

d.

telephone the numbers shown

below.

9. Australia:

 For Appliances and

services provided by Electrolux in

Australia: Electrolux goods come

with guarantees that cannot be

excluded under the Australian

Consumer Law. You are entitled to a

replacement or refund for a major

failure and for compensation for any

other reasonably foreseeable loss or

damage. You are also entitled to

have the Appliance repaired or

replaced if the Appliance fails to be

of acceptable quality and the failure

does not amount to a major failure.

‘Acceptable quality’ and ‘major

failure’ have the same meaning as

referred to in the ACL.

ENGLISH

25

Содержание T8DHC846B

Страница 1: ...USER MANUAL EN User Manual Tumble Dryer T8DHC846B ...

Страница 2: ...ordance with this manual You may not be able to claim on the AEG manufacturer s warranty in the event that your product fault is due to failure to adhere to this manual FOR PERFECT RESULTS Thank you for choosing this AEG product We have created it to give you impeccable performance for many years with innovative technologies that help make life simpler features you might not find on ordinary appli...

Страница 3: ...ance can be used by children aged from 8 years and above and persons with reduced physical sensory or mental capabilities or lack of experience and knowledge if they have been given supervision or instruction concerning the use of the appliance in a safe way and understand the hazards involved Children between 3 and 8 years of age and persons with very extensive and complex disabilities shall be k...

Страница 4: ...ace refer to the Installation leaflet Do not install the appliance behind a lockable door a sliding door or a door with a hinge on the opposite side that would prevent the appliance door from being fully open The ventilation opening in the base must not be covered by a carpet mat or any floor covering CAUTION The appliance must not be supplied through an external switching device such as a timer o...

Страница 5: ...not be dried in the tumble dryer Fabric softeners or similar products should only be used as specified by the product manufacturer s instructions Remove all objects from items that could be a source of fire ignition such as lighters or matches WARNING Never stop a tumble dryer before the end of the drying cycle unless all items are quickly removed and spread out so that the heat is dissipated Befo...

Страница 6: ...d items which contain padding or fillings Only dry fabrics which are applicable to dry in the tumble dryer Follow the instructions on the fabric label If you have washed your laundry with a stain remover start an extra rinse cycle before you start the dryer Do not drink or prepare food with the condensed water distilled water It can cause health problems to people and pets Do not sit or stand on t...

Страница 7: ...o repair the appliance contact the Authorised Service Centre Use original spare parts only 3 8 Disposal WARNING Risk of injury or suffocation Disconnect the appliance from the mains electrical and water supplies Cut off the mains electrical cable close to the appliance and dispose of it Remove the door catch to prevent children or pets from becoming trapped in the drum Dispose of the appliance in ...

Страница 8: ...0 Adjustable feet For ease of loading laundry or ease of installation the door is reversible see separate leaflet 5 CONTROL PANEL 2 3 5 1 6 4 1 Programme dial 2 Display 3 Start Pause button 4 Options 5 On Off button with Auto Off function 6 Programmes 5 1 Display www aeg com 8 ...

Страница 9: ...he water container indicator clean the filter indicator check the condenser laundry dryness option iron dry cupboard dry cup board dry extra dry ECO ECO option on Quiet option on Refresh option on extension of the default anti crease phase 30min 60min 90min indicator drying phase indicator cooling phase indicator crease guard phase 6 PROGRAM Program Load 1 Properties Fabric mark Cottons Eco 2 8 kg...

Страница 10: ...rovided that the garments are dried ac cording to the instructions issued by the manu facturer of this machine Follow the garment care label for other laundry instructions M1525 The Woolmark symbol is a Certification mark in many countries Silk 1 kg Gentle drying of hand washable silks Bed Linen 3 kg Bed linen such as single and dou ble sheets pillowcases duvet cov er Easy Iron 1 kg or 5 shirts Ea...

Страница 11: ...otton Eco program is the Standard cotton program 6 1 Program and options selection Options Program 1 Dryness Level Quiet Anti crease Refresh Time Dry ing Cottons Eco Cottons Synthetics 2 Mixed Wool 3 Silk Bed Linen Easy Iron Outdoor Sport 1 Together with the program you can set 1 or more options 2 cupboard dry of Dryness Level level is not available with Synthetics 3 See chapter OPTIONS Time Dryin...

Страница 12: ...is option is maximum load indicator disappears The cycle lasts as long as set drying time regardless of the size of a load and its dryness TIME DRYING RECOMMENDATION 10 20 min action of cool air only no heater 20 40 min additional drying to improve dryness after previous drying cycle 40 min full drying of the small laundry loads up to 4 kg well spun 1200 rpm 7 7 Time Drying on Wool program Option ...

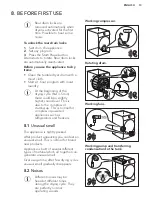
Страница 13: ...y higher sound level This is due to the compressor starting up This is normal for compressor powered appliances such as refrigerators and freezers 8 1 Unusual smell The appliance is tightly packed After product unpacking you can feel an unusual smell This is normal for brand new products Appliance is built of several different types of material which all together can generate unusual smell Over us...

Страница 14: ... jersey and knitwear to reduce shrinkage Do not exceed the maximum load stated in the programs chapter or shown on the display Dry only the laundry that is suitable for tumble drying Refer to the fabric label on the items Do not dry large and small items together Small items can be trapped inside the large items and remain wet Shake the large clothes fabrics before placing in the tumble dryer It i...

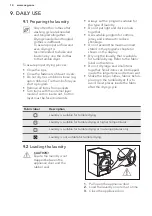
Страница 15: ...and composition the room temperature and the humidity of your laundry after spin drying phase 9 6 Options Together with the programme you can set 1 or more special options To activate or deactivate an option touch the relevant button or a two button combination its symbol appears on the display or the led above the corresponding button lights up 9 7 Child lock option The child lock can be set to p...

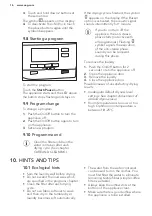
Страница 16: ...nals the execution of the anti crease phase Laundry can be removed during this phase To remove the laundry 1 Push the On Off button for 2 seconds to turn the appliance off 2 Open the appliance door 3 Remove the laundry 4 Close the appliance door Possible causes of unsatisfactory drying results Inadequate default dryness level settings See chapter Adjustment of default dryness level Room temperatur...

Страница 17: ...he appliance on 2 Wait approximately 8 seconds 3 Select 1 of the available programs 4 Touch and hold down the Quiet and Refresh buttons at the same time One of the symbols appears on the display Soft Medium Hard 5 Touch the Start Pause button repeatedly until you reach the desired water hardness level Water hard ness level Display symbol Soft Medium Hard 6 To memorise the setting touch and hold do...

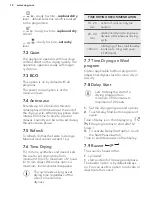
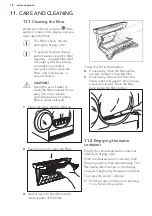
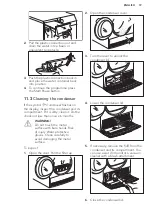
Страница 18: ...mbient 1 Open the door Pull the filter up 2 Push the hook to open the filter 3 Gather lint with hand from both internal parts of the filter Throw the lint in the dustbin 4 If necessary clean the filter with a vacuum cleaner Close the filter 5 If necessary remove lint from the filter socket and gasket You can use a vacuum cleaner Place the filter back inside the filter socket 11 2 Emptying the wate...

Страница 19: ...mpartment If it is dirty clean it Do the check not less than once a 6 months WARNING Do not touch the metal surface with bare hands Risk of injury Wear protective gloves Clean carefully to avoid damaging the metal surface To inspect 1 Open the door Pull the filter up 2 Open the condenser cover 3 Turn the lever to unlock the condenser lid 4 Lower the condenser lid 5 If necessary remove the fluff fr...

Страница 20: ...or dish soap To clean the sensor 1 Open the loading door 2 Clean the surfaces of the humidity sensor wiping off the metal surface several times 11 5 Cleaning the drum WARNING Disconnect the appliance before you clean it Use a standard neutral soap detergent to clean the inner surface of the drum and drum lifters Dry the cleaned surfaces with a soft cloth CAUTION Do not use abrasive materials or st...

Страница 21: ...the bot tom of the appliance Dirt on the humidity sensor in the drum Clean the front surface of the drum Dryness level not set to desired level Adjust the dryness level 5 The condenser is clogged Clean the condenser 3 The loading door does not close The filter is not locked into posi tion Put the filter in the correct posi tion Laundry is trapped between the door and the seal Remove trapped items ...

Страница 22: ...uffi ciently Spin the laundry well Too low or too high room temper ature this is not the appliance malfunction Ensure a room temperature higher than 5 C and lower than 35 C Optimal room temperature to ach ieve best drying results is between 19 24 C 1 If there is an error message on the display e g E51 Turn the tumble dryer off and on Select a new program Push the Start Pause button If the applianc...

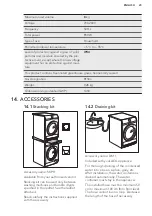
Страница 23: ...S 14 1 Stacking kit Accessory name SKP11 Available from your authorised vendor Stacking kit can be used only between washing machines and tumble dryers specified in the leaflet See the leaflet attached Read carefully the instructions supplied with the accessory 14 2 Draining kit Accessory name DK11 Included with your AEG appliance For thorough draining of the condensed water into a basin siphon gu...

Страница 24: ... and accompanied by this document c ASC means Electrolux s authorised serviced centres d AEG is the brand controlled by Electrolux Home Products Pty Ltd of 163 O Riordan Street Mascot NSW 2020 ABN 51 004 762 341 in respect of Appliances purchased in Australia and Electrolux NZ Limited collectively Electrolux of 3 5 Niall Burgess Road Mount Wellington in respect of Appliances purchased in New Zeala...

Страница 25: ...than an Electrolux authorised repairer or ASC normal wear and tear power surges electrical storm damage or incorrect power supply incomplete or improper installation incorrect improper or inappropriate operation insect or vermin infestation failure to comply with any additional instructions supplied with the Appliance In addition Electrolux is not liable under this warranty if the Appliance has be...

Страница 26: ...gaustralia com au For the cost of a local call Australia only FOR SPARE PARTS or to find the address of your nearest spare parts centre in Australia PLEASE CALL 13 13 50 OR EMAIL customercare aegaustralia com au For the cost of a local call Australia only SERVICE NEW ZEALAND aegnewzealand co nz FOR SERVICE or to find the address of your nearest au thorised service centre in New Zealand PLEASE CALL...

Страница 27: ......

Страница 28: ...www aeg com au 136965650 A 182020 ...

Отзывы: