background image

Problem

Possible cause

Solution

The compressor does
not start immediately
after pressing the
FROSTMATIC or
COOLMATIC button,
or after changing the
temperature.

This is normal, no error has
occurred.

The compressor starts after
a period of time.

Water flows on the
rear plate of the re-
frigerator.

During the automatic de-
frosting process, frost de-
frosts on the rear plate.

This is correct.

Water flows into the
refrigerator.

The water outlet is clog-
ged.

Clean the water outlet.


Products prevent that wa-
ter flows into the water
collector.

Make sure that products do
not touch the rear plate.

Temperature cannot
be set .

FROSTMATIC or COOL-
MATIC functions switched
on.

Switch off FROSTMATIC or
COOLMATIC manually, or
wait to set the temperature
until the function has reset
automatically. Refer to
"FROSTMATIC or COOL-
MATIC function"..

The temperature in
the appliance is too
low/high.

The temperature regulator
is not set correctly.

Set a higher/lower temper-
ature.


The door is not closed cor-
rectly.

Refer to "Closing the
door".


The product temperature
is too high.

Let the product tempera-
ture decrease to room tem-
perature before storage.


Many products are stored
at the same time.

Store less products at the
same time.

The temperature in
the refrigerator is too
high.

There is no cold air circula-
tion in the appliance.

Make sure that there is cold
air circulation in the appli-
ance.

The temperature in
the freezer is too
high.

Products are too near to
each other.

Store products so that
there is cold air circulation.

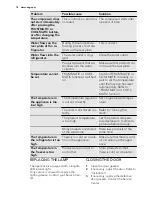
REPLACING THE LAMP

The appliance is equipped with a longlife
LED interior light.
Only service is allowed to replace the
lighting device. Contact your Service Cen-
ter.

CLOSING THE DOOR

1.

Clean the door gaskets.

2.

If necessary, adjust the door. Refer to
"Installation".

3.

If necessary, replace the defective
door gaskets. Contact the Service
Center.

18 www.aeg.com

Содержание SCT81900S0

Страница 1: ...SCT81900S0 EN FRIDGE FREEZER USER MANUAL ...

Страница 2: ...he environment and human health and to recycle waste of electrical and electronic appliances Do not dispose appliances marked with the symbol with the household waste Return the product to your local recycling facility or contact your municipal office VISIT OUR WEBSITE FOR Products Brochures User manuals Trouble shooter Service information www aeg com LEGEND Warning Important Safety information Ge...

Страница 3: ... find everything you need to keep all your AEG appliances looking spotless and working perfectly Along with a wide range of accessories designed and built to the high quality standards you would expect from specialist cookware to cutlery baskets from bottle holders to delicate laundry bags Visit the webshop at www aeg com shop CUSTOMER CARE AND SERVICE We recommend the use of original spare parts ...

Страница 4: ... door or lid be sure to make that spring lock unusable before you discard the old appliance This will prevent it from becoming a death trap for a child GENERAL SAFETY WARNING Keep ventilation openings in the appli ance enclosure or in the built in structure clear of obstruction The appliance is intended for keeping foodstuff and or beverages in a normal household as explained in this instruc tion ...

Страница 5: ...E AND CLEANING Before maintenance switch off the ap pliance and disconnect the mains plug from the mains socket Do not clean the appliance with metal objects Do not use sharp objects to remove frost from the appliance Use a plastic scraper Regularly examine the drain in the re frigerator for defrosted water If neces sary clean the drain If the drain is blocked water will collect in the bot tom of ...

Страница 6: ...be discar ded together with the urban re fuse and rubbish The insulation foam contains flammable gases the appliance shall be disposed according to the applicable regu lations to obtain from your local authorities Avoid damaging the cooling unit especially at the rear near the heat exchanger The ma terials used on this appliance marked by the symbol are re cyclable 6 www aeg com ...

Страница 7: ...dge is turned off The temperature indicator switches off The Pilot light switches off SWITCHING OFF THE APPLIANCE 1 Keep ON OFF switch pressed for more than 5 seconds 2 A countdown on the temperature in dicators from 3 2 1 will be shown When 1 appears the appliance is turned off The temperature indica tors switch off The Pilot lights switch off HIGH TEMPERATURE ALARM In the event of an abnormal te...

Страница 8: ...tion 1 Press the DYNAMICAIR button 2 The DYNAMICAIR indicator is shown To switch off the function 1 Press the DYNAMICAIR button 2 The DYNAMICAIR indicator goes off If the function is activated auto matically the DYNAMICAIR indica tor is not shown refer to Daily use The activation of the DYNAMI CAIR function increases the ener gy consumption COOLMATIC FUNCTION The COOLMATIC function is suitable for...

Страница 9: ...red from undesirable warming To activate the function do these steps 1 Press the FROSTMATIC button 2 The FROSTMATIC indicator switches on The FROSTMATIC function is ended auto matically after a period of 52 hours You can deactivate the function at any time 1 Press the FROSTMATIC button 2 The FROSTMATIC indicator switches off ENGLISH 9 ...

Страница 10: ...antities of food are to be stor ed remove all drawers and baskets from appliance and place food on cooling shelves to obtain the best performance WARNING Make sure that foods do not ex ceed the load limit stated on the side of the upper section where applicable In the event of accidental defrost ing for example due to a power failure if the power has been off for longer that the value shown in the...

Страница 11: ...llow 1 lift the shelf with the sliding box up wards and out of the holders in the door 2 remove the retaining bracket out of the guide under the shelf 3 Reverse the above operation to insert the sliding box at a different height MAXIBOX DRAWER The drawer is suitable for storing fruit and vegetables There is a separator inside the drawer that can be placed in different positions to al low for the s...

Страница 12: ...nt This device activates by itself when nee ded for example for a quick temperature recovering after door opening or when the ambient temperature is high Allows you to switch on the device man ually when needed refer to DYNAMI CAIR Function The DYNAMICAIR device stops when the door is open and restarts immediately af ter the door closing 12 www aeg com ...

Страница 13: ...ns and garlic if not packed must not be kept in the re frigerator HINTS FOR FREEZING To help you make the most of the freez ing process here are some important hints the maximum quantity of food which can be frozen in 24 hrs is shown on the rating plate the freezing process takes 24 hours No further food to be frozen should be added during this period only freeze top quality fresh and thor oughly ...

Страница 14: ... do not exceed the storage period indi cated by the food manufacturer 14 www aeg com ...

Страница 15: ... cleaners contain chemicals that can attack damage the plastics used in this appliance For this reason it is recommended that the outer casing of this appliance is only cleaned with warm water with a little washing up liquid added After cleaning reconnect the equipment to the mains supply DEFROSTING OF THE REFRIGERATOR Frost is automatically eliminated from the evaporator of the refrigerator compa...

Страница 16: ...ecautions disconnect the appliance from elec tricity supply remove all food defrost if foreseen and clean the appli ance and all accessories leave the door doors ajar to prevent unpleasant smells If the cabinet will be kept on ask some body to check it once in a while to pre vent the food inside from spoiling in case of a power failure 16 www aeg com ...

Страница 17: ... There is no voltage in the mains socket Connect a different electri cal appliance to the mains socket Contact a qualified electri cian The lamp does not work The lamp is in stand by Close and open the door The lamp is defective Refer to Replacing the lamp The Pilot light flash es The appliance is not work ing properly Contact a qualified electri cian The buzzer sounds The Alarm light flash ing Th...

Страница 18: ... temperature in the appliance is too low high The temperature regulator is not set correctly Set a higher lower temper ature The door is not closed cor rectly Refer to Closing the door The product temperature is too high Let the product tempera ture decrease to room tem perature before storage Many products are stored at the same time Store less products at the same time The temperature in the ref...

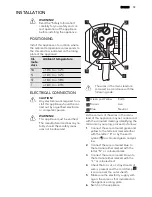
Страница 19: ...3 4 5 The wires in the mains lead are coloured in accordance with the following code 1 Green and Yellow Earth 3 Brown Live 5 Blue Neutral As the colours of the wires in the mains lead of this appliance may not correspond with the coloured markings identifying the terminals in your plug proceed as follows 1 Connect the wire coloured green and yellow to the terminal marked either with the letter E o...

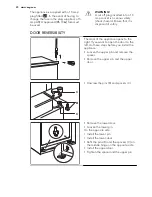
Страница 20: ... door of the appliance opens to the right If you want to open the door to the left do these steps before you install the appliance Loosen the upper pin and remove the spacer Remove the upper pin and the upper door B C C Unscrew the pins B and spacers C Remove the lower door Loosen the lower pin On the opposite side Install the lower pin Install the lower door Refit the pins B and the spacers C on ...

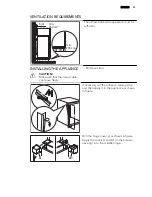
Страница 21: ... THE APPLIANCE CAUTION Make sure that the mains cable can move freely Do these steps x x If necessary cut the adhesive sealing strip and then apply it to the appliance as shown in figure A1 A Drill the hinge cover A as shown in figure Apply the covers A and A1 in the accesso ries bag in to the middle hinge ENGLISH 21 ...

Страница 22: ... 4 mm 44 mm Adjust the appliance in the niche Make sure that the distance between the appliance and the cupboard front edge is 44 mm The lower hinge cover in the accessories bag makes sure that the distance between the appliance and the kitchen furniture is correct Make sure that the clearance between the appliance and the cupboard is 4 mm Open the door Put the lower hinge cover in position I I At...

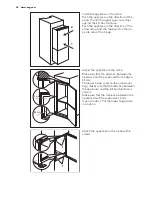
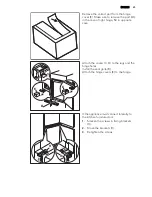
Страница 23: ...opposite case E E B D C Attach the covers C D to the lugs and the hinge holes Install the vent grille B Attach the hinge covers E to the hinge H H If the appliance must connect laterally to the kitchen furniture door 1 Slacken the screws in fixing brackets H 2 Move the brackets H 3 Retighten the screws ENGLISH 23 ...

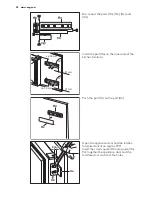
Страница 24: ...on the inner side of the kitchen furniture Ha Hc Push the part Hc on the part Ha Ha Hb 8 mm Open the appliance door and the kitchen furniture door at an angle of 90 Insert the small square Hb into guide Ha Put together the appliance door and the furniture door and mark the holes 24 www aeg com ...

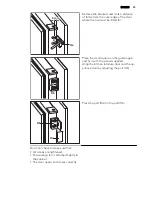
Страница 25: ...square on the guide again and fix it with the screws supplied Align the kitchen furniture door and the ap pliance door by adjusting the part Hb Hb Hd Press the part Hd on the part Hb Do a final check to make sure that All screws are tightened The sealing strip is attached tightly to the cabinet The door opens and closes correctly ENGLISH 25 ...

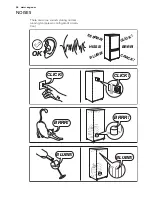
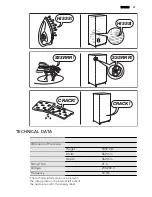
Страница 26: ...NOISES There are some sounds during normal running compressor refrigerant circula tion BRRR HISSS CLICK BLUBB CRACK SSSRRR OK CLICK CLICK BRRR BRRR BLUBB BLUBB 26 www aeg com ...

Страница 27: ... Dimension of the recess Height 1850 mm Width 560 mm Depth 560 mm Rising Time 21 h Voltage 230 240 V Frequency 50 Hz The technical information are situated in the rating plate on the internal left side of the appliance and in the energy label ENGLISH 27 ...

Страница 28: ...www aeg com shop 222359201 A 462011 ...

Отзывы: