background image

8

4.

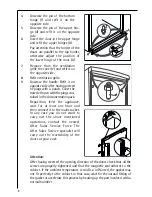
Unscrew the pin of the bottom
hinge (f) and refit it on the
opposite side.

5.

Unscrew the pin of the upper hin-
ge (d) and refit it on the opposite
side.

6.

Insert the door in the upper hinge
and refit the upper hinges (A). 
Pay attention that the border of the
doors are parallel to the top border,
otherwise adjust the position of
the lower hinge of the door (A).

7. 

Remove from the ventilation
grille the cover (e) and refit it on
the opposite side.

8.

Refit ventilation grille.

9.

Unscrew the handle. Refit it on
opposite side after having pierced
he plugs with a punch. Cover the
holes left open with the plugs con-
tained in the documentation pack.
Reposition, level the appliance,
wait for at least one hour and
then connect it to the mains socket.

In any case you do not want to
carry out the above mentioned
operations, contact the nearest
After Sales Service Force. The
After Sales Service specialist will
carry out the reversibility of the
doors at your cost.

Attention: 

After having reversed the opening direction of the doors check that all the
screws are properly tightened and that the magnetic seal adheres to the
cabinet. If the ambient temperature is cold (i.e. in Winter), the gasket may
not fit perfectly to the cabinet. in that case, wait for the natural fitting of
the gasket or accelerate this process by heating up the part involved with a
normal hairdrier. 

Содержание SANTO 71340 KA

Страница 1: ...SANTO 71340 KA User manual Manual de instruções Fridge Refrigerador ...

Страница 2: ...an integral part of our products To ensure optimal and regular performance of your appliance please read this instruction manual carefully It will enable you to navigate all processes perfectly and most efficiently To refer to this manual any time you need to we recommend you to keep it in a safe place And please pass it to any future owner of the appliance We wish you much joy with your new appli...

Страница 3: ...l connection 9 Prior to Inital Start up 9 Control panel 9 Starting up setting the temperature 10 Cold Store compartment 11 Air recycling 11 Interior Accessories 12 Storage shelves 12 Door rack 12 Bottle holder 12 Fresh food refrigeration 13 Defrosting 13 Switching off the appliance 14 Cleaning and Care 14 Energy Saving Tips 15 What to do if 15 Correcting Malfunctions 15 Changing the light bulb 17 ...

Страница 4: ...The refrigerant isobutane R600a is contained within the refrigerant circuit of the appliance a natural gas with a high level of environmental compa tibility which is nevertheless flammable During transportation and installation of the appliance be certain that none of the components of the refrigerant circuit become damaged If the refrigerant circuit should become damaged avoid open flames and sou...

Страница 5: ...urned at an incinerating plant without danger About the materials The plastics can be recycled and are identified as fol lows PE for polyethylene e g the outer covering and the bags in the interior PS for polystyrene foam e g the pads which are all free of chlorofluo rocarbon The carton parts are made from recycled paper and should be disposed of at a waste paper recycling collection location Disp...

Страница 6: ... be handed over to the applicable collection point for the recycling of electrical and electronic equipment By ensuring this product is disposed of correctly you will help prevent potential negative con sequences for the environment and human health which could otherwise be caused by inappropriate waste handling of this pro duct For more detailed information about recycling of this product please ...

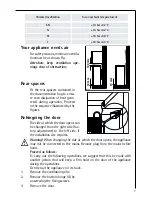
Страница 7: ...m 10 mm 10 mm NP007 Rehingeing the door The side at which the door opens can be changed from the right side fac tory adjustment to the left side if the installation site requires Warning When changing the side at which the door opens the appliance may not be connected to the mains Remove plug from the mains before hand Procced as follows To carry out the following operations we suggest that this b...

Страница 8: ...sleftopenwiththeplugscon tained in the documentation pack Reposition level the appliance wait for at least one hour and then connect it to the mains socket In any case you do not want to carry out the above mentioned operations contact the nearest After Sales Service Force The After Sales Service specialist will carry out the reversibility of the doors at your cost Attention After having reversed ...

Страница 9: ...appliance is built in the electrical installation must include suitable means of isolating the appliance from the mains e g fuse cut out current trip or similar with a minimum contact separation of 3 mm Attention The mains connection cable may only be replaced by a skilled electrician Please contact your dealer or our customer service department for repairs Prior to Initial Start Up Please clean t...

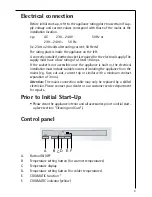
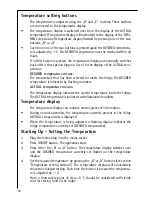
Страница 10: ...erature display indicates the current temperature inside the fridge The ACTUAL temperature is indicated with illuminated numbers Temperature display The temperature display can indicate several pieces of information During normal operation the temperature currently present in the fridge ACTUAL temperature is displayed When the temperature is being adjusted a flashing display indicates the fridge t...

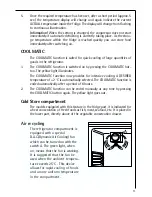
Страница 11: ...OLMATIC function now provides for intensive cooling A DESIRED temperature of 2 C is automatically selected The COOLMATIC function is ended automatically after a period of 6 hours 2 The COOLMATIC function can be ended manually at any time by pressing the COOLMATIC button again The yellow light goes out Cold Store compartment The models equippied with this feature in the fridge part it is indicated ...

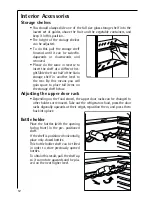
Страница 12: ... to the rear By this means you will gain space to place tall items on the storage shelf below Adjusting the upper door rack Depending on the food stored the upper door racks can be changed to other holders or removed Take out the refrigerators food press the door racks digonally upwards at their edges reposition them and press them back into place D338 Bottle holder Place the bottles with the open...

Страница 13: ...s these should be thoroughly cleaned and placed in the special drawer s provided Butter and cheese these should be placed in special airtight containers or wapped in aluminium foil or polythene bags to exclude as much air as pos sible Milk bootles these should have a cap and should be stored in the bottle rack on the door Bananas potatoes onions and garlic if not packed must not be kept in the ref...

Страница 14: ...rcuit breaker or fuse Never clean the appliance with a steam cleaner Moisture could accumu late in electrical components danger of electrical shock Hot vapours can lead to the damage of plastic parts The appliance must be dry before it is placed back into service Attention Ethereal oils and organic solvents can attack plastic parts e g lemon juice or the juice from orange peals butyric acid cleans...

Страница 15: ...y Saving Tips Do not install the appliance near cookers radiators or other sources of warmth High ambient temperatures cause longer more frequent opera tion of the compressor Ensure sufficient air circulation and exhaust at the appliance base and at the back wall of the appliance Never cover air vent openings Do not place warm foods into the appliance Allow warm foods to cool first Only leave door...

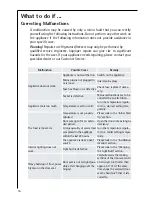
Страница 16: ...s are to be corrected by an electrician Appliance cools too much Temperature is set too cold Turn the temperature regula tor to a warmer setting tem porarily What to do if Correcting Malfunctions A malfunction may be caused by only a minor fault that you can rectify yourself using the following instructions Do not perform any other work on the appliance if the following information does not provid...

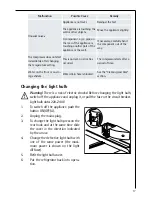
Страница 17: ... component out of the way Move the appliance slightly Readjust the feet Malfunction Possible Cause Remedy Changing the light bulb Warning There is a risk of electric shocks Before changing the light bulb switch off the appliance and unplug it or pull the fuse or the circuit breaker Light bulb data 220 240 V 1 To switch off the appliance push the button ON OFF A 2 Unplug the mains plug 3 To change ...

Страница 18: ...ent prevention regulations for refrigeration appliances VBG 20 and the regu lations of the German Society of Electrical Engineers VDE were observed in the manufacture of this appliance The refrigerant circuit has been checked for leaks This appliance is in accordance with the following EU guidelines 73 23 EWG dated 19 February 1973 low voltage guidelines 89 336 EWG dated 3 May 1989 including guide...

Страница 19: ...êm consumos de energia reduzidos e são amigos do ambiente Para assegurar a melhor performance do seu electrodoméstico leia cuida dosamente o manual de instruções Irá permitir lhe uma navegação perfei ta por todos os processos de um modo mais eficiente Para consultar este manual sempre que necessitar recomendamos lhe que o guarde num lugar seguro E por favor passe o a um futuro proprietário do apar...

Страница 20: ...relho em funcionamento 28 Painel de controlo 28 Colocação em funcionamento e reulação da temperatura 29 Acessorios internos 31 Posicionamento das prateleiras 31 Posicionamento das prateleiras na porta 31 Recirculação de ar 32 Compartimiento para botellas 32 Refrigeração dos alimentos 32 Descongelar 33 Descrição do aparelho 33 Limpeza e conservação 33 Conselhos pràticos para poupar energia 34 O que...

Страница 21: ...ngelados é favor observar as prescrições legais vigentes na sua zona Antes da primeira colocação em funcionamento Verifique se o aparelho frigorífico apresenta danos de transporte Não colocar de modo algum aparelhos danificados em funcionamento Em caso de danos é favor dirigir se aos fornecedores Agente de refrigeração O aparelho contém no circuito de refrigeração o agente de refrigeração isobutan...

Страница 22: ...r Excepção bebidas com elevado teor de álcool podem ser postas no congelador Não meter na boca gelado nem cubos de gelo acabados de sair do con gelador O gelado ou gelo muito frio pode ficar agarrado aos lábios ou à língua e causar ferimentos Não pegar nos produtos congelados com as mãos molhadas As mãos poderiam congelar e ficar agarradas aos produtos Não operar aparelhos eléctricos p ex máquinas...

Страница 23: ...omada desmontar o cabo de ligação à rede retirar ou destruir eventuais fechadu ras de mola ou de ferrolho Evitará assim que quaisquer cri anças se fechem por brincadeira no aparelho perigo de asfixia ou que se exponham a quaisquer outras situações em que possam correr perigo de vida Indicações relativas à remoção controlada O aparelho não pode ser removido juntamente com o lixo caseiro nem pelo se...

Страница 24: ... a 32 C ST 18 a 38 C T 18 a 43 C Se a instalação ao lado de uma fonte de calor não puder ser evitada terão que se respeitar os seguintes intervalos laterais mínimos em relação a fogões e aquecedores eléctricos 3 cm em relação a aquecedores a óleo e a carvão 30 cm Se estes intervalos não puderem ser respeitados é necessário instalar uma placa isotérmica entre o fogão aquecedor e o aparelho frigoríf...

Страница 25: ...óvel suspenso por cima do aparelho A solução preferível é indicada na Fig sem móvel Um ou vários pés niveladores situados na base têm a função de nive lar o aparelho correctamente O aparelho deve poder ser desligado da rede uma vez realizada a instalação portanto é necessário que a ficha fique acessível Espaçadores posteriores Na bolsinha da documentação encontram se dois espaçadores que hão de se...

Страница 26: ... grelha de ventilação 2 Retirar a dobradiça inferior A soltando os parafusos 3 Retirar a porta 4 Desaparafusar o pino da dobradiça inferior f e recolocar no lado oposto 5 Desaparafusar o pino da dobradiça superior d e recolocar no lado oposto 6 Colocar a porta no pino da dobradiça superior e recolocar as dobradiças superiores A Verificar se as extremidades da porta estão alinhadas com os lim ites ...

Страница 27: ...almente no armário Nesse caso esperar que esta encaixe naturalmente ou acelerar este processo aquecendo essa parte com um secador de cabelo Esperar no mínimo uma hora e depois ligar à corrente eléctrica Se não pretender realizar o procedimento acima descrito contactar o Concessionário de Assistência Técnica mais próximo da sua área de residência O técnico especializado do Serviço Pós Venda poderá ...

Страница 28: ...ação correspondem à tensão de conexão e ao tipo de corrente indicados na placa de características P ex AC 230 240 V 50 Hz ou 230 240 V 50 Hz isto é corrente alternada de 230 a 240 Volt 50 Hertz A placa de características encontra se no interior do aparelho à esquerda Antes de colocar o aparelho em funcionamento Por favor antes do primeiro uso limpe o interior e todas as peças do apa relho vide cap...

Страница 29: ...cada por algarismos ace sos de forma constante Indicador da temperatura O indicador da temperatura pode mostrar várias informações Durante o funcionamento normal é indicada a temperatura actualmente existente no frigorífico temperatura REAL Durante a regulação da temperatura é indicada de forma intermitente a temperatura regulada no momento temperatura TEÓRICA Se houver uma avaria no aparelho apar...

Страница 30: ... uma temperatura mais elevada prima a tecla MAIS QUENTE Para regular uma temperatura mais baixa prima a tecla MAIS FRIO O indicador da temperatura mostra imediatamente a temperatura alterada De cada vez que a tecla é premida a temperatura avança mais em 1 C Nota Do ponto de vista científico é suficiente uma temperatura de 5 C para a câmara frigorífica Se as teclas não voltarem a ser premidas depoi...

Страница 31: ...indicador amarelo acendese A função COOLMATIC proporciona agora uma refrigeração intensiva Para tal é ajustada automaticamente uma temperatura TEÓRICA de 2 C Após 6 horas a função COOLMATIC desactiva se automaticamente A temperatura TEÓRICA anteriormente regulada é de novo adoptada e a indicação da temperatura visualiza novamente a temperatura momentânea do frigorífico A função COOLMATIC pode ser ...

Страница 32: ...s de especial modo se são aromáticos Conselhos para a refrigeração Carne de qualquer tipo envolva esses alimentos em sacos plásticos e coloque as na divisão imediatamente acima das caixas para legumes O período de conservação é de 1 a 2 dias no máximo Alimentos cozidos pratos frios etc coloque os bem cobertos numa pra teleira qualquer Frutas e legumes nas caixas de legumes depois de lavados Banana...

Страница 33: ...ou desconectar o fusível 3 Descongelar o congelador e limpálo a fundo ver capítulo Limpeza e con servação 4 Deixar por fim a porta aberta para evitar maus cheiros Limpeza e conservação Por uma questão de higiene o interior do aparelho e o seu equipa mento interior deveriam ser limpos regularmente Aviso Durante a limpeza o aparelho não pode estar ligado à rede Perigo de cho que eléctrico Antes de i...

Страница 34: ...amento interior com um pano e água mor na Juntar eventualmente um pouco de detergente da louça 4 Em seguida limpar novamente com água limpa 5 Controlar o orifício de escoamento da água de descongelaçã o na parede posterior do frigorífico Se o orifício de escoamento da água estiver entupi do desentupilo com o auxílio de um arame Grandes camadas de pó no liquefactor reduzem a capacidade frigorífica ...

Страница 35: ...to Substituição da lâmpada neste capítulo Ajustar temporariamente o reguldor de temperatura em uma temperatura mais baixa A porta ficou aberta durante um período de tempo prolon gado É favor consultar o capítulo Local de instalação Nas últimas 24 horas foram armazenadas grandes quanti dades de alimentos quentes Deixar a porta aberta só durante o tempo estritamente necessário Aparelo gela demais A ...

Страница 36: ...eventualmente o ele mento em causa cuida dosa mente Afastar o aparelho um pouco da parede Reajustar os pés reguláveis frontais Avaria Causa possível Solução Substituição da lâmpada Aviso Perigo de choque eléctrico Antes de proceder à substituição da lâm pada desligar o aparelho e retirar a ficha de ligaçã o à rede da tomada ou desconectar o fusível Dados da lâmpada Sustituir la lámpara por otra de...

Страница 37: ...ncia técnica a falha indicada Nota uma deslocação injustificada do serviço de assistência técnica está sujeita a pagamento mesmo durante o prazo de garantia Prescrições normas directivas Este aparelho frigorífico foi concebido para uso doméstico e fabricado em conformidade com as normas vigentes para este tipo de aparelhos Duran te a sua produção tomaram se as providências necessárias especialment...

Страница 38: ......

Страница 39: ......

Страница 40: ...www electrolux com www aeg electrolux com pt 2223 455 11 00 09022007 Subject to change without notice Sujeito a alterações sem aviso prévio ...

Отзывы: