background image


36 

9.  Insert  the  small  transparent  RJ11  plugs  for  the  automatic 

recognition  of  the  battery  units  in  the  side  in  the 

corresponding connection jacks. 

10. As  the  last  step,  replace  the  front  panels.  The  wires  are 

threaded  carefully  through  the  corresponding  access  slots 

and  are  protected  behind  the  front  panels.  Remember  to 

tighten the screws in the center to lock the panel into place. 

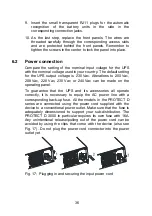
6.2  Power connection 

Compare  the  setting  of  the  nominal  input  voltage  for  the  UPS 

with the nominal voltage used in your country. The default setting 

for  the  UPS  output  voltage  is  230 Vac.  Alterations  to  200 Vac, 

208 Vac,  220 Vac,  230 Vac  or  240 Vac  can  be  made  on  the 

operating panel. 
To  guarantee  that  the  UPS  and  its  accessories  all  operate 

correctly,  it  is  necessary  to  equip  the  AC  power  line  with  a 

corresponding back-up fuse. All the models in the PROTECT D 

series  are  connected  using  the  power  cord  supplied  with  the 

device to a conventional power outlet. Make sure that the fuse is 

adequately  dimensioned  to  support  your  sub-distribution.  The 

PROTECT D. 3000 in particular requires its own fuse with 16A. 

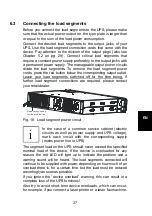
Any  unintentional  release/pulling  out  of  the  power  cord  can  be 

avoided by using the clips that come with the device (also see 

Fig.  17).  Do  not  plug  the  power  cord  connector  into  the  power 

outlet yet. 


Fig. 17:  Plugging in and securing the input power cord 
 

Содержание protect d. 1000

Страница 1: ...OPERATING INSTRUCTIONS EN Protect D Protect D 1000 Protect D 1000 BP Protect D 1500 Protect D 1500 BP Protect D 2000 Protect D 2030 BP Protect D 3000 ...

Страница 2: ...2 ...

Страница 3: ...safety precautions are an important part of these operating instructions They are designed to help you avoid problems caused by operating errors and to protect you against any possible hazards Please make sure to read through these instructions carefully before using the product for the first time ...

Страница 4: ...art of the PROTECT D The operator of this device is required to make these operating instructions openly available to any persons who transport install or service the PROTECT D or perform any other work on this device Validity These operating instructions comply with the current technical specifications of the PROTECT D at the time of publication The contents do not constitute a contract and are f...

Страница 5: ...be performed by qualified technicians only Illustrations are included to make certain steps more clear and easier to understand If there is any potential danger to personnel and equipment while performing certain work these activities are accompanied by pictograms whose meanings are explained in the Safety Instructions in Chapter 3 Hotline Should you still have any questions after reading this ope...

Страница 6: ...y 23 5 Overview of Connections Operating Display Elements 28 5 1 Front view 28 5 2 Rear panel view connections 29 6 Electrical Connection 32 6 1 Contacting the battery modules 32 6 1 1 Connecting the internal battery 33 6 1 2 Connecting external battery extension s 34 6 2 Power connection 36 6 3 Connecting the load segments 37 7 Operation Mode and Operating 39 7 1 First start up 39 7 1 1 Switching...

Страница 7: ... 4 EPO Emergency Power Off 57 8 5 Change over contact 58 9 Troubleshooting 58 9 1 Malfunctions 58 9 1 1 Alarm error messages 59 10 Maintenance 63 10 1 Charging the battery 63 10 2 Maintenance checks 63 10 2 1 Visual check 63 10 2 2 Battery check 64 10 2 3 Ventilator check 64 10 3 Battery replacement 64 Replace the EBM battery 68 11 Storage Dismantling and Disposal 69 11 1 Storage 69 11 2 Dismantli...

Страница 8: ...ate intelligent battery charger in switch mode power supply technology Valve regulated battery system maintenance free design as energy storage with downstream DC DC booster IGBT inverter for the continuous supply of connected loads with sinusoidal AC voltage Automatic bypass as additional passive redundancy Regulator on the basis of digital signal processor technology PFC Rectifier Inverter Batte...

Страница 9: ...educed significantly Additionally a sleep mode considerably increases the service life of the battery The inverter converts the DC voltage into a sinusoidal AC voltage In combination with digital signal processor technology and extremely high pulse rate IGBT power semiconductors in the inverter a microprocessor controlled regulator on the basis of pulse width modulation PWM guarantees a voltage sy...

Страница 10: ...y and without interruption In other words the automatic bypass provides the load segment with an additional passive redundancy Battery Load REC REC INV Mains Schematic diagram Secured busbar Load Power circuit at overload or faulty inverter autom Bypass The graphical LC display used provides for versatile use and easy operation Such convenient features as switchable outputs a freely programmable p...

Страница 11: ...Vac PROTECT D 1000 D 1500 190 Vac 276 Vac PROTECT D 2000 D 3000 Rectifier voltage range 160 Vac 276 Vac PROTECT D 1000 D 1500 180 Vac 276 Vac PROTECT D 2000 D 3000 Bypass voltage range 195 5 Vac 253 Vac Frequency 50 Hz 60 Hz autom recognition or manual Frequency tolerance range 5 Hz Charging rate at full load and battery charging max PROTECT D 1000 4 8 A PROTECT D 1500 7 2 A PROTECT D 2000 9 6 A P...

Страница 12: ...n speed 1 Hz s Power factor range 0 8 lag to 0 9 cap for full power output Power reduction 10 to 0 5lag 20 to 0 5cap Voltage waveform Sine distortion 3 THD linear load 6 THD non linear load Crest factor 3 1 Overload behavior to 110 continuously with mains supply 110 130 for 5 min 130 150 for 15 s 150 for 300 ms Overload behavior to 102 continuously with battery operation 110 130 for 12 s 130 150 f...

Страница 13: ...V PROTECT D 3000 72 V Float voltage 2 28 Vdc cell pre set to 25 C charging voltage temperature dependent Setting range 2 21 Vdc cell 2 31 Vdc cell in 0 01V increments Batt charge power max 1 4 Adc PROTECT D 1000 D 1500 1 7 Adc PROTECT D 2000 D 3000 Battery type Valve regulated lead battery VRLA Special type for high current discharge PROTECT D 1000 3 blocks at 12V 9Ah PROTECT D 1000 BP 2 belts at ...

Страница 14: ...rsion technology Full load efficiency PROTECT D 1000 88 83 AC AC DC AC PROTECT D 1500 88 83 PROTECT D 2000 89 86 PROTECT D 3000 90 86 Full load efficiency ECO 94 transfer time 10ms economical mode Full load efficiency ECO 95 D 1000 D 1500 efficiency optimized 98 D 2000 D 3000 transfer time 20ms Inherent noise 1m distance PROTECT D 1000 44 dB A PROTECT D 1500 45 dB A PROTECT D 2000 52 dB A PROTECT ...

Страница 15: ...olution 128 x 64 pixels Languages EN DE ES FR RU incl 3 LEDs for operating display Enclosure color RAL 9006 Weight net gross PROTECT D 1000 16 kg 22 kg PROTECT D 1500 19 5 kg 25 kg PROTECT D 2000 29 kg 35 5 kg PROTECT D 3000 29 5 kg 36 kg PROTECT D 1000 BP 23 kg 28 kg PROTECT D 1500 BP 28 kg 34 kg PROTECT D 2030 BP 41 kg 47 kg Dimensions net D 1000 BP D 1500 BP W 438 mm x D 430 mm x H 86 5 mm D 20...

Страница 16: ... Low Voltage Directive 2006 95 EG as well as the EMC Directive 2004 108 EG for electromagnetic compatibility if the installation instructions provided in this manual are followed For 2006 95 EG Low Voltage Directive Reference number EN 62040 1 1 2003 For 2004 108 EG EMC Directive Reference number EN 62040 2 2006 EN 61000 3 2 2006 A1 2009 A2 2009 EN 61000 3 3 2008 ...

Страница 17: ...ety of the device The following pictograms will appear in this manual Note Danger Indicates danger to the life and health of the operator Note Attention Indicates danger of injury and of damage to the device and parts of the device i Note Information Useful and important information on the operation of the UPS and its external battery modules special accessories 3 2 Safety instructions for PROTECT...

Страница 18: ...ircuit current Any incorrect connection or error made in disconnection can lead to the melting of plug connections to arcing and to serious burns The device is equipped with a warning signal that sounds when the PROTECT D battery power is dead or when the UPS is not working in the normal mode also see Chapter 9 1 1 Alarm error messages pg 59 To ensure operating safety with the UPS and the battery ...

Страница 19: ...y of the device with easy access to make it easier to activate the AC input or pull out the plug While the device is in operation do not pull the plug from the UPS or from the household outlet grounded power outlet This will cancel the ground for the UPS and all of the load segments connected Danger of electric shock Even when the mains power supply has been disconnected parts inside the UPS are s...

Страница 20: ...y other jewelry made of metal Use only tools with insulated handles i Do not use connecting blocks with central on off switches to prevent switch on current peaks Switch the UPS to OFF if you don t want to use it for a longer period of time If your company switches off the power every evening then the PROTECT D has to be switched off as well Otherwise the battery will run down To prolong battery l...

Страница 21: ...21 EN 3 3 CE certificate ...

Страница 22: ... within eight days of receipt to an AEG representative or retailer Check the contents for completeness PROTECT D with 1000 1500 2000 or 3000 VA 2 mounting brackets incl 2x4 screws M4x8 2 input power cords 1x CEE 7 7 hybrid plug 1x BS1363 plug 3 output device cables IEC320 10A as well as 1 device cable IEC320 16A for the D 3000 2 communication cables RS232 USB 2 rack rails incl screws and cage nuts...

Страница 23: ...r should preferably be operated at room temperature between 15 C and 25 C Install the devices in a room that is dry relatively dust free and free of chemical vapors Make sure that no magnetic storage media are stored and or operated in the vicinity of the PROTECT D Check the type plate to make sure that the voltage and frequency specifications match those of your load segments 4 3 Assembly For the...

Страница 24: ...his manual Using an external manual bypass is recommended this makes it possible to disconnect and remove the UPS for servicing for example at any time If the device is taken from a cold room and brought into a warm room or if the room temperature suddenly drops condensation inside the device may occur To prevent any condensation buildup let the device acclimatize for 2 hours before you switch it ...

Страница 25: ...rails Use 8 cage nuts for each rail pair Fig 2 Fastening the rails in the rack 3 Now insert the rails According to the illustration above fasten the rails to the rear post with two screws each in the front first use the lower screw Now tighten all the screws including the 3 screws each on the rail itself 4 Repeat these steps for each individual tray Front of rack Rear of rack Left rail Right rail ...

Страница 26: ...face Fig 3 Removing the PROTECT D from the packaging 6 Now fasten the two brackets that come with the device to the side of the UPS and if using an external battery unit according to Fig 4 Make sure to put the bracket marked L on the left and the one marked R on the right hand side Fig 4 Fastening the mounting bracket right hand side ...

Страница 27: ... the front post If being used screw the battery units to the rack Insert the UPS loosely at first 9 Check once again to make sure that the UPS and battery unit belong together Never connect different voltage levels with one another Connect PROTECT D 1000 with PROTECT D 1000BP only Connect PROTECT D 1500 with PROTECT D 1500BP only Connect PROTECT D 2000 with PROTECT D 2030BP only Connect PROTECT D ...

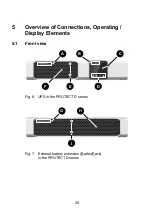
Страница 28: ...5 Overview of Connections Operating Display Elements 5 1 Front view A B C D E F __ ENTER ESC Fig 6 UPS in the PROTECT D series I __ H G Fig 7 External battery extension BatteryPack in the PROTECT D series ...

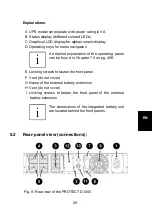
Страница 29: ...n of the operating panel can be found in Chapter 7 2 on pg 40ff E Locking screws to fasten the front panel F Vent do not cover G Name of the external battery extension H Vent do not cover I Locking screws to fasten the front panel of the external battery extension i The connections of the integrated battery unit are located behind the front panels 5 2 Rear panel view connections Fig 8 Rear view of...

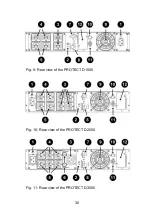
Страница 30: ...30 Fig 9 Rear view of the PROTECT D 1500 Fig 10 Rear view of the PROTECT D 2000 Fig 11 Rear view of the PROTECT D 3000 ...

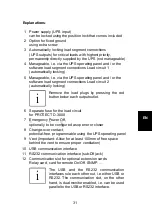
Страница 31: ... Remove the load plugs by pressing the red button below each output outlet 6 Separate fuse for the load circuit for PROTECT D 3000 7 Emergency Power Off optionally to be configured as opener or closer 8 Change over contact potential free programmable using the UPS operating panel 9 Vent Important Allow for at least 100mm of free space behind the vent to ensure proper ventilation 10 USB communicati...

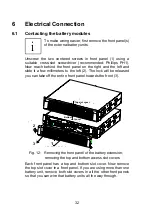
Страница 32: ...nd slide it a few millimeters to the left 2 The lock will be released you can take off the entire front panel towards the front 3 Fig 12 Removing the front panel of the battery extension removing the top and bottom access slot covers Each front panel has a top and bottom slot cover Now remove the top slot cover in a front panel If you are using more than one battery unit remove both slot covers in...

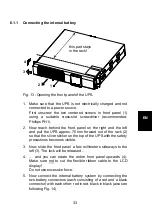
Страница 33: ...forward out of the rack 2 so that the silver sticker on the top of the UPS with the safety precautions becomes visible 3 Now slide the front panel a few millimeters sideways to the left 3 The lock will be released 4 and you can rotate the entire front panel upwards 4 Make sure not to cut the flexible ribbon cable to the LCD display Do not use excessive force 5 Now connect the internal battery syst...

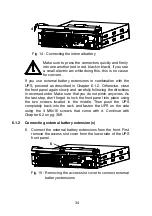
Страница 34: ...irections in reversed order Make sure that you do not pinch any wires As the last step don t forget to lock the front panel into place using the two screws located in the middle Then push the UPS completely back into the rack and fasten the UPS on the side using the 4 M6x16 screws that come with it Continue with Chapter 6 2 on pg 36ff 6 1 2 Connecting external battery extension s 6 Connect the ext...

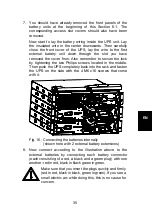
Страница 35: ...ck by tightening the two Philips screws located in the middle Then push the UPS completely back into the rack and fasten the UPS on the side with the 4 M6x16 screws that come with it Fig 16 Connecting the batteries internally shown here with 2 external battery extensions 8 Now connect according to the illustration above to the external batteries by connecting each battery connector each consisting...

Страница 36: ...c Alterations to 200 Vac 208 Vac 220 Vac 230 Vac or 240 Vac can be made on the operating panel To guarantee that the UPS and its accessories all operate correctly it is necessary to equip the AC power line with a corresponding back up fuse All the models in the PROTECT D series are connected using the power cord supplied with the device to a conventional power outlet Make sure that the fuse is ade...

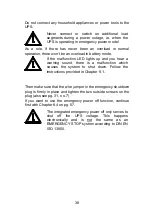
Страница 37: ...eing If further load segment connections are required please contact your retail dealer Removal by pushing the red push button Fig 18 Load segment power circuit i In the case of a common service cabinet electric circuits as well as power supply and UPS voltage mark each circuit with the corresponding supply mains power line or UPS The segment load on the UPS should never exceed the specified nomin...

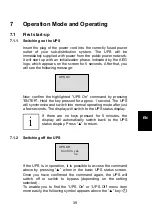
Страница 38: ...r a warning sound there is a malfunction which causes the system to shut down Follow the instructions provided in Chapter 9 1 Then make sure that the wire jumper in the emergency shutdown plug is firmly in place and tighten the two outside screws on the plug also see pg 31 no 7 If you want to use the emergency power off function continue first with Chapter 8 4 on pg 57 The integrated emergency pow...

Страница 39: ...pressed for approx 1 second The UPS will synchronize and switch into normal operating mode after just a few seconds The display will switch to the UPS status display i If there are no keys pressed for 5 minutes the display will automatically switch back to the UPS status display Press to return 7 1 2 Switching off the UPS If the UPS is in operation it is possible to access the command above by pre...

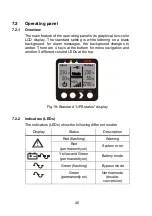
Страница 40: ...There are 4 keys at the bottom for menu navigation and another 3 different colored LEDs at the top Fig 19 Standard UPS status display 7 2 2 Indicators LEDs The indicators LEDs show the following different modes Display Status Description Red flashing Warning Red permanently on System error Yellow and Green permanently on Battery mode Green flashing Bypass mode Green permanently on Normal mode doub...

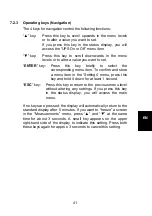
Страница 41: ...em To confirm and store a menu item in the Settings menu press this key and hold it down for at least 1 second ESC key Press this key to return to the previous menu level without altering any settings If you press this key in the status display you will access the main menu If no keys are pressed the display will automatically return to the standard display after 5 minutes If you want to freeze a ...

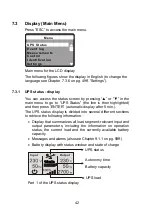
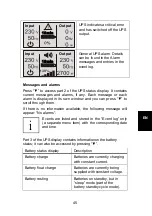
Страница 42: ...ter 5 min The UPS status display is divided into several different sections to retrieve the following information Display that summarizes all load segment relevant input and output parameters including the information on operation status the current load and the currently available battery capacity Messages and alarms also see Chapter 9 1 1 on pg 59ff Battery display with status window and state o...

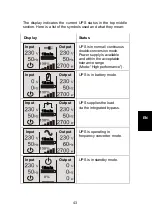
Страница 43: ...al continuous double conversion mode Power supply is available and within the acceptable tolerance range Mode High performance UPS is in battery mode UPS supplies the load via the integrated bypass UPS is operating in frequency converter mode UPS is in standby mode 18min Input Output 6 18min 18min Input Output 18min Input Output 18min Input Output Input Output ...

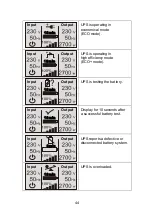
Страница 44: ...y mode ECO mode UPS is testing the battery Display for 10 seconds after a successful battery test UPS reports a defective or disconnected battery system UPS is overloaded 18min Input Output 0min Input Output 18min Input Output 18min Input Output 18min Input Output 18min Input Output ...

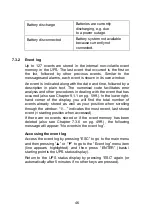
Страница 45: ...ormation available the following message will appear No alarms i Events are listed and stored in the Event log only a separate menu item with the corresponding date and time Part 3 of the UPS display contains information on the battery status it can also be accessed by pressing Battery status display Description Battery charge Batteries are currently charging with constant current Battery float ch...

Страница 46: ...nt that has occurred also see Chapter 9 1 1 on pg 59ff In the lower right hand corner of the display you will find the total number of events already stored as well as your position when scrolling through the window 1 indicates the most recent last stored event starting position when accessed If there are no events stored or if the event memory has been deleted also see Chapter 7 3 6 on pg 49ff th...

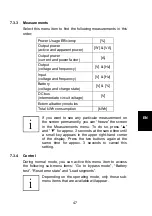
Страница 47: ...f you want to see any particular measurement on the screen permanently you can freeze the screen in the Measurements menu To do so press and for approx 3 seconds at the same time until a small key appears in the upper right hand corner of the display Press the two buttons again at the same time for approx 3 seconds to cancel this setting 7 3 4 Control During normal mode you can active this menu it...

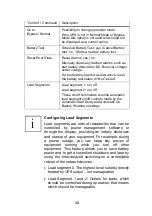
Страница 48: ... automatic load segment on off controls made by the Automatic Start Delay and Automatic On Battery Shutdown settings i Configuring Load Segments Load segments are sets of receptacles that can be controlled by power management software or through the display providing an orderly shutdown and startup of your equipment For example during a power outage you can keep key pieces of equipment running whi...

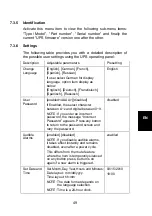
Страница 49: ...h User Password enabled AAAA disabled If Enabled the select character between A z and digital between 0 9 NOTE If you enter an incorrect password the message Incorrect Password appears Press any button to return to the password screen and retry the password disabled Audible Alarms enabled disabled NOTE If you disable audible alarms it takes effect instantly and remains disabled even after a power ...

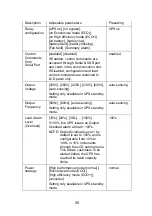
Страница 50: ...oltage 200V 208V 220V 230V 240V auto sensing Setting only available in UPS stand by mode auto sensing Output Frequency 50Hz 60Hz auto sensing Setting only available in UPS stand by mode auto sensing Load Alarm Level Overload 10 20 30 100 If 100 the UPS issues an Output Overload alarm at load 100 NOTE Output Overload Level 1 by default is set to 100 and is configurable from 10 to 100 in 10 incremen...

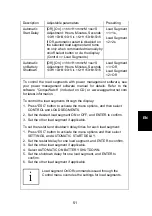
Страница 51: ... software CompuWatch included on CD or www aegpartnernet com for latest information To control the load segments through the display 1 Press ESC button to activate the menu options and then select CONTROL and LOAD SEGMENTS 2 Set the desired load segment ON or OFF and ENTER to confirm 3 Set the other load segment if applicable To set the restart and shutdown delay times for each load segment 1 Pres...

Страница 52: ...he selected level If set 0 the feature is disabled 0 Automatic battery support tests enabled disabled enabled Periodic Battery Tests daily weekly monthly weekly Automatic battery tests run according to periodic battery test unless disabled During the test the UPS transfers to Battery mode and discharges the batteries for 10 seconds under the existing load i The UPS on Battery notice and the Batter...

Страница 53: ...h disabled Default 14h means when work on battery mode for more than 14 hours UPS will make bat low alarm and then shutdown itself 30 minutes later even battery voltage still above the shutdown value Disabled means No time limitation for battery mode 14h Auto reboot enabled disabled Enabled means UPS will auto restart to normal mode while utility recover after the UPS has been shutdown for battery...

Страница 54: ...og Press the ENTER button for one second to reset the event count to zero and clear the log LCD Contrast 5 4 1 0 1 4 5 The LCD Contrast is adjustable and the valid range is from 5 to 5 0 Restore Factory Settings no yes Setting only available in UPS stand by mode Restoring the factory settings Returns all user configurable EEPROM settings to default factory settings Resets all pending on off comman...

Страница 55: ... slot There is a cover on the rear panel of the UPS see no 12 on Seite 31 remove it to install additional optionally available communication components e g Relay card Plug in card with status messages realized via potential free relay contacts opener or closer Relay PRO card As above but with programmable pin allocation connection via terminal additional option of remote On Off SNMP card Plug in c...

Страница 56: ...omponents and data backup are available The CompuWatch shutdown and management software supports a diverse range of operating systems including Windows NT 2000 XP Windows Vista 7 8 Linux SUSE Linux RedHat Novell Netware IBM AIX HP UX SUN Solaris Mac OS X Fig 20 Example of a CompuWatch screen For details on the installation under the different operating systems please refer to the operating manuals...

Страница 57: ...t the UPS is switched off and switch it off if necessary 2 Remove the plug from the EPO insert on the rear panel of the UPS by unscrewing the 2 outer screws also see pg 31 no 7 3 Connect a potential free opener contact able to manage a load of at least 60 Vdc 30 Vac 20 mA with the pins of the plug 4 To do so use a flexible wire with a diameter of min 0 5 mm2 or max 2 5 mm2 Replace the plug and loc...

Страница 58: ...lace the plug and lock the insert into place in the base by tightening the outer screws 9 Troubleshooting 9 1 Malfunctions The PROTECT D issues detailed error messages to help you or the maintenance staff to localize and interpret any malfunctions that may occur quickly and with high precision In the following please find process solution suggestions to eliminate the problem that has occurred If y...

Страница 59: ...on Battery Notice 168 Intermittent Alarm A utility failure has occurred and the UPS is in Battery mode The UPS is powering the equipment with battery power Prepare your equipment for shutdown Battery Disconnected Alarm 199 Continuous Alarm The UPS does not recognize the internal batteries Make sure that all batteries are correctly connected If the condition persists contact your service representa...

Страница 60: ... have already shut down gracefully Battery Test Failed Alarm 191 Intermittent Alarm A weak battery string was detected during the last battery test This is a warning notice Replace the batteries soon Service Battery Alarm 149 Continuous Alarm A faulted battery string has been detected and as a result the charger is disabled Contact your service representative Utility Not Present Alarm 59 Intermitt...

Страница 61: ... Fault to disabled in the Settings menu Remote Emergency Power Off Alarm 12 Intermittent Alarm The external contacts in the rear of the uninterruptible power supply are configured for remote emergency power off operation and they are activated The UPS deenergizes the load and enters Standby mode For more information see EPO Emergency Power Off in Chapter 8 4 on pg 57 Output Overload Alarm 25 Inter...

Страница 62: ...nt Alarm The uninterruptible power supply has detected that one of its heat sinks has exceeded the maximum defined operating temperature Possible fan failure see below Make sure that the fans are spinning and that the air intake vents on the uninterruptible power supply are not blocked After the maximum temperature is reached the uninterruptible power supply shuts down Fan Failure Alarm 193 Contin...

Страница 63: ...e IMPORTANT The battery charging module must be activated presetting also see Chapter 7 3 6 on pg 49ff The total charging time for the battery after it has been discharged for a long period of time can depend on the number of additional external battery units see Chapter 2 3 10 2 Maintenance checks The following maintenance work should be performed Activity Frequency Described in Visual check 6 mo...

Страница 64: ...e same power requirements If the battery time sinks drastically compared to the previous check please contact our hotline see pg 5 10 2 3 Ventilator check Check the ventilators regularly for dust accumulation and any noticeably irregular noises If the vents are clogged they must be cleaned if the ventilator appears to be unusually loud or is not operating smoothly please contact our hotline see pg...

Страница 65: ...attery replacement 2 Then unscrew the two centered screws in front panel 2 using a suitable cross slot screwdriver recommended Phillips PH1 3 Now reach behind the front panel on the right and the left and pull the UPS approx 70 mm forward out of the rack 3 so that the silver sticker on the top of the UPS with the safety precautions becomes visible refer as well to the following fig 22 4 Now slide ...

Страница 66: ... the UPS internal batteries Removal of the battery cover plate 8 Grasp an edge of the battery cover plate and pull it out gently Remove and retain the battery cover plate Figure 23 shows the location of the battery cover plate Carefully pull the handle on the battery tray and slide the battery package slowly out onto a flat stable surface use two hands to support the battery package see Figure 24 ...

Страница 67: ...d black in black Make sure to press the connectors quickly and firmly into one another red in red black in black If you see a small electric arc while doing this this is no cause for concern If the EBM cable isn t connected to an EBM clip the EBM cable back into its holder on the battery cover plate See Figure 23 12 Finally close the front panel again slowly and carefully following the directions ...

Страница 68: ...ns more than 0 4 lead By ensuring these batteries are disposed of correctly you will help prevent potentially negative consequences for the environment and human health which could otherwise be caused by inappropriate waste handling of the battery The recycling of the materials will help to conserve natural resources In case of products that for safety performance or data integrity reasons require...

Страница 69: ...etely charged For the minimum charging time please refer to the information in Chapter 10 1 11 2 Dismantling To de install the UPS perform the same steps as for the installation but in reversed order 11 3 Disposal In the interests of environmental protection and recycling please dispose of the individual parts of the device as specified and according to the legal regulations when its service life ...

Страница 70: ... health which could otherwise be caused by inappropriate waste handling of this product The recycling of materials will help to conserve natural resources For more detailed information about recycling of this product please contact your local Civic Office your household waste disposal service or the shop where you purchased the product ...

Страница 71: ... Power Factor Correction Circuit technology used to minimize the harmonic current particularly important when connecting non linear loads PWM Pulse Width Modulation Here Circuit technology to generate a sine like flux density waveform of highest quality from existing direct current voltage SNMP Simple Network Management Protocol Frequently used protocol in the network to manage administrate compon...

Страница 72: ...Emergency power off 57 Error messages 59 H Hotline 5 I Initial Start up 39 Installation 22 Interfaces PC 55 L Load segment connection 37 M Malfunctions 59 Measurement indicator 47 N Normal mode 9 40 O Operation 39 Operating modes 9 Operating panel 40 Overload 12 P Power supply 36 R Rack 19 installation 24 RS 232 interface 31 55 S Safety instructions 17 Settings 49 Signaling 40 Specifications 11 St...

Страница 73: ...73 EN 12 3 Notes ...

Страница 74: ...74 ...

Страница 75: ...75 EN ...

Страница 76: ...ion of the relevant conditions Due to the non binding nature of these terms we assume liability neither for the accuracy nor completeness of the data provided here AEG is a registered trademark used under licence from AB Electrolux Emil Siepmann Str 32 59581 Warstein Belecke Germany Tel 49 2902 763100 www aegps com OPERATING INSTRUCTIONS 8000032014_02 BAL EN GUARANTEE CERTIFICATE MODEL SERIAL NO D...

Отзывы: