AEG NSC7G751ES Скачать руководство пользователя страница 10

1

ECOMETER indicator

2

Extra Cool button / indicator

3

Fridge compartment indicator

4

Alarm indicator

5

Door open alarm indicator

6

Freezer compartment indicator

7

Extra Freeze button / indicator

8

Freezer temperature button /

indicator

9

Fridge temperature button / indicator

10

Fan button / indicator

11

ECO button

4.1 Switching on

Connect the mains plug to the power

socket.
To select a different set temperature,

refer to "Temperature regulation".
If "dE on" appears on the display, refer to

"Troubleshooting".

4.2 Switching off

1. Press and hold the freezer

temperature button for 5 seconds.

The display shows blinking OF.

2. Once the appliance is switched off,

the display reads OF.

3. Disconnect the mains plug from the

power socket.

4.3 Temperature regulation

The temperature range may vary

between -15°C and -24°C for freezer and

between 2°C and 8°C for fridge.
Press the temperature buttons to set the

temperature of the appliance.
The recommended set temperature is:
• +4°C for the fridge

• -18°C for the freezer

You may set the recommended

temperature manually with temperature

buttons or by switching on the ECO

function. Refer to "ECO function" for

more information
The temperature indicators show the set

temperature.

The set temperature will be

reached within 24 hours.

After a power failure, the

appliance goes back to the

set temperature.

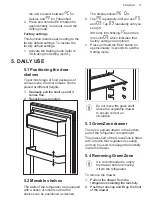
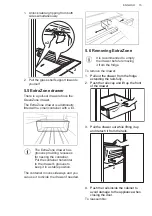
4.4 Switching off the fridge

It is possible to switch off only the fridge

compartment maintaining the freezer on.

1. Press and hold the fridge

temperature button for 5 seconds.

The display shows blinking OF.

2. Once the fridge compartment is

switched off, the display reads OF.

4.5 Switching on the fridge

To switch on the fridge:

1. Press and hold the fridge

temperature button for 5 seconds.

The display shows blinking ON.

2. The fridge compartment is switched

on and the previous set temperature

is restored.

To adjust the temperature,

refer to "Temperature

regulation".

4.6 ECO function

The ECO function sets the optimal

temperature to ensure food preservation

while minimizing energy consumption.

1. To activate the function press the

ECO button.

The fridge temperature is set to +4°C

and the freezer temperature to -18°C.

2. To deactivate the function, press the

ECO button again or select a

different set temperature (refer to

"Temperature regulation").

It is not possible to activate

the ECO function when the

Extra Cool function is on.

The ECOMETER indicator

shows the appliance's

current energy consumption.

Three fully lit bars indicate

the most energy-efficient

setup.

www.aeg.com

10

Содержание NSC7G751ES

Страница 1: ...USER MANUAL EN User Manual Fridge Freezer NSC7G751ES ...

Страница 2: ...usage advice brochures trouble shooter service and repair information www aeg com support Register your product for better service www registeraeg com Buy Accessories Consumables and Original spare parts for your appliance www aeg com shop CUSTOMER CARE AND SERVICE Always use original spare parts When contacting our Authorised Service Centre ensure that you have the following data available Model ...

Страница 3: ...ies provided that they have been properly instructed Children of less than 3 years of age should be kept away from the appliance unless continuously supervised Children should be supervised to ensure that they do not play with the appliance Children shall not carry out cleaning and user maintenance of the appliance without supervision Keep all packaging away from children and dispose of it appropr...

Страница 4: ...gents Do not use abrasive products abrasive cleaning pads solvents or metal objects When the appliance is empty for long period switch it off defrost clean dry and leave the door open to prevent mould from developing within the appliance Do not store explosive substances such as aerosol cans with a flammable propellant in this appliance If the supply cord is damaged it must be replaced by the manu...

Страница 5: ...mponents The mains cable must stay below the level of the mains plug Connect the mains plug to the mains socket only at the end of the installation Make sure that there is access to the mains plug after the installation Do not pull the mains cable to disconnect the appliance Always pull the mains plug 2 3 Use WARNING Risk of injury burns electric shock or fire The appliance contains flammable gas ...

Страница 6: ... of the appliance 2 6 Service To repair the appliance contact the Authorised Service Centre Use original spare parts only Please note that self repair or non professional repair can have safety consequences and might void the guarantee The following spare parts will be available for 7 years after the model has been discontinued thermostats temperature sensors printed circuit boards light sources d...

Страница 7: ...iance 3 1 Dimensions B A H1 W1 D1 W2 D2 W3 D3 9 0 Overall dimensions H1 mm 1884 W1 mm 696 D1 mm 549 the height width and depth of the appliance without the handle Space required in use H2 A B mm 1923 Space required in use W2 mm 696 D2 mm 561 A mm 1894 B mm 29 the height width and depth of the appliance including the handle plus the space necessary for free circulation of the cooling air ENGLISH 7 ...

Страница 8: ...ustomer service or to the nearest Authorised Service Centre It must be possible to disconnect the appliance from the mains power supply The plug must therefore be easily accessible after installation 3 3 Electrical Connection CAUTION Any electrical work required to install this appliance should be carried out by a qualified electrician or competent person WARNING This appliance must be earthed The...

Страница 9: ... be used WARNING A cut off plug inserted into a 13 amp socket is a serious safety shock hazard Ensure that it is disposed of safely 3 4 Ventilation requirements The airflow behind the appliance must be sufficient min 200 cm min 200 cm min 30 mm min 30 mm CAUTION Refer to the installation instructions for the installation 3 5 Door reversibility Please refer to the separate document with instruction...

Страница 10: ...n The temperature indicators show the set temperature The set temperature will be reached within 24 hours After a power failure the appliance goes back to the set temperature 4 4 Switching off the fridge It is possible to switch off only the fridge compartment maintaining the freezer on 1 Press and hold the fridge temperature button for 5 seconds The display shows blinking OF 2 Once the fridge com...

Страница 11: ...e fridge compartment is equipped with a device that allows rapid cooling of food and ensures high uniformity of temperature in the compartment This device activates automatically when needed or manually To switch on the function press the Fan button The Fan indicator lights up To switch off the function press again the Fan button The Fan indicator goes out If the function is activated automaticall...

Страница 12: ...zer temperature button on the right to change the parameter value Display Default parame ters ECOMETER indica tor Button sounds Display Default parame ters Temperature units Factory settings ECOMETER indicator In order to switch the ECOMETER on or off 1 Activate the Setting mode refer to Activating the Setting mode The display shows 2 Tap repeatedly The indicator will show respectively for the ena...

Страница 13: ... of various sizes the door shelves can be placed at different heights 1 Gradually pull the shelf up until it comes free 2 Reposition as required 5 2 Movable shelves The walls of the refrigerator are equipped with a series of runners so that the shelves can be positioned as desired Do not move the glass shelf above the vegetable drawer to ensure correct air circulation 5 3 GreenZone drawer There is...

Страница 14: ... Place the rear part of the drawer on the rails 3 Keep the front of the drawer lifted up while pushing the drawer in 4 Press the front part of the drawer downwards Pull out the drawer again and check if it is placed correctly on both rear and front hooks To remove the glass cover of the GreenZone drawer www aeg com 14 ...

Страница 15: ...ntal to the drawer s grooves to keep it in a stable position The container moves sideways and you can use it to divide the drawer if needed 5 6 Removing ExtraZone It is recommended to empty the drawer before removing it from the fridge To remove the drawer 1 Pull out the drawer from the fridge extending the rails fully 2 Push the rails cap and lift up the front of the drawer 3 Pull the drawer out ...

Страница 16: ...t of the drawer downwards Pull out the drawer again and check if it is placed correctly on both rear and front hooks To remove the glass shelf 1 Unlock lateral gripping from both sides simultaneously 2 x2 1 2 Pull the glass shelf support towards yourself 2 1 5 7 Humidity control The glass shelf of the GreenZone drawer is fitted with a device that regulates its www aeg com 16 ...

Страница 17: ...oisture To remove the humidity control device open the drawer below the glass shelf and pull out the cover Depending on the quantity and condition of fruit and vegetables stored in the GreenZone drawer condensation may occur In such a case remove the condensation using a soft cloth and set the humidity control to low humidity position 5 8 Fan The refrigerator compartment is equipped with a device ...

Страница 18: ...nce When the freezing process is complete the appliance automatically returns to the previous temperature setting see Extra Freeze function For more information refer to Hints for freezing 5 11 Storage of frozen food When activating an appliance for the first time or after a period out of use before putting the products in the compartment let the appliance run at least 3 hours with the Extra Freez...

Страница 19: ...compartment Before freezing wrap and seal fresh food in aluminium foil plastic film or bags airtight containers with lid For more efficient freezing and thawing divide food into small portions It is recommended to put labels and dates on all your frozen food This will help to identify foods and to know when they should be used before their deterioration The food should be fresh when being frozen t...

Страница 20: ...If food has defrosted even partially do not re freeze it Consume it as soon as possible Respect the expiry date and the storage information on the package 6 5 Shelf life for freezer compartment Type of food Shelf life months Bread 3 Fruits except citrus 6 12 Vegetables 8 10 Leftovers without meat 1 2 Dairy food Butter Soft cheese e g mozzarella Hard cheese e g parmesan cheddar 6 9 3 4 6 Seafood Fa...

Страница 21: ...lf or if available on the bottle rack In order to accelerate cooling down of the goods it is advisable to turn on the fan The activation of Fan allows greater homogenization of internal temperatures Always refer to the expiry date of the products to know how long to keep them 7 CARE AND CLEANING WARNING Refer to Safety chapters 7 1 Cleaning the interior Before using the appliance for the first tim...

Страница 22: ...OTING WARNING Refer to Safety chapters 8 1 What to do if Problem Possible cause Solution The appliance does not op erate The appliance is switched off Switch on the appliance The mains plug is not con nected to the mains socket correctly Connect the mains plug to the mains socket correctly There is no voltage in the mains socket Connect a different electrical appliance to the mains sock et Contact...

Страница 23: ...r pressing the Extra Freeze or Extra Cool or after changing the temperature The compressor starts after a period of time This is normal no error has occurred Door is misaligned or inter feres with ventilation grill The appliance is not level led Refer to installation instruc tions Door does not open easily You attempted to re open the door immediately after closing Wait a few seconds between closi...

Страница 24: ... Food products prevent the water from flowing into the water collector Make sure that food prod ucts do not touch the rear plate The water outlet is clogged Clean the water outlet Water flows on the floor The melting water outlet is not connected to the evapo rative tray above the com pressor Attach the melting water out let to the evaporative tray Temperature cannot be set The Extra Freeze functi...

Страница 25: ...dE on appears on the dis play The appliance is in the dem onstration mode To exit the demonstration mode press and hold the Extra Cool and ECO buttons for approximately 10 sec onds until you hear 3 short beeps If the advice does not lead to the desired result call the nearest Authorized Service Centre 8 2 Replacing the lamp The appliance is equipped with a longlife LED interior light Only service ...

Страница 26: ...ation of the appliance for any EcoDesign verification shall be compliant with BS EN 62552 Ventilation requirements recess dimensions and minimum rear clearances shall be as stated in this User Manual at Chapter 3 Please contact the manufacturer for any other further information including loading plans 12 ENVIRONMENTAL CONCERNS Recycle materials with the symbol Put the packaging in relevant contain...

Страница 27: ......

Страница 28: ...www aeg com shop 222380677 A 322022 ...

Отзывы: