background image

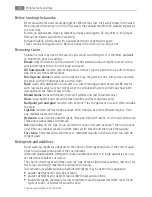
Before loading the laundry

Never wash whites and coloureds together. Whites may lose their «whiteness» in the wash.

New coloured items may run in the first wash; they should therefore be washed separately

the first time.

Button up pillowcases, close zip fasteners, hooks and poppers. Tie any belts or long tapes.

Remove persistent stains before washing.

Rub particularly soiled areas with a special detergent or detergent paste.

Treat curtains with special care. Remove hooks or tie them up in a bag or net.

Removing stains

Stubborn stains may not be removed by just water and detergent. It is therefore advisable

to treat them prior to washing.

Blood:

 treat fresh stains with cold water. For dried stains, soak overnight in water with a

special detergent then rub in the soap and water.

Oil based paint:

 moisten with benzine stain remover, lay the garment on a soft cloth and

dab the stain; treat several times.

Dried grease stains:

 moisten with turpentine, lay the garment on a soft surface and dab

the stain with the fingertips and a cotton cloth.

Rust:

 oxalic acid dissolved in hot water or a rust removing product used cold. Be careful

with rust stains which are not recent since the cellulose structure will already have been

damaged and the fabric tends to hole.

Mould stains:

 treat with bleach, rinse well (whites and fast coloureds only).

Grass:

 soap lightly and treat with bleach (whites and fast coloureds only).

Ball point pen and glue:

 moisten with acetone

1)

, lay the garment on a soft cloth and dab

the stain.

Lipstick:

 moisten with acetone as above, then treat stains with methylated spirits. Treat

any residual marks with bleach.

Red wine:

 soak in water and detergent, rinse and treat with acetic or citric acid, then rinse.

Treat any residual marks with bleach.

Ink:

 depending on the type of ink, moisten the fabric first with acetone

1)

, then with acetic

acid; treat any residual marks on white fabrics with bleach and then rinse thoroughly.

Tar stains:

 first treat with stain remover, methylated spirits or benzine, then rub with de

-

tergent paste.

Detergents and additives

Good washing results also depend on the choice of detergent and use of the correct quan

-

tities to avoid waste and protect the environment.

Although biodegradable, detergents contain substances which, in large quantities, can up

-

set the delicate balance of nature.

The choice of detergent will depend on the type of fabric (delicates, woollens, cottons, etc.),

the colour, washing temperature and degree of soiling.

All commonly available washing machine detergents may be used in this appliance:

• powder detergents for all types of fabric

• powder detergents for delicate fabrics (60°C max) and woollens

• liquid detergents, preferably for low temperature wash programmes (60°C max) for all

types of fabric, or special for woollens only.

1) do not use acetone on artificial silk

22

Helpful hints and tips

Содержание LAVAMAT 16950A3

Страница 1: ...LAVAMAT 16950A3 User manual Washer Dryer ...

Страница 2: ...ion buttons 11 PREWASH option 12 STAIN option 12 SENSITIVE option 12 DAILY option 12 SUPER QUICK option 12 EXTRA RINSE option additional rinse 12 Select the START PAUSE button 7 13 Select the DELAY START button 8 13 Altering an option or a running programme 13 Interrupting a programme 14 Cancelling a programme 14 Opening the door after the programme has started 14 At the end of the programme 14 US...

Страница 3: ...functioning of the appli ance and the relevant warnings You MUST read them carefully before installing or using the appliance Before first starting up check the appliance for any damage incurred during transport Never connect up a damaged appliance If parts are damaged contact your supplier If the appliance is delivered in the winter months when there are minus temperatures Store it at room temper...

Страница 4: ...ed to install this appliance should be carried out by a qualified plumber or competent person Any electrical work required to install this appliance should be carried out by a qualified electrician or competent person Use This appliance is designed for domestic use It must not be used for purposes other than those for which it was designed Only wash and dry fabrics which are designed to be machine...

Страница 5: ... safety Children should be supervised to ensure that they do not play with the appliance The packaging components e g plastic film polystyrene can be dangerous to children danger of suffocation Keep them out of children s reach Keep all detergents in a safe place out of children s reach Make sure that children or pets do not climb inside the drum To prevent children or pets becoming trapped inside...

Страница 6: ...powder or liquid detergent used for main wash Compartment for liquid additives fabric soft ener starch Follow the product manufacturer s recommendations on quantities to use and do not ex ceed the MAX mark in the detergent dispenser drawer Any fabric softener or starching additives must be poured into the compartment before starting the wash programme CONTROL PANEL Below is a picture of the contro...

Страница 7: ...ogramme IRON DRY CUPBOARD DRY and EXTRA DRY symbols selectable by pressing the button 3 indicator AUTO connected to the drying programme and to button 4 9 3 Programme progress indicator PREWASH MAIN WASH RINSE SPIN OVERDOSAGE EXTRA RINSE DRYING DRYING ANTI CREASE phase sym bols The programme progress display shows the washing or drying phases of the selected pro gramme During a cycle a black line ...

Страница 8: ...delay 20 hours max set by pressing the relevant button appears on the display for a few seconds for example then the duration of the previously selec ted programme is displayed The DELAY START symbol will appear on the display The delay time value decreases by one unit every hour and then when 1 hour remains the time decreases every minute Selected drying time After selecting a drying programme th...

Страница 9: ...ttons again the acoustic signal is reactivated Child safety lock This device permits you to leave the appliance unattended and not to worry that children might be injured by or cause damage to the appliance This function remains able also when the washing machine is not working There are two different ways to set this option Before pressing button 7 it will be impossible to start the machine after...

Страница 10: ...r any type of laundry following the descriptions on the washing programme tables see Washing Programmes Turn the programme selector dial to the required programme The programme selector de termines the type of washing cycle e g water level drum movement number of rinses and the washing temperature according to the type of laundry By selecting a programme the programme progress indicator symbols an...

Страница 11: ...mes the rinses will be performed with more water At the end of the programme a blinking and the RINSE HOLD symbol appear on the display the DOOR symbol remains lit and the pilot light of button 7 goes off The door is locked to indicate that the water must be emptied out RINSE HOLD or NIGHT CYCLE option cannot be selected with a NON STOP pro gramme see Drying section To empty out the water please r...

Страница 12: ... cannot be selected together with Extra Rinse option This option is recommended for non fast coloured items and for frequently washed items DAILY option By selecting this option you will be able to modify the washing duration to wash daily soiled laundry The display will show the corresponding symbol and the reduced washing time To be used for daily soiled laundry SUPER QUICK option By selecting t...

Страница 13: ... set the programme and before you press the button 7 You can modify or cancel the delay time at any moment before you press the button 7 The door will be locked throughout the delay time If you wish to add laundry in the ma chine during the delay time press the button 7 to set the machine to pause When the Door symbol disappears the door can be opened Add the laundry close the door and press the b...

Страница 14: ...programme The machine stops automatically The pilot light of button 7 goes off and a blinking appears on the display The acoustic signal sounds for a few minutes If you have chosen a programme or an option that ends with water left in the tub Before you empty out the water the drum continues to run at regular intervals until the water draining Follow the below instruction to empty the water out tu...

Страница 15: ...he display shows the duration of the drying cycle The pilot light of button 7 starts blinking Press then button 7 to start the pro gramme A black dash flashes under the DRYING symbol Set the timed drying button 4 Press this button until the time you want appears on the display Select the dura tion of the drying cycle from 10 to 250 minutes according to the type of fabric cot ton or synthetic Every...

Страница 16: ...ice ball when carrying out a washing and drying pro gramme 1 Load the laundry 2 Add detergent and fabric softener 3 Switch the machine turn the selector dial to the washing programme fabric required 4 Press the relevant buttons to select the required options If possible do not select a spin speed lower than that proposed by the appliance to avoid too long a drying time therefore saving energy In a...

Страница 17: ...d includes also the unrolling and the cooling phase 6 Press the button 7 to start the programme After the programme has started the time remaining is updated every minute 7 At the end of the programme follow the indications given in the previous chapter Then turn the selector to the O position to switch the machine off 8 Remove the laundry Fluff in the garments During the WASHING AND OR DRYING PHA...

Страница 18: ...parately The maximum load capacity can be put into the drum in order to save energy and water The same good washing result will be obtained as for normal programme at 60 C SPIN REDUCTION NIGHT CYCLE RINSE HOLD PREWASH2 STAIN SENSITIVE EXTRA RINSE COTTONS LINENS 60 40 30 Main wash Rinses Long spin at the maximum spin speed Max load 4 kg White and coloured cotton normally or lightly soiled items SPI...

Страница 19: ...oad 2 kg Washing programme for machine washable wool as well as for hand washable woollens and delicate fab rics Note A single or bulky item may cause imbal ance If the appliance doesn t perform the final spin phase add more items redistribute the load manually and then select the spinning programme SPIN REDUCTION NIGHT CYCLE RINSE HOLD SILK 30 Main wash Rinses Short spin at 1200 rpm Max load 1kg ...

Страница 20: ...ad 5 kg Quick washing programme to be used for lightly soiled white fast coloured cottons and mixed fabrics SPIN REDUCTION RINSE HOLD EXTRA RINSE ECONOMY 60 Main wash Rinses Long spin at the maximum spin speed Max load 8 kg White and fast coloured cotton This programme can be selected for slightly or nor mally soiled cotton items The temperature will de crease and the washing time will be extended...

Страница 21: ...195 215 120 130 70 80 CUPBOARD DRY1 Suitable for items to put away without ironing Cotton and linen bathrobes bath towels etc 6 kg 4 kg 2 kg 1600 185 205 110 120 60 70 CUPBOARD DRY Suitable for items to put away without ironing Synthetics and mixed fabrics jumpers blouses underwear house hold linen 3 kg 1 kg 1200 105 115 40 50 IRON DRY Suitable for ironing Cotton and linen sheets tablecloths shirt...

Страница 22: ...ureds only Grass soap lightly and treat with bleach whites and fast coloureds only Ball point pen and glue moisten with acetone1 lay the garment on a soft cloth and dab the stain Lipstick moisten with acetone as above then treat stains with methylated spirits Treat any residual marks with bleach Red wine soak in water and detergent rinse and treat with acetic or citric acid then rinse Treat any re...

Страница 23: ...rer s instructions When the degree of hardness is soft readjust the quantity of the detergent DRYING HINTS Preparing the drying cycle As a dryer the appliance works on the condensation principle Therefore the water tap must be open and the drain hose must drain water into a sink or into the drain pipe even during the drying cycle Attention Before starting the drying programme reduce the loads of w...

Страница 24: ...ying programmes chap ter The experience will help you to dry your laundry in a more suitable way according to the different fabrics Take note of the duration drying time of the already performed cycles Additional drying If the laundry is still damp at the end of the drying programme select a short drying cycle again WARNING Do not over dry the laundry in order to avoid creasing of fabrics or garme...

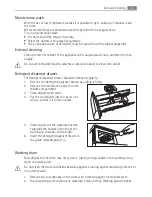
Страница 25: ...arly 1 Remove the detergent dispenser drawer by pulling it firmly 2 Remove the conditioner insert from the middle compartment 3 Clean all parts with water 4 Put the conditioner insert in as far as it will go so that it is firmly in place 5 Clean all parts of the washing machine especially the nozzles in the top of the washing in chamber with a brush 6 Insert the detergent dispenser drawer in the g...

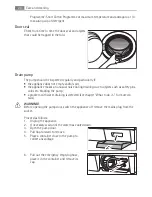
Страница 26: ... due to objects such as safety pins coins etc blocking the pump a problem with water draining is detected see chapter What to do if for more de tails WARNING Before opening the pump door switch the appliance off remove the mains plug from the socket Proceed as follows 1 Unplug the appliance 2 If necessary wait until the water has cooled down 3 Open the pump door 4 Pull flap forward to remove 5 Pla...

Страница 27: ... Serv ice Centre 10 Put the cap back on the emergency emptying hose and place the latter back in its seat 11 Replace the filter into the pump by in serting it correctly into the special guides Screw the pump cover firmly by turning it clockwise 12 Refit the flap and close the pump door WARNING When the appliance is in use and depending on the programme selected there can be hot water in the pump N...

Страница 28: ...an the water inlet filters 1 Turn off the water tap 2 Unscrew the hose from the tap 3 Clean the filter in the hose with a stiff brush 4 Screw the hose back onto the tap Make sure the connection is tight 5 Unscrew the hose from the machine Keep a towel nearby because some wa ter may flow 6 Clean the filter in the valve with a stiff brush or with the piece of cloth 7 Screw the hose back to the machi...

Страница 29: ...tying hose into the bowl Remove its cap The water should drain by gravity into the bowl When the bowl is full put the cap back on the hose Empty the bowl Repeat the procedure until water stops flowing out 6 clean the pump if necessary as previously described 7 replace the emergency emptying hose in its seat after having plugged it 8 screw the pump again and close the door WHAT TO DO IF Certain pro...

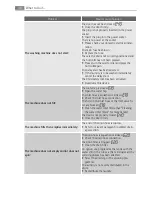
Страница 30: ...tap is closed Open the water tap The inlet hose is squashed or kinked Check the inlet hose connection The filter in the inlet hose or the inlet valve fil ter are blocked Clean the water inlet filters See Cleaning the water inlet filters for more details The door is not properly closed Close the door firmly The machine fills then empties immediately The end of the drain hose is too low Refer to rel...

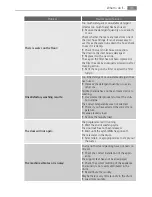
Страница 31: ...Increase the detergent quantity or use an other one Stubborn stains have not been treated prior to washing Use commercial products to treat the stub born stains The correct temperature was not selected Check if you have selected the correct tem perature Excessive laundry load Reduce the laundry load The door will not open The programme is still running Wait the end of washing cycle The door lock h...

Страница 32: ...he laundry in the drum when spinning as well as increased stability of the machine No water is visible in the drum Machines based on modern technology operate very economically using very little water with out affecting performance The display shows the alarm code Anti flooding system has activated Disconnect the appliance close the water tap and contact the Service Force Centre The laundry is ful...

Страница 33: ...l Handwash 30 0 32 64 1 Cotton Energy Saving programme at 60 C with a load of 8 kg is the reference programme for the data entered in the energy label in compliance with EEC 92 75 standards The consumption data shown on this chart is to be considered purely indicative as it may vary depending on the quantity and type of laundry on the inlet water temperature and on the ambient temperature TECHNICA...

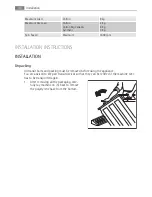
Страница 34: ...INSTALLATION Unpacking All transit bolts and packing must be removed before using the appliance You are advised to keep all transit devices so that they can be refitted if the machine ever has to be transported again 1 After removing all the packaging care fully lay machine on it s back to remove the polystyrene base from the bottom 34 Installation ...

Страница 35: ...power supply cable and the draining hose from the hose holders on the rear of the appliance 3 Unscrew the three bolts using the key supplied with the machine 4 Slide out the relevant plastic spacers Installation 35 ...

Страница 36: ...circulation around the machine is not impeded by carpets rugs etc Before placing it on small tiles apply a rubber coating Never try to correct any unevenness in the floor by putting pieces of wood cardboard or similar materials under the machine If it is impossible to avoid positioning the machine next to a gas cooker or coalburning stove an in sulating panel covered with aluminium foil on the sid...

Страница 37: ...Do not use the hose from your previous machine to connect to the water supply 1 Open the porthole and extract the inlet hose 2 Connect the hose with the angled con nection to the machine Do not place the inlet hose downwards Angle the hose to the left or right de pending on the position of your water tap 3 Set the hose correctly by loosening the ring nut After positioning the inlet hose be sure to...

Страница 38: ...nk using the plastic hose guide supplied with the machine In this case make sure the end cannot come unhooked when the machine is emptying This could be done by tying it to the tap with a piece of string or attaching it to the wall 2 In a sink drain pipe branch This branch must be above the trap so that the bend is at least 60 cm above the ground 3 Directly into a drain pipe at a height of not les...

Страница 39: ...be easily accessible after installing the machine WARNING Should the appliance power supply cable need to be replaced this must be carried out by a Service Centre ENVIRONMENT CONCERNS The symbol on the product or on its packaging indicates that this product may not be treated as household waste Instead it should be taken to the appropriate collection point for the recycling of electrical and elect...

Страница 40: ...e environment we recommend that you follow these tips Normally soiled laundry may be washed without prewashing in order to save detergent water and time the environment is protected too The machine works more economically if it is fully loaded With adequate pre treatment stains and limited soiling can be removed the laundry can then be washed at a lower temperature Measure out detergent according ...

Страница 41: ...41 ...

Страница 42: ...42 ...

Страница 43: ...43 ...

Страница 44: ...www aeg com shop 132933490 A 272011 ...

Отзывы: